Interesting research from Jonathan Sampson, where he watches the network requests a browser makes the very first time you launch it on a fresh install, and otherwise do nothing. This gives you a little insight into what kind of information that browser wants to collect and disseminate.
This was all shared as tweets, but I’m linking to an unrolled thread if there’s one available:
To cover this topic primarily it is essential for people to understand who exactly are ghostwriters? And what is ghostwriting?
Unquestionably the ghostwriting industry is in a consistent rise. Being the very reason that the market is full of agencies that provide various ghostwriting services. At present, there is a vast and wide-ranging industry of ghostwriters to such a huge extent that one can’t imagine but yet many are unaware of what exactly are the services provided by a ghostwriter or ghostwriting agency. This article should surely be of a tremendous asset to the readers in terms of knowledge on what is the role of a ghostwriter and from where can you avail or hire the best ghostwriters to get your job done. A ghostwriter is someone that you can hire to write/compose a book on your behalf, while in the end, you can claim all the credit of/for it as the author. The influence of ghostwriters has increased for the sole reason that they surely are an aid as not everyone is an expressive writer nor are they blessed with the gift of writing.
The four major reasons and benefits of hiring a ghostwriting agency are that you can save your time in writing a book as it is a time-consuming task. Secondly, you’ll be a writer to an amazingly written book even when you don’t possess the talent of writing. Thirdly you’ll have your book compiled easily since it is a comprehensive task that not everyone can take on. Lastly, the book can be compiled on a subject which you may have no knowledge of but the ghostwriter from the agency would have the in-depth understanding that would be required to compile the book and further you can go on to acclaim a name from the book as the author. Since the market and industry simultaneously have grown to make various customers distracted and diverted. Being an important motive to write this article to list the industries 5 best ghostwriting agencies.
Here are the top 5 prominent writing agencies in terms of customer preference and market value:
Vox Ghostwriting is a leading entity in the industry of writing agencies. They have been best known for their premium services which mostly is thanks to all that has been contributed by their experienced team of ghostwriters. They have been reluctant over the years to compromise their quality and have been able to maintain their superiority and standards even with the growing competition. As a writing agency, they are versatile in providing their services. Centralizing the need and requirement of their targeted audience in every aspect to provide nothing but the best in terms of the Payment Plans, Services Offered, Finest Literacy Usage and Secure Ownership. As a company, Vox Ghostwriting has every possible service that you would want to acquire expertise in every writing style from Fiction, Non-Fiction to even Memoirs. They are a one-stop Writing, Editing, and Publishing service provider.
Professional Ghostwriter is a prominent name in the industry as it has been able to secure a reputation as a service provider that offers quality nothing less than of a bestseller editor and ghostwriter. It is an absolute amazing company as it strongly believes in truly presenting their clients’ thoughts with the help of their profession ghostwriters. The outreach they provide is incredible to the maximum potential as possible when published via their services as their clear view is that every story deserves to be told and heard. The standout aspect of Professional Ghostwriter is that they provide extra services to their clients that help them in enhancing their presence even more. The extra facilitation that they give to their clients are services like Branding & Publicity, Web Design, Audio Book, Book Video Trailer, SEO Marketing, and Cover Design.
Ghostwriting LLC is a remarkable company to be associated with. To date, it has been able to establish an exceptional image in the industry for its tremendous contribution to the industry of writing agencies. Clients that once have availed services from them may it be from either their Ghostwriters, Editors or Publishing are provided with high-end results further making them reluctant to attain services from anywhere else other than Ghostwriting LLC. The pure reason for their clients to cling and rally on them is mainly because they are best known to deliver in terms of privacy, affordability, qualified experts, authentic research, secure ownership and most certainly to provide professional excellence. They are also defined to provide exclusive services other than editing and ghostwriting services which are mentioned on their official website. Every comprehensive array of services that they provide extent from illustration and typesetting to even branding and publicity.
Most certainly when spoken of the best writing agencies, Book Writing Inc. would make it to the top of one of the listed companies. Since it has contributed astonishingly well, when spoken of professional book writing services inclusive of providing every other aid required to transform their client’s idea to be exquisitely drafted, complied and published alongside with the markets most professional and expert advice/consultant. Their ghostwriters are off the chart indeed but they have made a strong impact in the book publishing industry since they are a name to reckon with. Their élite book writing services comprise of extensive research and interview, planning and outlining the book, selecting the correct persona ghostwriter who would best project your idea in words, revision/ editing, book cover, and publishing. The most exceptional part in regards to them is that they provide the benefit of keeping the client updates through the entire process via their “On-Call” service.
Ghostwriter Inside is one of the most renowned and popular writing agency that is residing in the industry today. They have surely had a strong place in the industry for providing ghostwriting services and solutions that are unmatched to another writing agency. They have been able to create a reputation in the market since they cater to premium quality services when it comes to Research & Outline Composition, Genuine Content Writing, Formatting & Typesetting, and even Publication and Promotion. They are an adverse understanding on how to present a book idea to result as a bestselling novel. Ghostwriter Insider most certainly is the go-to platform whenever there is any requirement or need for ghostwriters.
What to anticipate in terms of Service Deliverance from the Ghostwriters
Most certainly each of the writing agencies mentioned in this article provides utmost supreme quality deliverance which is based on these points mentioned below.
A set of initial discussions in regards to the context that should be of approximately 3-5 hours.
The ghostwriter to be committed enough to give 20-40 hours dedicated to fact-checking, research, outlining and reading.
Follow up interviews of roughly 5hours.
A rough draft or manuscript based on the interviews or original research.
A finalized manuscript built on revisions.
A Summary on What You Should Expect On Hiring a Writing Agency
There are Seven Basic perspectives that you should keep in mind when searching to hire the best ghostwriter for your task. Look out for a good writing agency that comprises of a set of a team with few of the most professional ghostwriters. If a writing agency has these seven features then you could expect amazing results in return from hiring the best ghostwriters. According to in-depth research for this article and from various researches based on the highest customer satisfaction rates the 5 writing agencies mentioned in this article are the top 5 most demanded to ghostwrite agencies. Look out for:
In this article, we’ll be putting all the theory to the test by performing step-by-step migration of an application, following the recommendations from the previous part. To make things straightforward, reduce uncertainties, unknowns, and unnecessary guessing, for the practical example of migration, I decided to demonstrate the practice on a simple to-do application.
It’s time to put the theory to the test. (Large preview)
In general, I assume that you have a good understanding of how a generic to-do application works. This type of application suits our needs very well: it’s predictable, yet has a minimum viable number of required components to demonstrate different aspects of Frankenstein Migration. However, no matter the size and complexity of your real application, the approach is well-scalable and is supposed to be suitable for projects of any size.
A default view of a TodoMVC application (Large preview)
For this article, as a starting point, I picked a jQuery application from the TodoMVC project — an example that may already be familiar to a lot of you. jQuery is legacy enough, might reflect a real situation with your projects, and most importantly, requires significant maintenance and hacks for powering a modern dynamic application. (This should be enough to consider migration to something more flexible.)
What is this “more flexible” that we are going to migrate to then? To show a highly-practical case useful in real life, I had to choose among the two most popular frameworks these days: React and Vue. However, whichever I would pick, we would miss some aspects of the other direction.
So in this part, we’ll be running through both of the following:
A migration of a jQuery application to React, and
A migration of a jQuery application to Vue.
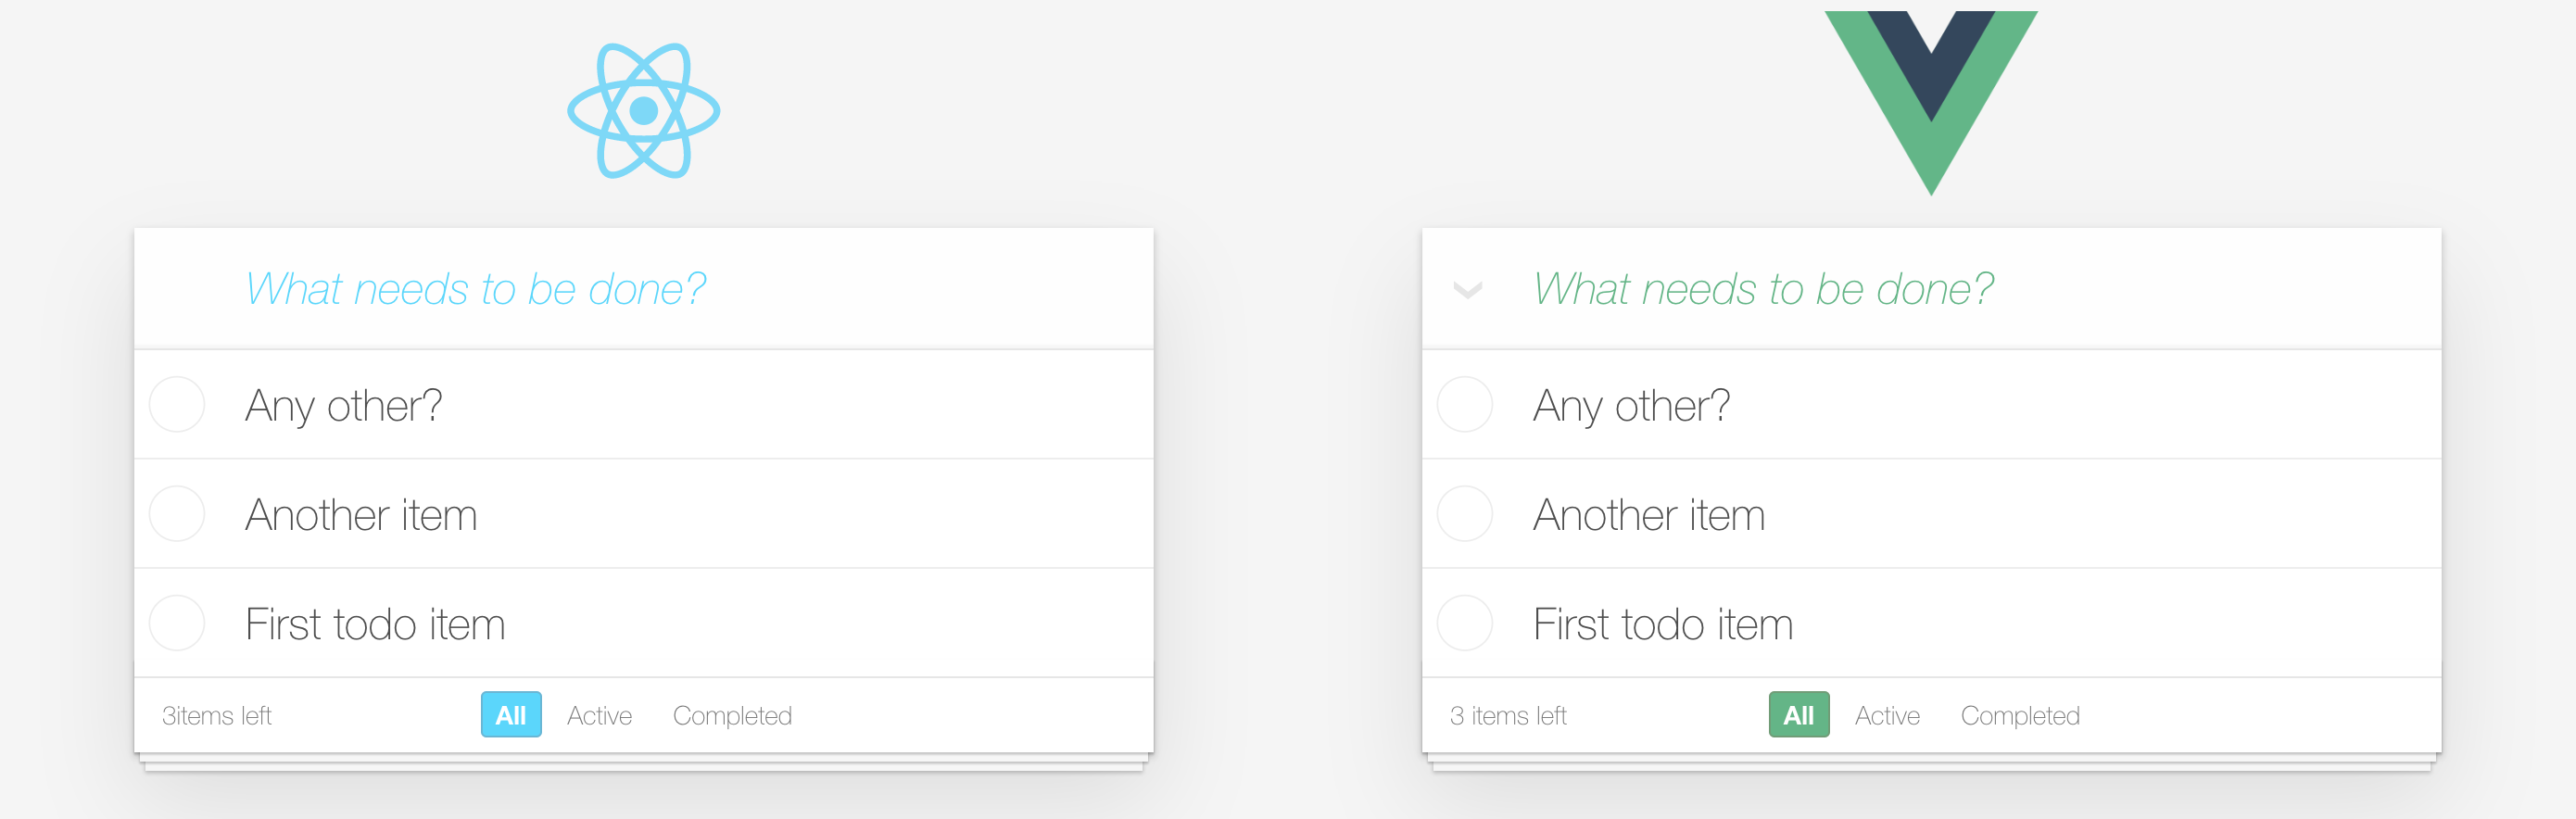
Our goals: results of the migration to React and Vue. (Large preview)
Code Repositories
All the code mentioned here is publicly available, and you can get to it whenever you want. There are two repositories available for you to play with:
Frankenstein TodoMVC
This repository contains TodoMVC applications in different frameworks/libraries. For example, you can find branches like vue, angularjs, react and jquery in this repository.
Frankenstein Demo
It contains several branches, each of which represents a particular migration direction between applications, available in the first repository. There are branches like migration/jquery-to-react and migration/jquery-to-vue, in particular, that we’ll be covering later on.
Both repositories are work-in-progress and new branches with new applications and migration directions should be added to them regularly. (You’re free to contribute as well!) Commits history in migration branches is well structured and might serve as additional documentation with even more details than I could cover in this article.
Now, let’s get our hands dirty! We have a long way ahead, so don’t expect it to be a smooth ride. It’s up to you to decide how you want to follow along with this article, but you could do the following:
Alternatively, you can relax and keep reading because I am going to highlight the most critical code right here, and it’s much more important to understand the mechanics of the process rather than the actual code.
I’d like to mention one more time that we’ll strictly be following the steps presented in the theoretical first part of the article.
As Part 1 suggests, in this step, we have to structure our application into small, independent services dedicated to one particular job. The attentive reader might notice that our to-do application is already small and independent and can represent one single microservice on its own. This is how I would treat it myself if this application would live in some broader context. Remember, however, that the process of identifying microservices is entirely subjective and there is no one correct answer.
So, in order to see the process of Frankenstein Migration in more detail, we can go a step further and split this to-do application into two independent microservices:
An input field for adding a new item.
This service can also contain the application’s header, based purely on positioning proximity of these elements.
A list of already added items.
This service is more advanced, and together with the list itself, it also contains actions like filtering, list item’s actions, and so on.
TodoMVC application split into two independent microservices. (Large preview)
Tip: To check whether the picked services are genuinely independent, remove HTML markup, representing each of these services. Make sure that the remaining functions still work. In our case, it should be possible to add new entries intolocalStorage(that this application is using as storage) from the input field without the list, while the list still renders the entries fromlocalStorageeven if the input field is missing. If your application throws errors when you remove markup for potential microservice, take a look at the “Refactor If Needed” section in Part 1 for an example of how to deal with such cases.
Of course, we could go on and split the second service and the listing of the items even further into independent microservices for each particular item. However, it might be too granular for this example. So, for now, we conclude that our application is going to have two services; they are independent, and each of them works towards its own particular task. Hence, we have split our application into microservices.
2. Allow Host-to-Alien Access
Let me briefly remind you of what these are.
Host
This is what our current application is called. It is written with the framework from which we’re about to move away from. In this particular case, our jQuery application.
Alien
Simply put, this one’s a gradual re-write of Host on the new framework that we are about to move to. Again, in this particular case, it’s a React or Vue application.
The rule of thumb when splitting Host and Alien is that you should be able to develop and deploy any of them without breaking the other one — at any point in time.
Keeping Host and Alien independent from each other is crucial for Frankenstein Migration. However, this makes arranging communication between the two a bit challenging. How do we allow Host access Alien without smashing the two together?
Adding Alien As A Submodule Of Your Host
Even though there are several ways to achieve the setup we need, the simplest form of organizing your project to meet this criterion is probably git submodules. This is what we’re going to use in this article. I’ll leave it up to you to read carefully about how submodules in git work in order to understand limitations and gotchas of this structure.
The general principles of our project’s architecture with git submodules should look like this:
Both Host and Alien are independent and are kept in separate git repositories;
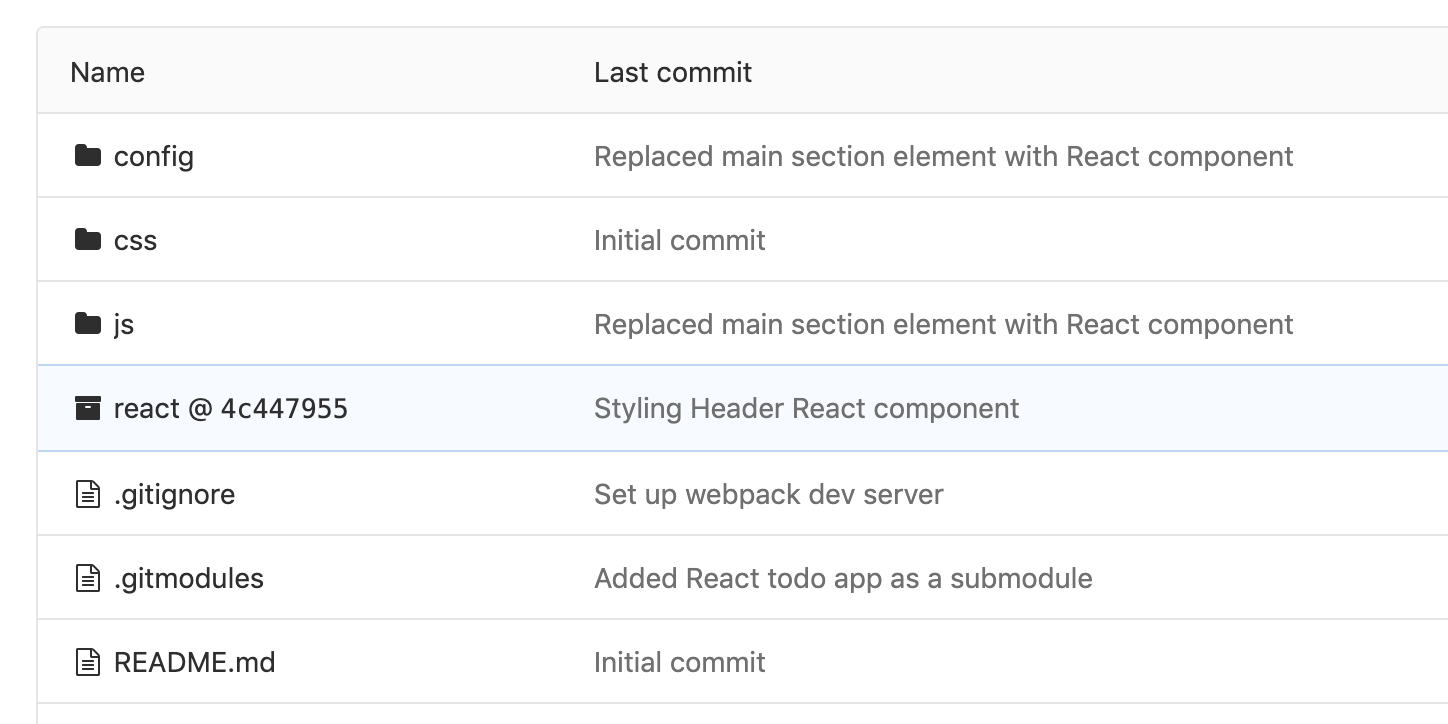
Host references Alien as a submodule. At this stage, Host picks a particular state (commit) of Alien and adds it as, what looks like, a subfolder in Host’s folder structure.
React TodoMVC added as a git submodule into jQuery TodoMVC application. (Large preview)
The process of adding a submodule is the same for any application. Teaching git submodules is beyond the scope of this article and is not directly related to Frankenstein Migration itself. So let’s just take a brief look at the possible examples.
In the snippets below, we use the React direction as an example. For any other migration direction, replace react with the name of a branch from Frankenstein TodoMVC or adjust to custom values where needed.
If you follow along using the original jQuery TodoMVC application:
$ git submodule add -b react git@gitlab.com:mishunov/frankenstein-todomvc.git react
$ git submodule update --remote
$ cd react
$ npm i
If you follow along with migration/jquery-to-react (or any other migration direction) branch from the Frankenstein Demo repository, the Alien application should already be in there as a git submodule, and you should see a respective folder. However, the folder is empty by default, and you need to update and initialize the registered submodules.
From the root of your project (your Host):
$ git submodule update --init
$ cd react
$ npm i
Note that in both cases we install dependencies for the Alien application, but those become sandboxed to the subfolder and won’t pollute our Host.
After adding the Alien application as a submodule of your Host, you get independent (in terms of microservices) Alien and Host applications. However, Host considers Alien a subfolder in this case, and obviously, that allows Host to access Alien without a problem.
3. Write An Alien Microservice/Component
At this step, we have to decide what microservice to migrate first and write/use it on the Alien’s side. Let’s follow the same order of services we identified in Step 1 and start with the first one: input field for adding a new item. However, before we begin, let’s agree that beyond this point, we are going to use a more favorable term component instead of microservice or service as we are moving towards the premises of frontend frameworks and the term component follows the definitions of pretty much any modern framework.
Branches of Frankenstein TodoMVC repository contain a resulting component that represents the first service “Input field for adding a new item” as a Header component:
Writing components in the framework of your choice is beyond the scope of this article and is not part of Frankenstein Migration. However, there are a couple of things to keep in mind while writing an Alien component.
Independence
First of all, the components in Alien should follow the same principle of independence, previously set up on the Host’s side: components should not depend on other components in any way.
Interoperability
Thanks to the independence of the services, most probably, components in your Host communicate in some well-established way be it a state management system, communication through some shared storage or, directly via a system of DOM events. “Interoperability” of Alien components means that they should be able to connect to the same source of communication, established by Host, to dispatch information about its state changes and listen to changes in other components. In practice, this means that if components in your Host communicate via DOM events, building your Alien component exclusively with state management in mind won’t work flawlessly for this type of migration, unfortunately.
...

fetch: function() {
  return JSON.parse(localStorage.getItem(STORAGE_KEY) || "[]");
},
save: function(todos) {
  localStorage.setItem(STORAGE_KEY, JSON.stringify(todos));
  var event = new CustomEvent("store-update", { detail: { todos } });
  document.dispatchEvent(event);
},

...
Here, we use localStorage (as this example is not security-critical) to store our to-do items, and once the changes to the storage get recorded, we dispatch a custom DOM event on the document element that any component can listen to.
At the same time, on the Alien’s side (let’s say React) we can set up as complex state management communication as we want. However, it’s probably smart to keep it for the future: to successfully integrate our Alien React component into Host, we have to connect to the same communication channel used by Host. In this case, it’s localStorage. To make things simple, we just copied over Host’s storage file into Alien and hooked up our components to it:
Now, our Alien components can talk the same language with Host components and vice versa.
4. Write Web Component Wrapper Around Alien Service
Even though we’re now only on the fourth step, we have achieved quite a lot:
We’ve split our Host application into independent services which are ready to be replaced by Alien services;
We’ve set up Host and Alien to be completely independent of each other, yet very well connected via git submodules;
We’ve written our first Alien component using the new framework.
Now it’s time to set up a bridge between Host and Alien so that the new Alien component could function in the Host.
Reminder from Part 1: Make sure that your Host has a package bundler available. In this article, we rely on Webpack, but it doesn’t mean that the technique won’t work with Rollup or any other bundler of your choice. However, I leave the mapping from Webpack to your experiments.
Naming Convention
As mentioned in the previous article, we are going to use Web Components to integrate Alien into Host. On the Host’s side, we create a new file: js/frankenstein-wrappers/Header-wrapper.js. (It’s going to be our first Frankenstein wrapper.) Keep in mind that it’s a good idea to name your wrappers the same as your components in Alien application, e.g. just by adding a “-wrapper” suffix. You”ll see later on why this is a good idea, but for now, let’s agree that this means that if the Alien component is called Header.js (in React) or Header.vue (in Vue), the corresponding wrapper on the Host’s side should be called Header-wrapper.js.
With this, we have all the essential bits of the Web Component set up, and it’s time to add our Alien component into the mix. First of all, at the beginning of our Frankenstein wrapper, we should import all the bits responsible for the Alien component’s rendering.
import React from "../../react/node_modules/react";
import ReactDOM from "../../react/node_modules/react-dom";
import HeaderApp from "../../react/src/components/Header";
...
Here we have to pause for a second. Note that we do not import Alien’s dependencies from Host’s node_modules. Everything comes from the Alien itself that sits in react/ subfolder. That is why Step 2 is so important, and it is crucial to make sure the Host has full access to assets of Alien.
Now, we can render our Alien component within Web Component’s Shadow DOM:
Note: In this case, React doesn’t need anything else. However, to render the Vue component, you need to add a wrapping node to contain your Vue component like the following:
...
connectedCallback() {
  const mountPoint = document.createElement("div");
  this.attachShadow({ mode: "open" }).appendChild(mountPoint);
  new Vue({
    render: h => h(VueHeader)
  }).$mount(mountPoint);
}
...
The reason for this is the difference in how React and Vue render components: React appends component to referenced DOM node, while Vue replaces referenced DOM node with the component. Hence, if we do.$mount(this.shadowRoot)for Vue, it essentially replaces the Shadow DOM.
That’s all we have to do to our wrapper for now. The current result for Frankenstein wrapper in both jQuery-to-React and jQuery-to-Vue migration directions can be found over here:
Unfortunately, this won’t work as simple as that. If you open a browser and check the console, there is the Uncaught SyntaxError waiting for you. Depending on the browser and its support for ES6 modules, it will either be related to ES6 imports or to the way the Alien component gets rendered. Either way, we have to do something about it, but the problem and solution should be familiar and clear to most of the readers.
5.1. Update Webpack and Babel where needed
We should involve some Webpack and Babel magic before integrating our Frankenstein wrapper. Wrangling these tools is beyond the scope of the article, but you can take a look at the corresponding commits in the Frankenstein Demo repository:
Essentially, we set up the processing of the files as well as a new entry pointfrankensteinin Webpack’s configuration to contain everything related to Frankenstein wrappers in one place.
Once Webpack in Host knows how to process the Alien component and Web Components, we’re ready to replace Host’s markup with the new Frankenstein wrapper.
5.2. Actual Component’s Replacement
The component’s replacement should be straightforward now. In index.html of your Host, do the following:
Replace DOM element with ;
Add a new script frankenstein.js. This is the new entry point in Webpack that contains everything related to Frankenstein wrappers.
That’s it! Restart your server if needed and witness the magic of the Alien component integrated into Host.
However, something still seemd to be is missing. The Alien component in the Host context doesn’t look the same way as it does in the context of the standalone Alien application. It’s simply unstyled.
Unstyled Alien React component after being integrated into Host (Large preview)
Why is it so? Shouldn’t the component’s styles be integrated with the Alien component into Host automatically? I wish they would, but as in too many situations, it depends. We’re getting to the challenging part of Frankenstein Migration.
5.3. General Information On The Styling Of The Alien Component
First of all, the irony is that there is no bug in the way things work. Everything is as it’s designed to work. To explain this, let’s briefly mention different ways of styling components.
Global Styles
We all are familiar with these: global styles can be (and usually are) distributed without any particular component and get applied to the whole page. Global styles affect all DOM nodes with matching selectors.
A few examples of global styles are and tags found into your index.html. Alternatively, a global stylesheet can be imported into some root JS module so that all components could get access to it as well.
The problem of styling applications in this way is obvious: maintaining monolithic stylesheets for large applications becomes very hard. Also, as we saw in the previous article, global styles can easily break components that are rendered straight in the main DOM tree like it is in React or Vue.
Bundled Styles
These styles usually are tightly coupled with a component itself and are rarely distributed without the component. The styles typically reside in the same file with the component. Good examples of this type of styling are styled-components in React or CSS Modules and Scoped CSS in single file components in Vue. However, no matter the variety of tools for writing bundled styles, the underlying principle in most of them is the same: the tools provide a scoping mechanism to lock down styles defined in a component so that the styles don’t break other components or global styles.
Why Could Scoped Styles Be Fragile?
In Part 1, when justifying the use of Shadow DOM in Frankenstein Migration, we briefly covered the topic of scoping vs. encapsulation) and how encapsulation of Shadow DOM is different from scoping styling tools. However, we did not explain why scoping tools provide such fragile styling for our components, and now, when we faced the unstyled Alien component, it becomes essential for understanding.
All scoping tools for modern frameworks work similarly:
You write styles for your component in some way without thinking much about scope or encapsulation;
You run your components with imported/embedded stylesheets through some bundling system, like Webpack or Rollup;
The bundler generates unique CSS classes or other attributes, creating and injecting individual selectors for both your HTML and corresponding stylesheets;
The bundler makes a entry in the of your document and puts your components’ styles with unique mingled selectors in there.
That’s pretty much it. It does work and works fine in many cases. Except for when it does not: when styles for all components live in the global styling scope, it becomes easy to break those, for example, using higher specificity. This explains the potential fragility of scoping tools, but why is our Alien component completely unstyled?
Let’s take a look at the current Host using DevTools. When inspecting the newly-added Frankenstein wrapper with the Alien React component, for example, we can see something like this:
Frankenstein wrapper with Alien component inside. Note unique CSS classes on the Alien’s nodes. (Large preview)
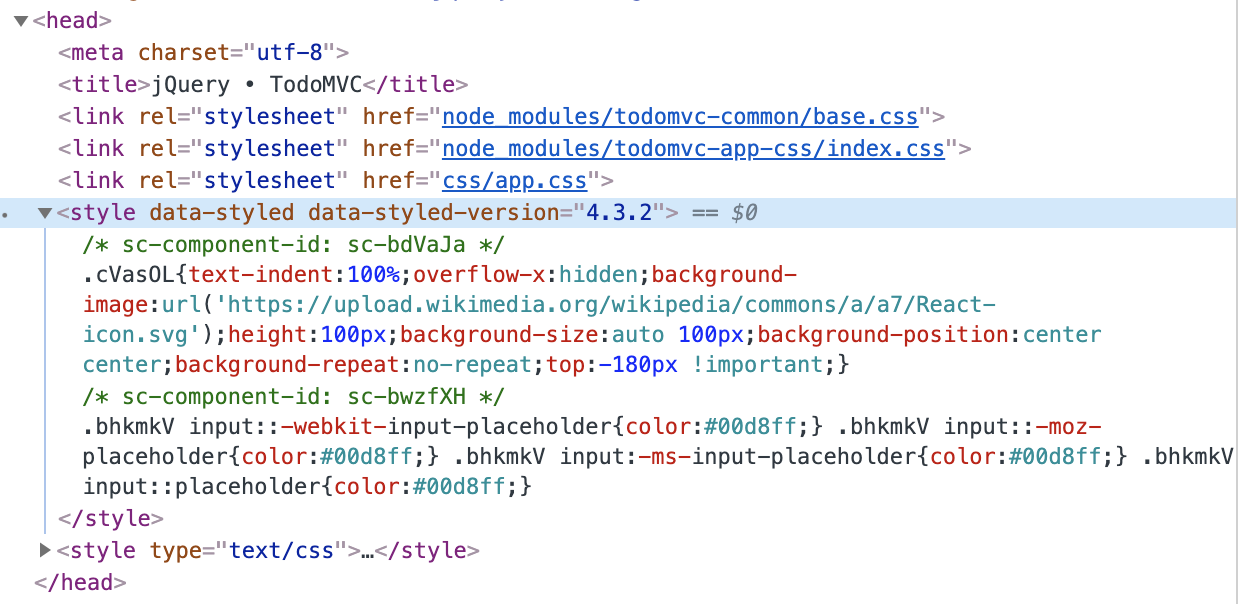
So, Webpack does generate unique CSS classes for our component. Great! Where are the styles then? Well, the styles are precisely where they are designed to be — in the document’s .
While Alien component is within Frankenstein wrapper, its styles are in document’s . (Large preview)
So everything works as it should, and this is the main problem. Since our Alien component resides in Shadow DOM, and as explained in Part #1, Shadow DOM provides full encapsulation of components from the rest of the page and global styles, including those newly-generated stylesheets for the component that cannot cross the shadow border and get to the Alien component. Hence, the Alien component is left unstyled. However, now, the tactics of solving the problem should be clear: we should somehow place the component’s styles in the same Shadow DOM where our component resides (instead of the document’s ).
5.4. Fixing Styles For The Alien Component
Up until now, the process of migrating to any framework was the same. However, things start diverging here: every framework has its recommendations on how to style components, and hence, the ways of tackling the problem differ. Here, we discuss most common cases but, if the framework you work with uses some unique way of styling components, you need to keep in mind the basic tactics such as putting the component’s styles into Shadow DOM instead of .
Generic CSS Modules and global styles. I combine these because CSS Modules, in general, are very similar to the global stylesheets and can be imported by any component making the styles disconnected from any particular component.
Constraints first: anything we do to fix styling should not break the Alien component itself. Otherwise, we lose the independence of our Alien and Host systems. So, to address the styling issue, we are going to rely on either bundler’s configuration or the Frankenstein wrapper.
Bundled Styles In Vue And Shadow DOM
If you’re writing a Vue application, then you’re most probably using single file components. If you’re also using Webpack, you should be familiar with two loaders vue-loader and vue-style-loader. The former allows you to write those single file components while the latter dynamically injects the component’s CSS into a document as a tag. By default, vue-style-loader injects the component’s styles into the document’s . However, both packages accept the shadowMode option in configuration which allows us to easily change the default behavior and inject styles (as the option’s name implies) into Shadow DOM. Let’s see it in action.
In a real application, your test: /.css$/ block will be more sophisticated (probably involving the oneOf rule) to account for both Host and Alien configurations. However, in this case, our jQuery is styled with simple in index.html, so we don’t build styles for Host via Webpack, and it’s safe to cater for Alien only.
Wrapper Configuration
In addition to Webpack configuration, we also need to update our Frankenstein wrapper, pointing Vue to the correct Shadow DOM. In our Header-wrapper.js, rendering of the Vue component should include the shadowRoot property leading to shadowRoot of our Frankenstein wrapper:
...
new Vue({
  shadowRoot: this.shadowRoot,
  render: h => h(VueHeader)
}).$mount(mountPoint);
...
After you update the files and restart your server, you should be getting something like this in your DevTools:
Styles bundled with Alien Vue component placed within Frankenstein wrapper with all unique CSS classes preserved. (Large preview)
Finally, styles for the Vue component are within our Shadow DOM. At the same time, your application should look like this:
Header component starts to look more like it should. However, something is still missing. (Large preview)
We start getting something resembling our Vue application: styles bundled with the component, are injected into the wrapper’s Shadow DOM, but the component still looks not as it is supposed to. The reason is that in the original Vue application, the component is styled not only with the bundled styles but also partially with global styles. However, before fixing the global styles, we have to get our React integration to the same state as the Vue one.
Bundled Styles In React And Shadow DOM
Because there are many ways one can style a React component, the particular solution to fix an Alien component in Frankenstein Migration depends on the way we style the component in the first place. Let’s briefly cover the most commonly used alternatives.
styled-components
styled-components is one of the most popular ways of styling React components. For the Header React component, styled-components is precisely the way we style it. Since this is a classic CSS-in-JS approach, there is no file with a dedicated extension that we could hook our bundler onto as we do for .css or .js files, for example. Luckily, styled-components allow the injection of component’s styles into a custom node (Shadow DOM in our case) instead of the document’s headwith the help of the StyleSheetManager helping component. It is a pre-defined component, installed with the styled-components package that accepts target property, defining “an alternate DOM node to inject styles info”. Exactly what we need! Moreover, we do not even need to change our Webpack configuration: everything is up to our Frankenstein wrapper.
We should update our Header-wrapper.js that contains the React Alien component with the following lines:
Here, we import the StyleSheetManager component (from Alien, and not from Host) and wrap our React component with it. At the same time, we send the target property pointing to our shadowRoot. That’s it. If you restart the server, you have to see something like this in your DevTools:
Styles bundled with React Alien component placed within Frankenstein wrapper with all unique CSS classes preserved. (Large preview)
Now, our component’s styles are in Shadow DOM instead of . This way, the rendering of our app now resembles what we have seen with the Vue app previously.
After moving bundled styles into Frankenstein wrapper, the Alien React component begins to look better. However, we’re not there yet. (Large preview)
Same story: styled-components are responsible just for the bundled part of the React component’s styles, and the global styles manage the remaining bits. We get back to global styles in a bit after we review one more type of styling components.
CSS Modules
If you take a closer look at the Vue component that we have fixed earlier, you might notice that CSS Modules is precisely the way we style that component. However, even if we style it with Scoped CSS (another recommended way of styling Vue components) the way we fix our unstyled component doesn’t change: it is still up to vue-loader and vue-style-loader to handle it through shadowMode: true option.
When it comes to CSS Modules in React (or any other system using CSS Modules without any dedicated tools), things get a bit more complicated and less flexible, unfortunately.
Let’s take a look at the same React component which we’ve just integrated, but this time styled with CSS Modules instead of styled-components. The main thing to note in this component is a separate import for stylesheet:
import styles from './Header.module.css'
The .module.css extension is a standard way to tell React applications built with the create-react-app utility that the imported stylesheet is a CSS Module. The stylesheet itself is very basic and does precisely the same our styled-components do.
Integrating CSS modules into a Frankenstein wrapper consists of two parts:
Enabling CSS Modules in bundler,
Pushing resulting stylesheet into Shadow DOM.
I believe the first point is trivial: all you need to do is set { modules: true } for css-loader in your Webpack configuration. Since, in this particular case, we have a dedicated extension for our CSS Modules (.module.css), we can have a dedicated configuration block for it under the general .css configuration:
Note: Amodulesoption forcss-loaderis all we have to know about CSS Modules no matter whether it’s React or any other system. When it comes to pushing resulting stylesheet into Shadow DOM, however, CSS Modules are no different from any other global stylesheet.
By now, we went through the ways of integrating bundled styles into Shadow DOM for the following conventional scenarios:
Vue components, styled with CSS Modules. Dealing with Scoped CSS in Vue components won’t be any different;
React components, styled with styled-components;
Components styled with raw CSS Modules (without dedicated tools like those in Vue). For these, we have enabled support for CSS modules in Webpack configuration.
However, our components still don’t look as they are supposed to because their styles partially come from global styles. Those global styles do not come to our Frankenstein wrappers automatically. Moreover, you might get into a situation in which your Alien components are styled exclusively with global styles without any bundled styles whatsoever. So let’s finally fix this side of the story.
Global Styles And Shadow DOM
Having your components styled with global styles is neither wrong nor bad per se: every project has its requirements and limitations. However, the best you can do for your components if they rely on some global styles is to pull those styles into the component itself. This way, you have proper easy-to-maintain self-contained components with bundled styles.
Nevertheless, it’s not always possible or reasonable to do so: several components might share some styling, or your whole styling architecture could be built using global stylesheets that are split into the modular structure, and so on.
So having an opportunity to pull in global styles into our Frankenstein wrappers wherever it’s required is essential for the success of this type of migration. Before we get to an example, keep in mind that this part is the same for pretty much any framework of your choice — be it React, Vue or anything else using global stylesheets!
This import is where we pull in the global stylesheet. In this case, we do it from the component itself. It’s only one way of using global stylesheet to style your component, but it’s not necessarily like this in your application.
Some parent module might add a global stylesheet like in our React application where we import index.css only in index.js, and then our components expect it to be available in the global scope. Your component’s styling might even rely on a stylesheet, added with or to your index.html. It doesn’t matter. What matters, however, is that you should expect to either import global stylesheets in your Alien component (if it doesn’t harm the Alien application) or explicitly in the Frankenstein wrapper. Otherwise, the wrapper would not know that the Alien component needs any stylesheet other than the ones already bundled with it.
Caution. If there are many global stylesheets to be shared between Alien components and you have a lot of such components, this might harm the performance of your Host application under the migration period.
// we import directly from react/, not from Host
import '../../react/node_modules/todomvc-app-css/index.css'
Nevertheless, by importing a stylesheet this way, we still bring the styles to the global scope of our Host, while what we need is to pull in the styles into our Shadow DOM. How do we do this?
Webpack configuration for global stylesheets & Shadow DOM
First of all, you might want to add an explicit test to make sure that we process only the stylesheets coming from our Alien. In case of our React migration, it will look similar to this:
test: /.css$/,
oneOf: [
  // this matches stylesheets coming from /react/ subfolder
  {
    test: //react//,
    use: []
  },
  ...
]
In case of Vue application, obviously, you change test: //react// with something like test: //vue//. Apart from that, the configuration will be the same for any framework. Next, let’s specify the required loaders for this block.
Two things to note. First, you have to specify modules: true in css-loader‘s configuration if you’re processing CSS Modules of your Alien application.
Second, we should convert styles into tag before injecting those into Shadow DOM. In the case of Webpack, for that, we use style-loader. The default behavior for this loader is to insert styles into the document’s head. Typically. And this is precisely what we don’t want: our goal is to get stylesheets into Shadow DOM. However, in the same way we used target property for styled-components in React or shadowMode option for Vue components that allowed us to specify custom insertion point for our tags, regular style-loader provides us with nearly same functionality for any stylesheet: the insert configuration option is exactly what helps us achieve our primary goal. Great news! Let’s add it to our configuration.
However, not everything is so smooth here with a couple of things to keep in mind.
Global stylesheets and insert option of style-loader
If you check documentation for this option, you notice, that this option takes one selector per configuration. This means that if you have several Alien components requiring global styles pulled into a Frankenstein wrapper, you have to specify style-loader for each of the Frankenstein wrappers. In practice, this means that you, probably, have to rely on oneOf rule in your configuration block to serve to all wrappers.
Not very flexible, I agree. Nevertheless, it’s not a big deal as long as you don’t have hundreds of components to migrate. Otherwise, it might make your Webpack configuration hard to maintain. The real problem, however, is that we can not write a CSS selector for Shadow DOM.
Trying to solve this, we might note that the insert option can also take a function instead of a plain selector to specify more advanced logic for insertion. With this, we can use this option to insert stylesheets straight into Shadow DOM! In simplified form it might look similar to this:
insert: function(element) {
  var parent = document.querySelector('frankenstein-header-wrapper').shadowRoot;
  parent.insertBefore(element, parent.firstChild);
}
Tempting, isn’t it? However, this won’t work for our scenario or will work far from optimal. Our is indeed available from index.html (because we added it in Step 5.2). But when Webpack processes all dependencies (incl. the stylesheets) for either an Alien component or a Frankenstein wrapper, Shadow DOM is not yet initialized in the Frankenstein wrapper: imports are processed before that. Hence, pointing insert straight to shadowRoot will result in an error.
There is only one case when we can guarantee that Shadow DOM is initialized before Webpack processes our stylesheet dependency. If Alien component does not import a stylesheet itself and it becomes up to Frankenstein wrapper to import it, we might employ dynamic import and import the required stylesheet after we set up Shadow DOM:
This will work: such import, combined with the insert configuration above, will indeed find correct Shadow DOM and insert tag into it. Nevertheless, getting and processing stylesheet will take time, which means your users on a slow connection or slow devices might face a moment of the unstyled component before your stylesheet gets on its place within wrapper’s Shadow DOM.
Unstyled Alien component gets rendered before the global stylesheet is imported and added to the Shadow DOM. (Large preview)
So all in all, even though insert accepts function, unfortunately, it’s not enough for us, and we have to fall back to plain CSS selectors like frankenstein-header-wrapper. This doesn’t place stylesheets into Shadow DOM automatically, however, and the stylesheets reside in outside of Shadow DOM.
style-loader puts imported stylesheet into the Frankenstein wrapper, but outside of Shadow DOM. (Large preview)
We need one more piece of the puzzle.
Wrapper configuration for global stylesheets & Shadow DOM
Luckily, the fix is quite straightforward on the wrapper’s side: when Shadow DOM gets initialized, we need to check for any pending stylesheets in the current wrapper and pull them into Shadow DOM.
The current state of the global stylesheet’s import is as follows:
We import a stylesheet that has to be added into Shadow DOM. The stylesheet can be imported in either the Alien component itself or, explicitly in the Frankenstein wrapper. In the case of migration to React, for example, the import is initialized from the wrapper. However, in migration to Vue, the similar component itself imports the required stylesheet, and we don’t have to import anything in the wrapper.
As pointed out above, when Webpack processes .css imports for the Alien component, thanks to the insert option of style-loader, the stylesheets get injected into a Frankenstein wrapper, but outside of Shadow DOM.
Simplified initialization of Shadow DOM in Frankenstein wrapper, should currently (before we pull in any stylesheets) look similar to this:
this.attachShadow({ mode: "open" });
ReactDOM.render(); // or `new Vue()`
Now, to avoid flickering of the unstyled component, what we need to do now is pull in all the required stylesheets after initialization of the Shadow DOM, but before the Alien component’s rendering.
this.attachShadow({ mode: "open" });

Array.prototype.slice
  .call(this.querySelectorAll("style"))
  .forEach(style => {
    this.shadowRoot.prepend(style);
  });

ReactDOM.render(); // or new Vue({})
It was a long explanation with a lot of details, but mainly, all it takes to pull in global stylesheets into Shadow DOM:
In Webpack configuration add style-loader with insert option pointing to required Frankenstein wrapper.
In the wrapper itself, pull in “pending” stylesheets after initialization of Shadow DOM, but before the Alien component’s rendering.
After implementing these changes, your component should have everything it needs. The only thing you might want (this is not a requirement) to add is some custom CSS to fine-tune an Alien component in Host’s environment. You might even style your Alien component completely different when used in Host. It goes beyond the main point of the article, but you look at the final code for the wrapper, where you can find examples of how to override simple styles on the wrapper level.
And finally, our components look exactly as we intended them to look like.
Result of migrating Header component written with Vue and React. The listing of the to-do items is still jQuery application. (Large preview)
5.5. Summary of fixing styles for the Alien component
This is a great moment to sum up what we have learned in this chapter so far. It might look like we had to do enormous work to fix styling of the Alien component; however, it all boils down to:
Fixing bundled styles implemented with styled-components in React or CSS modules and Scoped CSS in Vue is as simple as a couple of lines in Frankenstein wrapper or Webpack configuration.
Fixing styles, implemented with CSS Modules, starts with just one line in css-loader configuration. After that, CSS Modules are treated as a global stylesheet.
Fixing global stylesheets requires configuring style-loader package with insert option in Webpack, and updating Frankenstein wrapper to pull in the stylesheets into Shadow DOM at the right moment of the wrapper’s lifecycle.
After all, we have got properly styled Alien component migrated into the Host. There is just one thing that might or might not bother you depending on what framework you migrate to, however.
Good news first: If you’re migrating to Vue, the demo should be working just fine, and you should be able to add new to-do items from migrated Vue component. However, if you’re migrating to React, and try to add a new to-do item, you won’t succeed. Adding new items simply doesn’t work, and no entries are added to the list. But why? What’s the problem? No prejudice, but React has its own opinions on some things.
5.6. React And JS Events In Shadow DOM
No matter what React documentation tells you, React is not very friendly to Web Components. The simplicity of the example in the documentation doesn’t stand any criticism, and anything more complicated than rendering a link in Web Component requires some research and investigation.
As you have seen while fixing the styling for our Alien component, contrary to Vue where things fit Web Components nearly out of the box, React is not that Web Components-ready. For now, we have an understanding of how to make React components at least look good within Web Components, but there is also functionality and JavaScript events to fix.
Long story short: Shadow DOM encapsulates events and retargets them, while React does not support this behavior of Shadow DOM natively and hence does not catch events coming from within Shadow DOM. There are deeper reasons for this behavior, and there is even an open issue in React’s bug tracker if you want to dive into more details and discussions.
import retargetEvents from 'react-shadow-dom-retarget-events';
...
ReactDOM.render(
  ...
);
retargetEvents(this.shadowRoot);
If you want to have it more performant, you can make a local copy of the package (MIT license allows that) and limit the number of events to listen to as it is done in Frankenstein Demo repository. For this example, I know what events I need to retarget and specify only those.
With this, we are finally (I know it was a long process) done with proper migration of the first styled and fully-functional Alien component. Get yourself a good drink. You deserve it!
6. Rinse & Repeat For All Of Your Components
After we migrated the first component, we should repeat the process for all of our components. In the case of Frankenstein Demo, there is only one left, however: the one, responsible for rendering the listing of to-do items.
New Wrappers For New Components
Let’s start with adding a new wrapper. Following the naming convention, discussed above (since our React component is called MainSection.js), the corresponding wrapper in migration to React should be called MainSection-wrapper.js. At the same time, a similar component in Vue is called Listing.vue, hence the corresponding wrapper in the migration to Vue should be called Listing-wrapper.js. However, no matter the naming convention, the wrapper itself is going to be nearly identical to the one we already have:
There is just one interesting thing we introduce in this second component in React application. Sometimes, for that or another reason, you might want to use some jQuery plugin in your components. In case of our React component, we introduced two things:
Note: This use of jQuery for adding/removing classes is purely illustrative. Please don’t use jQuery for this scenario in real projects — rely on plain JavaScript instead.
Of course, it might look weird to introduce jQuery in an Alien component when we migrate away from jQuery, but your Host might be different from the Host in this example — you might migrate away from AngularJS or anything else. Also, jQuery functionality in a component and global jQuery are not necessarily the same thing.
However, the problem is that even if you confirm that component works just fine in the context of your Alien application, when you put it into Shadow DOM, your jQuery plugins and other code that rely on jQuery just won’t work.
jQuery In Shadow DOM
Let’s take a look at a general initialization of a random jQuery plugin:
$('.my-selector').fancyPlugin();
This way, all elements with .my-selector are going to be processed by fancyPlugin. This form of initialization assumes that .my-selector is present in global DOM. However, once such an element is put into Shadow DOM, just like with styles, shadow boundaries prevent jQuery from sneaking into it. As a result, jQuery can not find elements within Shadow DOM.
The solution is to provide an optional second parameter to the selector that defines the root element for jQuery to search from. And this is, where we can supply our shadowRoot.
$('.my-selector', this.shadowRoot).fancyPlugin();
This way, jQuery selectors and, as a result, the plugins will work just fine.
Keep in mind though that the Alien components are intended to be used both: in Alien without shadow DOM, and in Host within Shadow DOM. Hence we need a more unified solution that would not assume the presence of Shadow DOM by default.
As a bonus, we use the same root property to define a container for injecting the tooltip in this case.
Now, when the Alien component is ready to accept the root property, we update rendering of the component in corresponding Frankenstein wrapper:
// `appWrapper` is the root element within wrapper's Shadow DOM.
ReactDOM.render(<MainApp root={ appWrapper } />, appWrapper);
And that’s it! The component works as fine in Shadow DOM as it does in the global DOM.
Webpack configuration for multi-wrappers scenario
The exciting part is happening in Webpack’s configuration when using several wrappers. Nothing changes for the bundled styles like those CSS Modules in Vue components, or styled-components in React. However, global styles should get a little twist now.
Remember, we said that style-loader (responsible for injecting global stylesheets into correct Shadow DOM) is inflexible as it takes just one selector at a time for its insert option. This means that we should split the .css rule in Webpack to have one sub-rule per wrapper using oneOf rule or similar, if you’re on a bundler other than Webpack.
I have excluded css-loader as its configuration is the same in all cases. Let’s talk about style-loader instead. In this configuration, we insert tag into either *-header-* or *-listing-*, depending on the name of the file requesting that stylesheet (issuer rule in Webpack). But we have to remember that the global stylesheet required for rendering an Alien component might be imported in two places:
The Alien component itself,
A Frankenstein wrapper.
And here, we should appreciate the naming convention for wrappers, described above, when the name of an Alien component and a corresponding wrapper match. If, for example, we have a stylesheet, imported in a Vue component called Header.vue, it gets to correct *-header-* wrapper. At the same time, if we, instead, import the stylesheet in the wrapper, such stylesheet follows precisely the same rule if the wrapper is called Header-wrapper.js without any changes in the configuration. Same thing for the Listing.vue component and its corresponding wrapper Listing-wrapper.js. Using this naming convention, we reduce the configuration in our bundler.
After all of your components migrated, it’s time for the final step of the migration.
7. Switch To Alien
At some point, you find out that the components you identified at the very first step of the migration, are all replaced with Frankenstein wrappers. No jQuery application is left really and what you have is, essentially, the Alien application that is glued together using the means of Host.
For example, the content part of index.html in the jQuery application — after migration of both microservices — looks something like this now:
At this moment, there is no point in keeping our jQuery application around: instead, we should switch to Vue application and forget about all of our wrappers, Shadow DOM and fancy Webpack configurations. To do this, we have an elegant solution.
Let’s talk about HTTP requests. I will mention Apache configuration here, but this is just an implementation detail: doing the switch in Nginx or anything else should be as trivial as in Apache.
Imagine that you have your site served from the /var/www/html folder on your server. In this case, your httpd.conf or httpd-vhost.conf should have an entry that points to that folder like:
DocumentRoot "/var/www/html"
To switch your application after the Frankenstein migration from jQuery to React, all you need to do is update the DocumentRoot entry to something like:
DocumentRoot "/var/www/html/react/build"
Build your Alien application, restart your server, and your application is served directly from the Alien’s folder: the React application served from the react/ folder. However, the same is true for Vue, of course, or any other framework you have migrated too. This is why it is so vital to keep Host and Alien completely independent and functional at any point in time because your Alien becomes your Host at this step.
Now you can safely remove everything around your Alien’s folder, including all the Shadow DOM, Frankenstein wrappers and any other migration-related artifact. It was a rough path at moments, but you have migrated your site. Congratulations!
Conclusion
We definitely went through somewhat rough terrain in this article. However, after we started with a jQuery application, we have managed to migrate it to both Vue and React. We have discovered some unexpected and not-so-trivial issues along the way: we had to fix styling, we had to fix JavaScript functionality, introduce some bundler configurations, and so much more. However, it gave us a better overview of what to expect in real projects. In the end, we have got a contemporary application without any remaining bits from the jQuery application even though we had all the rights to be skeptical about the end result while the migration was in progress.
After the switch to Alien, Frankenstein can be retired. (Large preview)
Frankenstein Migration is neither a silver bullet nor should it be a scary process. It’s just the defined algorithm, applicable to a lot of projects, that helps to transform projects into something new and robust in a predictable manner.
In this week’s roundup: fighting shifty layouts, some videos might be a bit stalled, and a new way to take screenshots in Firefox.
Let’s get into the news!
Identifying the causes of layout shifts during page load
You can now use WebPageTest to capture any layout shifts that occur on your website during page load, and identify what caused them.
Step 1: Paste a snippet
Paste the following snippet into the “Custom Metrics” on webpagetest.org in field in the Custom tab (under Advanced Settings) and make sure that a Chrome browser is selected.
[LayoutShifts]
return new Promise(resolve => {
  new PerformanceObserver(list => {
    resolve(JSON.stringify(list.getEntries().filter(entry => !entry.hadRecentInput)));
  }).observe({type: "layout-shift", buffered: true});
});
Step 2: Inspect entries
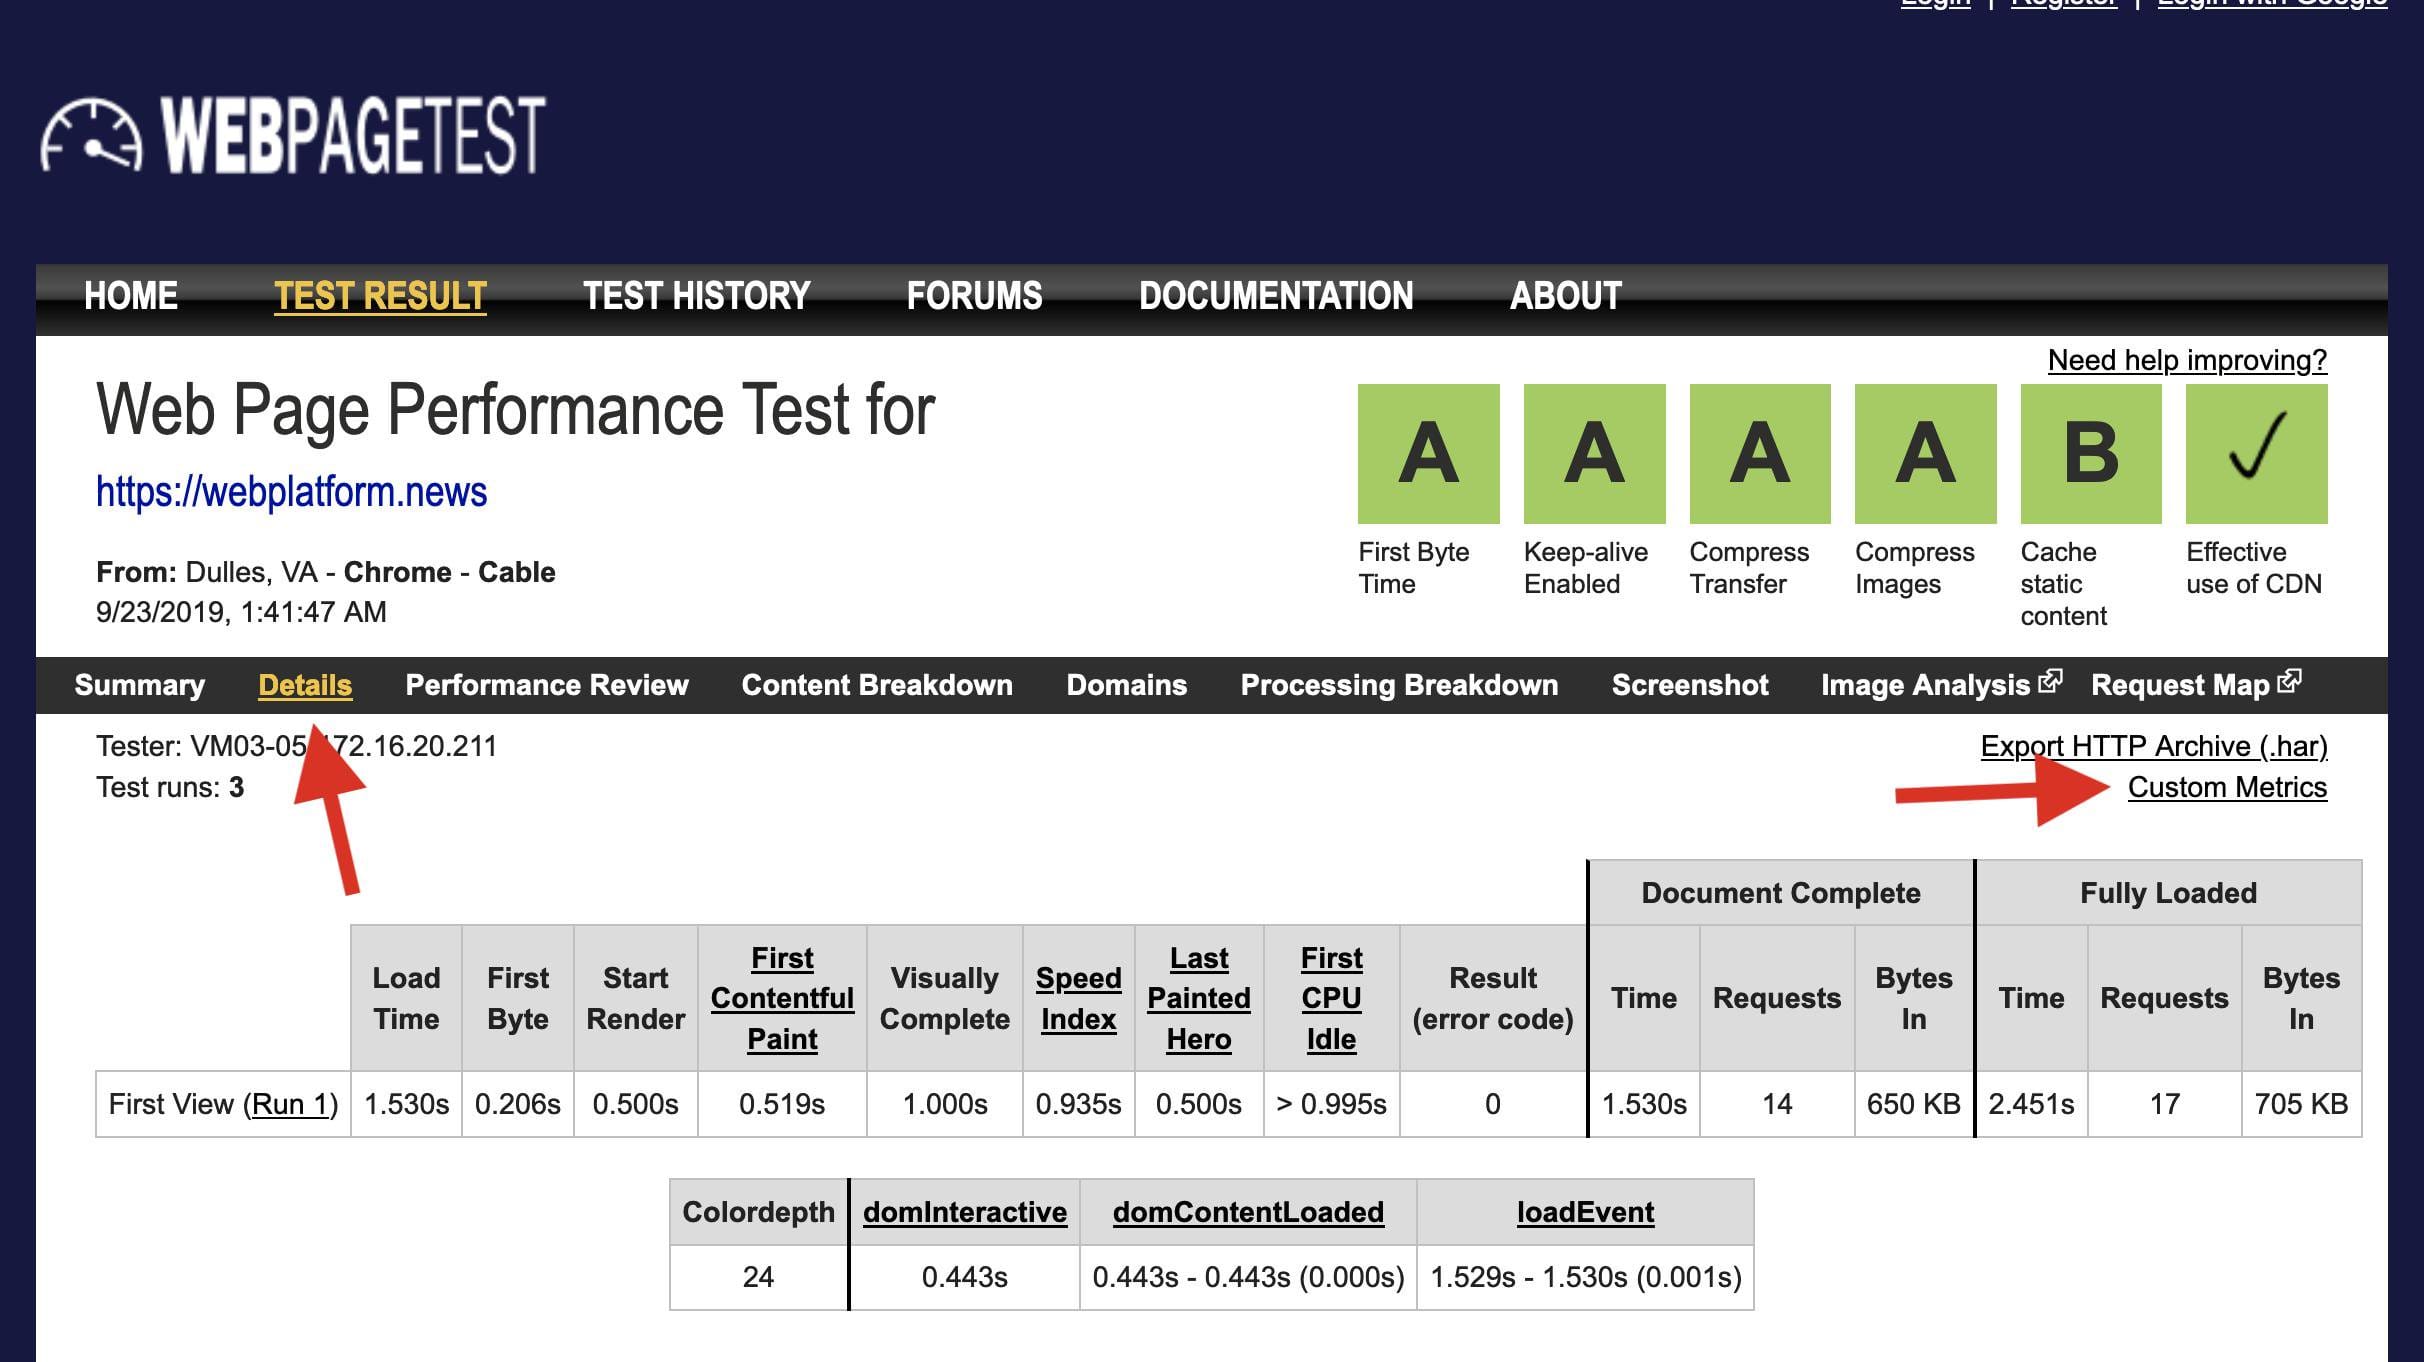
After completing the test, inspect the captured LayoutShifts entries on the Custom Metrics page, which is linked from the Details section.
Step 3: Check the filmstrip
Based on the "startTime" and "value" numbers in the data, use WebPageTest’s filmstrip view to pinpoint the individual layout shifts and identify their causes.
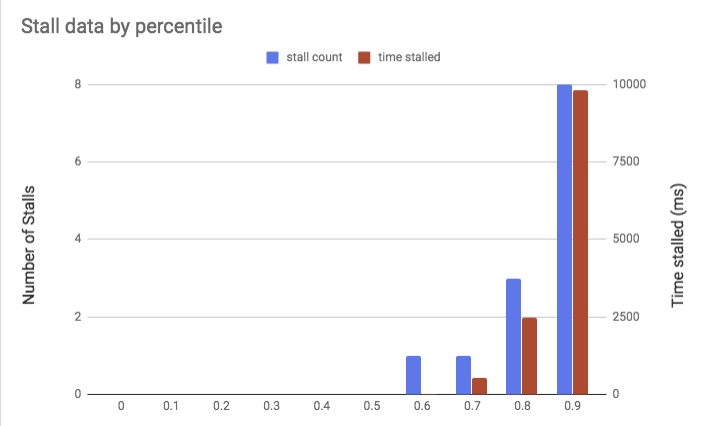
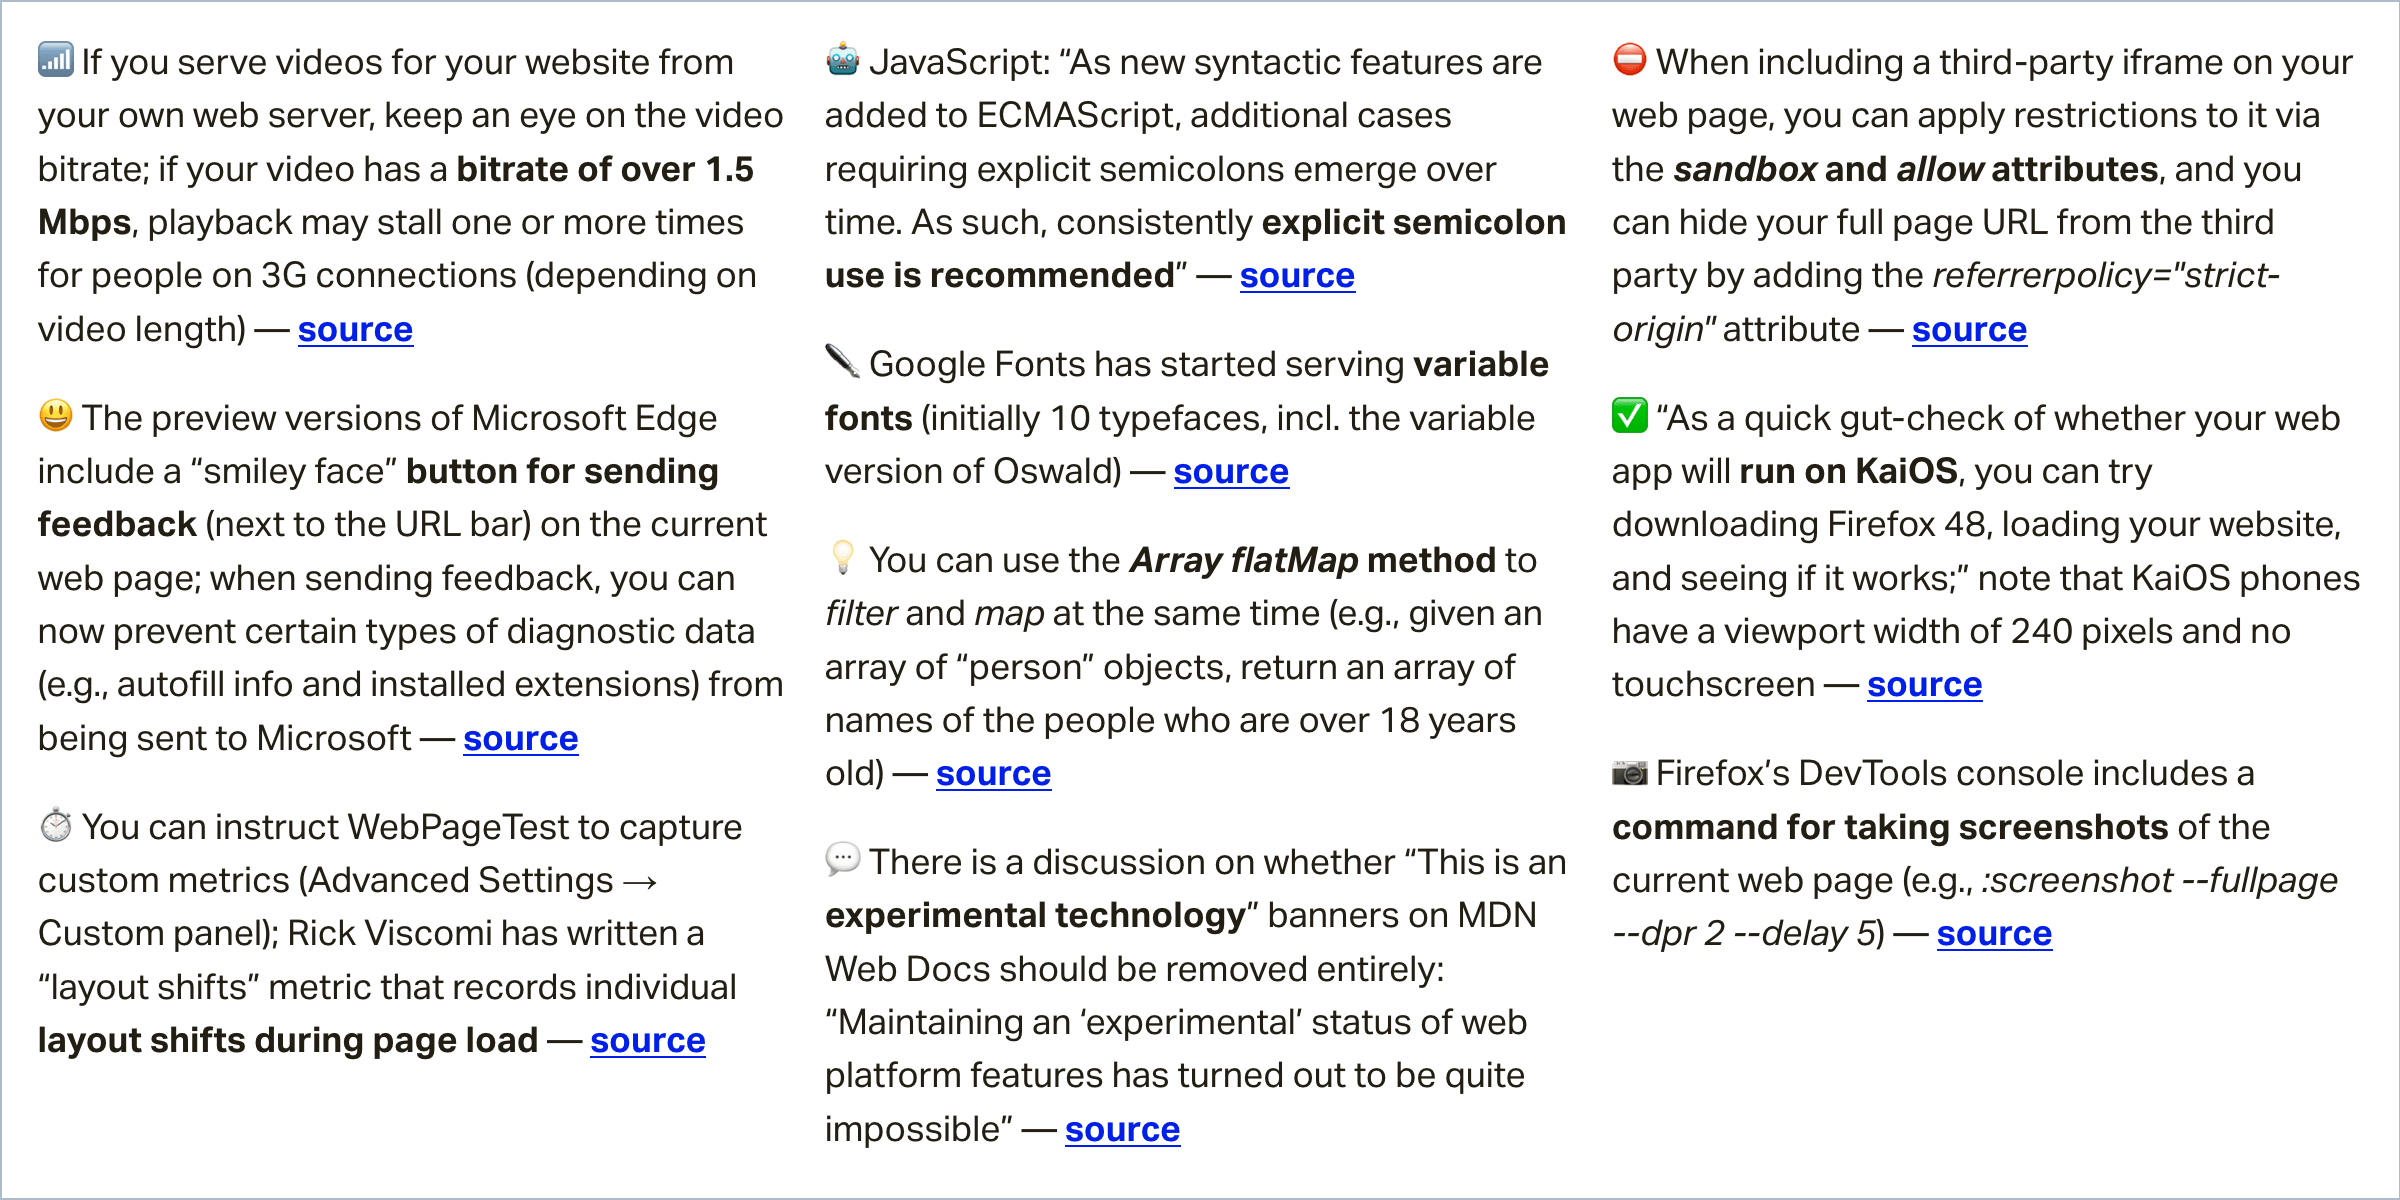
If you serve videos for your website from your own web server, keep an eye on the video bitrate (the author suggests FFmpeg and streamclarity.com). If your video has a bitrate of over 1.5 Mbps, playback may stall one or more times for people on 3G connections, depending on the video’s length.
50% of videos in this study have a bitrate that is greater than the downlink speed of a 3G connection — meaning that video playback will be delayed and contain stalls.
Firefox’s DevTools console includes a powerful command for capturing screenshots of the current web page. Like in Chrome DevTools, you can capture a screenshot of an individual element, the current viewport, or the full page, but Firefox’s :screenshot command also provides advanced options for adjusting the device pixel ratio and setting a delay.
// capture a full-page screenshot at a device pixel ratio of 2
:screenshot --fullpage --dpr 2

// capture a screenshot of the viewport with a 5-second delay
:screenshot --delay 5
GraphQL and REST are two specifications used when building APIs for websites to use. REST defines a series of unique identifiers (URLs) that applications use to request and send data. GraphQL defines a query language that allows client applications to specify precisely the data they need from a single endpoint. They are related technologies and used for largely the same things (in fact, they can and often do co-exist), but they are also very different.
That’s a little dry, eh? Let’s explain it a much more entertaining way that might help you understand better, and maybe just get you a little excited about GraphQL!
? You’re at a cocktail mixer
You’re attending this mixer to help build your professional network, so naturally, you want to collect some data about the people around you. Close by, there are five other attendees.
Their name tags read:
Richy REST
Friend of Richy REST
Employer of Richy REST
Georgia GraphQL
Being the dynamic, social, outgoing animal that you are, you walk right up to Richy REST and say, “Hi, I’m Adam Application, who are you?” Richy REST responds:
{
  name: "Richy REST",
  age: 33,
  married: false,
  hometown: "Circuits-ville",
  employed: true
  // ... 20 other things about Richy REST
}
“Whoa, that was a lot to take in,” you think to yourself. In an attempt to avoid any awkward silence, you remember Richy REST specifying that he was employed and ask, “Where do you work?”
Strangely, Richy REST has no idea where he works. Maybe the Employer of Richy Rest does?
You ask the same question to the Employer of Richy REST, who is delighted to answer your inquiry! He responds like so:
{
  company: "Mega Corp",
  employee_count: 11230,
  head_quarters: "1 Main Avenue, Big City, 10001, PL"
  year_founded: 2005,
  revenue: 100000000,
  // ... 20 other things about Richy REST Employer
}
At this point, you’re exhausted. You don’t even want to meet the Friend of Richy Rest! That might take forever, use up all your energy and, you don’t have the time.
However, Georgia GraphQL has been standing there politely, so you decide to engage her.
“Hi, what’s your name?”
{
  name: "Georgia GraphQL"
}
“Where are you from, and how old are you?”*
{
  hometown: "Pleasant-Ville",
  age: 28
}
“How many hobbies and friends do you have and what are your friends’ names?”
Georgia GraphQL is incredible, articulate, concise, and to the point. You 100% want to swap business cards and work together on future projects with Georgia.
This anecdote encapsulates the developer’s experience of working with GraphQL over REST. GraphQL allows developers to articulate what they want with a tidy query and, in response, only receive what they specified. Those queries are fully dynamic, so only a single endpoint is required. REST, on the other hand, has predefined responses and often requires applications to utilize multiple endpoints to satisfy a full data requirement.
Metaphor over! Let’s talk brass tacks.
To expand further upon essential concepts presented in the cocktail mixer metaphor let’s specifically address two limitations that often surface when using REST.
1. Several trips when fetching related resources
Data-driven mobile and web applications often require related resources and data sets. Thus, retrieving data using a REST API can entail multiple requests to numerous endpoints. For instance, requesting a Post entity and related Author might be completed by two requests to different endpoints:
Multiple trips to an API impacts the performance and readiness of an application. It is also a more significant issue for low bandwidth devices (e.g. smart-watches, IoT, older mobile devices, and others).
2. Over-fetching and under-fetching
Over/under-fetching is inevitable with RESTful APIs. Using the example above, the endpoint domainName.com/posts/:id fetches data for a specific Post. Every Post is made up of attributes, such as id, body, title, publishingDate, authorId, and others. In REST, the same data object always gets returned; the response is predefined.
In situations where only a Post title and body are needed, over-fetching happens — as more data gets sent over the network than data that is actually utilized. When an entire Post is required, along with related data about its Author, under-fetching gets experienced — as less data gets sent over the network than is actually utilized. Under-fetching leads to bandwidth overuse from multiple requests to the API.
Client-side querying with GraphQL
GraphQL introduces a genuinely unique approach that provides a tremendous amount of flexibility to client-apps. With GraphQL, a query gets sent to your API and precisely what you need is returned — nothing more and nothing less — in a single request. Query results are returned in the same shape as your query, ensuring that response structures are always predictable. These factors allow apps to run faster and be more stable because they are in control of the data they get, and not the server.
“Results are returned in the same shape as queries.”
/* Query */
{
  myFriends(first: 2) {
    items {
      name
      age
    }
  }
}
Now, at this point, you probably think GraphQL is as easy as slicing warm butter with a samurai sword. That might be the reality for front-end developers — specifically developers consuming GraphQL APIs. However, when it comes to server-side setup, someone has to make the sausage. Our friend Georgia GraphQL put in some hard work to become the fantastic professional she is!
Building a GraphQL API, server-side, is something that takes time, energy, and expertise. That said, it’s nothing that someone ready for a challenge is unable to handle! There are many different ways to hop in at all levels of abstraction. For example:
Un-assisted: If you really want to get your hands dirty, try building a GraphQL API with the help of packages. For instance, like Rails? Checkout graphql-ruby. Love Node.js? Try express-graphql.
Assisted: If fully maintaining your server/self-hosting is a priority, something like Graph.cool can help you get going on a GraphQL project.
Instant: Tired of writing CRUD boilerplate and want to get going fast? 8base provides an instant GraphQL API and serverless backend that’s fully extensible.
Wrapping up
REST was a significant leap forward for web services in enabling highly available resource-specific APIs. That said, its design didn’t account for today’s proliferation of connected devices, all with differing data constraints and requirements. This oversight has quickly lead to the spread of GraphQL — open-sourced by Facebook in 2015 — for the tremendous flexibility that it gives front-end developers. Working with GraphQL is a fantastic developer experience, both for individual developers as well as teams.
Buy or build is a classic debate in technology. Building things yourself might feel less expensive because there is no line item on your credit card bill, but has cost in the form of time. Buying things, believe it or not, is usually less expensive when it comes to technology that isn’t your core focus. Build your core technology, buy everything else.
That’s what I think of with a tool like Paperform. A powerful form builder like Paperform costs me a few bucks, but saves me countless hours in building something that might become extremely complex and a massive distraction from my more important goals.
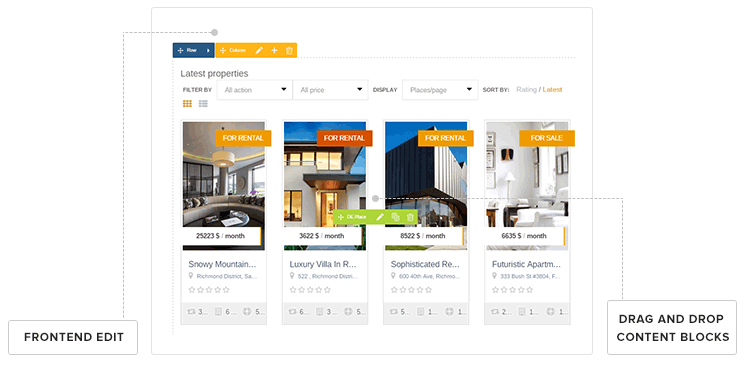
Paperform is a form builder, but disguised within a page builder
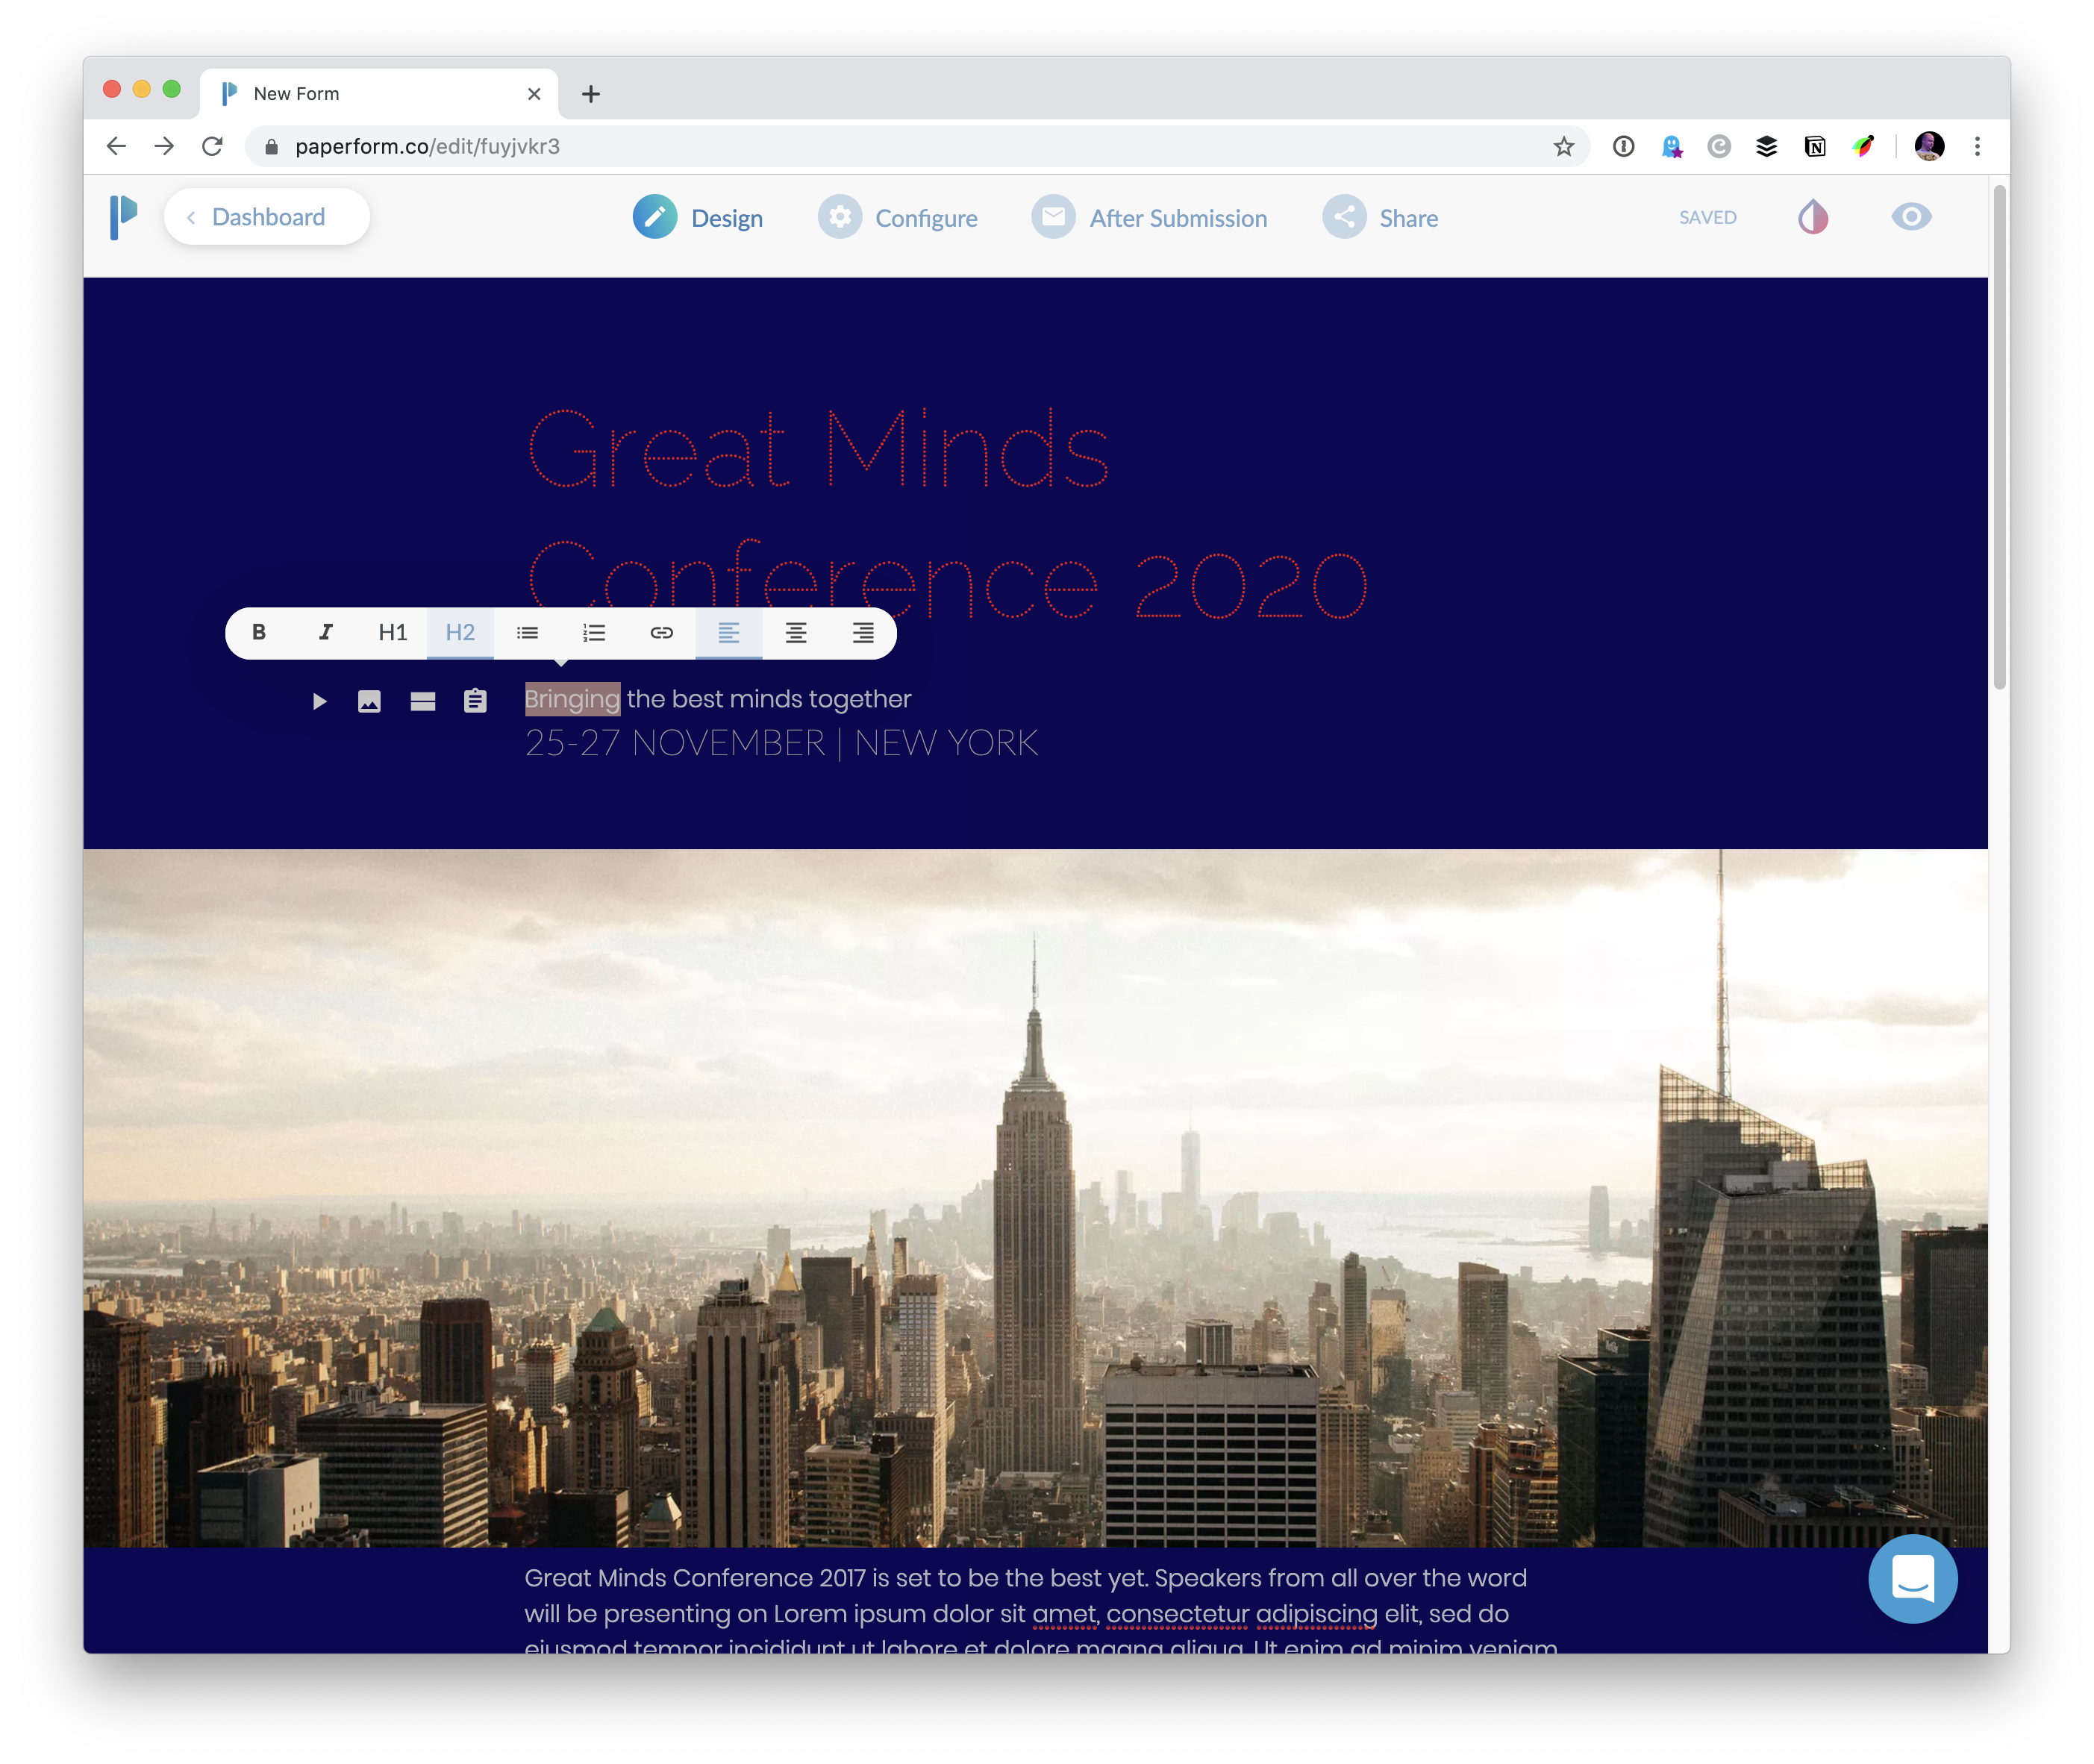
Imagine you’re building a registration form for a conference. (That’s a perfect fit for Paperform, by the way, as Paperform has payment features that can even handle the money part.) The page that explains the conference and the registration form for the conference can be, and maybe should be, the same thing.
The Paperform designer makes it quite intuitive to build out a page of content.
It is equally intuitive to sprinkle questions into the page as you are writing and design it, making it an interactive form.
Block editing
As a little aside, I dig how the editor is block-based. That’s a trend I can get behind lately, with some of my favorite apps like Notion really embracing it and huge projects like Gutenberg in WordPress.
This feels lighter than both of those, a little bit more like the Dropbox Paper editor. Building a form is just like editing a document is a principle they have and I think they are right on. It really is just like working in a document with perhaps a bit more configuration possibilities when you get into the details.
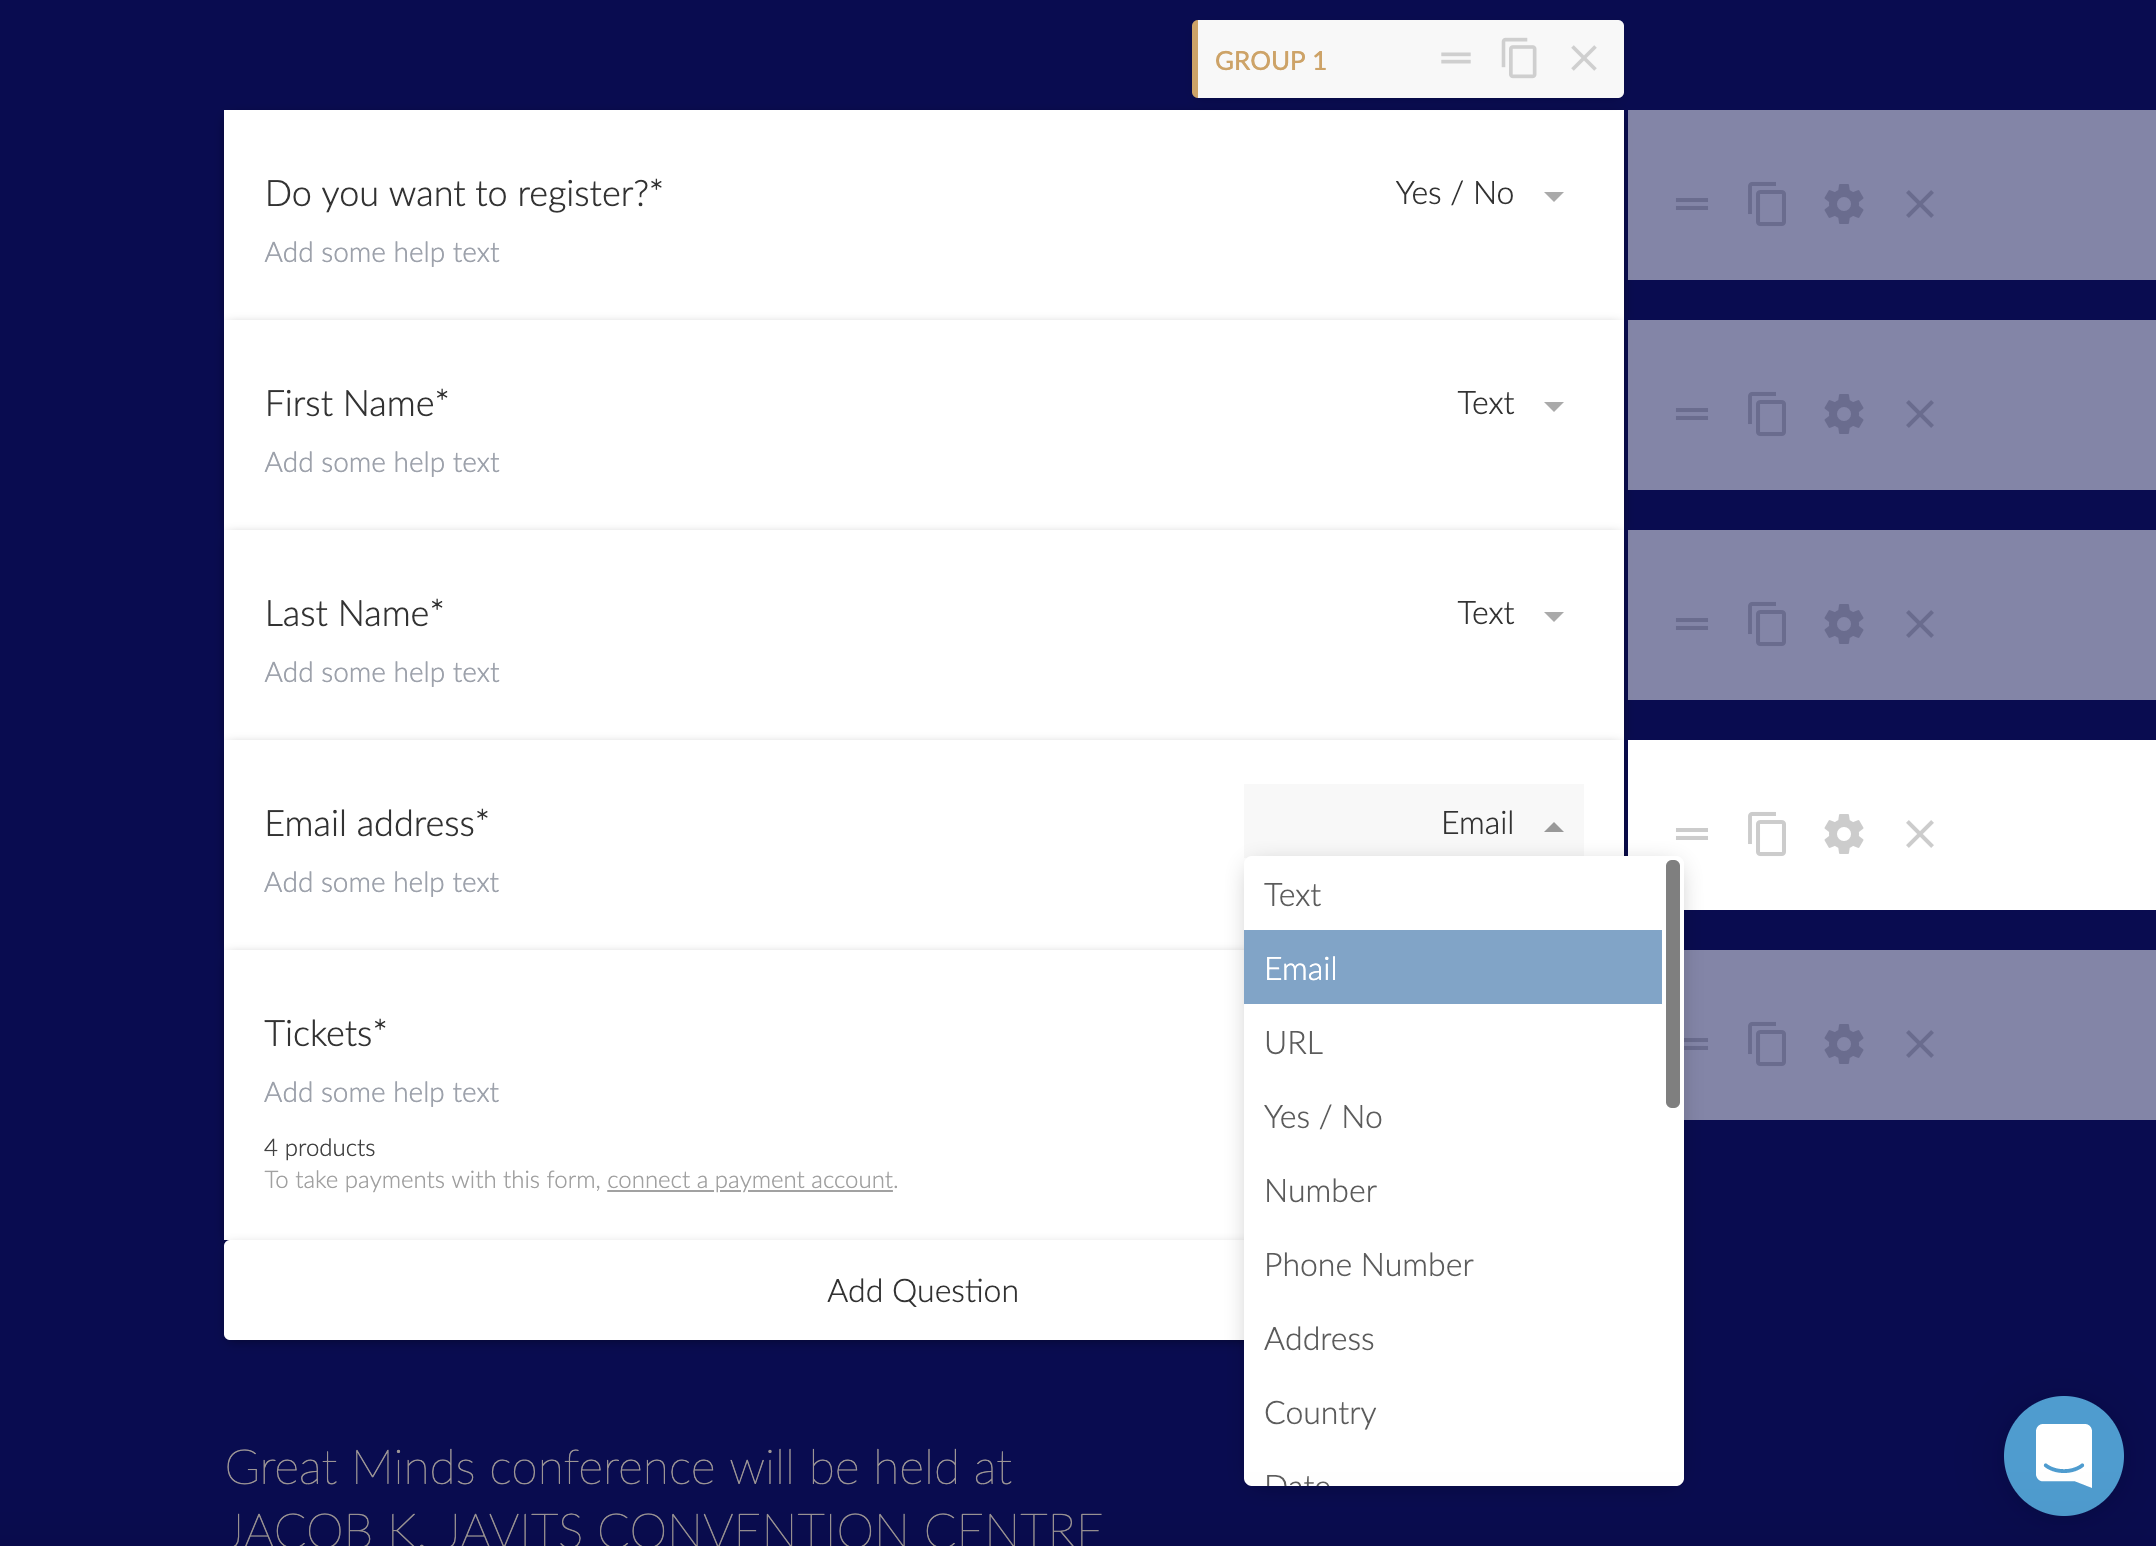
You’ve got a lot of power at the question level
With a form builder, you really want that power. You don’t want to get knee-deep into building a form only to find out you can’t do the thing you need to with the functionality and flow of the form. Here’s a bunch of yes’s:
Can you make a field be required? Yes.
Can you apply conditional logic to hide/show fields? Yes.
Can you apply put default and placeholder text? Yes.
Can you set minimum and maximums? Yes.
Can you control the layout? Yes.
Can you control the design? Yes.
Can you programmatically prefill fields? Yes.
Can you have hidden fields? Yes.
Can you have complex fields like address and signatures? Yes.
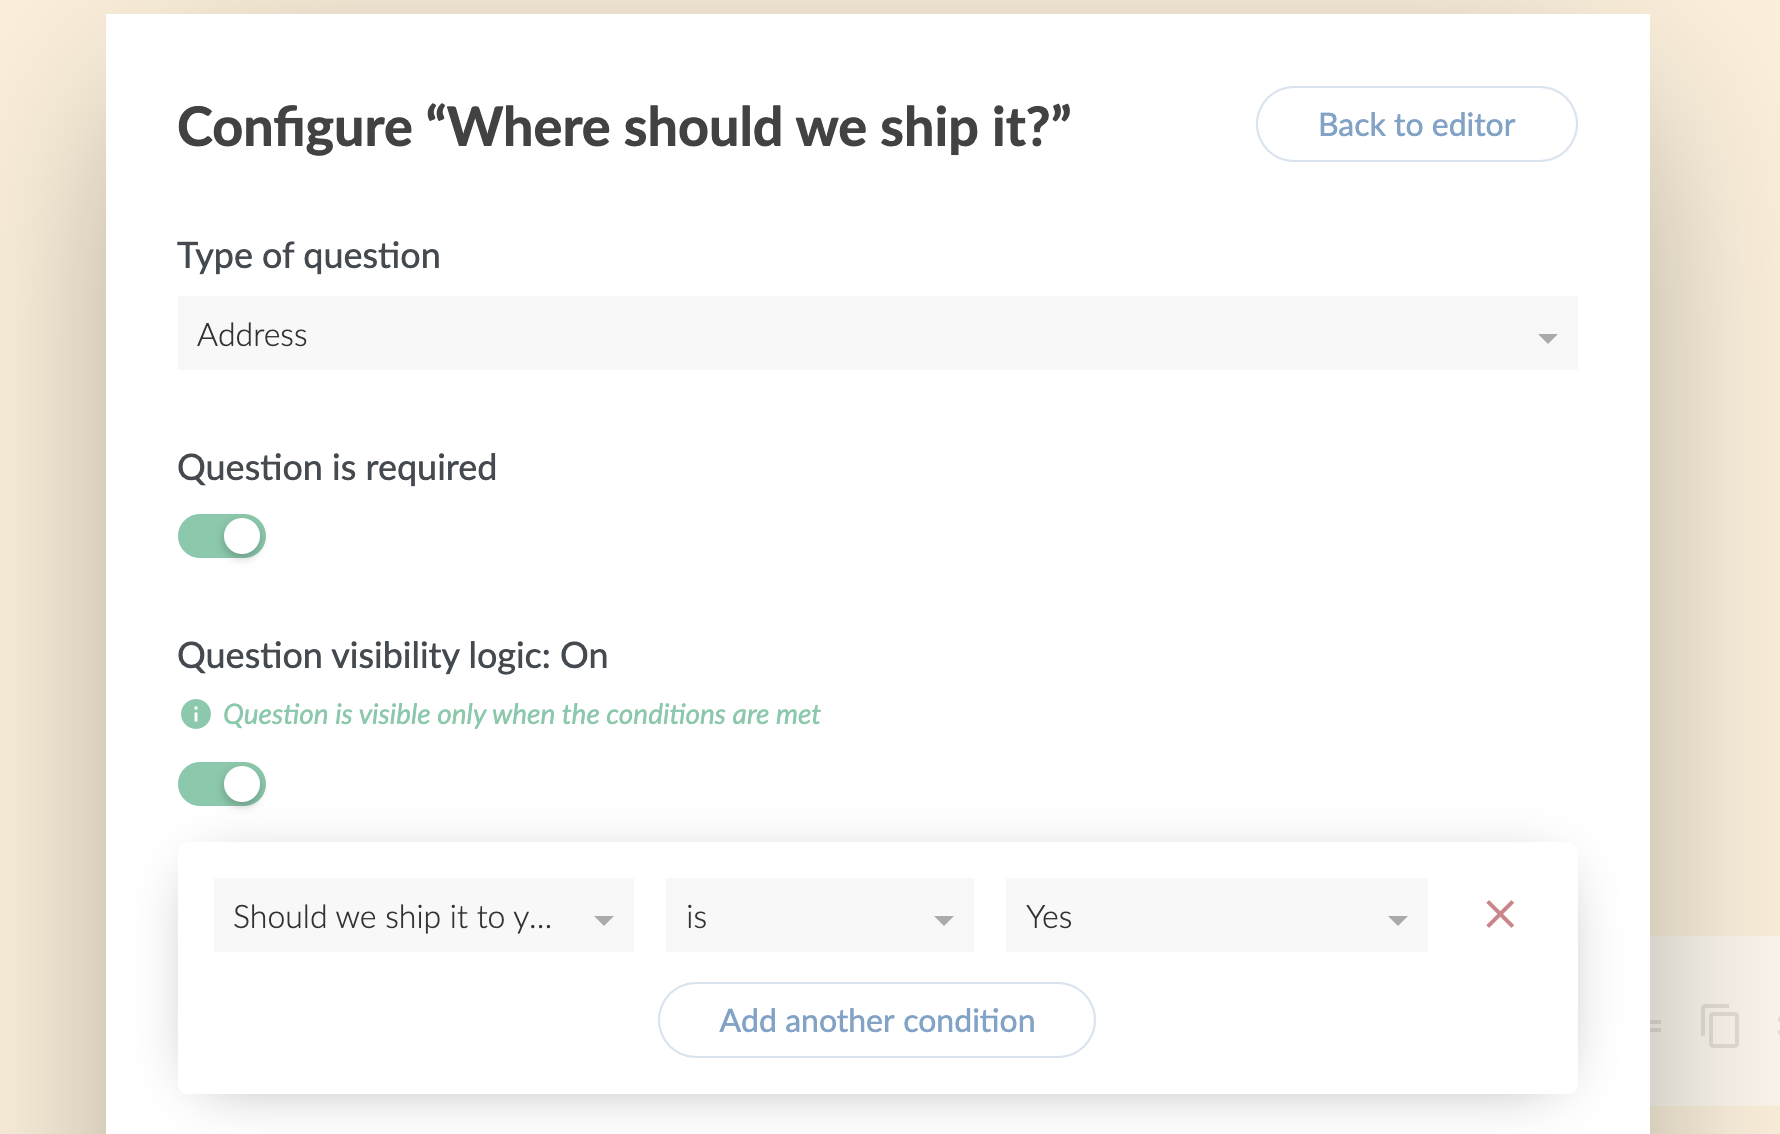
Features like logic on questions, I happen to know, are particularly tricky to nail the UX on, and Paperform does a great job with it. You control the logic from option built naturally into the form builder where you would expect to find it.
Based on a “yes” answer to a yes/no question, I reveal an extra address field. Even the address field has powerful features, like limiting the countries you use.
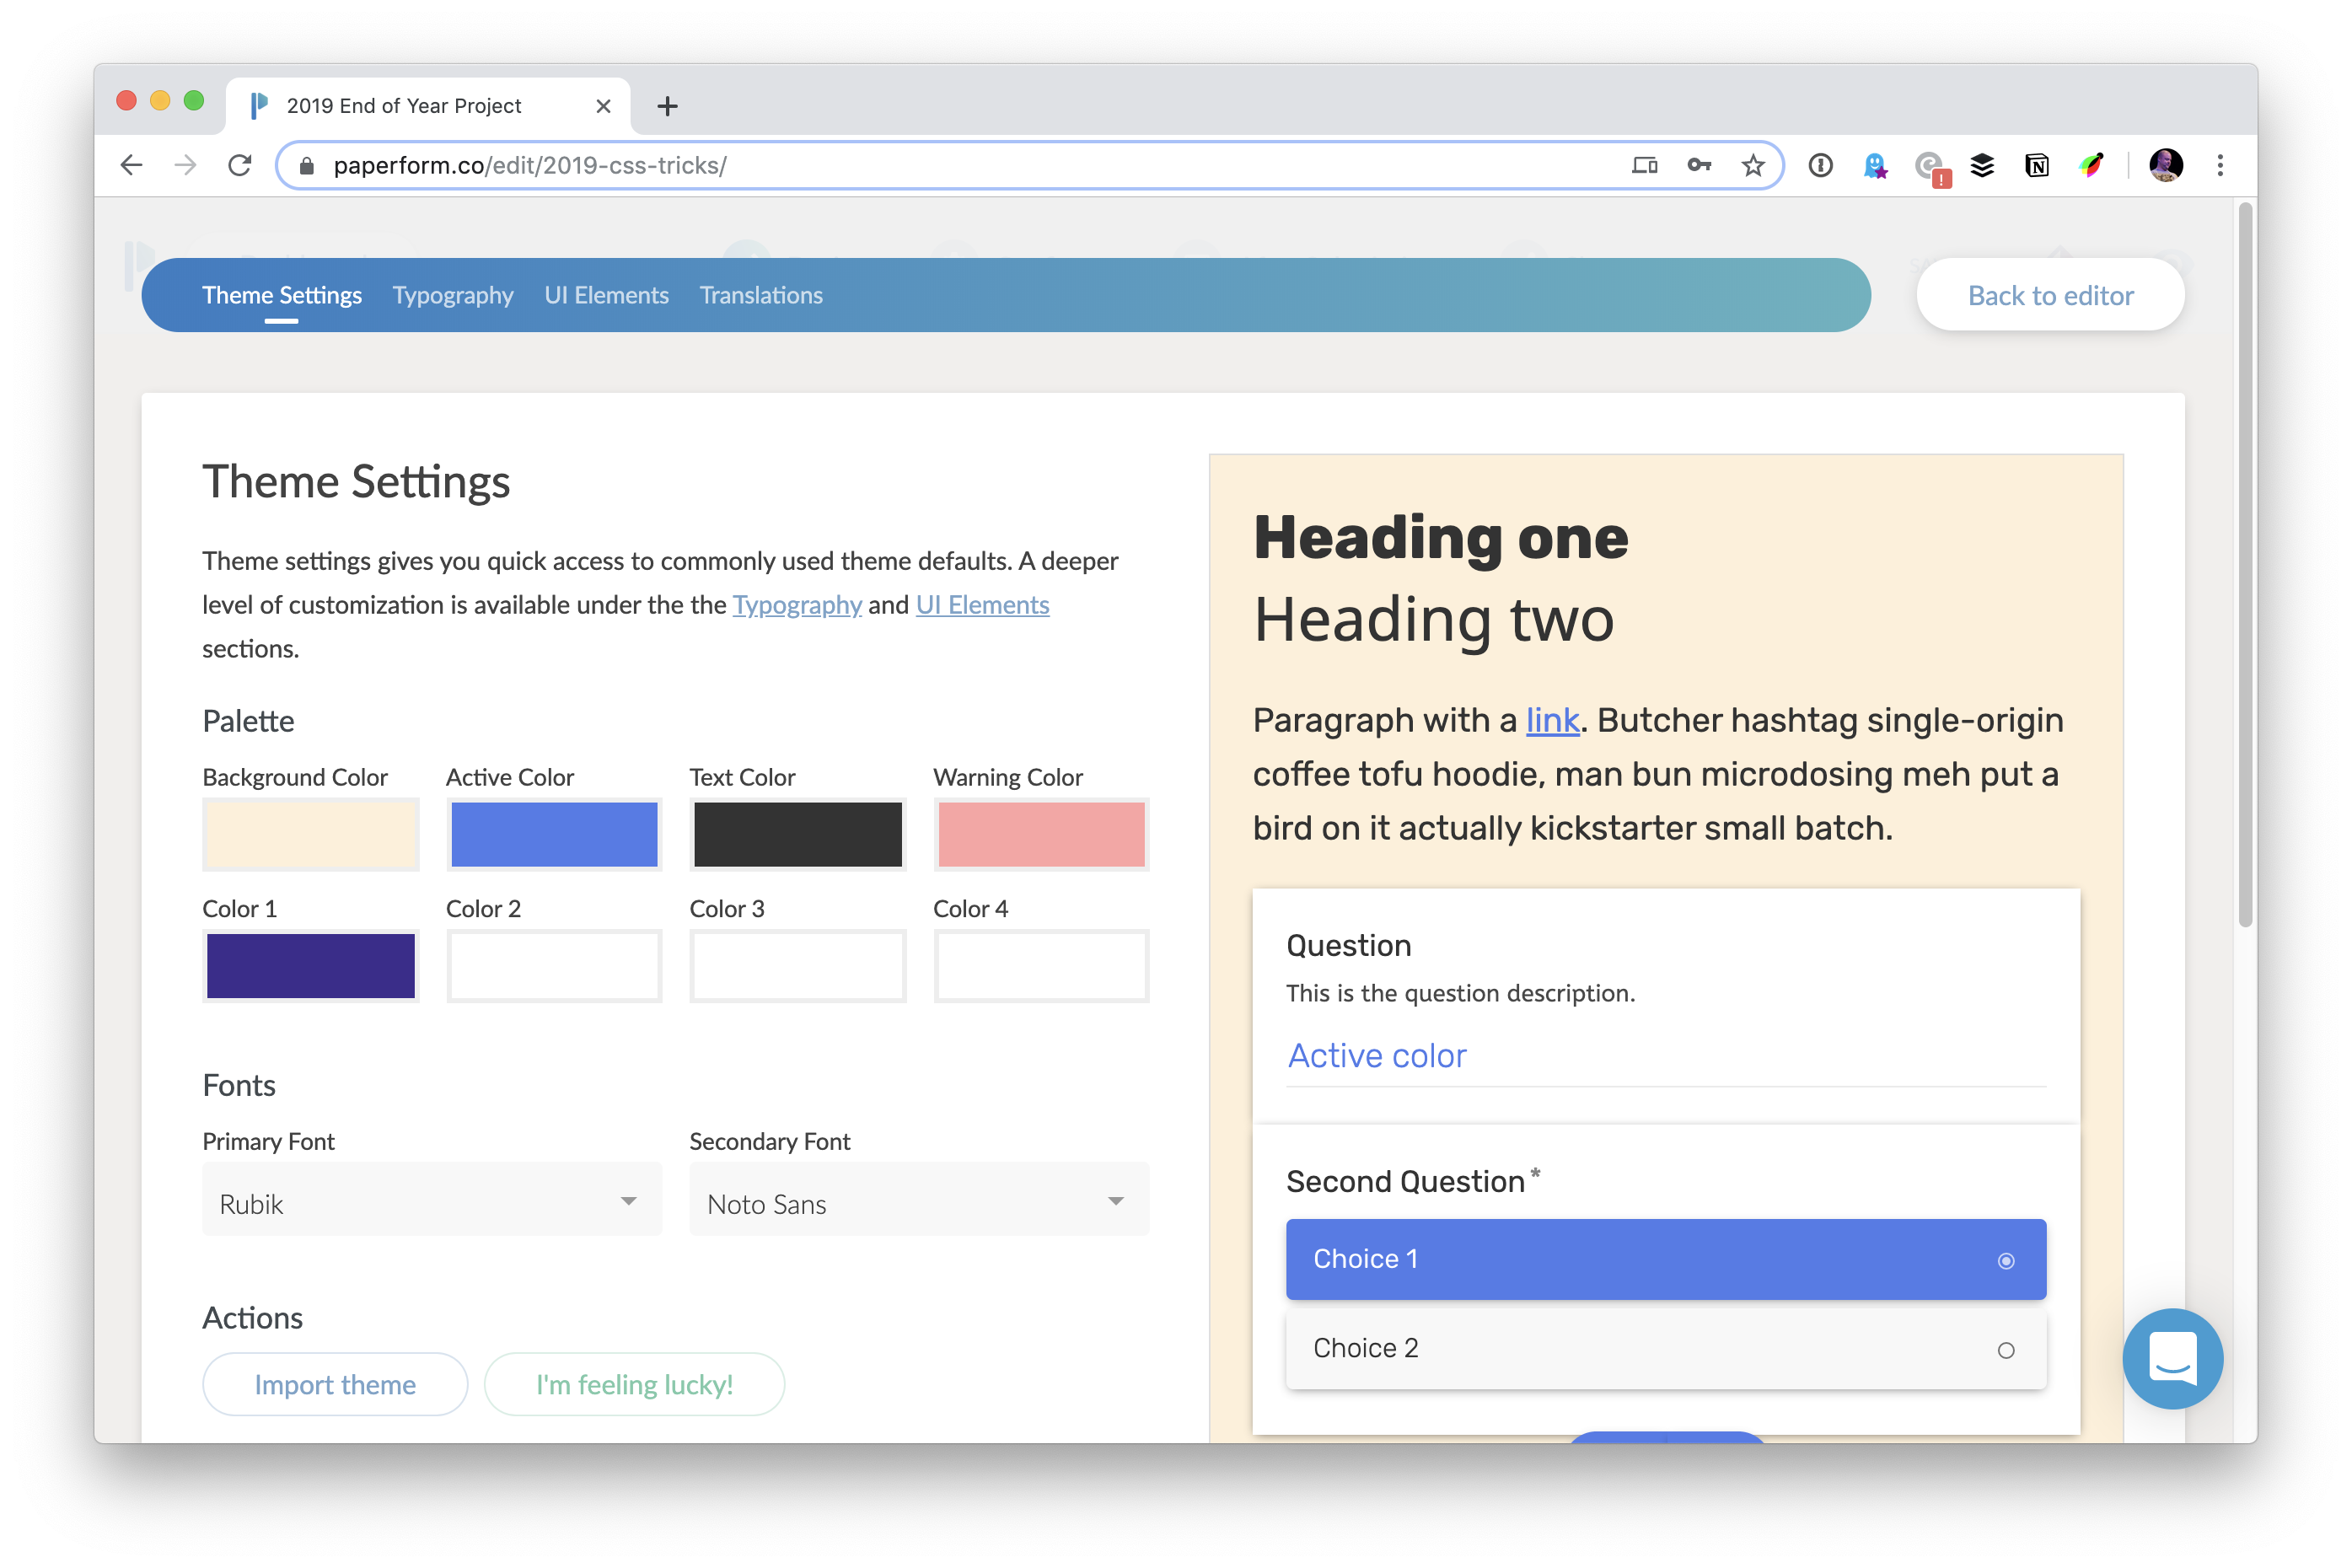
Theming is very natural
Controlling color and typography are right up front and very obvious. Color pickers for all the major typographic elements, and the entire kitchen sink of Google Fonts for you to pick from.
I really like that at no point does it feel like you are leaving “the place where you’re building the form”. You can easily flip around between building the content and design and theme and logic and all that while it’s saving your work as you go.
All the most common stuff has UI controls for you, and other big features are easy to find, like uploading background images and controlling buttons. Then if you really need to exert 100% control, their highest plan allows you to inject your own CSS into the form.
“After Submission”
What an obvious thing to call it! I love that. This is where you configure everything that happens with the form data after you’ve captured it. But instead of calling it something dry and obtuse like “Form Data Configuration Options” or something, it’s named after what you are thinking: “What happens after the form is submitted? That’s what I’m trying to control.”
There are three things that I tend to think about after form submission:
Where is the confirmation email going to go?
What does the success message say to the user?
What integrations can I use?
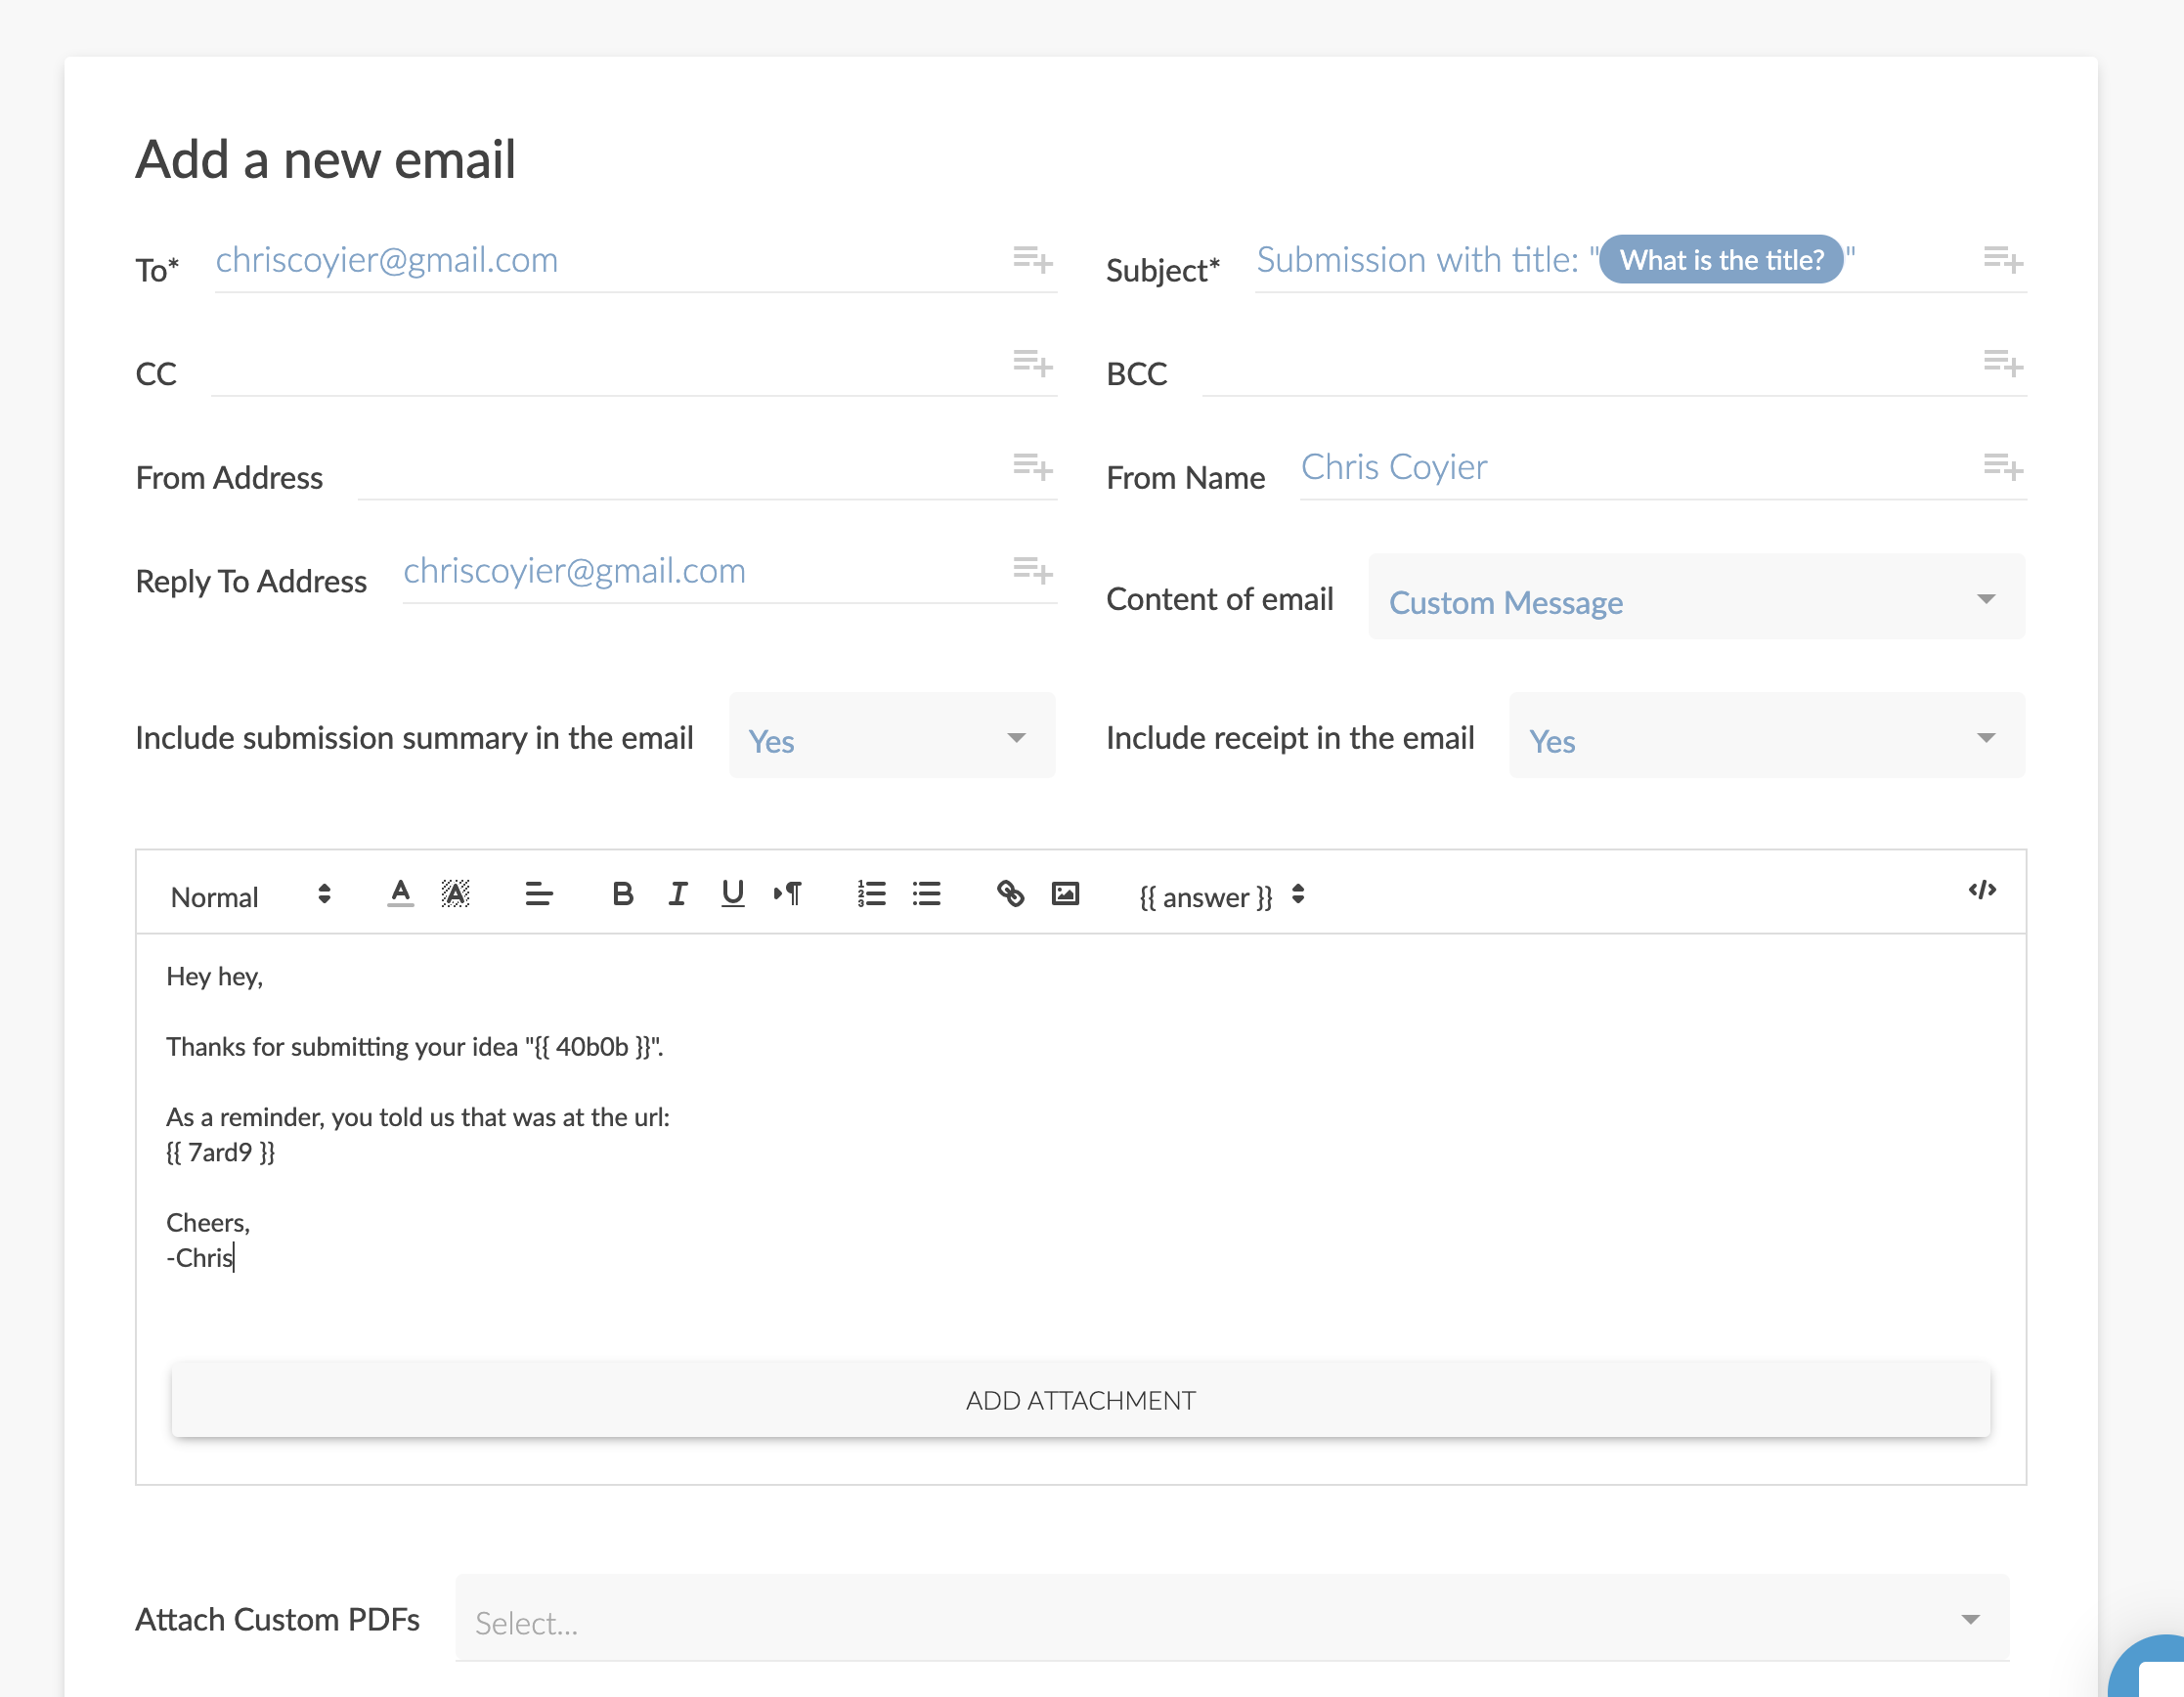
A nice touch? By default, the form is set up to email you all submissions. Do nothing, and you get that. That’s probably what you want 90% of the time anyway. But if you want to get in there and manipulate that email with custom destinations, subject lines, and even entirely reformatted content, you’ve got it.
In the same fashion, you can create custom PDFs from the submitted data, which is a pretty unique feature and I imagine quite important for some folks.
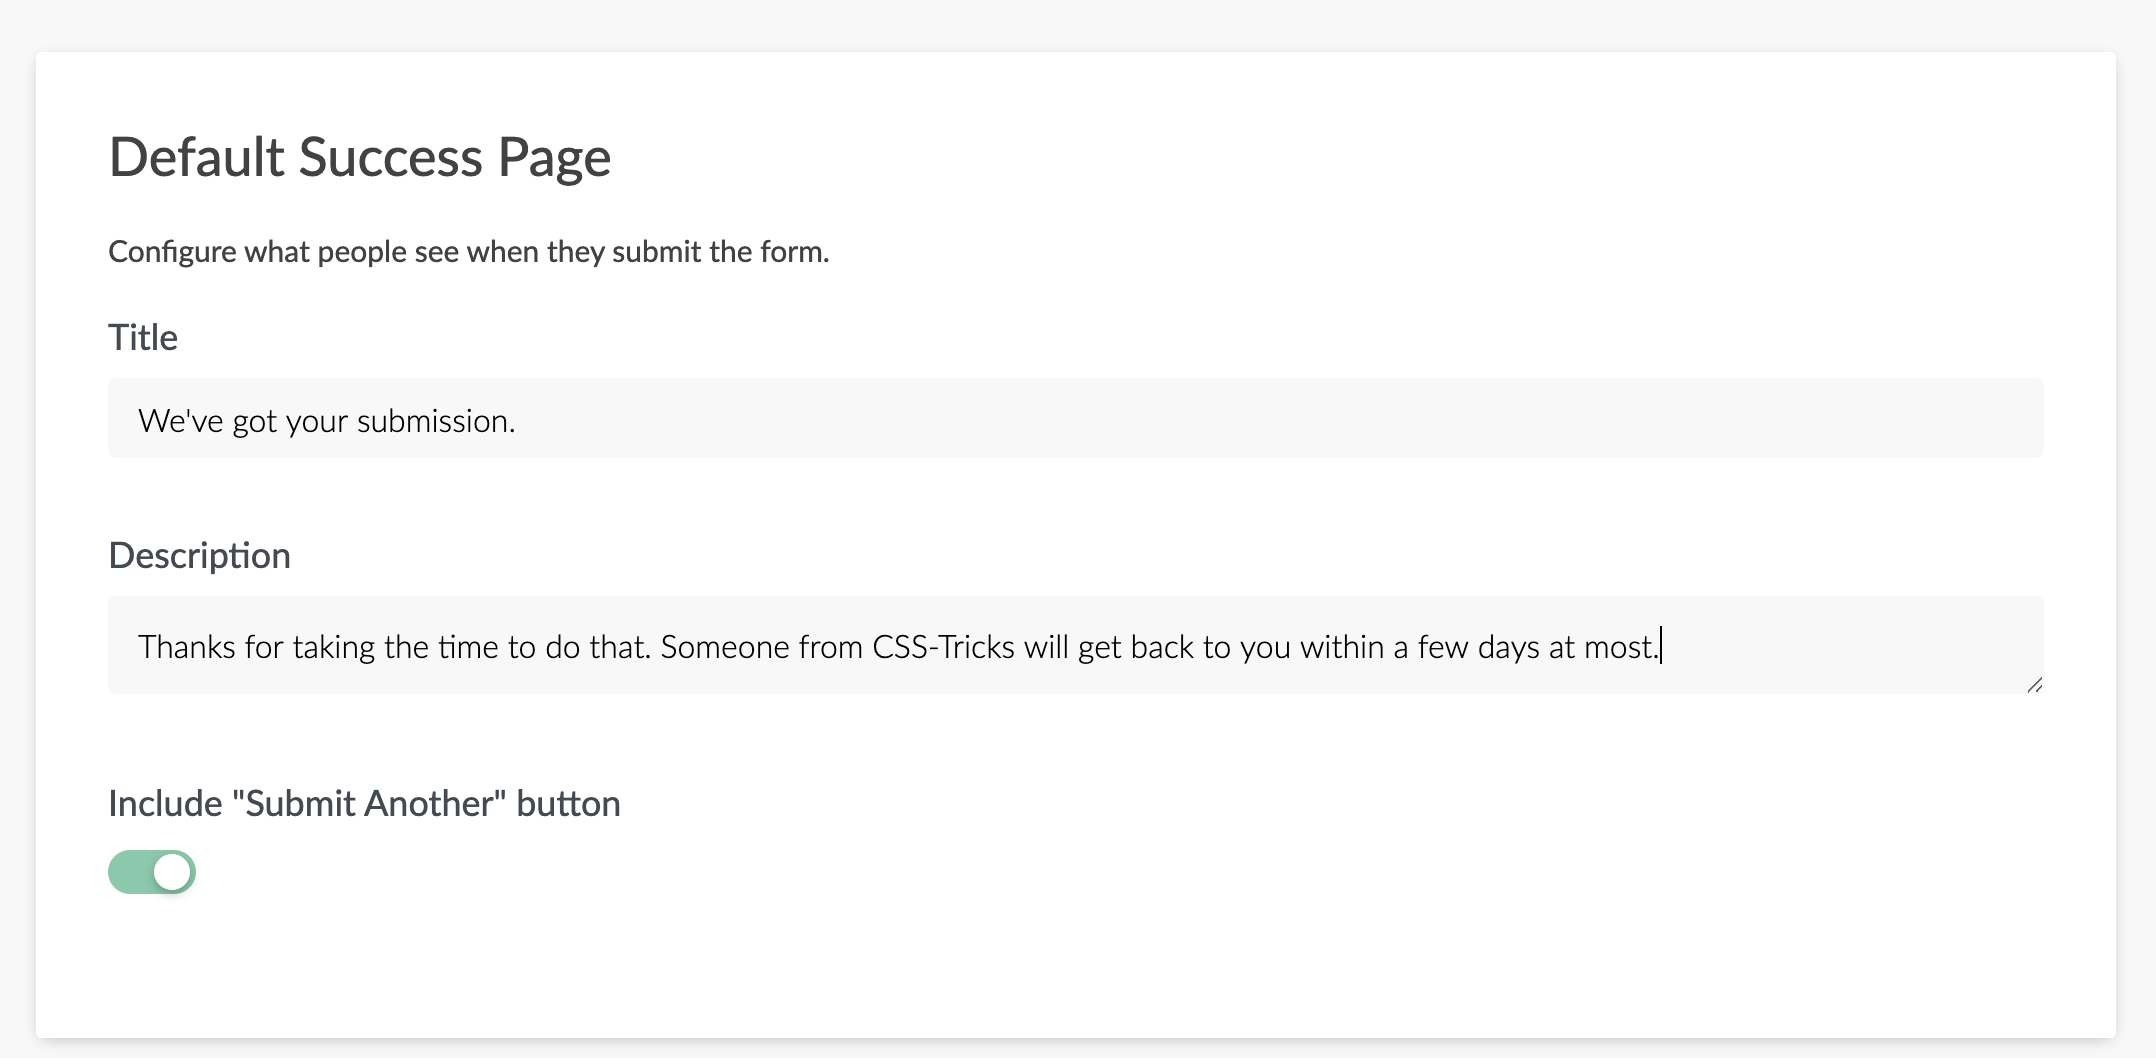
Customizing that success message, which I find to be appropriate pretty much 100% of the time, is just a matter of changing two fields.
Integrations-wise, for me, the big ones I find myself using are:
Make a Trello card from this.
Put the person on a MailChimp list.
Send a Slack notification.
They’ve got all those, plus webhooks (hit this arbitrary URL with the data after submission) and Zapier, which covers just about every use case under the sun.
Of course, when you’re done building your form, you get a URL you can send people to. For me, the vast majority of the time, what I want to do is embed the form right onto another site, and they have all the options you could want for that as well.
Paperform is too big for one blog post. I barely mentioned payments, which is a massive feature they handle very well. I’d just end by saying it’s a very impressive product and if you’re picking a form builder, picking one as feature-rich as Paperform isn’t likely to be one you’ll regret.
Are you a property geek planning to launch a WordPress website to help others find suitable properties for themselves? If yes, then you need a relevant theme to make your website look great and appealing to property seekers.
Just like finding a domain name or a WordPress hosting provider, it’s not easy to browse through hundreds of options available online and find the best theme that fits your needs. That’s why I did the work for you.
Before getting started, if you are just thinking about getting your hands dirty with real estate industry but not sure where to start, here is a great guide about how to become a real estate agent to jump-start your career which later on you can boost it with having awesome WordPress websites.
Following is my list of 15 of the best real estate WordPress themes for realtors in 2019. My list will not only highlight their features but I’ll discuss their function as well. So without further ado, let’s get started with the list.
1. RealHomes – Estate Sale and Rental WordPress Theme
First on my list of the best real estate WordPress themes is Real Homes. It’s a modern, contemporary lightweight theme that is heavy on features and will make your website look beautiful.
One of the main highlights of this theme is that it was created with the Twitter Bootstrap which provides an intuitive interface for easy customization. There are several grid layouts, headers, and footers at your disposal to tinker and it also brings in payment module compatibility for payment options like Stripe.
The theme has tons of other features as well and retails for just $59.
2. Elegant Real Estate WordPress Theme
Second on my list is Elegant Real Estate which is an elegant and minimal theme, as the name suggests, with loads of options to play with. There are other great features that you can understand without any coding experience.
The theme also has a customizable user panel with advanced theme options, blog functionalities, and localization. Also, the theme updates automatically so you don’t need to check for updates every day yourself.
You can use a demo to see if what the theme has to offer is good enough for you or not, so give the theme a spin if you need an elegant theme for your realty website.
3. Residence Real Estate WordPress Theme
This is a new theme with more than 400 different theming options for you to explore. WP Residence is a premium theme that was designed for agencies and property agents.
WP Residence is an awesome theme and could very well be one of the best real estate WordPress themes. With the help of a visual composer, the theme offers a heap of customizing options for you to play with.
There is SEO optimization, pre-made demos, support for third party plugins, automatic sync listings, one-click demo importer, worldwide translation options and a fully customizable UI to make the theme look like a full-fledged website. Users can also browse and upload their properties without hassles and you can have your very own listings website for properties.
You can add pictures and videos without hassles. The theme is optimized for bringing in speed while browsing making Residence a superb addition to my list of real estate WordPress themes.
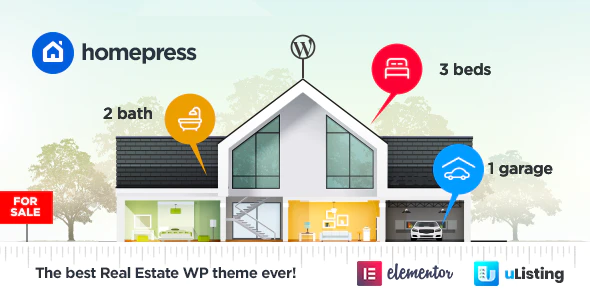
4. HomePress – Real Estate WordPress Theme
Home Press is more than a theme, it is like the classifieds website that would make your WordPress website look beautiful and professional.
If you want a theme that complements your real estate listings in an easy to understand layout, then get Home Press. There are more than 10 pre-built demos, lots of gallery options, advanced search sections that can be placed anywhere as widgets, and drag and drop features to help import media quickly and easily.
Since the theme is responsive, your users would have no trouble viewing on handheld devices. All the features I mentioned make Home Press one of the best real estate listings theme for your WordPress website. Try it out and let me know how you liked it in the comments box below.
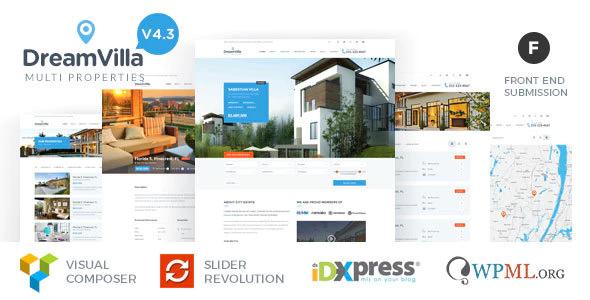
5. DreamVilla – Real Estate WordPress Theme
DreamVilla is a beautiful, responsive and lightweight real estate WordPress theme. There are lots of options to set your backgrounds in a way that they look beautiful and intuitive. This theme is also very functional in terms of its performance because it is powered by Visual Composer.
There are customizable mortgage calculators built-in, slider revolution plugins and other property listing options that are too many to list. The main highlight of DreamVilla is the advanced search functionality built-in.
You can even use the power of AJAX searches, advanced grid layouts, and pre-built templates to really bring out the best in your real estate WordPress website. Try it out and give your feedback.
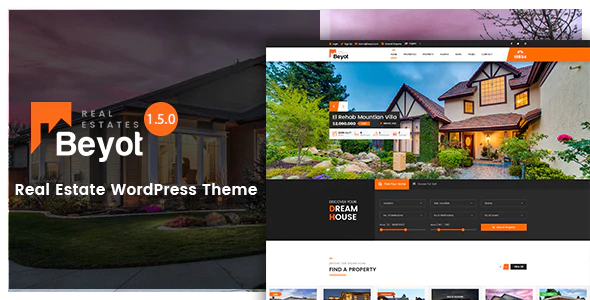
6. Eiddo – Real Estate and Realtor Theme
This is a professional real estate theme that will help publish your properties in an elegant way through sophisticated web design. Eiddo is a fast and lightweight WordPress theme for realtors to ensure that loading takes as little time as possible.
Being responsive means that users can view the website easily through their handheld devices. There are templates for you to browse through as well as support for the most recent plugins, as well as apps, extensions and gallery options.
7. BEYOT – WordPress Real Estate Theme
With 7 pre-built templates and the power of visual composer at your disposal, Beyot is one of the best real estate WordPress themes you should try in 2019.
One of the many features that I found useful with this theme is that you can list properties with Google’s search integration. The theme is also compatible with popular payment gateways like Paypal, Stripe and even wire transfer.
When you get into customization, you have a lot to experiment with. There are lots of gallery templates, sliders, floaters and widgets that can be used. There is also a mortgage calculator built-in with this theme.
All the features that I have mentioned make Beyot a feature-rich and stable theme. Do try it out and let me know what you liked about it.
8. Zoner – Real Estate WordPress Theme
Another sophisticated and responsive real estate WordPress theme is Zoner. One of the best things about this real estate WordPress theme is that it supports WordPress version 4+, which means even users still using an older version of WordPress can use this theme.
There are lots of grid, gallery and other customization options that can be used in this theme, and it is very easy to navigate through the UI of this theme. The admin panel is quite advanced in terms of features and is powered by the Redux Framework.
The theme itself being powered by a visual composer means that it is stable and supports the most popular plugins and extensions. You can use Google Maps and OpenStreetMap to showcase your properties along with currency converters, blog post formats, parallax options and Geo Locations to your advantage.
9. Square – Real Estate WordPress Theme
If you are running a real estate business website powered by WordPress, then you should check out Square. One of the most feature-rich and stable real estate WordPress themes.
You have beautiful spaces and gallery options, along with templates to help you get started with the theme. There are 8 variations to choose from and with so many grids and layout options within them, you can have yourself a professionally designed real estate website in no time.
You can use fonts of your choice since Square supports Google Fonts and create animated sliders for an even better look. The theme is SEO ready and responsive, so users with hand-held devices will have no problems viewing your website wherever they are.
10. Landmark – Real Estate WordPress Theme
With Landmark, you get 4 columns and a responsive theme that will help users view your WordPress website on their handheld devices without problems.
Being responsive is not new, but Landmark also brings in SEO optimization within itself, a mega menu and optional navigation options. With WooCommerce support, you can start selling without problems. One of the highlights of Landmark is that it also brings in WPML support for automatic translations.
There are 6 demos that will be helpful before you confirm the theme, and with the premium package, you get 24/7 support from the developers. Another cool feature I would like to mention is that this theme also includes social media buttons so sharing content is also possible.
11. CitiLights – Real Estate WordPress Theme
Welcome to a more modern and stylish real estate WordPress theme. CitiLights is one of the best real estate WordPress themes you should try in 2019 because it brings very helpful features like revolution slider, a responsive structure, agent profiles, and a neat and clean property listing interface.
Citilights brings with it Frontend Submission and Agent Profile, which is very useful in bringing a cleaner and more user-engaging listing for properties that you won’t find in most themes nowadays.
Citilights also bring IDX plugin so your listings are detailed and easy to navigate for your users. Even though the theme works great in the Free version, with the premium package you will get even more features to play with like payment options, geotagging and pay per submission options.
12. Solus – Single Property Theme
If you have a real estate listing WordPress website, then Solus is the theme you would love. What is special about Solus?
Solus brings in XML demos so you will be seeing how your WordPress website performs without confirming the theme. This theme is also HTML 5 supported to support front-end development so you will have no issues making the theme look exactly how you want.
Solus is made for developers and seasoned users, because even when customization might require some getting used to, overall, this is a very good property listing theme. There are full-width headers, footers, sliders, and templates to play around with.
Also, since Solus comes with Contact Form 7, you can also include other features like subscription options on your WordPress website. Try it out and let me know what you think.
13. Oikia – Real Estate WordPress Theme
A real estate business owner would love Oikia. This is a theme for business professionals and those who seek quality in theme development on WordPress.
You can customize Oikia to your heart’s content but you should know that this is a more business-related theme, so many features like animations and transitions that you seek, might not be present within this theme. But, I really adore the way this theme presents property listing.
The theme has a dynamic map, widgets, search from Bing and Google, and multiple colour choices for backgrounds. The theme is paid and with it, you get support and lots of updates, making Oikia one of the best real estate WordPress themes for property business owners.
14. Nest – Real Estate HTML Template
Nest is based on Bootstrap and coded with HTML 5, CSS3 and Ajax. This means that you can not only customize this theme, you can also make sure it is compatible with the most popular formats, plugins and extensions.
Even though it is developed for property owners and companies, users can upload their properties with ease like a classifieds website. With Visual Composer, you can enhance the look of this theme even more without breaking a sweat.
Overall, Nest is a simple real estate theme that provides all the features for a classifieds WordPress website. Let me know if you tried sharing a property ad on this website.
15. EstateEngine
Last on my list of the best real estate WordPress themes is Estate Engine. What makes Estate Engine a good theme is the clean interface, without the extra bells and whistles that other themes provide.
Estate Engine brings in grids and property listings that are easy to understand and users will find it very simple to upload media and information about their properties. The grid list and gallery options will give more options to customize the theme to your taste.
Another good feature I found in Estate Engine was the ability to support multiple payment gateways like Paypal, Stripe and wire transfers. Check this theme out and let me know if you liked it or not.
Conclusion
There you have it. These were my 15 real estate WordPress themes for realtors and companies that I think you should try in 2019. All the themes I mentioned in this list have their pros and cons but all of them will bring something new for your design and features. Some themes are minimal while others are feature-packed, but choosing one for yourself will depend on the type of real estate WordPress website you have in mind.
Did I miss out on a great real-estate theme you know? Let me know in the comments box below, I would love to know your opinion.
In the golden era of technology, we as humans find ourselves less fascinated by the machine-like design most websites boast, and more attracted to conversational design. But, that does leave us with one overwhelming question: What the heck is conversational design?
What the heck is conversational design?
Conversational design isn’t as foreign as it sounds. In fact, you’re probably very familiar with the concept.
For websites, conversational design is considered user-centric design. Basically, that means that instead of conversing through a computer screen, the content is designed to sound more like a face-to-face conversation.
Why is this a good idea? Well, that’s a concept you’re probably pretty familiar with, too. People don’t want to talk to read content that sounds like it’s computer-generated. They want to have a conversation, not be lectured.
Overall, this design tone is very polite. And, as you can imagine, this can change UI and UX completely. Right now, one of the most conversational design elements is that of a chatbot.
Can you ever remember a time when you had a question, sent it into customer service via live chat, and you got the generic reply:
“One of our agents will be with you shortly. Average wait time: 5-10 minutes.”
It’s awful. For me, I don’t seem like a priority in the slightest. In fact, I feel like they don’t even want to talk to me. Maybe I’m overreacting a little, but think about how much better you would feel if instead, the automated chatbot replied with a:
“Good afternoon, and welcome to [insert company’s name]! Please bear with us as we connect you to someone who can help.”
There are two very different tones here. In the first, you have a very unenthusiastic voice, putting you in a line, and simply hoping that you hang up.
The second, although it’s not much longer, not only implies that they’re happy you’re here, but it sounds like there’s actually a person that typed that out.
Tips to pulling off conversational design
Remember, conversational design is not just text on a screen. It’s anything that can alter the UI/UX. So we’re talking about any interactions as a user might have. Of course, this does mostly come off in your tone of voice, but you can still apply the following tips to things like machine learning with chatbots, or even video content. It’s all about making them feel like they’re part of a friendly conversation.
Be human
This is the biggest tip than anyone can give you, and it’s actually pretty easy. Just remember that conversational design is not always the most convenient for you. Instead of just typing out a ton of information, you have to consider how the reader will actually read it. Remember, it’s a conversation!
Avoid ending the conversation
This can be a little bit more tricky. You always want to give the user the option to end the conversation. So we’ll use the example of a chatbot again.
Chatbots have the ability to decipher what most people are saying, but sometimes there just isn’t an answer that they can give. Instead of not replying, or replying with an “I don’t have an answer for that,” you could give them common queries by other users. This way, they always have an option.
Use loads of rich content
We live in a day and age where people want to be constantly entertained. But with that said, it does go too far sometimes. Videos, images, and playful designs are a great way to engage your users in a conversational way without actually having a conversation.
Of course, there are lots more ways to strike up a conversation, but these are just a few of the basics. The key is to have a rhythm and stick to it.
How to design a conversation
When I say design a conversation, I imagine that a lot of you are picturing an image like the one above. Fortunately, it’s not all that hard. In fact, there are a few very basic steps you can take to get started:
Create an outline
Like an essay or article, there needs to be an outline first. This will act as your structure for any conversation that could take place. This might be questions people may ask, keywords within the questions, or both.
Create a conversation flow
You have to connect the dots in the conversation. Basically, your bot has to know what to say and the order in which to say it, all based on the answer from the user. This includes the main flows, which consists of a few conversation routes the user can take.
The bot script
Now, you have to create a friendly and conversation script. Again, remember that the golden rule is to be human. Make it sound like a real human being is answering them, not a robot.
Greetings and goodbyes
You definitely need to have a friendly greeting and goodbye for your bot once the conversation is over.
Safety net
Let’s be blunt for a second and just say that there’s a 100% chance that your bot will break. Technology is nice, but it’s not perfect. You’ll need a sort of safety net response to help you in these situations. A message like, “Um, I got super confused. Can we start again please?” Goes a long way, and it lets people know that there really isn’t a response made for that particular question yet.
Why you need conversational design
The short answer to the header above: most people like conversations. The long answer: People like to feel important. Nothing can make you feel less important than short and very vague answers.
A great example of conversational design is Apple’s Siri. Now, I know what you’re thinking.
“I can think of so many times when Siri didn’t do what I asked.”
But, let’s think about how much Siri has evolved since release. Let’s think about Siri directs us when she doesn’t understand. And since she’s connected to the internet, she can look it up there if she doesn’t have an answer. She can even tell jokes.
I think as far as conversational design in AI goes, Siri has nailed it. At least on a basic consumer’s level.
Start your conversation
Don’t get me wrong, there’s a lot all of us could learn about conversational design. The fact is that it’s not an exact science at all. There will always be times where you fail, but there will also be plenty of times where you succeed.
The key is to follow the main points I gave up above, use the steps we listed for designing a conversation, and remember to think about your design not as text on a screen, but words with a real person.
With the advent of digital technology, more and more businesses are starting to establish their online presence on the internet each day.
However, in the process of launching a website, one should pick the right web hosting service to avoid problems.
These days, a lot of companies out there offer seemingly excellent hosting plans, such as 99 percent up times and other relevant features. But without enough information about web hosting, it can be quite challenging to pick the right service provider that can cater to your needs.
To help choose a web hosting service that’s right for you, you need to focus on your common web hosting troubles and how you can keep away from them.
Recurring downtimes
This is one common problem that will surely undermine your site. Not to mention, it can cause you a lot of stress in the long run. These regular outages will negatively impact your site traffic, and even cost you to lose your audience.
But admittedly, even the best hosting providers out there do have downtimes. The problem begins if these downtimes are constant and worse than that. Your web host can’t give you a clear explanation of why it’s happening.
So before signing up with a web hosting provider, double-check their claim first. Even a host that claims they have 99 percent uptime isn’t always the case. Read online reviews of their previous clients, and also check their websites.
As much as possible, read independent review sites versus those PR write-ups that you see online. Chances are, some of those are just masquerading themselves as reviews.
Hidden charges
In one way or another, you might be enticed to sign up for a web hosting package for dirt-cheap rates. The next thing you know, you’re already paying more than it’s advertised prices, and specific extras and add-ons pile up in your bill without you knowing.
What you can do is to read carefully what the promo is all about. Check the exact duration that you’ll be enjoying the promo before the offer goes back to its original rate.
A lot of web hosts out there give lower rates if you sign up with them for an extended period. Meaning, you have to pay a little bit higher if you’re only signing up with them for about three to six months.
Ideally, web hosts should be transparent with users and should tell them of these costs upfront.
The moment it becomes a bit shady with its billing system and rates, then it’s better to look for another web hosting provide elsewhere. To know which web host works well for you, make sure to read and see hosting reviews online.
Low level of security
There are some web hosting companies who won’t be able to protect you from receiving malicious attacks, getting hacked, and to identify any theft going on.
For some, it will just give its users a false sense of security just to get hosting orders. Thus, a web hosting company needs to assure its customers that it’s safe and secure to run business transactions on their sites.
Before you pick a web hosting company, see first whether or not it’s giving you the required security that you need or not. Only if you’re satisfied with its security terms should you work with them.
For instance, if you have a growing business, you should seriously consider getting a dedicated or VPS hosting. For shared hosting, there are various levels of security.
Search for a web host that has a secure data center and enables two-factor authentication. That way, it’s more difficult for unauthorized parties to access your site.
Slow website loading speed
You depend on your web host to keep your site up online. Ideally, you want to have a fast and reliable server, so that visitors and customers can access your pages quickly.
Keep in mind that people these days have extremely short patience when it comes to slow-loading sites. Even a delay for just a few seconds can make you lose precious leads.
Keep in mind that several factors significantly affect your site speed. If you have images that aren’t optimized and have so many videos on your site, this can also cause slow site speed. If you’re on WordPress, then using too many plug-ins can be the culprit as well.
Lack of scalability
An excellent web host makes it convenient to scale your business. Remember that your business might continue to grow and evolve, and so does your needs.
For instance, you might need to upgrade from shared hosting to a VPS or a dedicated hosting server, so does you host to let you have an unlimited data transfer?
Make sure that you work with a host that will grow along with you, and is flexible enough to meet your needs.
Unreliable support
If you run into technical issues and problems along the way, see to it that you have a reliable support team to get in touch with. Always getting a busy tone when you call, or getting an email days later can be frustrating.
If you want to know if a web hosting company does offer their support services 24/7 (as advertised) try calling during late at night or on weekends.
See to it that you’re asking about the package you’re eyeing and other related queries and if they can properly address those questions.
Over to You
Those are the primary things that you need to consider when picking a web hosting provider to work with. You must work with one that carefully considers all your needs.
If you own a website, you should have at least heard the term AMP before. If you haven’t, it’s likely you will hear more about it very soon.
Google’s Accelerated Mobile Pages (AMP) Project has impacted the user experience of millions of mobile web users since its initial launch in 2015. Though primarily used to help website owners build interactive sites that load fast on mobile devices, this project never fails to impress with new and improved features, despite some people’s inability to keep up.
Google recently announced one such feature – Swipe to Visit – in late July of this year. Designed to make it faster and easier than ever for users to view images on mobile devices, this feature also makes accessing those images’ webpages a cinch. All you have to do is search for an image, view the website header preview, and swipe up to be redirected to the website.
This begs the question: Is all of this really necessary?
Of course, Google claims that this is dedicated to improving the user experience, but is having to support projects such as AMP something that should be required by all website owners looking for higher search engine results pages (SERPs)? Or is this just another excuse for Google to control what happens on the Internet?
While there are good arguments on either side, one thing is for sure: Swipe to Visit will change the way people view images and access websites on their mobile devices. You’ll need to decide whether this is something you want to support or not, after you understand the good and the bad of AMP.
Why Is AMP So Important?
When your mobile webpages take forever to load, don’t work right, or force people to zoom, pinch, or rotate their devices, you risk losing a reader instantly. Poorly optimized mobile web design and clunky advertisements ruin the user experience. Google understands this.
In an effort to improve the performance of the mobile web, Google teamed up with Twitter to launch the AMP project. Has it worked?
If you’re a publisher that relies on advertisements, you stand to generate up to three times the ad revenue each day and see your ads load five seconds faster by implementing AMP pages.
Whether you’re a fan of Google AMP or not, there’s no denying that the Swipe to Visit feature is a good thing.
Every person out there with a website is vying for the first page in Google SERPs. However, Google has made it increasingly hard for websites to rank organically, seeing as paid ads and featured snippets are dominating the first page these days.
On tiny mobile devices, this means your website isn’t initially seen much of the time, even if it’s on the first page.
What if we told you that appearing in specialized Google image searches would allow your website to rank higher? Using Google AMP and Swipe to Visit does just that.
Thanks to the unique way people can instantly access your website with a simple swipe, you can not only expect better search rankings, but higher clickthrough rates and lower bounce rates.
Swipe to Visit makes it simple for site visitors to scan images, compare offers, and make better purchasing decisions, all of which are considered by Google to be best practices (and award your higher SERPs). This means that anyone adopting Google AMP pages will automatically enjoy more site traffic from image searches.
The Criticism of AMP
The other side of the coin is that there are a lot of problems associated with AMP.
The truth is that implementing AMP pages is not that easy. Even some websites that do enable Google AMP pages don’t get the results they expected simply because they didn’t do a thorough enough job implementing AMP throughout the entire website.
Criticism from experts centers on the fact that AMP mainly works because it’s so restrictive. Imposing limits is ultimately how AMP reduces load times and bandwidth use.
Further, a good amount of third-party software doesn’t yet work well with AMP, which can hinder functions like data tracking.
To utilize Google Analytics tracking, AMP requires that every single AMP page uses a unique analytics tag, which can be a burdensome task from the start for large websites, if the tags are added manually.
There are also other things to think about, such as:
There are still branding limitations since JS and CSS aren’t used
AMP only works if users click your AMP-enabled webpage
Even WordPress-specific AMP plugins aren’t always easy to use or compatible with other plugins
Lastly, development has been relatively slow-paced in the AMP world. While 30+ million domains have adopted AMP pages, that’s nowhere near recognizable enough for the average mobile user to realize they’re using (and benefiting from) AMP pages.
Final Thoughts: To Adopt AMP or Not?
The Google AMP project is a great concept with the goal of improving the user experience and helping website owners reap the benefits of said user experiences. When it comes to helpful features like Swipe to Visit, this project becomes even more valuable. However, until AMP pages become more mainstream in mobile results, the time and effort it will take to overhaul your site and implement AMP may not be worth it right now.
In the end, every website owner has a different set of circumstances. This means that enabling AMP on an entire website, on just certain pages, or not at all, might be your best solution.
As the competition continues to stiffen in the online world, it’s going to become more important than ever to consider all the tools available at your disposal, including AMP pages, and determine how these tools can be used to help you achieve your goals.