How to Install Facebook Pixel on your WordPress website

Facebook has become one of the greatest ways to bring your products to your customers. It allows you to display products through a Facebook business page.
Therefore, you can promote your products via Facebook ads or posts on a business page. The advertising, remarketing, and retargeting capabilities of Facebook are incredible.
While running a WordPress-based online store, Facebook advertising capabilities will bring you the best output according to your budget. Hence, you need to learn how to install Facebook Pixel on your WordPress website. That is because it’s crucial for online businesses to reach the right audience with the right product.
In this article, we will guide you through the processes of installing Facebook Pixel on your WordPress site. This step-by-step guide will assist you in running your online business smoothly via Facebook pixel.
What Is The Facebook Pixel?
On Facebook, you will find various advertising tools with unique features to help you grow your business. Facebook pixel is one of those tools where you need to invest some time to understand and utilize it. Therefore, you need a clear understanding of Facebook Pixel before using it on your WordPress site.

The Facebook Pixel is basically a piece of JavaScript code that leaves cookies on your website to monitor user activities. As a result, you can reconnect with your online store visitors later and offer them ads based on their activities. You can also measure the efficiency and productivity of your Facebook Ads via Facebook Pixel.
Facebook Pixel allows you the options to understand the behaviors of your site visitors while they are using their Facebook account. Therefore, installing the Facebook pixel is a must if you are running an online store or promoting via Facebook Ads.
By using Facebook pixel on your WordPress site, you can:
- Target every type of customer that visits your store
- Analyze conversion by tracking user behaviors accurately
- Enhance the efficiency of your Facebook Ads by optimizing it
- Promote your products to the right audience at the right moment
- Target and retarget your current and previous website visitors
Let’s say you are not willing to promote products via Facebook Ads; still, it is essential to insert Facebook Pixel on your site. Why? By pixeling your visitors, you will get an idea about the product preference of your site visitors. As a result, you can advertise to those visitors and set up an ad campaign accordingly.
How does Facebook Pixel Work
The Facebook Pixel and Google analytics both work almost in a similar way. How?
Let’s pretend someone clicked on your ad, was taken to your online shop, and bought your product. As a result, the Facebook Pixel will be triggered, and you will get a report of your customer’s activity that just occurred. Additionally, you will get a specific report on your customer’s actions on your Facebook Ads (clicks, shares, buying via ads), thanks to the Facebook Pixel.
In the future, you can easily target all your customers again, utilizing a custom audience. Moreover, the Pixel feature isn’t just assisting you in targeting those who completed the purchase process. It also allows you to target shoppers who only clicked your ads, showed some interest, added products to the cart, and left without purchasing.
According to Facebook, the pixel is a piece of JavaScript code that enables you to monitor website visitor behavior. It works by loading a tiny library of functions that you can call whenever a site visitor performs any activity (referred to as an event) that you wish to monitor (called a conversion). Tracked conversions data are displayed in the Facebook Ads Manager that is required to analyze the success of your website’s conversion funnels, establish custom audiences for ad targeting, and monitor the impact of your ads.
All the customer activities on your site are called “events.” There are 17 standard Facebook events that usually take place on a website. Standard events can be utilized to track conversions & optimize them and increase the audience. The standard events for the Facebook pixel are listed below:
| Website action |
Description |
| Add payment info | When a customer add payment information on a checkout process or click a button to save their billing info |
| Add to cart | Adds a product in a shopping cart or clicks the add to cart button |
| Add to wishlist | Adds a product on a wishlist or clicking the add to wishlist button |
| Complete registration | When a user completes a registration form on your website |
| Contact | When someone contacts your business via a website |
| Customize product | When Someone selects a specific color or category of your products |
| Donate | When someone donates on your website for a specific cause |
| Find location | When someone searches for the location of your business |
| Initiate checkout | When a shopper initiates the checkout process |
| Lead | When a user signs up for a trial service or submits a form |
| Purchase | When a customer completes the purchase process on your website |
| Schedule | When a user schedules an appointment to visit your service location or business |
| Search | When a user searches for something on your site |
| Start trial | When someone starts the trial version of your service |
| Submit application | If someone submits an application to get a product, service, or program on your website |
| Subscribe | When someone subscribes to a product or service on your site |
| View content | When someone views content on any page of your website |
You can customize the standard events by adding a few extra lines of code that are called parameters. Therefore you can add more factors such as – The worth of a conversion event, event, content type, and long-term value that was predicted. As a result, you will be able to track pixels for a specific scenario. For example, finding out the specific category that was viewed by your customers through the tracking pixel.
The Process of Installing Facebook Pixel on WordPress website
Now that you’ve learned what is Facebook pixel is and how it works, it is time to get to the main point. Let’s hop into the process of installing Facebook Pixel on your WordPress website following the easiest process.
There are two different methods of adding Facebook Pixel on your WordPress website:
- Manual Installation with code – This option is handy, and you can add the code manually. But to get the code, you have to get into the Facebook ads manager and collect it.
- With a third-party integration or plugin – There are several plugins on WordPress such as Official Facebook Pixel, Insert Headers, and Footers, Pixel Caffeine plugin, CTX Feed Pro, etc.
Installing Pixel with the official Facebook Pixel plug-in
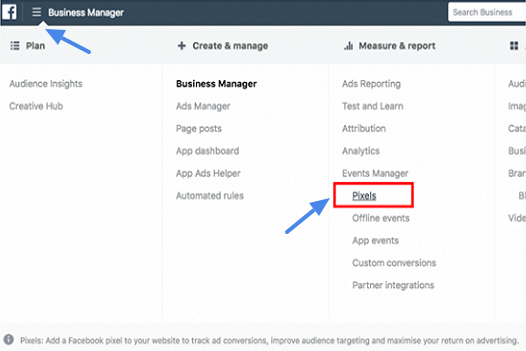
Step 1: Heading to the Pixel on Business Manager
First of all, sign in to your Facebook account and then head over to the Facebook Business Manager. Sign in and then click the hamburger icon on the upper left corner of the page beside the heading “Business Manager.” A menu will open up where you need to select Events Manager > Pixel.
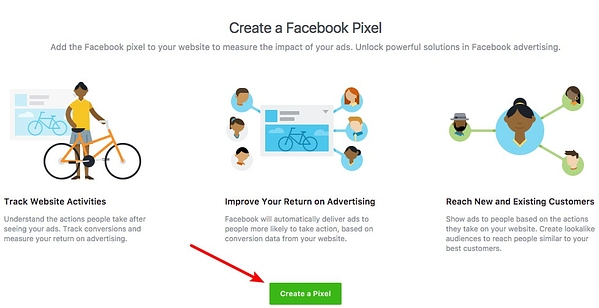
Step 2: Selecting the Pixel Setup Method
After clicking on Pixel, a page will appear with the heading “Create a Facebook Pixel.” On this page, you have to click the button – Create a Pixel.
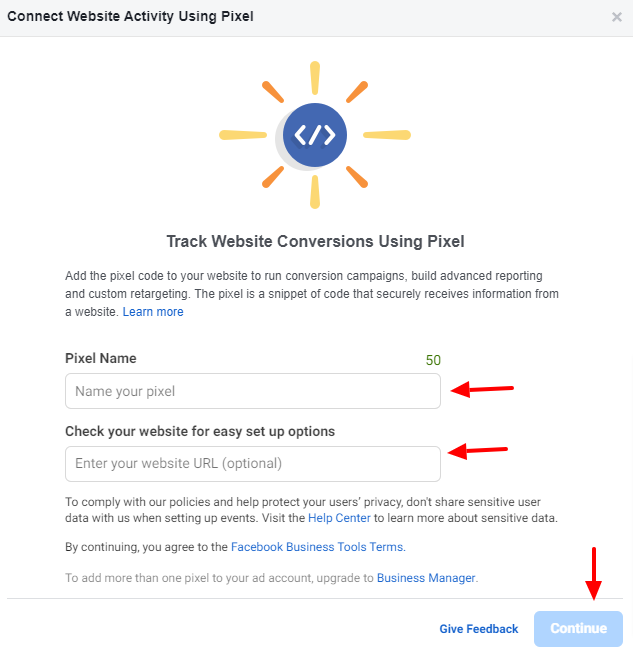
Now you can enter your preferred name for the Pixel and provide your website URL (Option). If required, you can change the name of the pixel later. After providing the information, click Continue to proceed further.
At this point, a pop-up box will appear, including a message “Download Your Pixel Key” after getting a message about the progress.
From the pop-up box, select the Use an Integration or Tag Manager between three options.
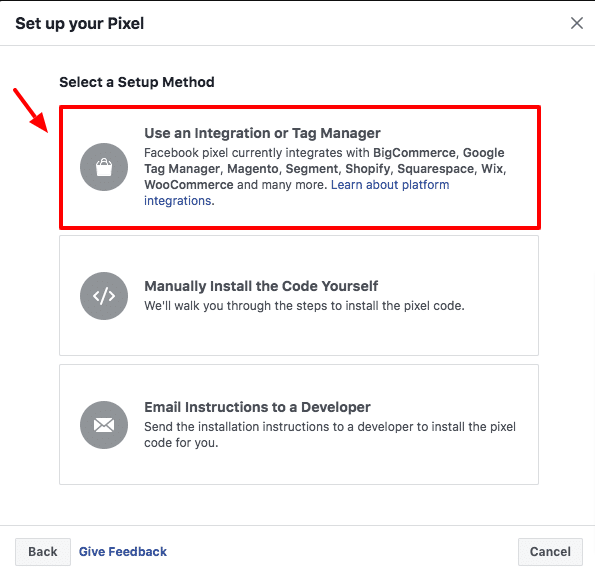
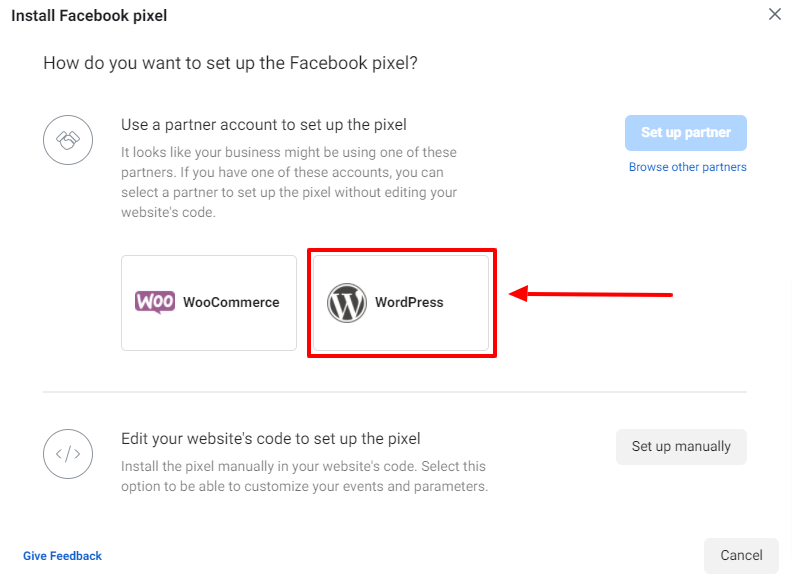
By Clicking the first option, “Use an Integration or Tag Manager,” you will be presented with another pop-up window that will offer your different website solutions such as WordPress, Wix, Shopify, BigCommerce, and more. As you are going to set up Pixel for your WordPress website, select WordPress from the window.
Step 3: Facebook Pixel plugin Setup Method
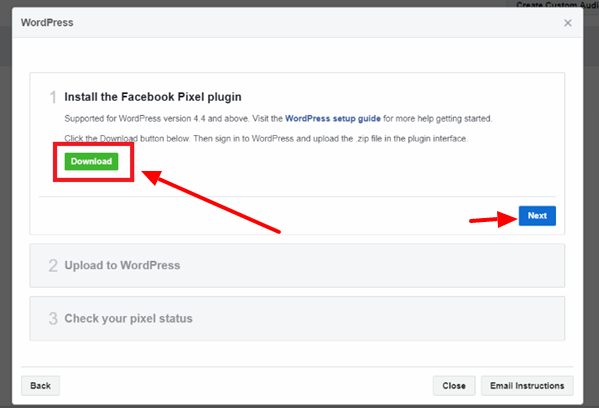
In this step, you have to download the Facebook Pixel plugin in order to install Facebook Pixel on your WordPress website. After selecting WordPress on your previous step, you will be given an option to install the Facebook Pixel plugin via a pop-up window. Click the Download button to download the Facebook Pixel Plugin.
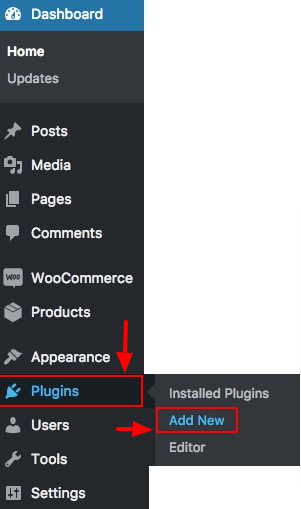
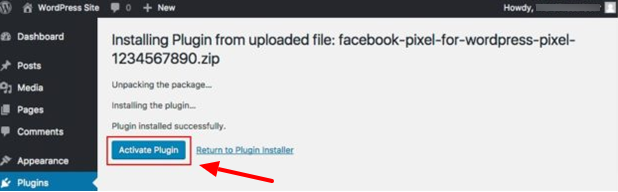
After downloading the Facebook Pixel plugin, you have to upload it and activate it through the WordPress dashboard. Therefore, you have to sign in to your WordPress website and then head to Plugin > Add New section by clicking those.
Now, click the “Choose File” button and upload the plugin by selecting it from your download directory. After selecting the downloaded plugin, click the “Install Now” button. When the installation process is finished, click “Activate Plugin” to finalize the setup process.
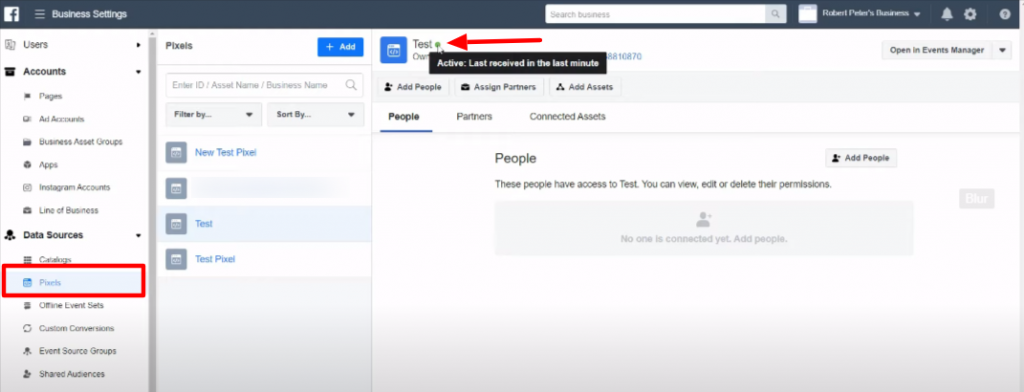
Within thirty minutes, head back to the Ads Manager. Click the Breadcrumb on the top left corner of your screen and head to Data Source> Pixel. Now you can see pixels that you’ve created. Just beside (right side) your pixel name when the dot becomes green from red indicates that your pixel is successfully activated.
Installing Facebook Pixel on your WordPress Website Manually
In case if you don’t want to install Facebook Pixel via a plugin, you can complete the whole process manually. The process is not as complex as it sounds. You can follow the process stated below:
- Create the Facebook Pixel if you haven’t created one already.
- In your WordPress site’s section, paste the tracking code from the Facebook pixel.
Step 1: Creating New Pixel and Collecting the Code
Let’s start this process by heading to the Pixel tab on Facebook Ads Manager. If your Facebook Pixel is not ready, we recommend you to follow the previously stated Step 1 and step two at the beginning. Consequently, you have to select the manual installation process and for that, firstly click the “Create a Pixel” button.
Now on the pop-up window, select the “Manually Install the Code” between three options.
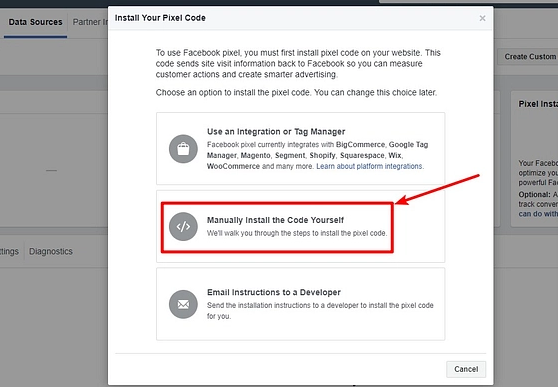
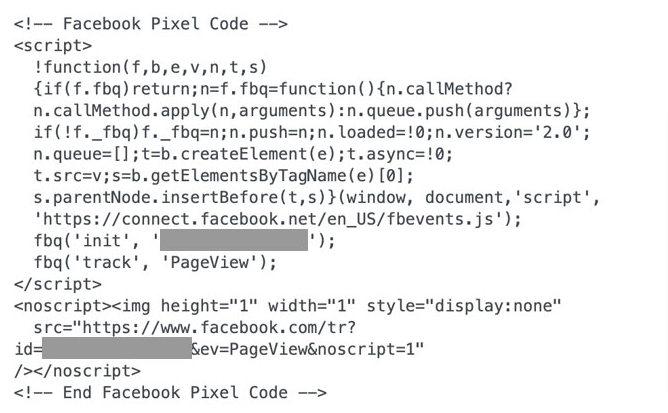
Right after selecting the manual installation option, you will be presented with the Facebook pixel tracking code. This is the piece of code that you need to use on your WordPress website. Therefore, keep this code copied on your system.
Step 2: Inserting the Pixel Code
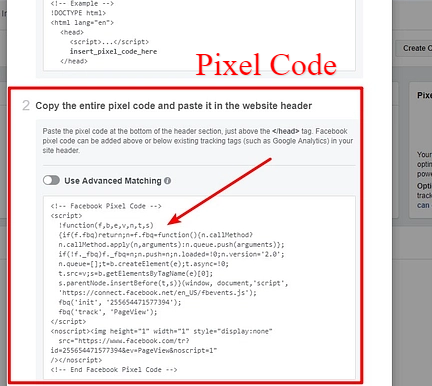
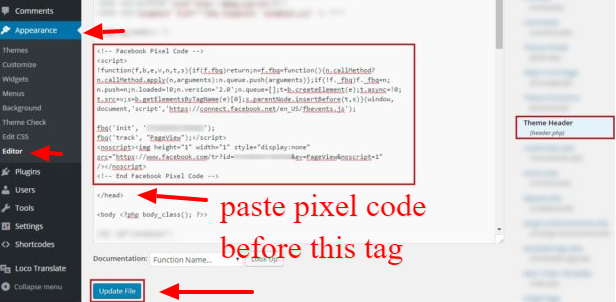
Sign in to your WordPress dashboard to manually insert the pixel code in your WordPress website. Now, go to Appearance > Editor, where you will get the theme’s header.php file. You can search out the tag easily from the header file.
Before the tag, paste the Facebook pixel code and update the file. You have successfully added the pixel to your WordPress site.
Some WordPress themes will allow you to install scripts to run in the header or footer section. Moreover, there are plugins such as Insert Headers and Footers, CTX Feed, Pixel Caffeine that you can utilize to install Facebook Pixel on your site. These plugins will allow installing the pixel on your site easily. That is because you don’t have to paste the code into the header section manually.
Testing if Facebook Pixel is Working on Your WordPress Site
When you are done adding pixels to your WordPress site, make sure it’s working properly. Hence, you need to install the Facebook Pixel Helper Chrome extension.
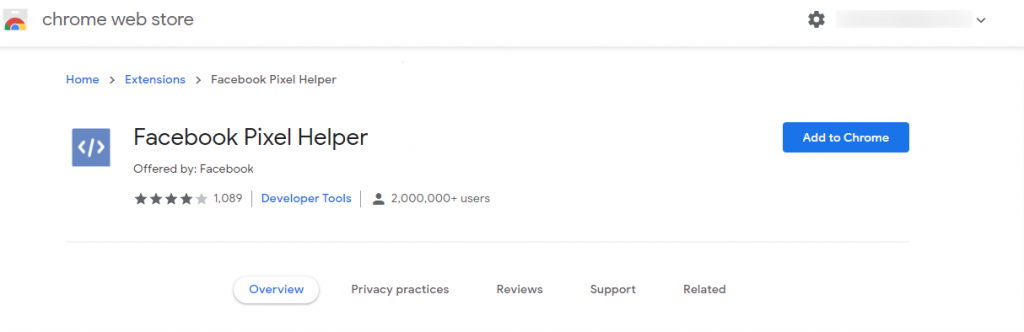
After installing and activating the Facebook Pixel Helper plugin, head back to your WordPress site via Chrome Browser. When you click on the extension, you should see something like this:

And there you have it! Now you can track customer conversion, take a remarketing approach, and make decisions by creating custom audiences. That’s all there is to do when it comes to adding Facebook Pixel to WordPress.
Conclusion
You have successfully learned the process of installing Facebook pixel on your WordPress site. So, Facebook Pixel is not as hard as it sounds, right? Now, you can set the roadmap for your business with precise targeting and retargeting opportunities. Additionally, you can optimize your ads according to your pixel data and get outstanding results.
However, we recommend online business owners integrate Facebook pixel on their WordPress site right away. We hope this article helped you understand the importance of Facebook Pixel and guided you thoroughly.
