Don’t confuse activity with productivity. Many people are simply busy being busy.
Robin Sharma
Productivity lies at the heart of every business. If you and your staff are more productive, it will directly affect your business’s profitability. Moreover, the benefits of productivity are apparent and widely felt by various companies.
You can’t add extra hours to a day, but you can automate tasks to improve your productivity. But, how will you do it? Is it expensive? Which things can be automated? These quotations are obvious.
To answer these questions, Let’s look at the top 10 apps that can help you improve your work productivity.
Expensify – Expense Reports
No more, you need to keep the bills and receipts for a long time. Instead, you just have to scan it in the Expensify app, and the app will automate the rest.
Every business needs to make and maintain an expenses report. However, it is a hectic and time-consuming task. However, with the Expensify app, you can create real-time expense reports with just one tap. Moreover, the app has advanced features like converting currencies.
Cost: Expensify app costs as low as $4.99 per month; however, it can be increased depending on tracking and scanning capabilities.
Invoices are the essential thing in every business. You need invoices for getting paid, tracking and recording transactions, and filing taxes. However, creating an invoice manually can take significant time and effort.
But the good news is that apps like Billdu can quickly create professional and customized invoices for your business. As a result, it will improve your productivity and help improve cash flow by faster the payment process.
Billdu app offers ready-made invoice templates that can be customized. The app also works offline. Additionally, the app also allows accepting payments through Paypal and Cards.
Cost: The app provides a 30-day free trial and offers three different plans, between $3.99 to $16.99.
In the digital era, Social Media is one of the best ways to connect with prospects and consumers. Therefore, every small business needs to leverage social media to communicate with customers and generate leads for your business. But building a social media presence requires consistent efforts.
Hootsuite app helps to improve the productivity of the social media teams by planning and publishing content. With the Hootsuite app, you can quickly post content on different social media platforms from a single app.
Moreover, the app helps engage with customers, monitor post-performance, connect with customers, assign customer inquiries, etc.
Cost: The app provides a 30-day free trial and offers 3 different plans for $3.99 to $16.99.
factoTime is specially designed for small and medium-sized businesses for attendance management and payroll automation to help business owners/managers. The app can be helpful for both employees and employers.
Employees can mark the attendance Punch with a selfie and location or QR code, Apply for the leave, Check the salary details, etc., directly from their mobile phone.
While employers or managers will get to know all the data of the employees’ timing, leave, and salary and can download the reports as per their wants. You can use ICICI bank for complete salary automation. The app provides all the employee management features on your mobile phone.
Cost: factoTime provides a free trial and offers affordable plans that start at just $0.99, which goes up to $1.49 per month per employee.
Canva might not seem like the most productive app on a list, but it is one of the most useful and time-saving apps. Every small business needs infographics for virtual communication while it requires graphic skills and time to design it. That’s where the Canva app came into the game.
It is an easy, simple, and highly effective way to design graphics for your business. The app provides free images, photo frames, charts, design grids, badges, and stickers. This feature-rich app helps create colorful graphics quickly with varieties of pre-made templates without any special graphic designing skills.
Cost: Despite everything, the app is free for core features and charges $12.95 for advanced features.
The more time management the person does, the more productive that person is. There is a direct relationship between time management and productivity. If you are the person or business that provides service and meets many people in a day, then the Acuity app will work like magic for you.
With this app, you can schedule all meetings in one place. The app can help schedule appointments, send endless emails, send reminders via SMS or Email. By using this app, you will never miss an important meeting. You will also get to know about your free time with just one tap.
Cost: The app offers three plans that start from $14 to $45.
Managing knowledge and essential documents are essential for any business. However, managing all documents is an inconvenient and time-consuming process for the company. That’s a problem solved by Evernote, the digital notes app.
The best thing about the app is it keeps all the things organized. The app is available in android and ios phones that sync with the desktop version. You can write a note down ideas in the middle of the night, in between the meetings quickly. You can easily store and share important documents anytime and anywhere.
Cost: The app offers basic features for free and charges $3.99 and $7.99 for advanced features.
Every list of essential business tools is incomplete without the name Hubspot. Hubspot is the perfect CRM app for small businesses. The app can be integrated with websites, social media, and email service providers.
HubSpot said, “Organize your contacts, get deeper insights on every lead, and monitor deals with ease — all for free.”
With the help of the HubSpot CRM app, you can collect your customers’ contact and other details through various platforms. In addition, the app streamlines all the data of the prospects and customers, making it easy for you to get in touch with them.
We can be more productive and organized if we visually things better. Based on this principle, the Trello app is built. The app uses a Japanese technique named kanban to manage the project better.
Trello allows you to break down big projects into small task chunks by creating “cards.”
This card is easily movable according to the priority of the task. As tasks get completed, cards are easily transferred from one column to another.
Having well organized helps employees work better, making managing projects less stressful and enjoyable.
Cost: The Trello app offers essential services for free; however, if you want to use the advanced feature, you have two options: a business class plan and an enterprise plan, which costs $9.99 and $20.83 per month.
Effective communication is the key to success for every business. A smooth communication channel can help to improve productivity and workflow because it directly influences employees’ behavior. If you are looking for a great communication app, Slack is one of the best communication apps. Unlike most productivity apps, slack isn’t only made for small businesses but can also be used by everyone.
Slack lets you share files, one-to-one chat, group chat, and community participation. It makes smooth and effective communication to communicate and collaborate with someone in real-time. In addition, the excellent security feature of the app makes it a protective platform for sharing crucial information.
Cost: The app provides free basic service, and the paid plan starts at $2.67 per month to $5 per month.
If you want to become more productive, the above apps can help you out as a business. Achieve your productivity goals by researching and experimenting with apps made to help your business succeed. Then, we recommend signing up and using it and discovering which one works for you. After using this app, you will have more time to level up your business.
Every company takes appointments and schedules them as per the availability of the concerned person. The appointments are a source of income for every company. Therefore, more appointments will lead to more revenue. When the appointment scheduling is done manually it will lead to some errors which can cost the company the loss of its clients and downfall of profit.
So many companies rely on online meeting scheduling softwares to avoid errors that help the organization work more efficiently. The toll intensifies the growth of the business. It is designed with AI features to give a friendly experience to users. Every business type such as health and fitness, nutritionist, salons, and many more like them make use of software to fetch appointments. The business that is small, big, or owned by solo entrepreneurs prefers to take the help of software. As a result, it cuts the cost of the employee that is hired for specific tasks or bookkeeping.
5 common mistakes that can impact the business
Complicated scheduling process
It is the responsibility of the staff to keep the Appointment booking procedure simple. While handling the documents and client data, there is a chance of misplacing or losing important files or information.
In addition to this, the clients can receive the same date appointment which will lead to the overlapping of dates.
The majority of the population is technically sound and therefore, finds scheduling appointments online easy. The software gives an easy navigating experience to its users so that they can easily find the steps to book an appointment. The users will get an instant message if they try to book the taken slot or the software will only show the available slots which can save a lot of hassle.
The clients will find it more engaging to follow a self-explanatory procedure of appointment booking online.
No Follow-ups
When the client books the appointment, the task does not end there. Besides scheduling the appointment, it is mandatory to take follow-ups. People usually forget the booked webinars, meetings, or other events which can lead to no-shows. Above all, if there is a huge rush of clients in a day as a result, follow-ups are hard to make by the staff. The software has a feature to store the information of the booked date for an appointment and take the follow-up if there is no show on the date.
Therefore, The Online Meeting Scheduling Software is very much beneficial as it has automated features to take follow-ups via emails, SMS, or text messages. It is crucial to maintain engagement with clients to avoid the loss of resources spent on retaining potential users.
Fail to send reminders
Since the staff member handles a lot of clients during the day, many of them miss on sending regular reminders. No doubt, the client has booked the appointment consciously but due to many circumstances, they may miss it. However, it is crucial for every business to notify their clients of every update and send regular reminders.
The Online Meeting Scheduling Software has an inbuilt feature to send reminders to its clients regarding their booked appointments. The automated reminder to clients will reflect our quality services and customer value. No company would like to lose a nurtured lead that will cost them a fall in revenue.
No Plan of action for missed appointments
Moving next, cutting down the figures of missed appointments is equally important for the business. Unlikely, many appointments go missed when proper follow-up is not scheduled. The organization should take measures to avoid no show.
Firstly, the company should have a powerful strategy to deal with these issues. Of course, the missed appointment is not a lost deal.
There comes the need to identify the reason behind lost appointments which can be the shift of interest to others or services not required. It is very important to know the details so that the company can work on it and can retain its leads efficiently. These details can be fetched using an Online Meeting Scheduling Software. The software usually provide accurate information and insight to understand the business better
No Interactive approach
The interaction of clients with the company bridges the strong relationship. Once the client has taken the services, there are many positive reviews or suggestions from his end. Additionally, it is beneficial for the company to know the quality of its services. Moreover, the staff member tries to take feedback from clients after the services but many avoid giving feedback as they have to rush back to their home or offices.
When the services are good, clients hardly make any effort to leave feedback. On the contrary, Clients get eager to give feedback when they have not received the expected product or services. Feedback works as a detailed report on the business. It gives information about the areas of improvement and the popular services.
The use of software can make the process of collecting feedback simple. Feedback can be collected from the clients via web forms, emails, links, and so on after their every visit as the information such as contact number and email id is stored in the software.
Conclusion
To summarize, technology makes the process much easier and brings down the chance of error that is usually made by humans. However, every company has a dedicated staff member that keeps a check on the booking of appointments, storing data, and keeping it secure. The software is designed in a way that works efficiently without any mistakes.
The services such as storing client data, security to data, managing leads, automated reminders and notification, confirmation, and taking feedback are some of the essential services that the good Online Meeting Scheduling Software possesses. Every business must take the help of software to save time consumed in administrative duties and work on real tasks.
I hope this article is beneficial in understanding the mistakes that people make while scheduling and the importance of Online Meeting Scheduling Software.
Any company’s marketing department is one of the most significant aspects of scaling their productivity and sales. As a marketing team, you need to build a good relationship with your customers and you need to automate the marketing process to scale up your business.
Why customer relationship management is difficult
However, managing customer relationships and automating the marketing process became quite difficult due to the multiple marketing channels and sales processes. If you are not using CRM software and marketing automation tools, Sales and leads are slipping away from you.
Each has a different purpose
These automation tools may appear the same. Despite appearing similar, there is a difference between marketing automation and CRM tools. Consequently, it is important to determine each software’s purposes and how integrating them can benefit your company.
In today’s post, We’ll explain the differences between CRM and marketing automation software to help you decide which one to use in different circumstances.
The key difference between CRM and marketing automation tools:
As CRM and marketing automation tools both aid in customer outreach and relationship building, it is important to know the differences. What makes them different is how they allow you to tailor your approach to each customer and build relationships with them based on their stage of the buying process.
1. Definition: In its most basic form, marketing automation aims to manage email marketing, digital campaigns, scoring, lead tracking, and landing pages. However, CRM ensures the entire sales process is handled: lead status tracking, individual emails, pipeline reporting, opportunity tracking, and task management.
2. Funnel: CRM is primarily used at the bottom of the funnel, whereas Marketing automation is mostly used at the top of the funnel.
3. Target Audience: CRM platforms are primarily used by sales representatives, whereas a marketing automation tool assists teams with marketing tasks.
Some other striking differences
1. Purpose: An MA tool allows you to automate your campaigns by using triggers and conditions. Such tools are often used for sales cycles that are relatively short. Alternatively, CRMs help organizations manage their sales processes, assign sales representatives tasks, and keep their databases organized.
2. Goal: MA platforms help you improve marketing workflows, drive qualified leads, and measure marketing’s contribution to ROI. By implementing a CRM system, you can improve the performance of sales representatives and increase productivity.
3. Business goals: The main purpose of marketing automation is to shorten the purchase cycle. It is useful for B2C businesses that don’t need to reach out to clients extensively or guide them through complex sales processes. CRM is of benefit to businesses that have long sales cycles.
Complex sales funnels are common among B2B and SaaS companies. Their sales funnel requires sales reps to persuade potential customers to advance to the next level of the funnel by converting them.
CRM’s Features:
CRMs can provide your team with real, measurable benefits if they’re used correctly. You might want to consider these benefits when deciding whether to use a CRM.
1. Marketing and sales alignment: CRMs can help with alignment between marketing and sales. The result will be a better understanding of each department’s customers’ sales funnel, allowing them to close deals faster.
2. Collaboration made easy: Your CRM keeps tabs on discussions, interactions, needs, contact information, and notes about your team members. You and your coworkers will be able to access its data easily if it’s cloud-based, and it will always be up to date.
3 striking features of CRM
1. Marketing tailored to the customer’s needs: Depending on the customer’s position in the sales process, you can reach out to them with tailored messages.
2. Personalized communications: By storing detailed information about your customers, you can provide a more personalized experience. You will be able to create more relevant and personalized messages and outreach – both in human and automated campaigns – as you continue to gather data and insights about your audience, industry, and market.
3. Proactive outreach: The CRM can inform the user when some action is required. Being proactive and educated in your sales and customer service saves you time and makes your current and prospective customers feel special.
Marketing Automations tools Features:
To understand how marketing automation works, we must know the benefits of automating our marketing. Consider the benefits of automation. The tool takes an otherwise time-consuming and tedious task, automates it, so you can spend your time on more productive tasks. Marketing automation tools offer the following features:
1. User segmentation: A marketing campaign cannot function without user segmentation. You will have customers that behave differently regardless of who you are or what you do. Your customers and leads can be grouped into segments according to their behavior, enabling you to create targeted campaigns.
2. Make your sales lead more accurate: Poor-quality leads are a waste of money and time. With marketing automation, you will be able to generate highly targeted leads, which will increase the earnings potential of your sales team.
3. Improved interactions with customers: With marketing automation, you can centralize client information so your sales staff has access to it at all times. It enables them to interact more effectively with potential customers.
Customer behavior of automation Features
1. Automated emails targeted towards specific customer behavior: A marketing automation system is essential for automated emails. Send emails tailored to specific leads based on their behaviors and actions.
These emails will contain relevant information based on where the lead is in the funnel.
2. Increased efficiency: Marketing automation can be a great benefit to your business because it can increase your efficiency, eliminate the tedium of repetitive tasks, and help you focus on what’s important.
CRM or Marketing Automation tool: Which is better for your company?
This is a tricky question because the answer always depends on where in the funnel your prospects are. Since both platforms are often able to sync data, you’ll be able to gain access to all data in one place. By synchronizing data both ways, the sales team and customer service team can communicate regarding sales processes and can see customer history.
As an alternative to investing in two separate systems, or if you do not wish to make two separate investments, you might decide on a system that includes a relationship between marketing automation and CRM capabilities.
Final Thought
Because CRM marketing automation is a much broader tool, you’ll find a wide variety of tools available for enhancing your marketing efforts. However, This can be quite confusing and difficult. Hence, speak with a marketing cloud consultant to simplify things.
We recently covered creating fancy borders with CSS mask properties, and now we are going to cut the corners with CSS maskandclip-path! A lot of techniques exist to cut different shapes from the corners of any element. In this article, we will consider modern techniques to create unique corner shapes while trying to work from reusable code that allows us to produce different results by adjusting variables.
Check this online tool to get an idea of what we are building. It’s a CSS generator where you select the shape, the corners, and the size then you get the code in no time!
We mainly have two types of cuts: a circular one and an angled one. For each, we can get the full shape or the border-only shape, not to mention that we can select the corners we want to cut. A lot of combinations!
Like in the previous article, we will make lots of use of the CSS mask property. So, if you are not familiar with it, I recommend reading the quick primer I wrote before continuing.
Circular cut-out
For a circular or rounded cut, we will use radial-gradient(). To cut four corners, the logical solution is to create four gradients, one for each corner:
CodePen Embed Fallback
Each gradient is taking a quarter of the element’s dimensions. The syntax of the gradient is self-explanatory:
radial-gradient(circle 30px at top left, #0000 98%, red) top left;
Translated, this renders a circle at the top-left corner with a 30px radius. The main color is transparent (#0000) and the remaining is red. The whole gradient is also placed so that it starts at the element’s top-left corner. Same logic for the three other gradients. The keyword circle can be omitted since we explicitly specified one value for the radius.
Like I did in the previous article, I will be using slightly bigger or smaller values this time around in order to avoid bad visual result. Here, I am using 98% instead of 100% to avoid jagged edges and 51% instead of 50% to create an overlap between gradients and avoid white spaces. This logic will follow throughout this article. In fact, you will find that adding or removing 1% or 1deg typically results in a nice visual.
We apply this to the CSS mask property and we are done!
CodePen Embed Fallback
We can actually optimize that code a little:
--g: #0000 98%,#000;
--r: 30px;
mask:
  radial-gradient(var(--r) at 0    0   ,var(--g)) 0    0,
  radial-gradient(var(--r) at 100% 0   ,var(--g)) 100% 0,
  radial-gradient(var(--r) at 0    100%,var(--g)) 0    100%,
  radial-gradient(var(--r) at 100% 100%,var(--g)) 100% 100%;
mask-size: 51% 51%;
mask-repeat: no-repeat;
This way, we use custom properties for the redundant values and, as a personal preference, I am using numeric values for the positions instead of keywords.
In the generator, I will use the following syntax:
The shorthand syntax is easier to generate plus the whole value can be used as one custom property.
Can we use fewer gradients if we want?
Sure! One gradient can do the job. Hover the below to see the trick:
CodePen Embed Fallback
Here, we define one radial-gradient() with no size (by default it is 100% height and 100% width). This gives us a hole in the center. We translate/move the gradient by half the width and height of the image to move the hole to one corner. Since, by default, the CSS mask repeats, we get the same on each corner. We have four cut corners with only one gradient!
The only drawback of this method is that we need to know the width and height of the element in advance.
Can’t we use -50% instead of half the width and height?
Unfortunately, we’re unable to do that here because percentages doesn’t behave the same as pixel values when used with the CSS mask-position property. They’re tricky.
I have a detailed Stack Overflow answer that explains the difference. It deals with background-position but the same logic applies to the CSS mask-position property.
However, we can use some tricks to make it work with percentage values and without the need to know the width or the height. When a gradient (or a background layer) has a width and height equal to the element, we cannot move it using percentage values. So we need to change its size!
I will define a size equal to 99.5% 99.5%. I am reducing 0.5% from the width and the height to have a value different from 100% and at the same time keep the same visual result since we won’t notice a big difference between 100% and 99.5%. Now that our gradient has a size different from 100% we can move it using percentage values.
I will not detail all the math, but to move it by half the width and the height we need to use this equation:
100% * (50/(100 - 99.5)) = 100% * 100 = 10000%
It’s a strange value but it does the job:
CodePen Embed Fallback
As you can see, the trick works just fine. Whatever the size of the element is, we can cut four corners using only one gradient. However, this method has a small drawback when the width or the height of the element is a decimal value. Here is an example with an image having a width equal to 150.5px:
CodePen Embed Fallback
The use of 99.5% combined with 150.5px will create rounding issues that will break the calculation, resulting in the mask being misaligned. So, use this method with caution.
To overcome the rounding issue, we can combine the last trick with a pseudo-element. Here is a step-by-step illustration to understand the idea:
CodePen Embed Fallback
Here’s what going on in there:
We define a pseudo-element that behaves as our background layer. Logically, we should use inset:0 to make it cover the entire area, but we will create a small overflow by using inset: -10% meaning that the pseudo element will overflow each side by 10%.
We set our CSS mask to the pseudo-element. The mask size needs to match the size of the main element, not the pseudo-element. In other words, it will be smaller than the size of the pseudo-element and this is what we want to be able to move using percentage values. After we do the math, the size needs to be 100%/1.2. Notice in the demo above that the CSS mask is within the green border so that it matches the size of the container.
Now, we need to move it in a way that simulates cutting the corner of the main element. The center of the hole needs to be in the corner of the main element, as illustrated in the demo. To do this, we use mask-position: 300% 300% ( 300% = 50%/(1 - 1/1.2) ).
We remove no-repeat to activate the repetition and get the same effect for every corner.
We clip the overflow and we get our final result!
I know it’s a bit overkill, but it does work and it requires only one gradient instead of four.
Let’s quickly recap the three methods we just covered:
The first method uses four gradients and has no drawbacks as far as usage. Sure, it’s verbose but it works with any kind of element and size. I recommend using this one.
The second method uses one gradient and works with any element, but it can break in some particular cases. It’s suitable with fixed-size elements. It’s ok to use, but maybe less frequently.
The third method uses one gradient and requires a pseudo-element. It won’t work with and other elements that unable to support a pseudo-element.
The generator only supports the first and third methods.
Now that we saw the case with all the corners, let’s disable some of them. Using the first method, any corner we want to keep uncut we simply remove its gradient and adjust the size of what remains.
CodePen Embed Fallback
To disable the top-right corner:
We remove the top-right gradient (the blue one).
We have an empty corner, so we increase the size of the red gradient (or the purple one) to cover that leftover space.
Done!
You probably see just how many possibilities and combinations we can do here. If we want to cut N corners (where N ranges from 1 to 4), we use N gradients. All we need is to correctly set the size of each one to leave no space.
What about the other methods where there’s only one gradient? We will need another gradient! Those two methods use only one radial-gradient() to cut the corners, so we will rely on another gradient to “hide” the cut. We can use a conic-gradient() with four sections for this task:
conic-gradient(red 25%, blue 0 50%, green 0 75%, purple 0)
We add it on the top of the radial gradient to get the following:
CodePen Embed Fallback
The conic-gradient() covers the radial-gradient() and no corner is cut. Let’s change one color in the conic-gradient() to transparent. The one at the top-right, for example:
CodePen Embed Fallback
Did you see that? We revealed one corner of the radial-gradient() and we end with one cut corner!
Now let’s do the same thing, but for the bottom-left corner.
CodePen Embed Fallback
I think you probably get the trick by now. By changing the colors of the conic-gradient() from opaque to transparent, we reveal the corners we want to cut and gain all kinds of possible combinations. The same can be done with the third method.
Circular border-only cut-out
Let’s make the border-only version of the previous shape. In other words, we achieve the same shape but knock out the fill so all we’re left with is a border of the shape.
This is a bit tricky because we have different cases with different code. Fair warning, I will be using a lot of gradients here while finding opportunities to trim the number of them.
It should be noted that we will consider a pseudo-element in this case. Showing only the border means we need to hide the inner “fill” of the shape. Applying this to the main element will also hide the content — that’s why this is a nice use case for a pseudo-element.
One cut corner
This one needs one radial gradient and two conic gradients:
CodePen Embed Fallback
The first example illustrates the radial gradient (in red) and both conic gradients (in blue and green). In the second example, we apply all of them inside the CSS mask property to create the border-only shape with one cut corner.
Here’s a diagram of the game plan.
As the diagram shows, the radial-gradient() creates the quarter of a circle and each conic-gradient() creates two perpendicular segments to cover two sides. It should be noted that overlapping gradients is not an issue since we are not going to change the CSS mask-composite property value.
Using the same code an adjusting a few variables, we can get the shape for the other corners.
Two cut corners
For the two-corner configuration we have two situations taking place.
In the first situation, there are two opposite corners where we need two radial gradients and two conic gradients.
CodePen Embed Fallback
The configuration is almost the same as cutting only one corner: we add an extra gradient and update a few variables.
In the second situation, there are two adjacent corners and, in this case, we need two radial gradients, one conic gradient, and one linear gradient.
CodePen Embed Fallback
“Wait!” you might exclaim. “How come the conic gradient covers three sides?” If you check the code, notice the repeat-y. In all of the examples, we always used no-repeat for the gradients, but for this we can repeat one of them to cover more sides and reduce the number of gradients we use.
Here is an example with only the conic-gradient() to understand the repetition. The trick is to have a height equal to 100% minus the border size so that the gradient fills that space when repeating, which covers the third side in the process.
CodePen Embed Fallback
Three cut corners
For this configuration, we need three radial gradients, one conic gradient, and two linear gradients.
CodePen Embed Fallback
Four corners cut
It takes four radial gradients and two linear gradients to cut all four corners.
CodePen Embed Fallback
I can hear you screaming, “How the heck am I supposed to memorize all these cases?!” You don’t need to memorize anything since you can easily generate the code for each case using the online generator. All you need is to understand the overall trick rather than each individual case. That’s why I’ve only gone into fine detail on the first configurations — the rest are merely iterations that tweak the initial foundation of the trick.
Notice there’s a general pattern we’ve been following throughout the examples:
We add a radial-gradient() on the corners we want to cut.
We fill the sides using either a conic-gradient() or a linear-gradient() to create the final shape.
It should be noted that we can find different ways to create the same shape. What I am showing in this post are the methods I found to be best after trying lots of other ideas. You may have a different approach you consider to be better! If so, definitely share it in the comments!
Angled cut-out
Let’s tackle another type of cut shape: the angled cut.
We have two parameters: the size and angle of the cut. To get the shape, we need a conic-gradient() for each corner. This configuration is very similar to the example that kicked off this article.
CodePen Embed Fallback
Here is an illustration of one corner to understand the trick:
The difference between each corner is an extra offset of 90deg in from and the at position. The full code is like below:
--size: 30px;
--angle: 130deg;

--g: #0000 var(--angle), #000 0;
mask:
  conic-gradient(from calc(var(--angle)/-2 -  45deg)
    at top    var(--size) left  var(--size),var(--g)) top left,
  conic-gradient(from calc(var(--angle)/-2 + 45deg)
    at top    var(--size) right var(--size),var(--g)) top right,
  conic-gradient(from calc(var(--angle)/-2 - 135deg)
    at bottom var(--size) left  var(--size),var(--g)) bottom left,
  conic-gradient(from calc(var(--angle)/-2 + 135deg)
    at bottom var(--size) right var(--size),var(--g)) bottom right;
mask-size: 51% 51%;
mask-repeat: no-repeat;
If we want to disable one corner, we remove the conic-gradient() for that corner and update the size of another one to fill the remaining space exactly like we did with the circular cut. Here’s how that looks for one corner:
CodePen Embed Fallback
We can do the exact same thing for all the other corners to get the same effect.
In addition to CSS mask, we can also use the CSS clip-path property to cut the corners. Each corner can be defined with three points.
The shape consists of two points at each end of the cut, and one between them to form the angle.
The other corners will have the same value with an offset of 100%. This gives us the final code with a total of 12 points — three per corner.
Notice the OR comments in that code. It defines the code we have to consider if we want to disable a particular corner. To cut a corner, we use three points. To uncut a corner, we use one point — which is nothing but the coordinate of that corner.
Border-only angled cut
Oof, we have reached the last and trickiest shape at last! This one can be achieved with either gradients or clip-path, but let’s go with the clip-path approach.
Things would get complex and verbose if we go with the gradient approach. Here’s a demo that illustrates that point:
CodePen Embed Fallback
There are nine gradients total, and I am still not done with the calculation. As you can tell, the thickness of the border is incorrect, plus the final result is unsatisfying due to the nature of gradients and their anti-aliasing issues. This approach might be a good exercise to push the limit of gradients, but I don’t recommend it in a production environment.
So, back to the clip-path method. We will still wind up with verbose code, but less of a big deal since the generator can do the job for us with a cleaner end result.
Here is an overview of the path. I am adding a small gap to better see the different points but we should have an overlap of points instead.
We have 13 outer points (the ones in black) and 13 inner points (the ones in blue).
The way we calculate the outer points is the same as how we did it for the regular angled cut. For the inner points, however, we need more math. Don’t worry, I’ll spare you some “boring” geometry explanation for this one. I know most of you don’t want it, but in case you need to dig into this, you can check the JavaScript file of the generator to find the code and the math I am using to generate the shape.
The 180deg special case
Before we end, there’s a special case for the angle cut I want to call out. It’s where we use an angle equal to 180deg. Here’s what that produces:
We have a straight line on the corner so we can optimize the clip-path code. For the full shape, we can use eight points (two points per corner) instead of 12. And for the border-only version, we can use 18 points (nine inner points and outer points) instead of 26. In other words, we can remove the middle point.
The border-only shape can also be made using gradients. But rather than using nine gradients like we did before, we can get away with only four linear gradients and a clean result.
CodePen Embed Fallback
Conclusion
We just combined CSS masks with gradients to create some fancy shapes without resorting to hacks and a lot of code! We also experienced just how much it takes to strike the right balance of code to get the right results. We even learned a few tricks along the way, like changing values by one or even half a unit. CSS is super powerful!
But, as we discussed, the online generator I made is a great place to get the code you need rather than writing it out by hand. I mean, I went through all the work of figuring out how all of this works and I would likely still need to reference this very article to remember how it’s all put together. If you can memorize all of this, kudos! But it’s nice to have a generator to fall back on.
The global health crises brought along many paradigm shifts. The way we live, the way we travel, and most importantly, the way we work.
The phenomenon of working remotely may have happened out of compulsion. But it looks like it’s here to stay, even as we progress towards normalcy. According to Forbes, 74% of professionals expect remote work to become standard and 97% of the employees don’t want to return to work full-time.
Web development is one of the many job roles that enjoy the flexibility of working from home.
65 percent of IT executives mentioned that one-fourth of their workforce will continue to work remotely even after the pandemic. Equipped with the right tools and access to the internet, they are dedicated to finishing their tasks.
The challenge with remote work is not about the lack of trust in your development team about fulfilling their roles and responsibilities. It lies in implementing a robust change management strategy and establishing a continuous learning process to maintain productivity and efficiency.
The experience of training your remote web development team will be nowhere near the experience of providing in-person training. How do you inculcate the organizational culture and expect them to have a team spirit if they haven’t met any of their colleagues in person? It definitely adds a layer of difficulty as you deal with the communication, time, and individual barriers.
You need a solid strategy to navigate these challenges.
Listed below are some tips on how you can improve training for your remote web development team. Let’s check them out.
1. Set up a Solid Onboarding Flow
More than your onboarding, it is the pre-onboarding process that will take extra effort for remote developers. Your newly hired developers may not be having the technological infrastructure to work remotely. You’ll have to help and notify them to set up the system in advance. By the time they join, they need to have access to your internal systems, have an authorized email id, access to communication tools, and HR tools.
There will also be added steps in between where you’ll need to guide the developers on the extra tools they’ll use to collaborate, work, and manage their tasks. Assign a mentor who is constantly in touch with the new team developer and allow him/her to guide them into how to use the tools and how to go about each of their tasks daily.
When a developer joins the office, you would probably have an onboarding flow already. They get familiarized with colleagues, are given training materials, are given insights into the development protocols, briefed on the company policies, leave policies, and so on. While transitioning to a remote onboarding flow, you’ll just have to digitize all these processes through virtual callings and meetings.
2. Invest in the Right Tools
Training tools streamline the training process and automate key areas of learning and onboarding. But when you’re providing training in a virtual environment, you will need to ensure that both you and the developer are equipped with the digital infrastructure to support the training. Some of the top common tools you’ll need for training your web developers are:
Knowledge Base and Standard Operating Procedure tools like Document360
Additionally, for web designers, you’ll need to incorporate collaboration tools like InVision. It helps them to automate handoffs and keep in touch with the entire product team and the content team while working on new projects.
For web developers, train them on pair programming tools like Motepair by Atom where two developers can work on the same at the same time. It allows programmers to run remote pair programming sessions using Github’s editor.
Also, incorporate collaborative screen sharing tools that are tailor-made for developers. For example, CoScreen facilitates multi-user editing, simultaneous screen sharing, and video chat and calling. It will make it easier for developers to write codes and fix bugs in real-time with teams.
3. Create a Dev Group for Resource Sharing and Discussions
When you have team members that don’t meet every day, you need alternative virtual methods where they can share knowledge and resources. It helps to build a virtual discussion forum where developers can collaborate and discuss their day-to-day tasks and also keep up with their teams’ progress. Tools like Google Drive can help your team be in sync with each other’s work.
Additionally, they also need an information medium where they can share feedback and experiences of working on a project. This is very challenging considering the different time zones that the team works in. To counter these issues, you can use tools like DailyBot for Slack, and Jira by Atlassian. They help teams to share resources, measure progresses, and encourage discussions.
4. Provide Free Access to Online Courses
Think of a regular office setting where time and again, you had random training sessions that ranged from work-related topics to wellness topics. You could easily create a learning ecosystem and encourage participation from your teams.
The excitement of training shouldn’t die with the onboarding process. But your teams won’t have the same motivation to upgrade their skills to take part in training while they’re working remotely.
You’ll have to entice them with something extra. If you want to keep the learning process ongoing, incorporate free courses for remote employees.
There is always something new to learn in website development and design. Providing free online courses can help your team keep up with the updates, and operations required to create and maintain a website.
5. Don’t Forget Non-Technical Skills
We often overlook honing soft skills when it comes to web developers or software engineers. They need to know that what they do is valuable to the company but being a developer doesn’t just mean to code. Soft skills are just as necessary for personal growth and development. Some of the top soft skills you’ll need to train them while they’re working remotely are:
Problem-solving skills
Communication
Openness to new experiences
Teamwork
Leadership
Creativity
Accountability
Time management
When your development teams are working remotely, it becomes all the more important for them to inculcate skills that make them not just good but great developers. These skills also ensure successful teamwork and guarantee overall progress despite the lack of physical proximity.
Wrapping up
Building a creative and impactful learning experience in a remote environment may seem overwhelming. But the good part about training your development team is that they’ll be most embracive towards adopting new technologies. Take this opportunity to virtually upskill them using the various tools at your disposal.
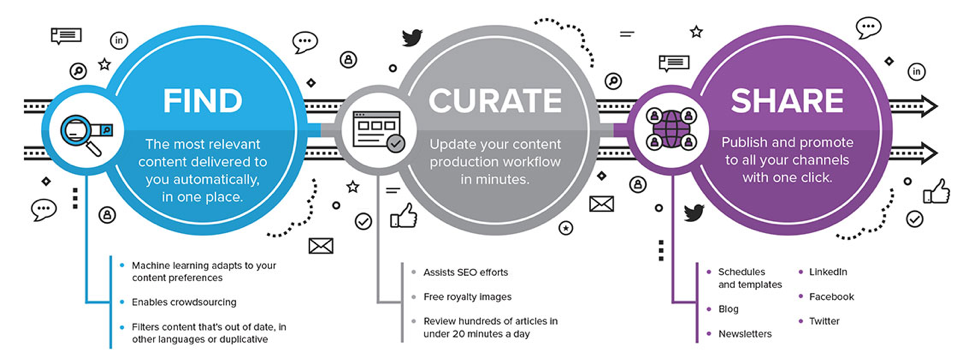
Content curation is a major aspect of any content marketing initiative. It means finding and sharing relevant, high-quality content with your online community.
Today, with so many platforms, the pressure of providing regular content to your audience is greater than ever. Taking the route of “content curation” helps you provide a wide variety of content to your customers, especially during the times you are unable to produce original content.
The result?
Your audience stays engaged.
Moreover, content curation offers your customers only the “BEST” stuff as you do the hard work of sifting through a ton of material and choosing only the great ones in the end.
Now that we have a brief idea about what content curation is, let’s explore it in more detail and learn how to do it the right way!
What is Content Curation?
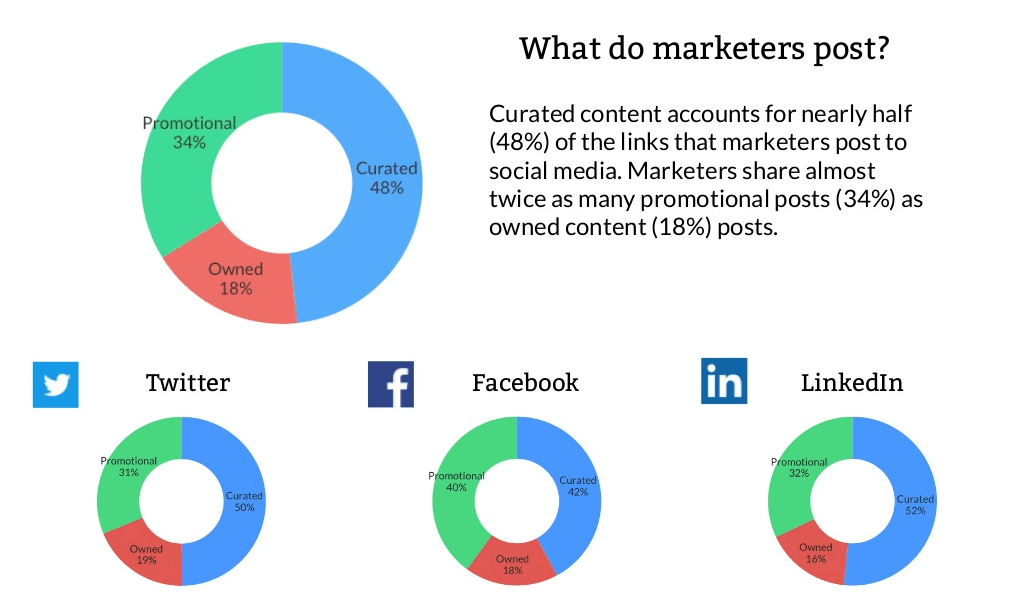
Content curation is the process of selecting, collecting, packaging, and sharing content from the internet. Usually, curated content comprises a list of valuable resources on a particular topic, such as the “best of” lists you get to see every now and then.
As per a study, 57% of marketers believe thatcontent curation is the best way to continuously produce content.
Content Curation Vs. Content Creation
One can easily get confused between both these terms. The difference between content creation and curation is:
Content creation involves designing and promoting content pieces from scratch. The material you create can be of a variety such as videos, podcasts, or blogs.
Content curation, on the other hand, involves searching for excellent content from other brands and sources. Hence, in this case, you don’t create your own original content.
It may not come as a surprise when we say this –
Curating content costs less than creating it.
Infact, 35% of marketers are of the view that if you have budget constraints, content curationis the way to go!
What Makes Content Curation Useful?
There are a lot of benefits of curating content, such as:
Helps your customers know helpful information that they otherwise might not have known.
It is typically faster than creating new content from scratch.
Helps boost your visibility online.
Sharing other people’s content helps you create relationships with them.
Sharing high-quality, relevant content establishes you as a thought leader in your customer’s eyes.
Pretty cool how curated content canbe so helpful to you, isn’t it?
How Much Curated Content To Curate?
If we talk of your social calendar, it should contain the right content mix. According to Hootsuite, a good ratio to aim for is 60% curated content and 40% original content.
Curating Content The Right Way
You must focus on curating content like a pro if you want to effectively engage your audience. Follow these basic steps to curate content the right way:
1. Understand Your Audience
If you don’t understand your potential customers, you won’t be able to find content that is relevant to them. Hence, a key part of the content curation process is to know your audience. Remember,content curation is more customer-focused. Therefore, you need to curate content they find extremely valuable and that also saves their precious time.
Before scheduling curated content, ask yourself the following questions:
How will this content piece help my target audience?
Is it relevant to a common issue or problem they have?
Does this align with how my audience perceives my brand?
2. The Sources
You can curate content from various highly-authoritative sources, such as blogs, news outlets, publications, video streaming services, and social media updates.
Note: Check out a plethora of sources to find the right information. Don’t just share from a single site.
3. Organize Into Categories
Organize your curated results into categories that grab the interest of your target audience. For instance, many companies can be seen sorting their curated content into categories like latest news, events, case studies, best practices, trends, etc.
4. Credit Your Sources
Don’t pass off curated content as something you made yourself. Give credit where it’s due. This means, you must tag and link to the original creator.
Also, if you plan to share a compilation from a number of sources, ensure you credit each and every source in the piece.
5. Share, Share, and Share
Share the results of your curation efforts across different channels, such as blogs, websites, mobile app experiences, email newsletters, and social media feeds to get the most out of your curated content.
The different ways in which you can enhance yourcontent curation strategy are:
Discuss about what you share and give your own point of view so that your unique brand voice shines through.
Content curation takes up a lot of time. To make things a little easier, you can always choose from the different content curation tools available out there. You can easily find the ones that fit your curation practices and needs. Some top content curation tools include Curata, Storify, PostPlanner, and TagBoard.
Ensure to curate content in such a way that it can be shared across multiple platforms.
Ensure to track your performance after you share. The engagement levels will let you know if you are sharing the right information.
Wrapping it Up
Content curation helps you cater to the increasing demands of information as well as entertainment from your customers. When done right, it can establish you as a thought leader, improve your SEO, aid lead generation, and complement your social media and blogging efforts. It can also help unlock networking opportunities and maintain conversations with your customers.
But to do this, ensure that you curate content the right way. This means, you need to know your audience, choose from a variety of credible sources, organize your curated results into categories, and distribute and share it across multiple digital channels. So, now that you know what content curation is andits examples, are you ready to leverage the power of curated content?
This month’s collection of the best new fonts is headed in a lighter and quirkier direction than previous months. What’s more, font foundries seem to be getting more creative with their designs as many of these fonts come with alternative stylistic sets, giving you more control over the resulting typeface.
If you’re looking for some fun new fonts to spice up your web designs with, start here:
1. Beauty Rose
Beauty Rose is a whimsical script font that can add a touch of romance and warmth to header text and hero images. It would also look great when promoting holidays and events like Mother’s Day, Valentine’s Day, and weddings.
2. Black Sharp
Black Sharp is a bold display font that works equally well for website logos as it does for physical products (e.g., signage, packaging, book covers, etc.). What’s especially neat about this font is how it transforms when you change its texture. It takes on a very different tone with a grainy look instead of a shiny one, for instance.
3. Goat & Qalvigo
Goat & Qalvigo is a classic serif font with a modern twist. While many of the examples provided by the type designer show off the funky side of the font, thanks to the additional ligatures and alternative styles, you can always use the regular character sets. Either way, you’ll have a classy new font to use all over your website.
4. Happy Comic
Happy Comic is a font filled with personality. Looking at it makes me think of a goofy cartoon character or maybe even an older Adam Sandler movie. This would be a good font for branding lighthearted and humorous brands or publications.
5. Helsa Display
Helsa Display is a slim and compact serif. While serifs usually work pretty well for paragraph text, this one belongs in headlines and sub-headlines because of how thin the characters are. It also has a bit of a dark side (see the examples at the link to see what I mean), so reserve this font for boundary-pushing brands and personalities.
6. Lab Antiqua Variable
Lab Antiqua is a font that took years to create. The most recent release for this font family is called Lab Antiqua Variable. Like other variable fonts, Lab Antiqua will effortlessly transition through a range of font sizes without losing the characteristics that make this serif font so unique.
7. Monomorium
Monomorium is a monospaced typeface with open apertures and a flowing style. In addition, this quirky font comes with additional ligatures, stylistic alternates, parentheses, and more, depending on how fun or buttoned-up you want it to look.
8. Neumond
Neumond is a serif font that pushes the boundaries of legibility. This font gives you the ability to equip the characters with razor-sharp lines, overlap the letters, and push them towards extreme angles. If you have a brand that’s challenging the norm, a font like this that does the same will go really well with it.
9. Pratico Slab UI
Pratico Slab UI is a slab serif font that would add strength and character to the text of a website. You can also experiment with the weight and size if you’re looking for a not-so-boring but highly legible header font.
10. PT Nature
PT Nature is an exciting collection of script fonts. While they all technically belong to the PT Nature family, each font is modeled after different people’s handwriting. So this font family could be really useful if you use a lot of script fonts in your work. Or if you want to make one site and brand look like it has multiple personalities.
11. Rosehot Typeface
Rosehot Typeface is a pretty font that straddles the line between serif and sans serif. With its elegant curves, unexpected twists, and additional angles, this font would beautifully elevate designs for high-end retailers, fashionistas, and others with luxury offerings or services.
12. Shorai Sans
Shorai Sans is a sans serif font inspired by both calligraphic brushstrokes as well as geometric outlines. You can use it to style Latin text as well as Japanese. The font’s creators suggest pairing it with Avenir Next for greater harmony in your designs.
13. Shoutyperson
Shoutyperson is a bold all-caps font. Because of the grungy, stenciled style of the font, it’s not really applicable for many projects. That said, Shoutyperson would be an effective font choice for military, ammunition companies, or brands or personalities associated with a strict, regimented lifestyle (like personal trainers).
14. Simple Farmhouse
Simple Farmhouse is a basic handwriting font that’s highly legible. It resembles the style of writing you’d use to jot down notes on a whiteboard or in a notebook, so it would work well for brands that want to convey a casual and low-key vibe.
15. Sweet Pancakes
Sweet Pancakes is a fun font with full-bodied characters. Most of the examples provided frame the font against food, so this could be used on restaurant websites or food blogs. However, that’s not to say it couldn’t be used elsewhere. It’s a lighthearted and easy-to-read font, so it could just as well be used to style websites and branding for companies and personalities with a bubbly personality and/or positive mission.
Every day design fans submit incredible industry stories to our sister-site, Webdesigner News. Our colleagues sift through it, selecting the very best stories from the design, UX, tech, and development worlds and posting them live on the site.
The best way to keep up with the most important stories for web professionals is to subscribe to Webdesigner News or check out the site regularly. However, in case you missed a day this week, here’s a handy compilation of the top curated stories from the last seven days. Enjoy!”
Do you know when you can use an image legally online? Or if other people can use your images without payment or permission?
As a designer or photographer, creating online content automatically opens you up to exploitation by those who disregard copyright laws. When it comes to images you upload, it’s very important to have a thorough understanding of your rights and know exactly how to keep your work safe.
What is copyright?
Most people have a basic idea of what copyright means. For those who aren’t sure, copyright refers to the ownership of a piece of work (literature, visual art, musical compositions etc.), which is automatically bestowed upon the creator. A photographer owns every photo they take and is the only one with the legal right to reproduce it, sell it, or use it for financial gain.
Creators can and do grant rights to other individuals and groups, who can then reproduce or use the original work.
How does online copyright work?
The past few decades have opened up a can of worms when it comes to copyright laws and enforcing them. Before the Internet and other technology, the only reproductions of an artwork would be manually copied from the original.
Posting content online, however, is a different story altogether…
People on the other side of the world can access whatever images you upload to your social media, website, or any other online space. Each time you upload a photograph to Instagram, Facebook, or a website, you’re making it available to anyone with access to the Internet. They might not have the legal right to it, but very few people actually consider copyright laws when they’re browsing online. Many of us understand the term “copyright”, but have little understanding of what it means in practice.
There is no process you need to go through to secure copyright to your work. When you take a photo or create an illustration, you automatically have copyright. The issue comes in when others download your images without your knowledge, let alone permission. The only exception to this rule is when you have taken photos or produced images as an employee, in which case your employer has copyright.
Online copyright for employees versus freelancers
The issue of copyright when it comes to working for an individual or organization can be tricky to negotiate. To avoid this bureaucratic quagmire, your best bet is to hash out all the details before you begin—in writing.
The USA has quite comprehensive guidelines for photographers who produce work for their employers, which is why it’s important to do your research before committing to any job or commission.
Work for hire
“Work for hire” refers to photographers who produce images as part of their daily work duties. Apart from those whose job description includes photography services, “work for hire” can sometimes apply to photographers who get employed for a specific task or project.
When taking photos is part of a job description, copyright does not belong to the photographer, but to the employer. The second scenario, in which a photographer is engaged for a standalone project, is not so cut and dried.
Commissions, contracts and conditions
As we mentioned, it is critically important to be aware of the distinction between work for hire and commissioned work.
Photographers commissioned to produce images for a time-limited project may also fall under the work for hire umbrella. In these cases, however, employer and employee sign a written contract that lays out all the details of copyright ownership.
Sometimes copyright is granted exclusively to whoever hired the photographer, while other arrangements grant the employer permission to use the images. This permission, or license, can be conditional, and does not allow the employer to circulate images to any third party, as they are ultimately still the property of the photographer.
What about photos of people?
Online copyright laws don’t only apply to professional photographers. Anyone posting an image online has automatic ownership, as long as they produced it themselves. The average person doesn’t stop to consider that other parties may download and use their photos without permission, and many have fallen prey to unscrupulous individuals or organizations who steal images for their own use.
This problem affects both professional photographers and their models in addition to all those people whose personal images have been downloaded illegally. There have been cases of people coming face-to-face with themselves on billboards – a very unnerving discovery.
One example is the experience of Shubnum Khan, a South African author and artist who found her photograph popping up in adverts around the world. While she did sign an agreement at the time of the shoot that allowed the images to be sold as stock photographs, the adverts came as a complete surprise. This further emphasizes the importance of drawing up clear and concise contracts that the photographer and model both understand. In Khan’s case, the photographer had copyright, and in selling the images as stock photographs he gave various parties license to use the photos for financial gain.
When you, as a photographer, photograph a model with the intention of using the image or granting others permission to use it, you must have the person fill out a model release, or you have no right to use it for financial gain.
Fair use
One exception to the standard copyright laws is “fair use”. This covers photographs used for reasons other than financial gain. This includes images for use in teaching, research, news reporting, criticism and parody.
The takeaway
The bottom line when it comes to copyright is quite simple. Copyright laws get broken if someone uses photos that you’ve taken and posted online—unless you have granted them the license to do so.
Giving permission is an active process, while your ownership is automatic. Copyright laws are designed to protect photographers (as well as all other creatives), and although they can seem nebulous, many millions of people have successfully sued those who stole their images.
If or when you suspect your images have been used illegally, you can contact the person or organization directly, seek out a mediator, or work with a lawyer to hold the offender accountable.