WordPress Plugin: TinyPNG Compresses JPG and PNG For Free
TinyPNG compresses JPG and PNG like no other tool. Especially for PNGs, there are few alternatives, due to the lossy compression that sets TinyPNG apart from the competition. As a WordPress plugin, TinyPNG takes care of optimal image sizes fully automatically.
TinyPNG: No Stranger When it Comes to Image Compression
Loyal Noupe readers have already known TinyPNG for five years. In 2012, I stumbled across the smart tool for PNG compression for the first time. Back then, compressing PNGs was only possible via upload using the web app. It was possible to upload a stack of images and to download it again one by one after successful compression. This was tedious, but it was worth it.
It didn’t take long until the creators of the TinyPNG also provided their algorithm as a Photoshop plugin. I was very excited and bought the software, but didn’t really like it in the end. I found this way of working to be too uncomfortable.
Since then, I’ve been using pngquant for desktop operation, in conjunction with the GUI PNGoo for Windows or Pngyu for macOS, respectively. Pngquant also works with loss compression, and, in batch operation, it is a lot faster than TinyPNG, already because of the lack of image uploads to the web platform.
TinyPNG as a Free WordPress Plugin
What I completely overlooked here is that TinyPNG has released a WordPress plugins in the meantime. Logically, it works with the same algorithm and can automatically compress the images that you upload into your WordPress, no matter if they are JPGs or PNGs. With JPGs, TinyPNG achieves the same values as others, but it really shines when it comes to PNG. Weight losses of up to 75 percent are possible, and they are always at least around 60.
A Free API Key is Required for the Operation
Once installed, you need to get an API key for the TinyPNG API directly from the backend. This is done very easily by entering the name and email address. TinyPNG will then send a confirmation link to said email address. Click it, and it will take you directly to your API key, which you then place in your backend via copy & paste. Now, the plugin is operational.
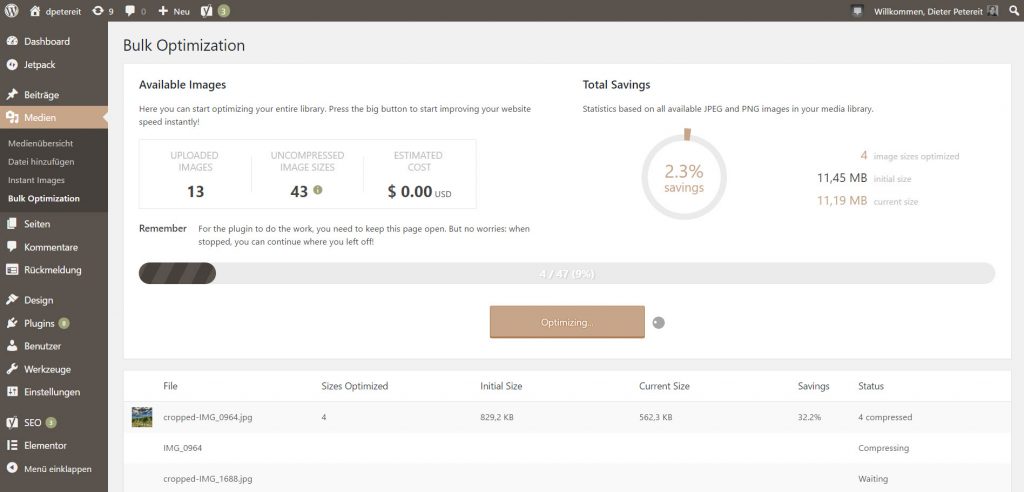
In your WordPress navigation, you won’t see a lot of TinyPNG. You may notice the newly added menu item “Bulk Optimization” under the main menu item “Media.” This is where you compress all of your media library’s images at once. This is only needed during first application because TinyPNG automatically takes care of all newly uploaded images after the installation.
In the list overview of the media library, you’ll now see the item “Compression” as the last entry on each image. Here, you control which variants of each image were compressed. Under “Details,” you receive information on every image size.
How to Adjust Tiny PNG to Your Needs
General settings can be found under Settings > Media > JPEG and Image Optimization Here, you can view how many images you have compressed in the current month. This is also where you choose the image formats that you wish to activate a compression for. You won’t use all the ones that your theme provides. That’s the case for me, at least.

It is also possible to define a general size limit. This makes sense if the images you upload are normally much larger than what would make sense for WordPress, for example, uploading unedited photos from your 20MP camera. In this case, the option Resize and compress the original image with additional parameters on width and/or height would be useful. This way, TinyPNG would make sure that your 6.000 x 3.000 pixel monster would be compressed to a width defined by you, say 1.024 pixels.
Other options for JPG files let you decide if you want data to remain after compression. This includes the date of creation of the original file, the GPS position the picture was taken at, and any copyright notes.
There is nothing else to configure.
TinyPNG: Free, Yes, But Only For 500 Compressions a Month
TinyPNG for WordPress is available for free, and the compression is free as well, though not unlimited. The API key allows for 500 free compressions a month. At first, this sounds like a lot, but it is relativized very quickly, considering that every defined image size in your theme requires a compression.
If I were to compress all image sizes in my Twenty-Sixteen-powered blog – seven in total – I would only be able to compress 71 images for free. Thus, I have already excluded all sizes that I don’t use, getting me to 125 images a month. This should suffice.
When it comes to the prices for additional compressions, TinyPNG isn’t aggressive. The information is not really easy to find, which I don’t understand as the prices aren’t unfair:
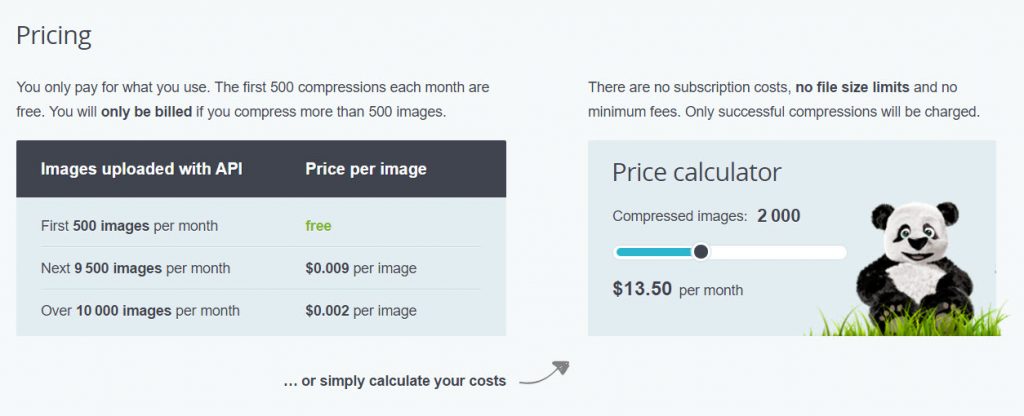
Just play around with the slider a bit (once you found the page ;). 13.50 USD for 2,000 images a month doesn’t sound bad at all. Most bloggers will probably get along with the free package as it is.
TinyPNG for WordPress is an excellent argument for using PNG on your blog by default again. Get the plugin here:
