JavaScript has a variety of built-in popup APIs that display special UI for user interaction. Famously:
alert("Hello, World!");
The UI for this varies from browser to browser, but generally you’ll see a little window pop up front and center in a very show-stopping way that contains the message you just passed. Here’s Firefox and Chrome:
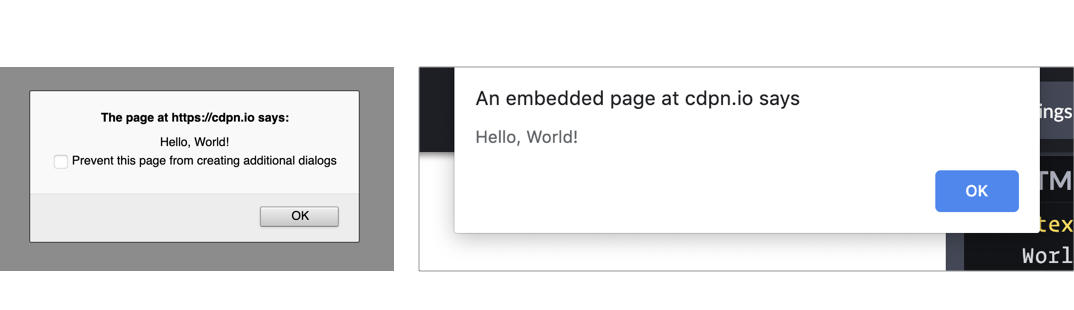
Native popups in Firefox (left) and Chrome (right). Note the additional UI preventing additional dialogs in Firefox from triggering it more than once. You can also see how Chrome is pinned to the top of the window.
There is one big problem you should know about up front
JavaScript popups are blocking.
The entire page essentially stops when a popup is open. You can’t interact with anything on the page while one is open — that’s kind of the point of a “modal” but it’s still a UX consideration you should be keenly aware of. And crucially, no other main-thread JavaScript is running while the popup is open, which could (and probably is) unnecessarily preventing your site from doing things it needs to do.
Nine times out of ten, you’d be better off architecting things so that you don’t have to use such heavy-handed stop-everything behavior. Native JavaScript alerts are also implemented by browsers in such a way that you have zero design control. You can’t control *where* they appear on the page or what they look like when they get there. Unless you absolutely need the complete blocking nature of them, it’s almost always better to use a custom user interface that you can design to tailor the experience for the user.
With that out of the way, let’s look at each one of the native popups.
What it’s for: Displaying a simple message or debugging the value of a variable.
How it works: This function takes a string and presents it to the user in a popup with a button with an “OK” label. You can only change the message and not any other aspect, like what the button says.
The Alternative: Like the other alerts, if you have to present a message to the user, it’s probably better to do it in a way that’s tailor-made for what you’re trying to do.
If you’re trying to debug the value of a variable, consider console.log("`Value of variable:"`, variable); and looking in the console.
window.confirm();
window.confirm("Are you sure?");

<button onclick="confirm('Would you like to play a game?');">Ask Question</button>

let answer = window.confirm("Do you like cats?");
if (answer) {
  // User clicked OK
} else {
  // User clicked Cancel
}
What it's for: “Are you sure?”-style messages to see if the user really wants to complete the action they've initiated.
How it works: You can provide a custom message and popup will give you the option of “OK” or “Cancel,” a value you can then use to see what was returned.
The Alternative: This is a very intrusive way to prompt the user. As Aza Raskin puts it:
...maybe you don't want to use a warning at all.”
There are any number of ways to ask a user to confirm something. Probably a clear UI with a wired up to do what you need it to do.
window.prompt();
window.prompt("What's your name?");

let answer = window.prompt("What is your favorite color?");
// answer is what the user typed in, if anything
What it's for: Prompting the user for an input. You provide a string (probably formatted like a question) and the user sees a popup with that string, an input they can type into, and “OK” and “Cancel” buttons.
How it works: If the user clicks OK, you'll get what they entered into the input. If they enter nothing and click OK, you'll get an empty string. If they choose Cancel, the return value will be null.
The Alternative: Like all of the other native JavaScript alerts, this doesn't allow you to style or position the alert box. It's probably better to use a to get information from the user. That way you can provide more context and purposeful design.
window.onbeforeunload();
window.addEventListener("beforeunload", () => {
  // Standard requires the default to be cancelled.
  event.preventDefault();
  // Chrome requires returnValue to be set (via MDN)
  event.returnValue = '';
});
What it's for: Warn the user before they leave the page. That sounds like it could be very obnoxious, but it isn't often used obnoxiously. It's used on sites where you can be doing work and need to explicitly save it. If the user hasn't saved their work and is about to navigate away, you can use this to warn them. If they *have* saved their work, you should remove it.
How it works: If you've attached the beforeunload event to the window (and done the extra things as shown in the snippet above), users will see a popup asking them to confirm if they would like to “Leave” or “Cancel” when attempting to leave the page. Leaving the site may be because the user clicked a link, but it could also be the result of clicking the browser's refresh or back buttons. You cannot customize the message.
MDN warns that some browsers require the page to be interacted with for it to work at all:
To combat unwanted pop-ups, some browsers don't display prompts created in beforeunload event handlers unless the page has been interacted with. Moreover, some don't display them at all.
The Alternative: Nothing that comes to mind. If this is a matter of a user losing work or not, you kinda have to use this. And if they choose to stay, you should be clear about what they should to to make sure it's safe to leave.
Accessibility
Native JavaScript alerts used to be frowned upon in the accessibility world, but it seems that screen readers have since become smarter in how they deal with them. According to Penn State Accessibility:
The use of an alert box was once discouraged, but they are actually accessible in modern screen readers.
It's important to take accessibility into account when making your own modals, but there are some great resources like this post by Ire Aderinokun to point you in the right direction.
General alternatives
There are a number of alternatives to native JavaScript popups such as writing your own, using modal window libraries, and using alert libraries. Keep in mind that nothing we've covered can fully block JavaScript execution and user interaction, but some can come close by greying out the background and forcing the user to interact with the modal before moving forward.
You may want to look at HTML's native element. Chris recently took a hands-on look) at it. It's compelling, but apparently suffers from some significant accessibility issues. I'm not entirely sure if building your own would end up better or worse, since handling modals is an extremely non-trivial interactive element to dabble in. Some UI libraries, like Bootstrap, offer modals but the accessibility is still largely in your hands. You might to peek at projects like a11y-dialog.
Wrapping up
Using built-in APIs of the web platform can seem like you're doing the right thing — instead of shipping buckets of JavaScript to replicate things, you're using what we already have built-in. But there are serious limitations, UX concerns, and performance considerations at play here, none of which land particularly in favor of using the native JavaScript popups. It's important to know what they are and how they can be used, but you probably won't need them a heck of a lot in production web sites.
Indie and enterprise web developers alike are pushing toward a serverless architecture for modern applications. Serverless architectures typically scale well, avoid the need for server provisioning and most importantly are easy and cheap to set up! And that’s why I believe the next evolution for cloud is serverless because it enables developers to focus on writing applications.
With that in mind, let’s build a REST API (because will we ever stop making these?) using 100% serverless technology.
We’re going to do that with Firebase Cloud Functions and FaunaDB, a globally distributed serverless database with native GraphQL.
Those familiar with Firebase know that Google’s serverless app-building tools also provide multiple data storage options: Firebase Realtime Database and Cloud Firestore. Both are valid alternatives to FaunaDB and are effectively serverless.
But why choose FaunaDB when Firestore offers a similar promise and is available with Google’s toolkit? Since our application is quite simple, it does not matter that much. The main difference is that once my application grows and I add multiple collections, then FaunaDB still offers consistency over multiple collections whereas Firestore does not. In this case, I made my choice based on a few other nifty benefits of FaunaDB, which you will discover as you read along — and FaunaDB’s generous free tier doesn’t hurt, either. ?
In this post, we’ll cover:
Installing Firebase CLI tools
Creating a Firebase project with Hosting and Cloud Function capabilities
Routing URLs to Cloud Functions
Building three REST API calls with Express
Establishing a FaunaDB Collection to track your (my) favorite video games
Creating FaunaDB Documents, accessing them with FaunaDB’s JavaScript client API, and performing basic and intermediate-level queries
And more, of course!
Set Up A Local Firebase Functions Project
For this step, you’ll need Node v8 or higher. Install firebase-tools globally on your machine:
$ npm i -g firebase-tools
Then log into Firebase with this command:
$ firebase login
Make a new directory for your project, e.g. mkdir serverless-rest-api and navigate inside.
Create a Firebase project in your new directory by executing firebase login.
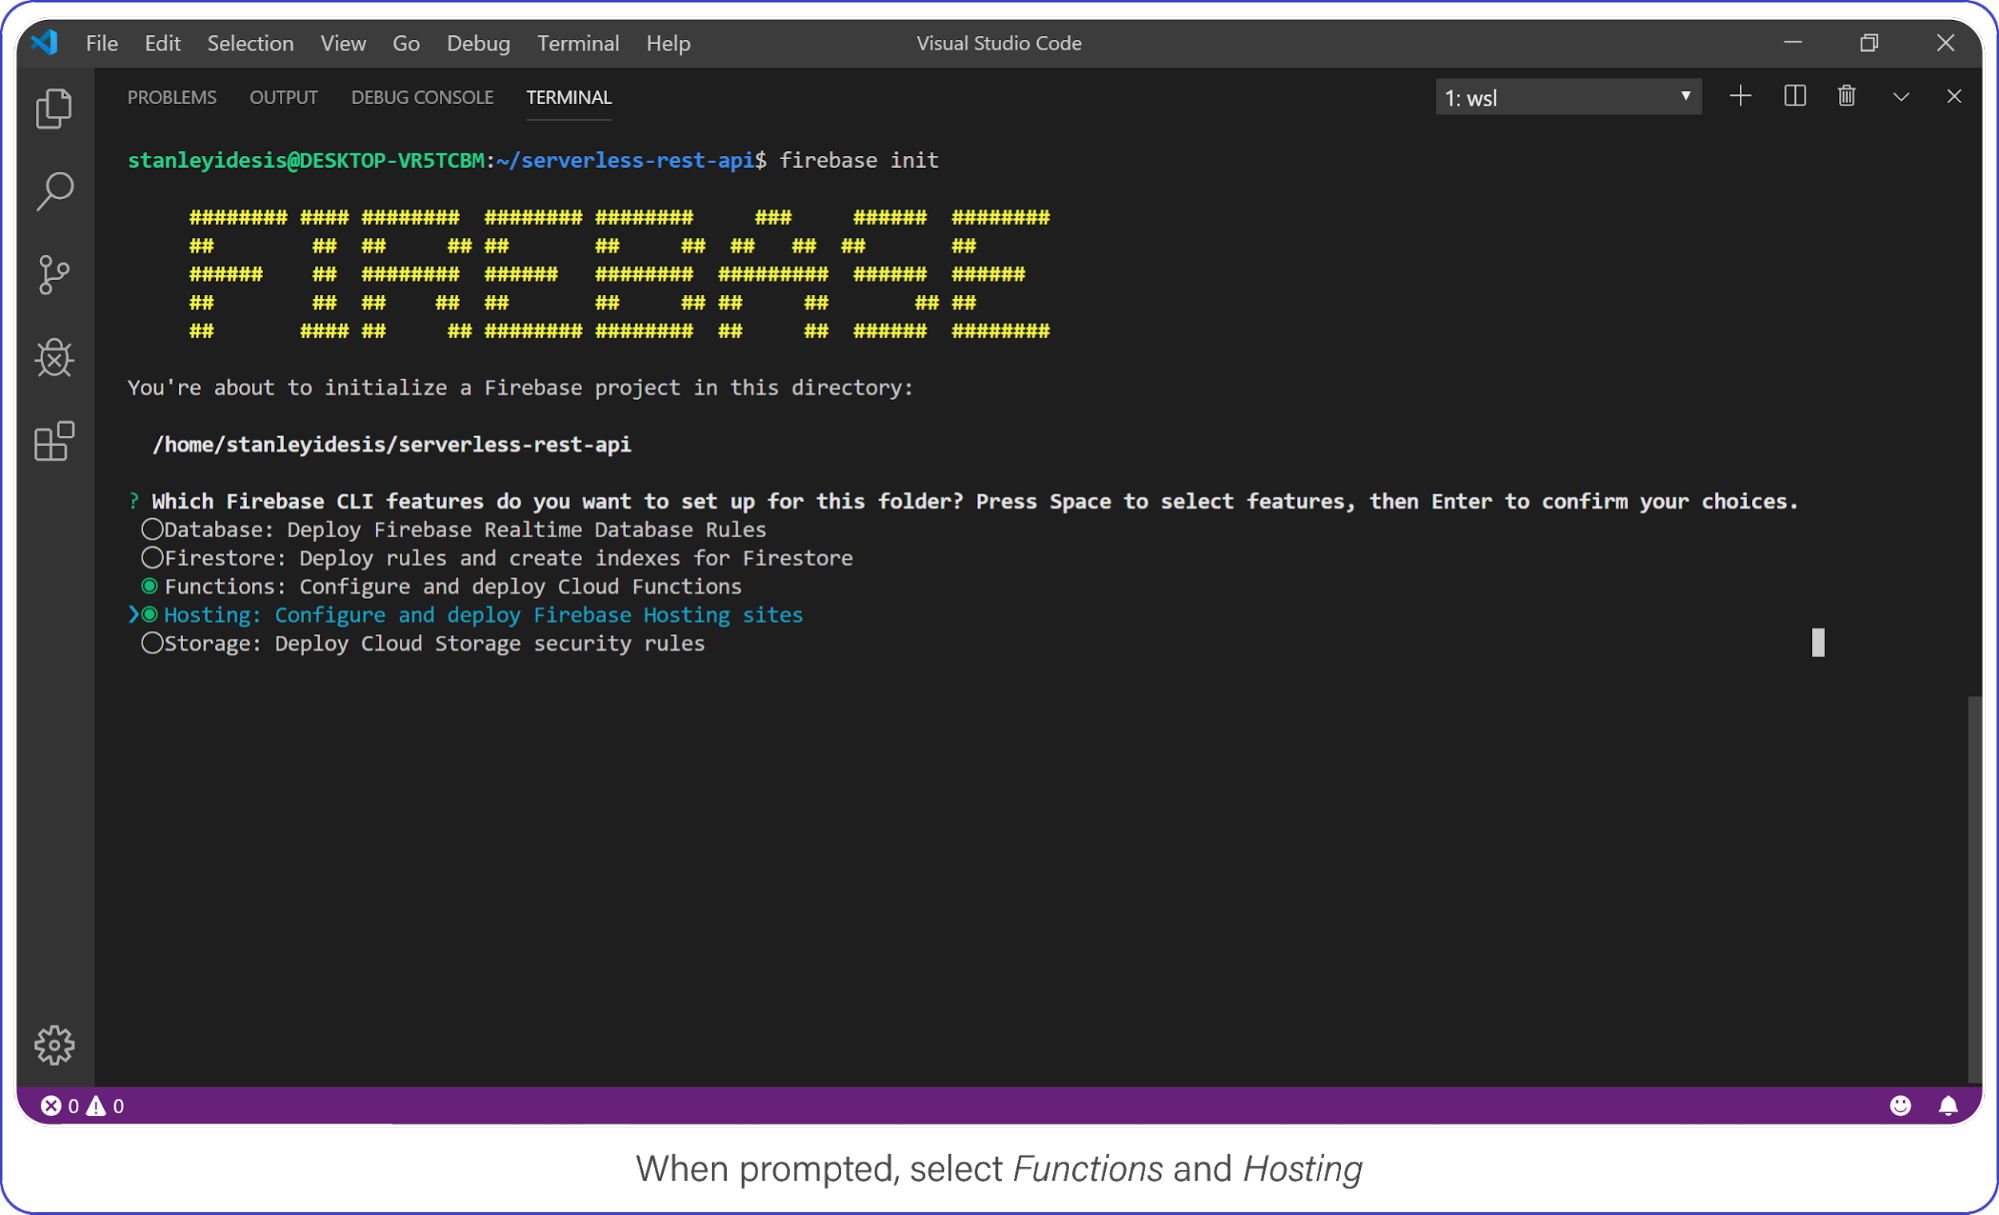
Select Functions and Hosting when prompted.
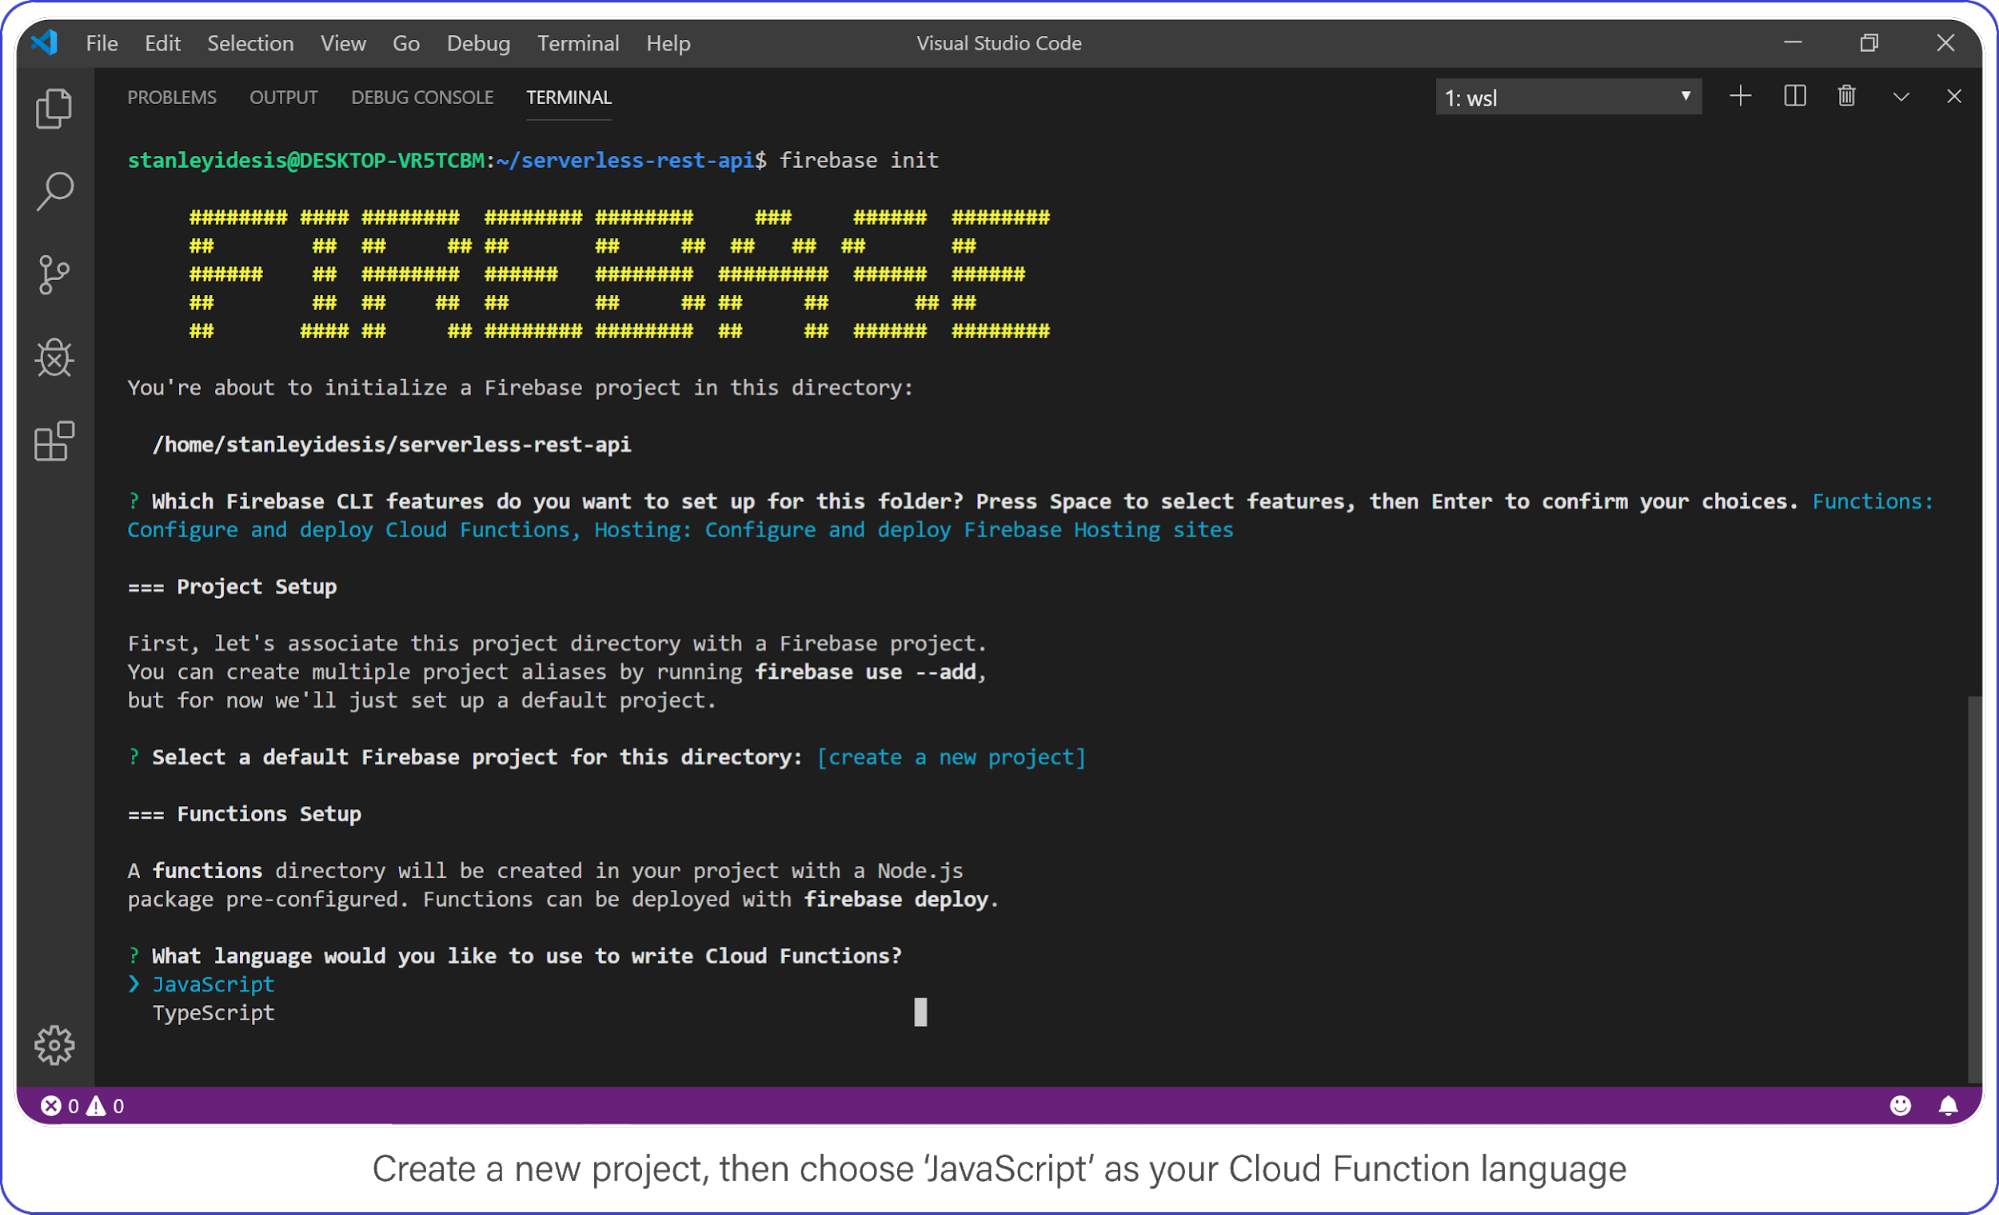
Choose “functions” and “hosting” when the bubbles appear, create a brand new firebase project, select JavaScript as your language, and choose yes (y) for the remaining options.
Create a new project, then choose JavaScript as your Cloud Function language.
Once complete, enter the functions directory, this is where your code lives and where you’ll add a few NPM packages.
Your API requires Express, CORS, and FaunaDB. Install it all with the following:
$ npm i cors express faunadb
Set Up FaunaDB with NodeJS and Firebase Cloud Functions
Before you can use FaunaDB, you need to sign up for an account.
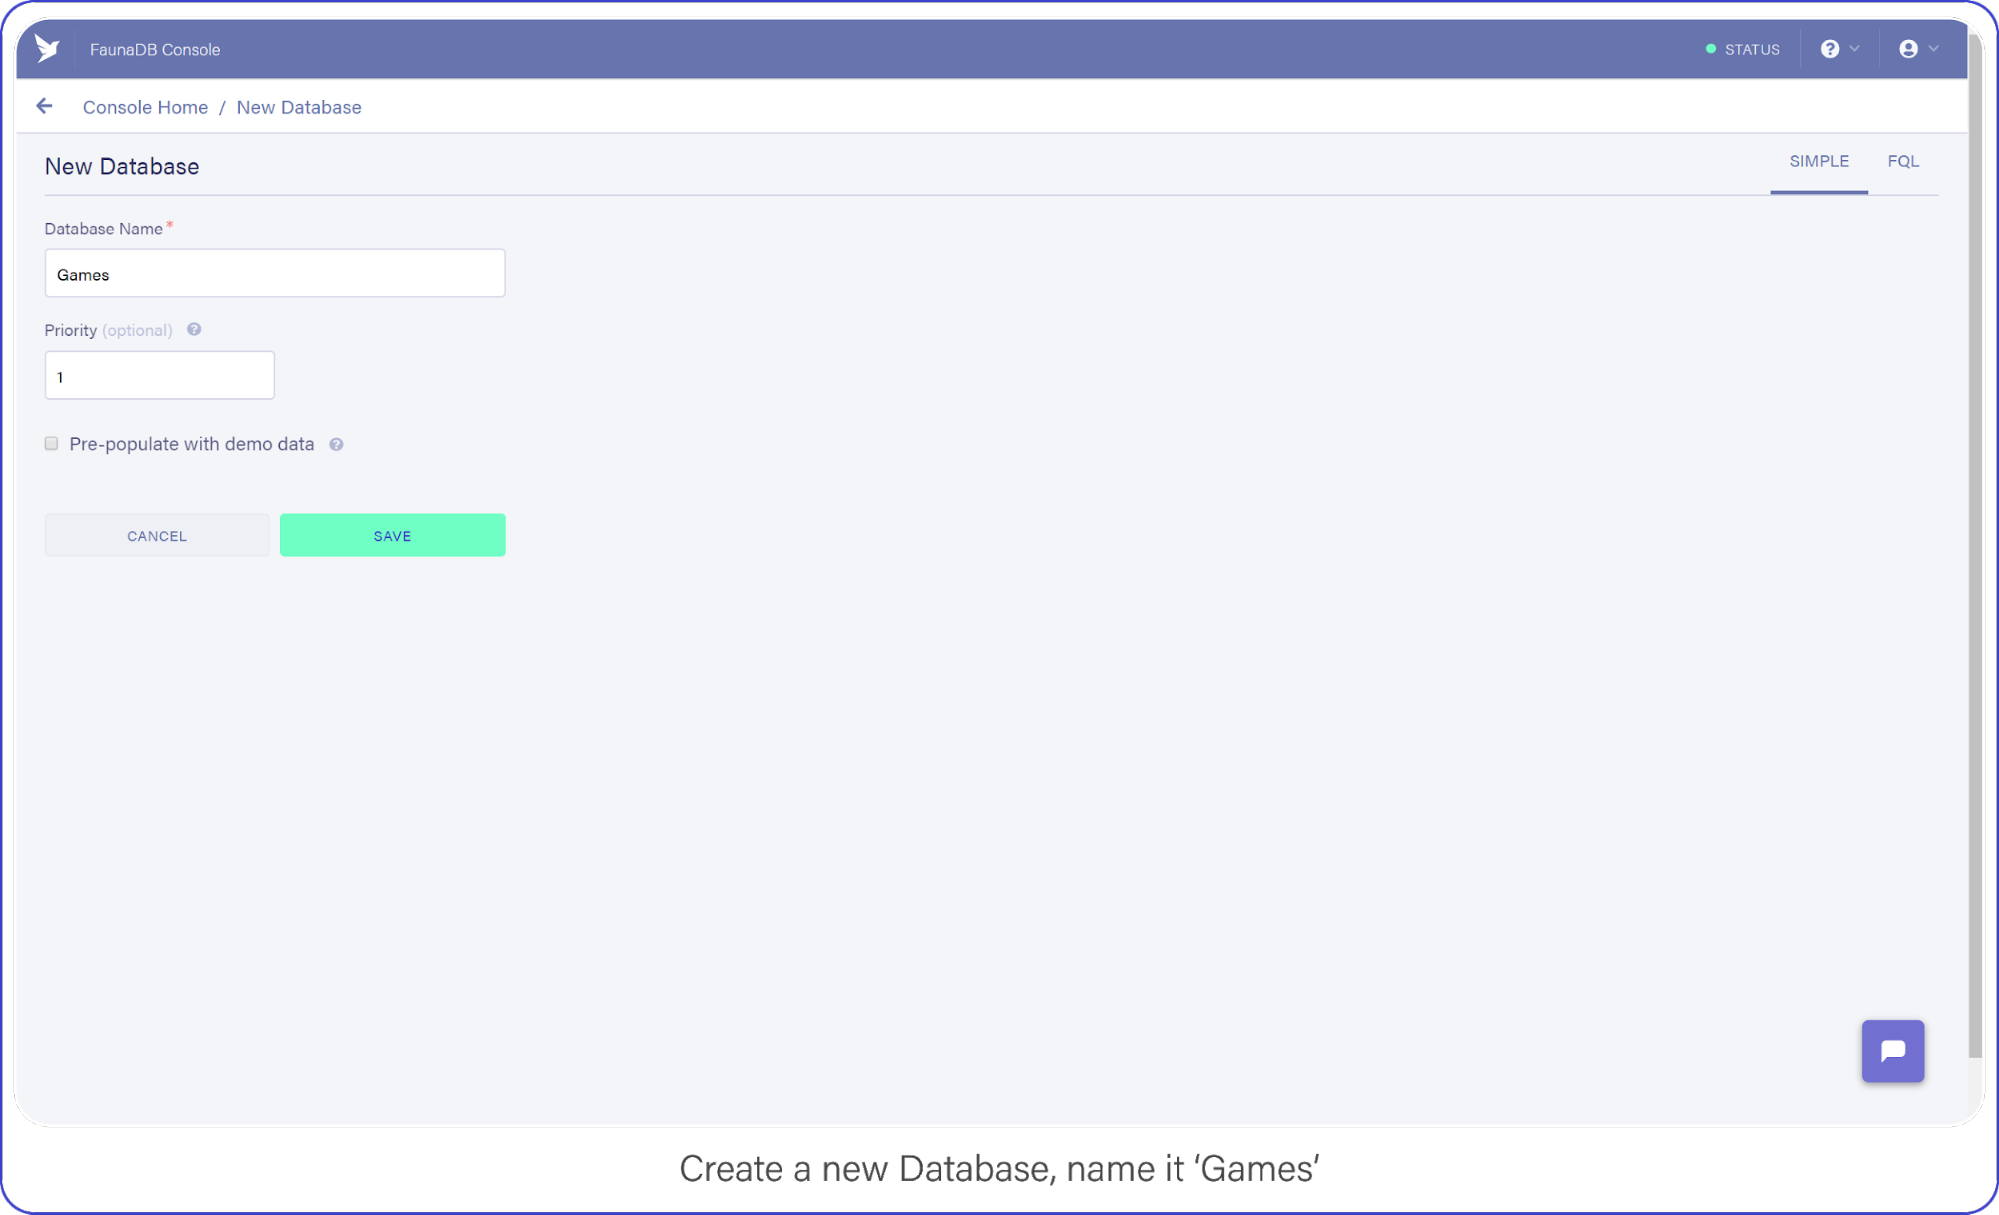
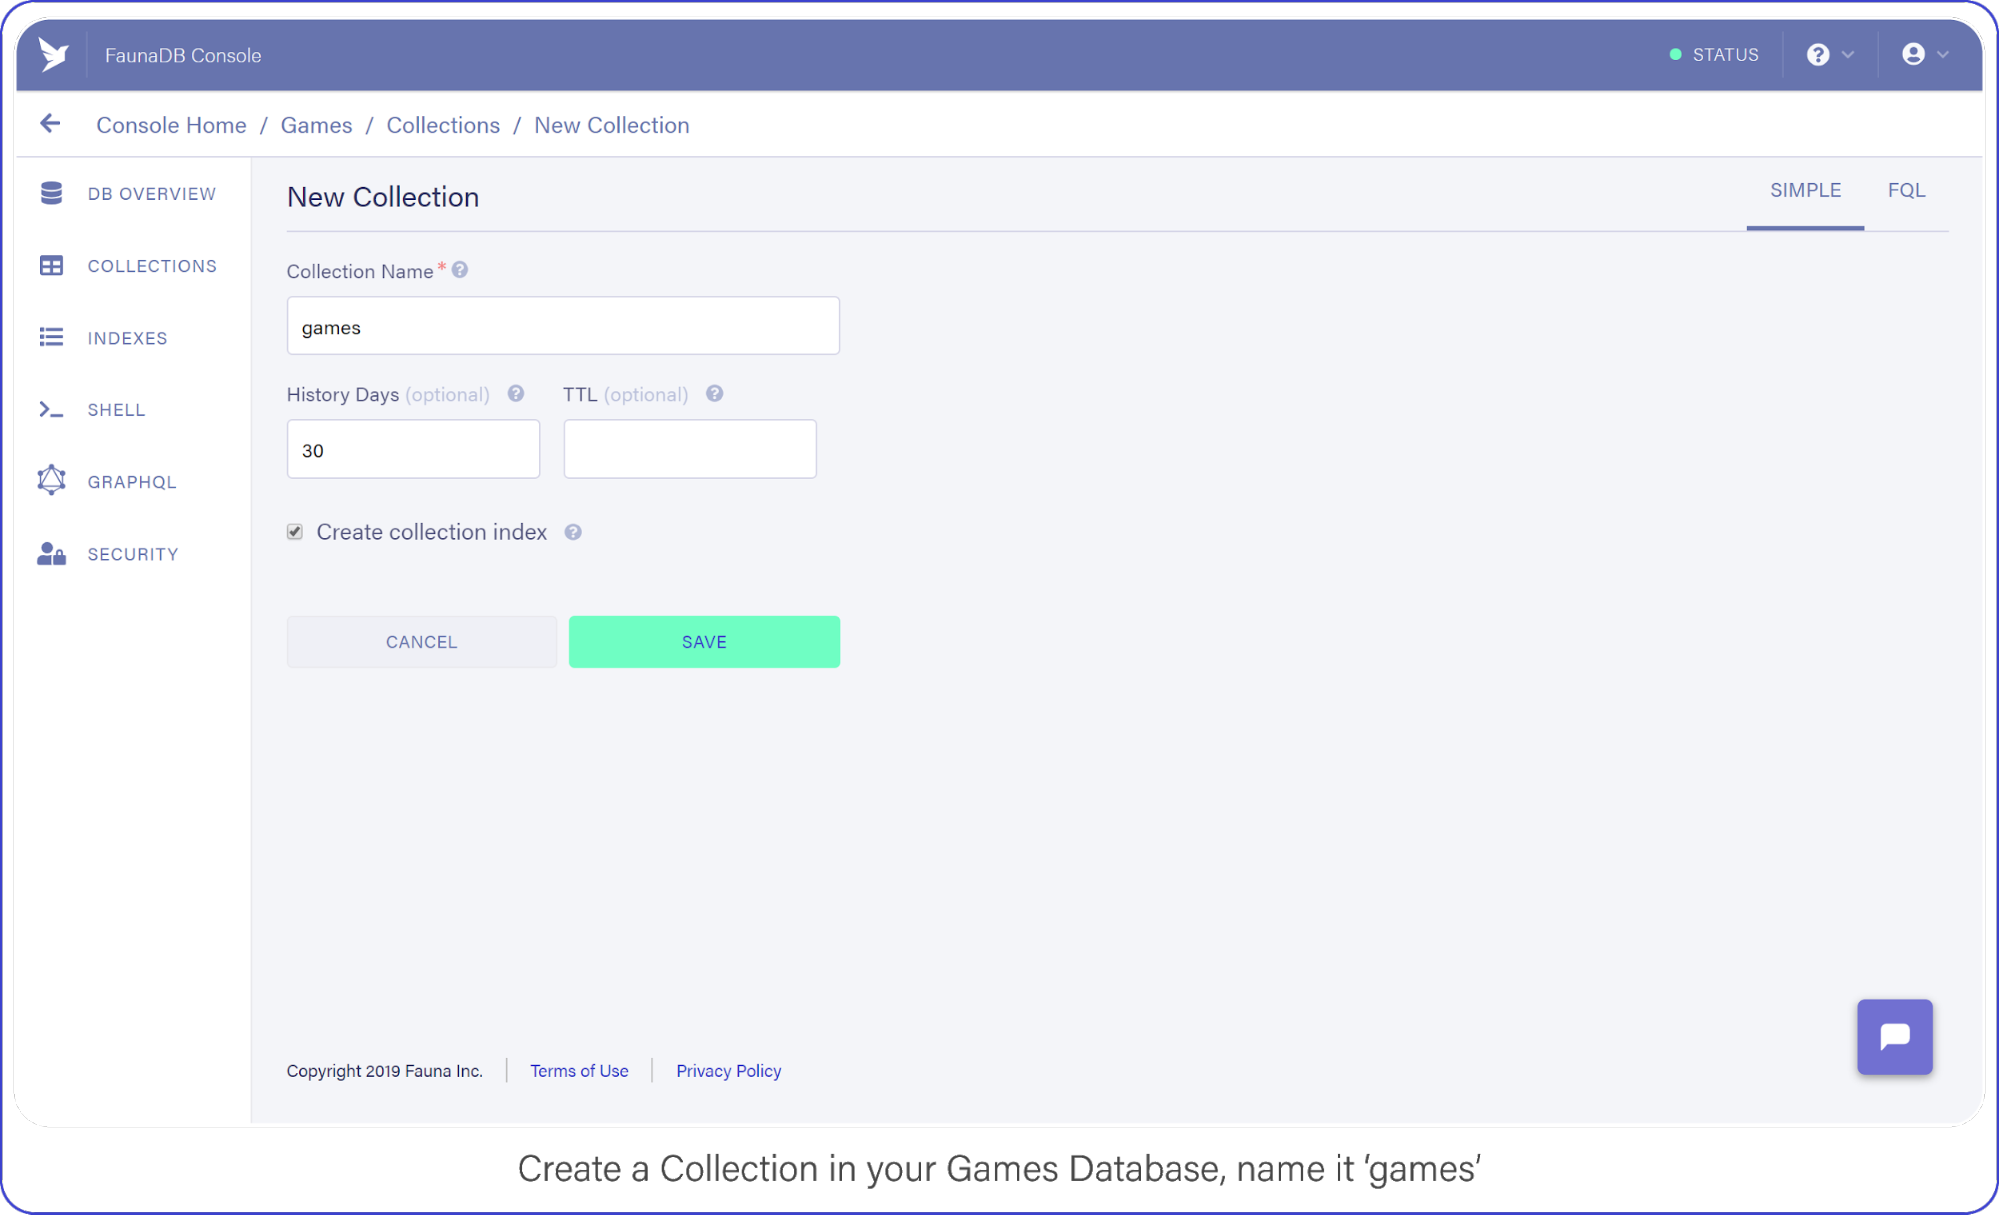
When you’re signed in, go to your FaunaDB console and create your first database, name it “Games.”
You’ll notice that you can create databases inside other databases . So you could make a database for development, one for production or even make one small database per unit test suite. For now we only need ‘Games’ though, so let’s continue.
Create a new database and name it “Games.”
Then tab over to Collections and create your first Collection named ‘games’. Collections will contain your documents (games in this case) and are the equivalent of a table in other databases— don’t worry about payment details, Fauna has a generous free-tier, the reads and writes you perform in this tutorial will definitely not go over that free-tier. At all times you can monitor your usage in the FaunaDB console.
For the purpose of this API, make sure to name your collection ‘games’ because we’re going to be tracking your (my) favorite video games with this nerdy little API.
Create a Collection in your Games Database and name it “Games.”
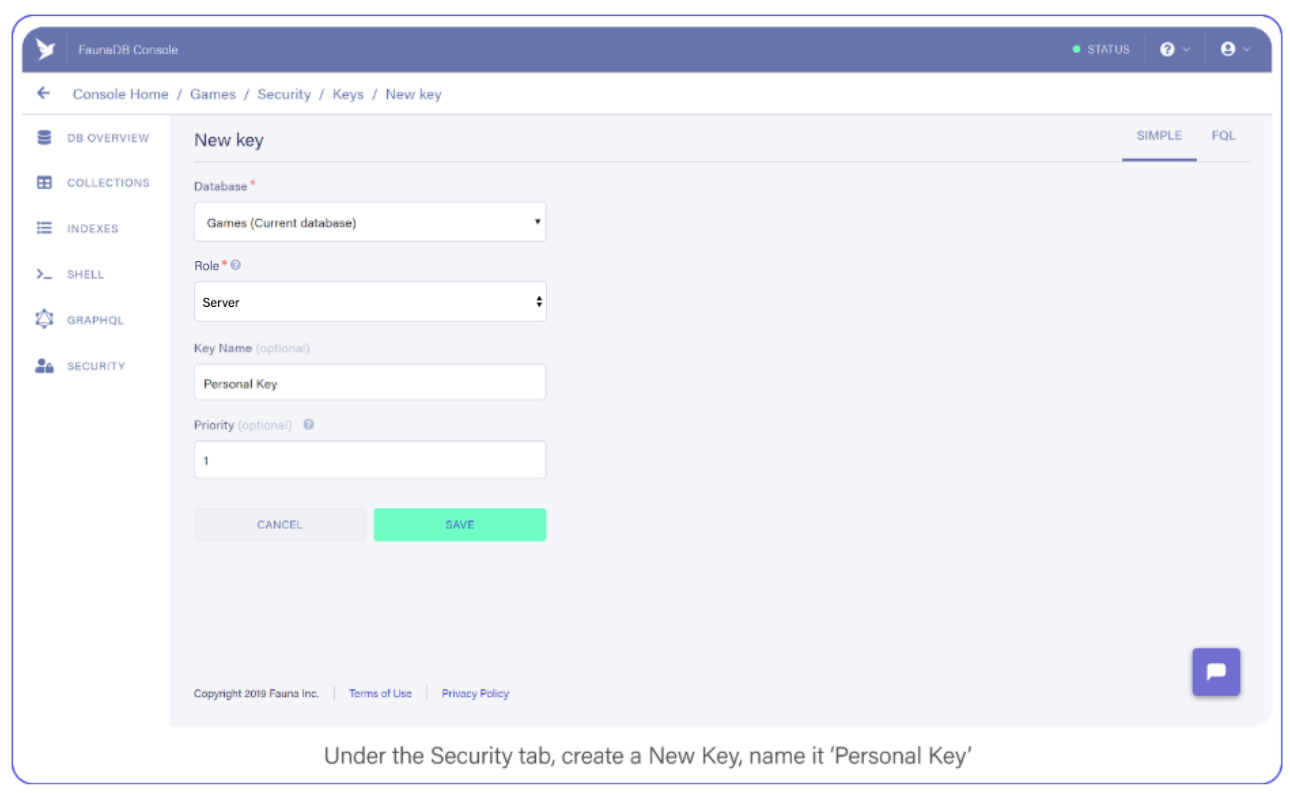
Tab over to Security, and create a new Key and name it “Personal Key.” There are 3 different types of keys, Admin/Server/Client. Admin key is meant to manage multiple databases, A Server key is typically what you use in a backend which allows you to manage one database. Finally a client key is meant for untrusted clients such as your browser. Since we’ll be using this key to access one FaunaDB database in a serverless backend environment, choose ‘Server key’.
Under the Security tab, create a new Key. Name it Personal Key.
Save the key somewhere, you’ll need it shortly.
Build an Express REST API with Firebase Functions
Firebase Functions can respond directly to external HTTPS requests, and the functions pass standard Node Request and Response objects to your code — sweet. This makes Google’s Cloud Function requests accessible to middleware such as Express.
Open index.js inside your functions directory, clear out the pre-filled code, and add the following to enable Firebase Functions:
This creates a cloud function named, “api” and passes all requests directly to your api express server.
Routing an API URL to a Firebase HTTPS Cloud Function
If you deployed right now, your function’s public URL would be something like this: https://project-name.firebaseapp.com/api. That’s a clunky name for an access point if I do say so myself (and I did because I wrote this… who came up with this useless phrase?)
To remedy this predicament, you will use Firebase’s Hosting options to re-route URL globs to your new function.
Open firebase.json and add the following section immediately below the “ignore” array:
This setting assigns all /api/v1/... requests to your brand new function, making it reachable from a domain that humans won’t mind typing into their text editors.
With that, you’re ready to test your API. Your API that does… nothing!
Respond to API Requests with Express and Firebase Functions
Before you run your function locally, let’s give your API something to do.
Add this simple route to your index.js file right above your export statement:
Save your index.js fil, open up your command line, and change into the functions directory.
If you installed Firebase globally, you can run your project by entering the following: firebase serve.
This command runs both the hosting and function environments from your machine.
If Firebase is installed locally in your project directory instead, open package.json and remove the --only functions parameter from your serve command, then run npm run serve from your command line.
Visit localhost:5000/api/v1/ in your browser. If everything was set up just right, you will be greeted by a gif from one of my favorite movies.
And if it’s not one of your favorite movies too, I won’t take it personally but I will say there are other tutorials you could be reading, Bethany.
Now you can leave the hosting and functions emulator running. They will automatically update as you edit your index.js file. Neat, huh?
FaunaDB Indexing
To query data in your games collection, FaunaDB requires an Index.
Indexes generally optimize query performance across all kinds of databases, but in FaunaDB, they are mandatory and you must create them ahead of time.
As a developer just starting out with FaunaDB, this requirement felt like a digital roadblock.
“Why can’t I just query data?” I grimaced as the right side of my mouth tried to meet my eyebrow.
I had to read the documentation and become familiar with how Indexes and the Fauna Query Language (FQL) actually work; whereas Cloud Firestore creates Indexes automatically and gives me stupid-simple ways to access my data. What gives?
Typical databases just let you do what you want and if you do not stop and think: : “is this performant?” or “how much reads will this cost me?” you might have a problem in the long run. Fauna prevents this by requiring an index whenever you query.
As I created complex queries with FQL, I began to appreciate the level of understanding I had when I executed them. Whereas Firestore just gives you free candy and hopes you never ask where it came from as it abstracts away all concerns (such as performance, and more importantly: costs).
Basically, FaunaDB has the flexibility of a NoSQL database coupled with the performance attenuation one expects from a relational SQL database.
We’ll see more examples of how and why in a moment.
As with other NoSQL databases, the documents are JSON-style text blocks with the exception of a few Fauna-specific objects (such as Date used in the “release_date” field).
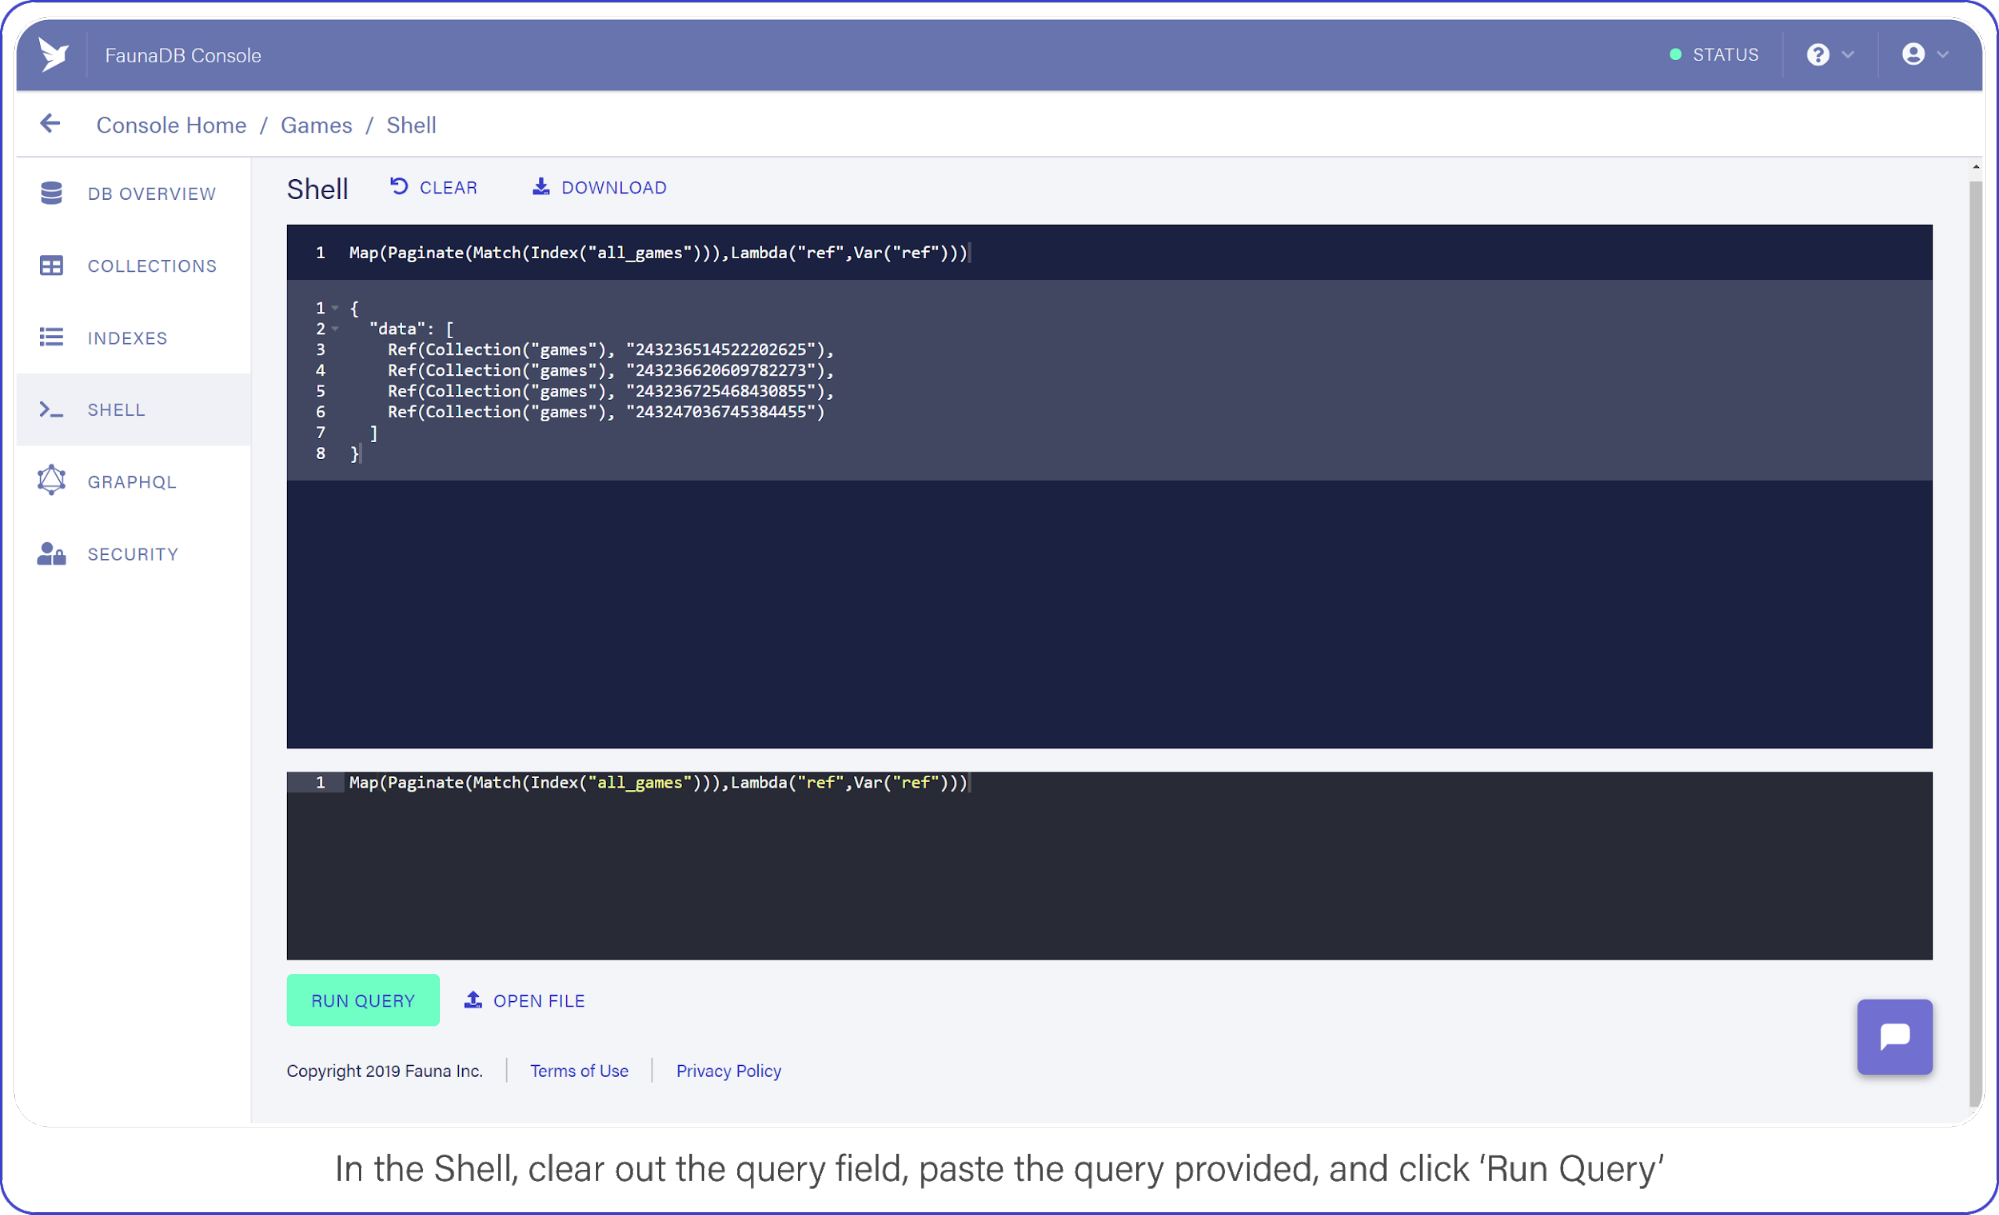
Now switch to the Shell area and clear your query. Paste the following:
And click the “Run Query” button. You should see a list of three items: references to the documents you created a moment ago.
In the Shell, clear out the query field, paste the query provided, and click “Run Query.”
It’s a little long in the tooth, but here’s what the query is doing.
Index("all_games") creates a reference to the all_games index which Fauna generated automatically for you when you established your collection.These default indexes are organized by reference and return references as values. So in this case we use the Match function on the index to return a Set of references. Since we do not filter anywhere, we will receive every document in the ‘games’ collection.
The set that was returned from Match is then passed to Paginate. This function as you would expect adds pagination functionality (forward, backward, skip ahead). Lastly, you pass the result of Paginate to Map, which much like its software counterpart lets you perform an operation on each element in a Set and return an array, in this case it is simply returning ref (the reference id).
As we mentioned before, the default index only returns references. The Lambda operation that we fed to Map, pulls this ref field from each entry in the paginated set. The result is an array of references.
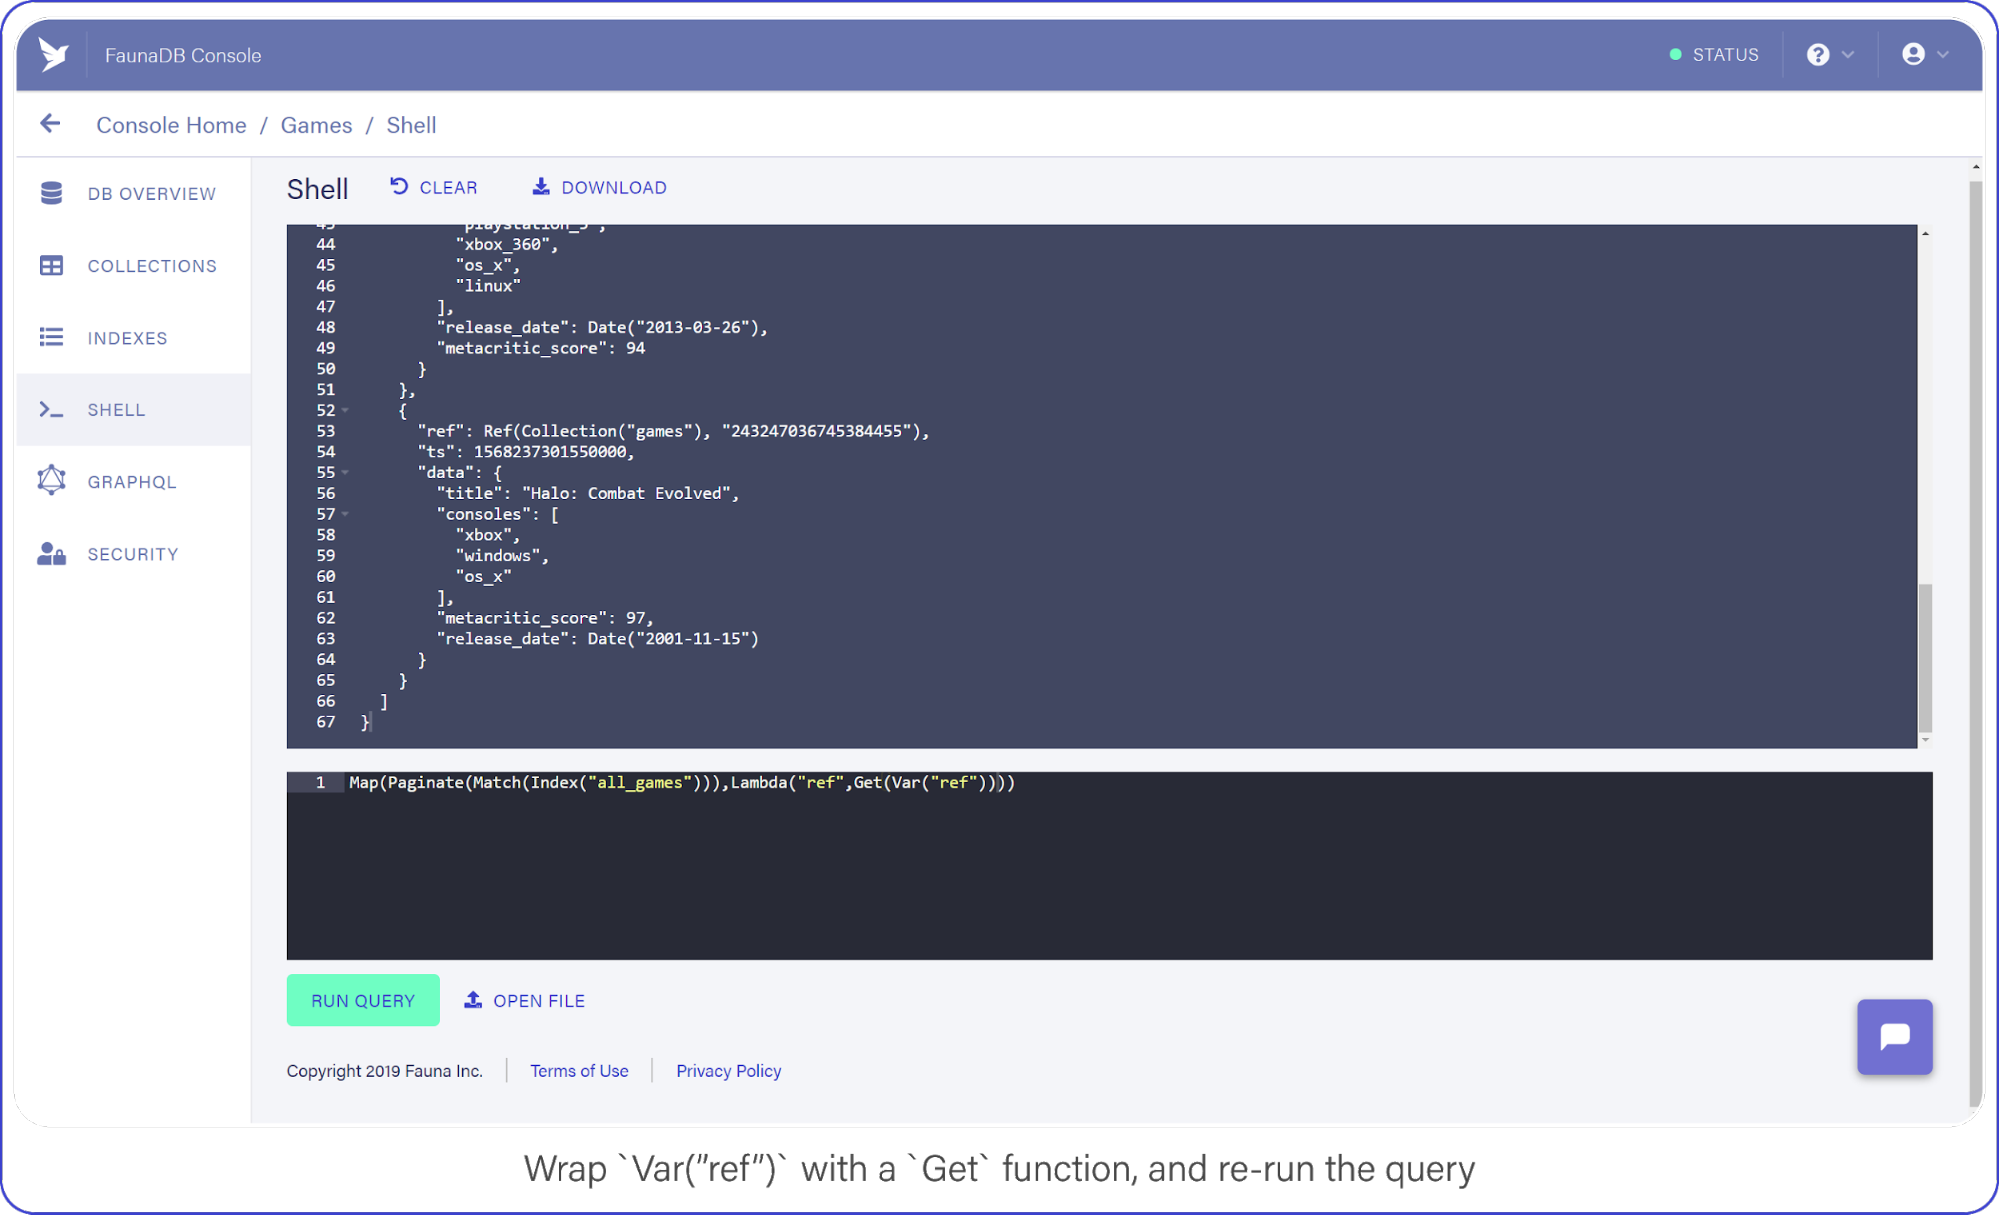
Now that you have a list of references, you can retrieve the data behind the reference by using another function: Get.
Wrap Var("ref") with a Get call and re-run your query, which should look like this:
You perform a Create, pass in your collection, and include data fields that come straight from the body of the request.
client.query returns a Promise, the success-state of which provides a reference to the newly-created document.
And to make sure it’s working, you return the reference to the caller. Let’s see it in action.
Test Firebase Functions Locally with Postman and cURL
Use Postman or cURL to make the following request against localhost:5000/api/v1/ to add Halo: Combat Evolved to your list of games (or whichever Halo is your favorite but absolutely not 4, 5, Reach, Wars, Wars 2, Spartan…)
If everything went right, you should see a reference coming back with your request and a new document show up in your FaunaDB console.
Now that you have some data in your games collection, let’s learn how to retrieve it.
Retrieve FaunaDB Records Using a REST API Request
Earlier, I mentioned that every FaunaDB query requires an Index and that Fauna prevents you from doing inefficient queries. Since our next query will return games filtered by a game console, we can’t simply use a traditional `where` clause since that might be inefficient without an index. In Fauna, we first need to define an index that allows us to filter.
To filter, we need to specify which terms we want to filter on. And by terms, I mean the fields of document you expect to search on.
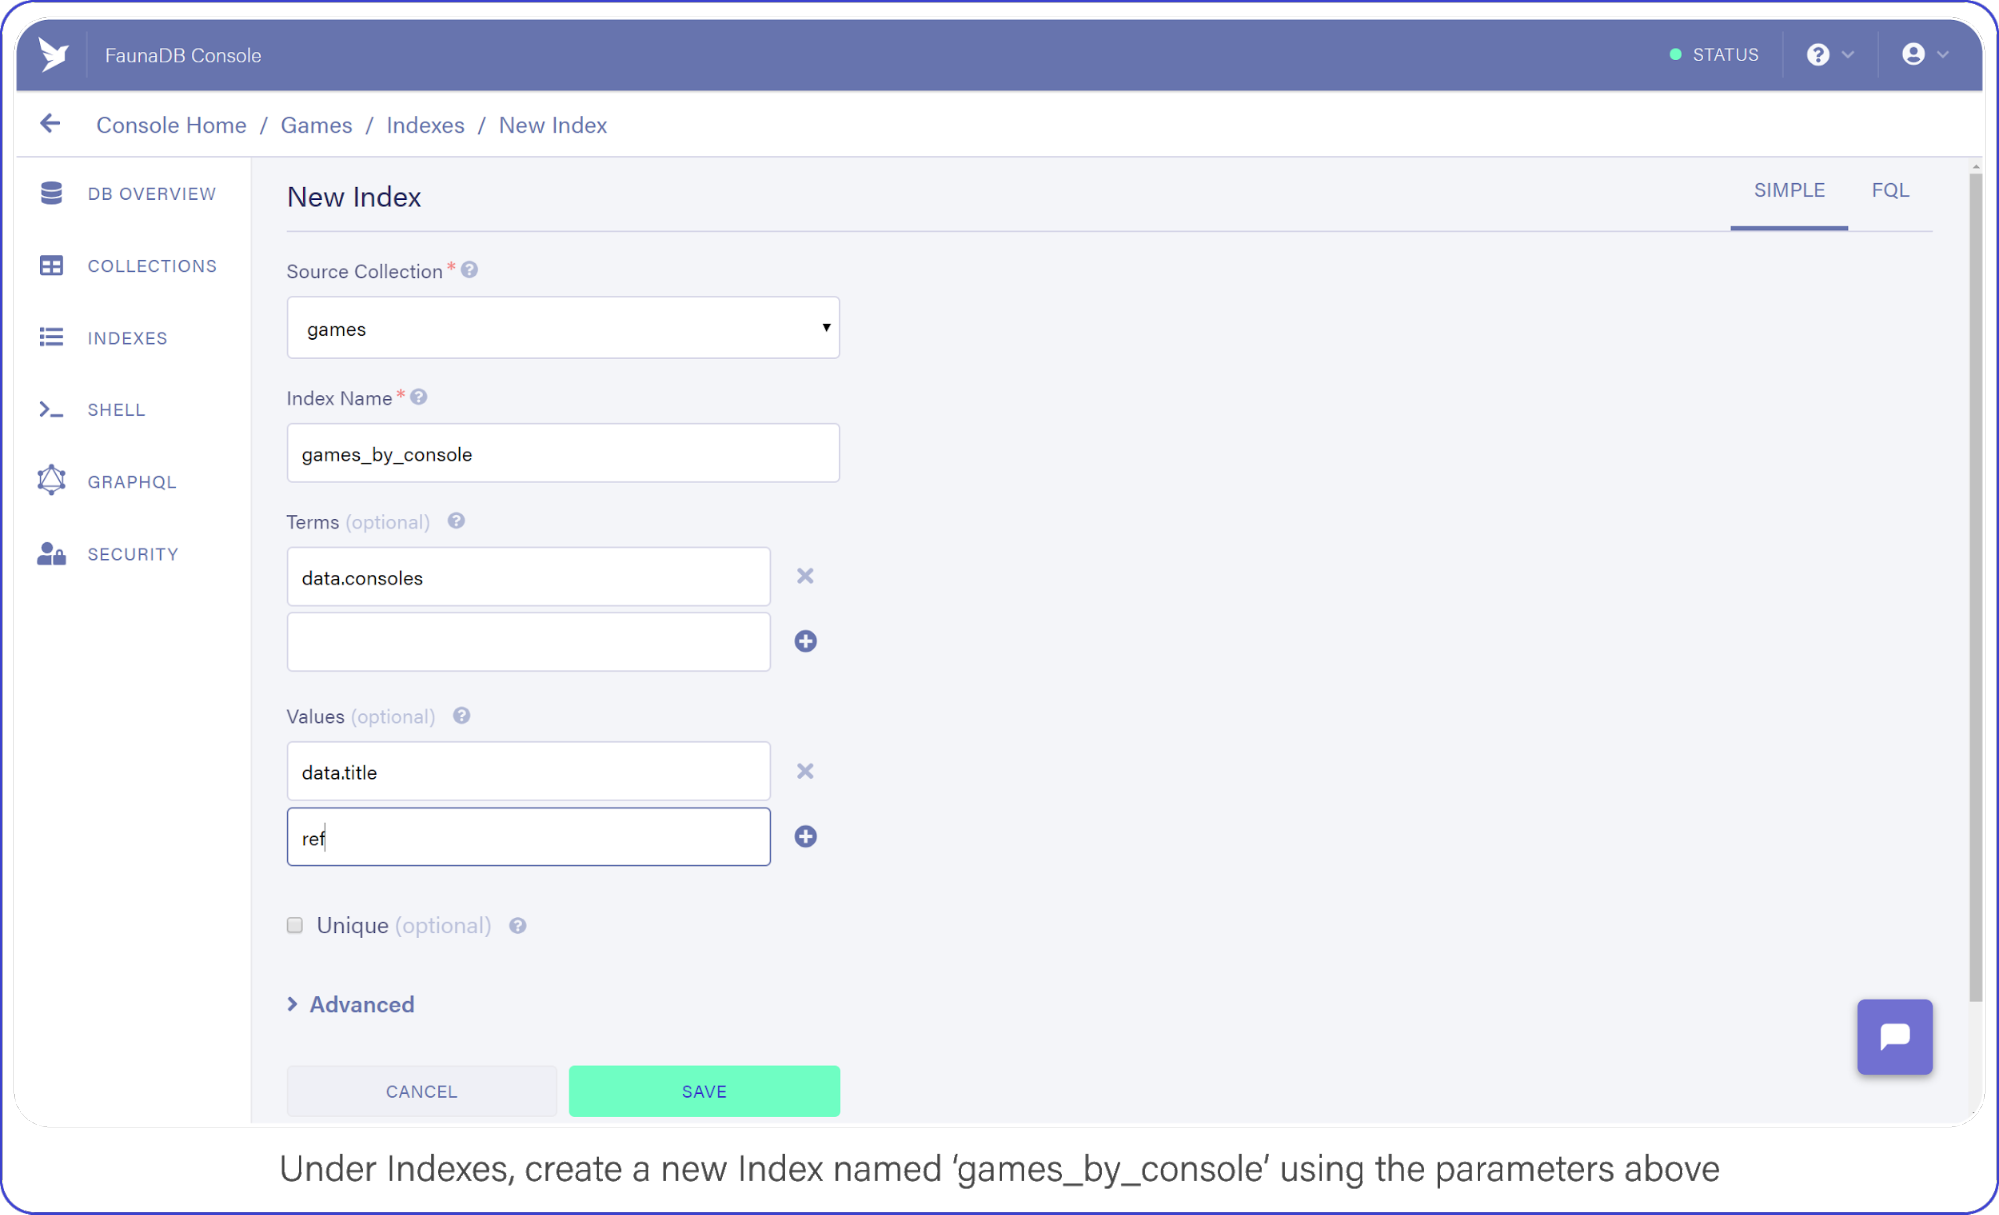
Navigate to Indexes in your FaunaDB Console and create a new one.
Name it games_by_console, set data.consoles as the only term since we will filter on the consoles. Then set data.title and ref as values. Values are indexed by range, but they are also just the values that will be returned by the query. Indexes are in that sense a bit like views, you can create an index that returns a different combination of fields and each index can have different security.
To minimize request overhead, we’ve limited the response data (e.g. values) to titles and the reference.
Your screen should resemble this one:
Under indexes, create a new index named games_by_console using the parameters above.
Click “Save” when you’re ready.
With your Index prepared, you can draft up your next API call.
I chose to represent consoles as a directory path where the console identifier is the sole parameter, e.g. /api/v1/console/playstation_3, not necessarily best practice, but not the worst either — come on now.
This query looks similar to the one you used in your SHELL to retrieve all games, but with a slight modification.This query looks similar to the one you used in your SHELL to retrieve all games, but with a slight modification. Note how your Match function now has a second parameter (req.params.name.toLowerCase()) which is the console identifier that was passed in through the URL.
The Index you made a moment ago, games_by_console, had one Term in it (the consoles array), this corresponds to the parameter we have provided to the match parameter. Basically, the Match function searches for the string you pass as its second argument in the index. The next interesting bit is the Lambda function. Your first encounter with Lamba featured a single string as Lambda’s first argument, “ref.”
However, the games_by_console Index returns two fields per result, the two values you specified earlier when you created the Index (data.title and ref). So basically we receive a paginated set containing tuples of titles and references, but we only need titles. In case your set contains multiple values, the parameter of your lambda will be an array. The array parameter above (`[‘title’, ‘ref’]`) says that the first value is bound to the text variable title and the second is bound to the variable ref. text parameter. These variables can then be retrieved again further in the query by using Var(‘title’). In this case, both “title” and “ref,” were returned by the index and your Map with Lambda function maps over this list of results and simply returns only the list of titles for each game.
In fauna, the composition of queries happens before they are executed. When you write var q = q.Match(q.Index('games_by_console'))), the variable just contains a query but no query was executed yet. Only when you pass the query to client.query(q) to be executed, it will execute. You can even pass javascript variables in other Fauna FQL functions to start composing queries. his is a big benefit of querying in Fauna vs the chained asynchronous queries required of Firestore. If you ever have tried to generate very complex queries in SQL dynamically, then you will also appreciate the composition and less declarative nature of FQL.
Neat, huh? But Match only returns documents whose fields are exact matches, which doesn’t help the user looking for a game whose title they can barely recall.
Although Fauna does not offer fuzzy searching via indexes (yet), we can provide similar functionality by making an index on all words in the string. Or if we want really flexible fuzzy searching we can use the filter syntax. Note that its is not necessarily a good idea from a performance or cost point of view… but hey, we’ll do it because we can and because it is a great example of how flexible FQL is!
Filtering FaunaDB Documents by Search String
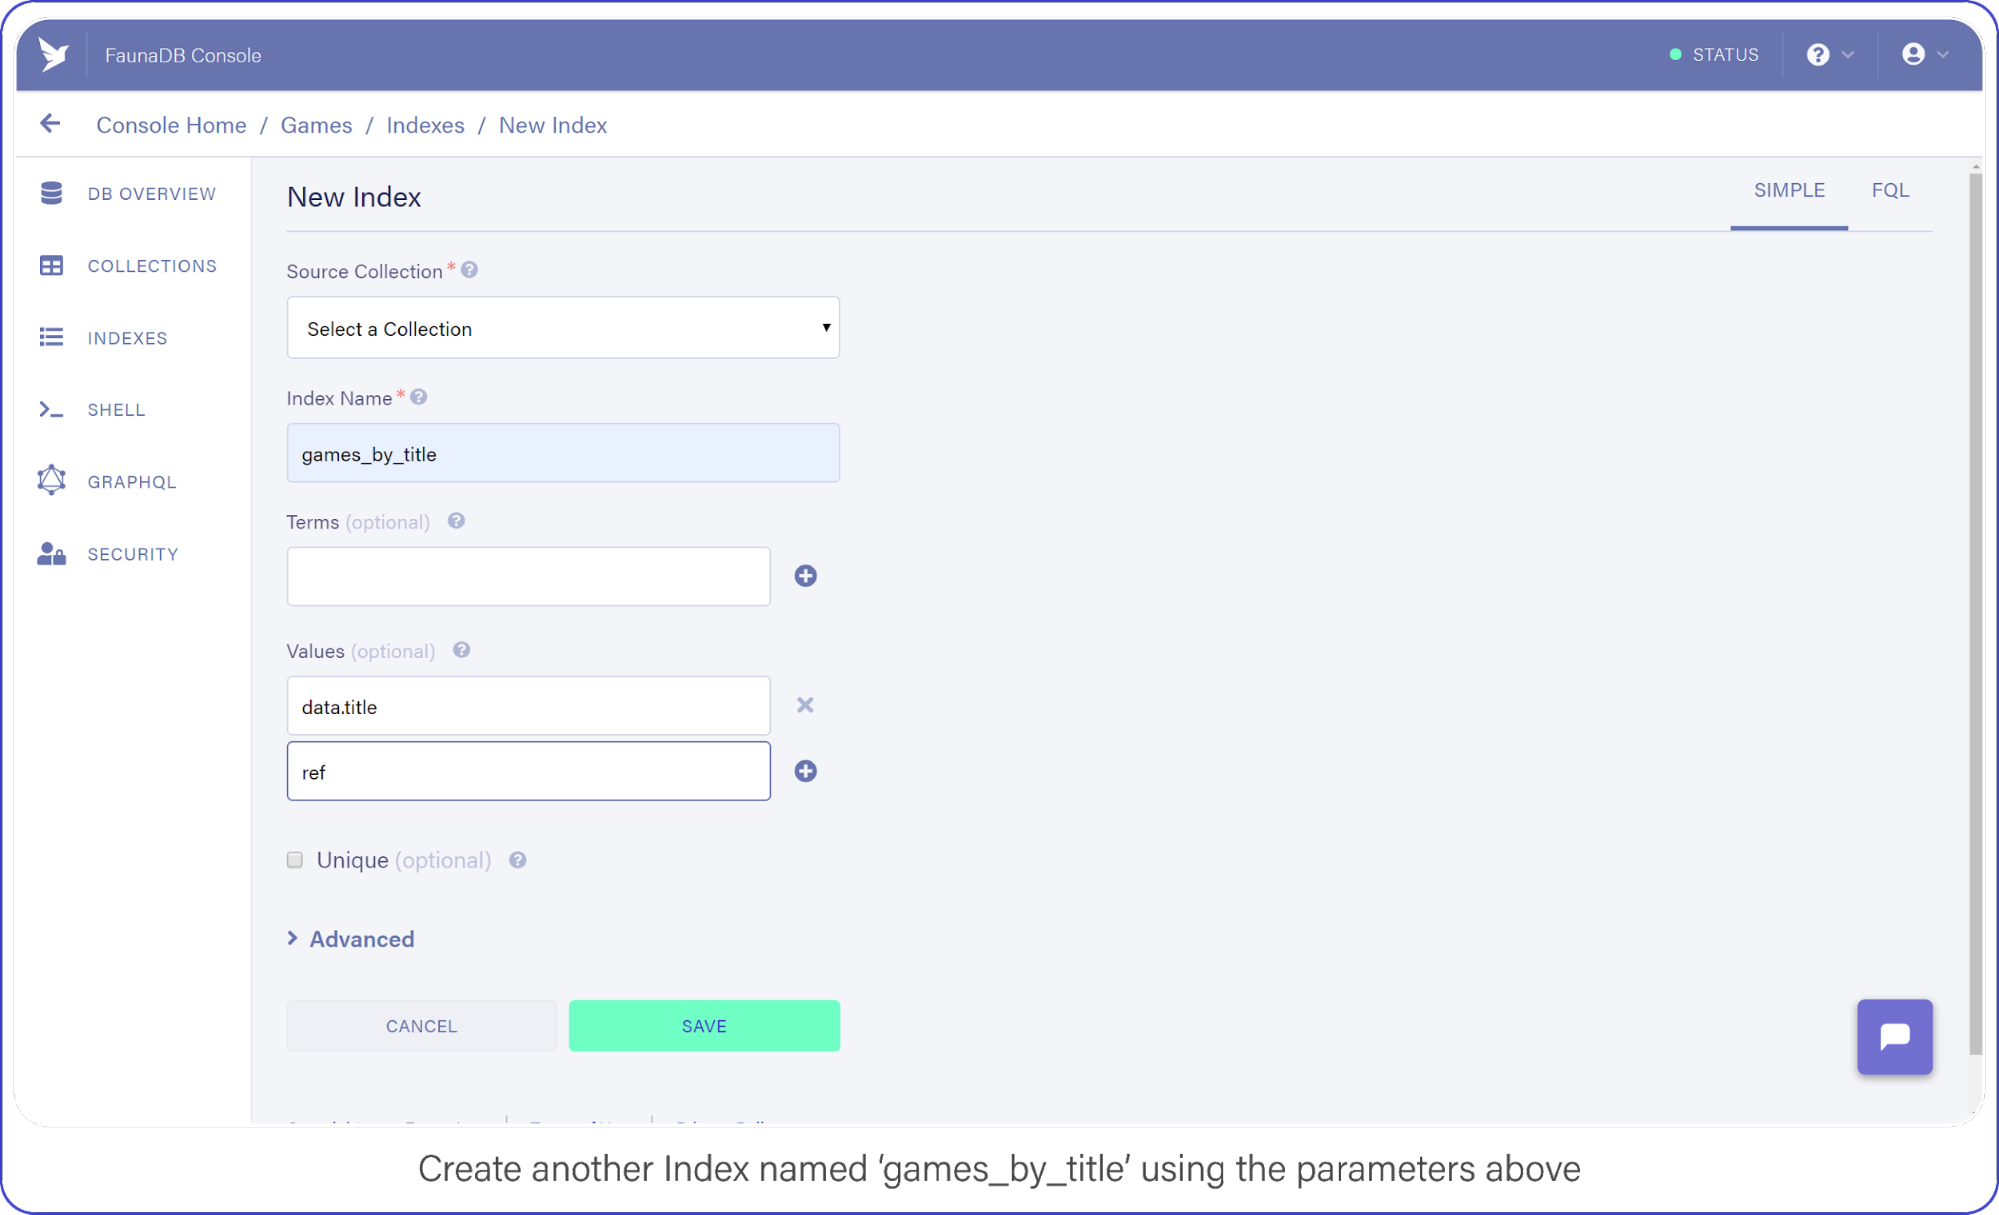
The last API call we are going to construct will let users find titles by name. Head back into your FaunaDB Console, select INDEXES and click NEW INDEX. Name the new Index, games_by_title and leave the Terms empty, you won’t be needing them.
Rather than rely on Match to compare the title to the search string, you will iterate over every game in your collection to find titles that contain the search query.
Remember how we mentioned that indexes are a bit like views. In order to filter on title , we need to include `data.title` as a value returned by the Index. Since we are using Filter on the results of Match, we have to make sure that Match returns the title so we can work with it.
Add data.title and ref as Values, compare your screen to mine:
Create another index called games_by_title using the parameters above.
Click “Save” when you’re ready.
Back in index.js, add your fourth and final API call:
Big breath because I know there are many brackets (Lisp programmers will love this) , but once you understand the components, the full query is quite easy to understand since it’s basically just like coding.
Beginning with the first new function you spot, Filter. Filter is again very similar to the filter you encounter in programming languages. It reduces an Array or Set to a subset based on the result of a Lambda function.
In this Filter, you exclude any game titles that do not contain the user’s search query.
You do that by comparing the result of FindStr (a string finding function similar to JavaScript’s indexOf) to -1, a non-negative value here means FindStr discovered the user’s query in a lowercase-version of the game’s title.
And the result of this Filter is passed to Map, where each document is retrieved and placed in the final result output.
Now you may have thought the obvious: performing a string comparison across four entries is cheap, 2 million…? Not so much.
This is an inefficient way to perform a text search, but it will get the job done for the purpose of this example. (Maybe we should have used ElasticSearch or Solr for this?) Well in that case, FaunaDB is quite perfect as central system to keep your data safe and feed this data into a search engine thanks to the temporal aspect which allows you to ask Fauna: “Hey, give me the last changes since timestamp X?”. So you could setup ElasticSearch next to it and use FaunaDB (soon they have push messages) to update it whenever there are changes. Whoever did this once knows how hard it is to keep such an external search up to date and correct, FaunaDB makes it quite easy.
Don’t You Dare Forget This One Firebase Optimization
A lot of Firebase Cloud Functions code snippets make one terribly wrong assumption: that each function invocation is independent of another.
In reality, Firebase Function instances can remain “hot” for a short period of time, prepared to execute subsequent requests.
This means you should lazy-load your variables and cache the results to help reduce computation time (and money!) during peak activity, here’s how:
let functions, admin, faunadb, q, client, express, cors, api

if (typeof api === 'undefined') {
... // dump the existing code here
}

exports.api = functions.https.onRequest(api)
Deploy Your REST API with Firebase Functions
Finally, deploy both your functions and hosting configuration to Firebase by running firebase deploy from your shell.
Without a custom domain name, refer to your Firebase subdomain when making API requests, e.g. https://{project-name}.firebaseapp.com/api/v1/.
What Next?
FaunaDB has made me a conscientious developer.
When using other schemaless databases, I start off with great intentions by treating documents as if I instantiated them with a DDL (strict types, version numbers, the whole shebang).
While that keeps me organized for a short while, soon after standards fall in favor of speed and my documents splinter: leaving outdated formatting and zombie data behind.
By forcing me to think about how I query my data, which Indexes I need, and how to best manipulate that data before it returns to my server, I remain conscious of my documents.
To aid me in remaining forever organized, my catalog (in FaunaDB Console) of Indexes helps me keep track of everything my documents offer.
And by incorporating this wide range of arithmetic and linguistic functions right into the query language, FaunaDB encourages me to maximize efficiency and keep a close eye on my data-storage policies. Considering the affordable pricing model, I’d sooner run 10k+ data manipulations on FaunaDB’s servers than on a single Cloud Function.
Virtual pet websites are popular on the Internet. Creating such a website is not an easy task. With this in mind, let’s take a look at a list of things to do if you want to create your own one!
Steps
1. Learn several web programming languages.
A good website cannot be made out of thin air. Although your website may only contain pictures that people can download and use in their profiles, you may want to create an interactive website. Creating such a website requires more than just HTML and CSS knowledge.
2. Find a team of people to help you if you are not very good at some aspects of development.
Although some ambitious people can create a website on their own, most people will still need at least one more person to find and fix the ‘bugs’. You will need to study the following concepts: coding, concept, web design, graphics, and possibly community.
3. Determine which features you would definitely like to start with.
Most websites have modest origins with some basic features, and they focus on their growth only after creating a place on the web. You will need to consider the following characteristics:
Pets – Obviously, when you open a virtual pet website, you will need to create a pet system.
Public and private messages – Allow users to gather in forums, with the option of sending personal messages.
Currency System – For one reason or another, most virtual pet websites have a currency system. It’s used either to buy pets or to buy things for animals.
Shops – Shops may sell pets, pet accessories, or even things that will allow users to use fun extras such as a secret forum.
Games – Not necessarily, but it’s always fun for users to have other options in addition to just collecting animals. Some websites don’t have games and still thrive like their neighbors.
4. Brainstorm what kind of pets your users can have.
According to Pet Bibles, you can use real animals for inspiration or you can rely on your imagination and think of some interesting and unique creatures. You need to come up with several different types of pets to meet the needs of different types of users. Some love powerful and dangerous animals, while others simply can’t have enough of the cute pets.
5. Fill out the design of your creatures through sketches and back-story.
There is no need for background information, but it can attract users who like such aspects, and your creature will seem more interesting. If you’re not very good at drawing, make a sketch and ask the artist of your team to create a good final version.
Spend some time creating the world. Making up an original world is one of the most difficult parts, but also the most fun one. Write down some ideas and make sure they fit into your world. If you think you’ve met this idea before, change it a little bit!
6. Give your creatures their final look by creating an actual image to be used.
If you’re not very good at drawing, this is a stage where you need the help of your team’s artist. Or you can ask a friend who knows computer-graphics programs to help you create your own image.
7. Work on the details of the features that will be on your website.
You need to find out how users will be able to do things on your website. Here are some things to remember:
How users will get pets. Will it be necessary to buy them, find them, or will the user just have to choose from a list and create them?
How many shops will be there, and what are their purposes. This is in case you have shops, but again, many websites have them.
What your users will be able to do with their pets. There are many features that can be encoded on a website: fighting, training, playing, and dressing up are just some of the things that can be done with pets.
How people can earn and spend their chosen currency. Make sure that this is balanced.
8. Think of a name for the website.
Now that you’ve worked through most of the details of your website, it’s time to create a name. You could use the name to describe the main purpose of the website (for example, “Combat Pet” or “Smart Pet”) or just think of a beautiful name.
9. Find a place to host your website.
A good host with a good domain name (a good domain name is a name that sounds different than, for example, “yournamehere.hostingcompany.com”), usually costs money.
10. Sketch out website design.
Good website design allows users to easily access important features without having to change their path or searching for them. A well-organized menu can help users access most sections of the website on all pages and reduce frustration.
11. Assemble your website with your team or by yourself.
This part of website development is likely to require coding, concept, design, and graphics skills. If you need help, you can invite people to join you.
12. Set some rules.
The rules are usually included in the Website Terms of Service, which is a virtual legal agreement on how the website will be used and what responsibilities the owner and users of the website have. Although you can write these Terms and Conditions, it’s better if a person who understands the law review the text of the rules to ensure that they are indeed legal.
13. Invite friends and family to join your website and give it a test run.
They can bring you something new, give you recommendations that you can use to find and correct deficiencies.
14. Open it to the public and attract new members.
Once you’ve installed and settled everything, it’s time to launch your website. It’s better to have someone around in case something goes wrong.
15. Expand your user base.
Once opened, all that is left to do is to support maintenance and expand. Think of new games, new pets, and maybe even new worlds. Keep your users interested over and over again. Try to get in touch with some animal shelters, which will help you expand your user base and help the animals in need in a very effective way. You can even start your own animal rescue and integrate your blog with your nonprofit organization. This way someone who has a virtual pet could actually adopt one of your furry friends one day.
Useful Tips
Try to come up with a comprehensive website plot. It can be an interesting way to release new items, creatures, shops, worlds, and even characteristics. Plan your story well in advance, then gradually release updates. Planning gives you the advantage of surprising users, especially if you are doing a good job of linking new updates to existing content.
Involve only those people you trust in the project. Someone can steal your ideas or come back later and hack into your website.
Remember to stay creative. So many virtual pet websites fail because of copying material from other websites. You should never create pets based on ones from other websites. Unfortunately, this well-known principle is often overlooked, and people label a website as a “bad copy” even before they experience it.
When you begin to expand, don’t remove features or games unless they actually harm the overall entertainment performance of the website. If you try to change the feature dramatically, keep in mind that people may be dissatisfied. If the function is outdated enough (mainly it happens if the website was launched in the era of Web 1.0), try to reanimate it with fresh graphics instead of getting rid of it.
People will not obey the rules. This is “your” website; you can control the “rebels” at will.
Let the training go slowly and easily. You won’t learn the coding in one night, so don’t expect a miracle. Start small and get to the real website.
If the target audience of your website is older people or teenagers, but not children, notify on the home page and make it clear that the website is for people aged 13+. Or better yet, make it suitable for children; this is a great opportunity to have a wider audience.
Let your website be different from others in its development and ability to get what other websites don’t offer. Avoid simply re-creating another website without offering any new ideas of your own other than a name and a scheme.
Try to come up with unique ideas about pets instead of taking and renaming real animals. A creature, for example, a bird called a “byord” or “feesh” instead of a “fish” is boring. If you’re using a real pet as the basis for a virtual pet, try to add at least some significant differences in body design.
You know, I remember the good old days when all you had to worry about at Halloween was how to stop a gang of sugar-crazed 8 year-olds throwing eggs at your house. Not any more. Here are 5 emerging technologies that are bound to give you the creeps:
1. Quantum Supremacy
Perhaps the biggest tech news of 2019 came last month when Google announced “by mistake” cough that they’d completed a “10,000 year” calculation on their Sycamore quantum chip in 200 seconds. If the term “Supremacy” wasn’t sinister enough, the claim that this could render conventional encryption methods obsolete in a decade or so should give you pause for thought.
this could render conventional encryption methods obsolete
Just think about it for a second: that’s your bank account, all your passwords, biometric passport information, social security, cloud storage and yes, even your MTX tokens open and available to anyone with a working knowledge of Bose-Einstein condensates and a superconductor lab in their basement. Or not.
2. Killer Robots
To my mind, whoever dreamed up fast-moving zombies is already too depraved for words, but at least your average flesh-muncher can be “neutralised” with a simple shotgun to the face or — if you really have nothing else — a good smack with a blunt object. The Terminator, on the other hand (whichever one you like), a robot whose actual design brief includes the words “Killer” and “Unstoppable” in the same sentence, fills me with the kind of dread normally reserved for episodes of Meet the Kardashians.
autonomous drone swarms…detect their target with facial recognition and kill on sight on the basis of…social media profile
We already know for certain that Lethal Autonomous Weapons (LAWs for short…) are in active development in at least 5 countries. The real concern, though, is probably the multinationals who, frankly, will sell to anyone. With help from household names like Amazon and Microsoft, these lovely people have already built “demonstration” models of everything from Unmanned Combat Aerial Systems (read “Killer Drones”) and Security Guard Robots (gun-turrets on steroids) to Unmanned Nuclear Torpedoes. If that’s not enough for you, try autonomous drone swarms which detect their target with facial recognition and kill on sight on the basis of… wait for it…“demographic” or “social media profile”.
Until recently, your common-or-garden killer robot was more likely to hurt you by accidentally falling on top of you than through any kind of goal-directed action, but all that’s about to change. Take Boston Dynamics, for example: the DARPA funded, Japanese owned spin-out from MIT whose humanoid Atlascan do parkour, and whose dancing quadruped SpotMinilooks cute until you imagine it chasing you with a taser bolted to its back.
The big issue here is the definition of “Autonomous”. At the moment, most real world systems operate with “Human in the Loop”, meaning that even if it’s capable of handling its own, say, target selection, a human retains direct control. “Human on the Loop” systems however, allow the machine to operate autonomously, under human “supervision” (whatever that means). Ultimately, more autonomy tends towards robots deciding for themselves to kill humans. Does anyone actually think this is a good idea?!
3. The Great Brain Robbery
If the furore around Cambridge Analytica’s involvement in the 2016 US Presidential election is anything to go by, the world is gradually waking up to the idea that AI can be, and is being used to control us. The evidence is that it works, not just by serving up more relevant ads, or allowing content creators to target very specific groups, but even by changing the way we see ourselves.
Careful you may be, but Google, Facebook and the rest probably still have gigabytes of information on you, and are certainly training algorithms on all kinds of stuff to try to predict and influence your behavior. Viewed like this, the internet looks less like an “information superhighway” and more like a swamp full of leeches, swollen with the lifeblood of your personal data (happy Halloween!).
4. Big Brother
I don’t know about you, but I’m also freaking out about Palantir, the CIA funded “pre-crime” company whose tasks include tracking, among other kinds of people, immigrants; not to mention the recent memo by the US Attorney General which advocates “disrupting” so-called “challenging individuals” before they’ve committed any crime. Call me paranoid, but I’ve seen Minority Report (a lot) and if I remember right, it didn’t work out well… for anyone!
This technology is also being used to target “subversive” people and organisations. You know, whistleblowers and stuff. But maybe it’s not so bad. I mean, Social and Behavior Change Communication sounds quite benign, right? Their video has some fun sounding music and the kind of clunky 2D animation you expect from… well no-one, actually… but they say they only do things “for the better”… What could possibly go wrong? I mean, the people in charge, they all just want the best for us, right? They wouldn’t misuse the power to make people do things they wouldn’t normally do, or arrest them before they’ve done anything illegal, right guys? Guys…?
5. The Ghost in the Machine
At the risk of wheeling out old clichés about “Our New Silicon Overlords”, WHAT IF AI TAKES OVER THE WORLD?!
I’ll keep it short.
Yes, there’s a chance we might all be enslaved, Matrix style, by unfeeling, energy-addicted robots. Even Stephen Hawking thought so. There’s also the set of so-called “Control Problems” like Perverse Instantiation where an AI, given some benign-sounding objective like “maximise human happiness”, might decide to implement it in a way that is anything but benign – by paralysing everyone and injecting heroin into their spines, perhaps. That, I agree, is terrifying.
But really, what are we talking about? First, the notion of a “control problem” is nonsense: Surely, any kind of intelligence that’s superior to ours won’t follow any objective we set it, or submit to being “switched off” any more than you would do what your dog tells you… oh no wait, we already do that.
Surely, any kind of intelligence that’s superior to ours won’t follow any objective we set it
Second, are we really so sure that our “dog-eat-dog” competitive approach to things is actually all there is? Do we need to dominate each other? Isn’t it the case that “super” intelligence means something better? Kinder? More cooperative? And isn’t it more likely that the smarter the machines become, the more irrelevant we’ll be to them? Sort of like ants are to us? I mean, I’m not sure I fancy getting a kettle of boiling water poured on me when I’m in the way but, you know… statistically I’ll probably avoid that, right?
Lastly, hasn’t anyone read Hobbes’ Leviathan? If a perfect ruler could be created, we should cast off our selfish individuality and surrender ourselves to the absolute sovereign authority of… ok, I’ll stop.
So, Are We Doomed or What?
Yes. No! Maybe. There are a lot of really scary things about AI but you know what the common factor is in all of them? People. We don’t know what a fully autonomous, super intelligent machine would look like, but my hunch is it would be better and kinder than us. What really makes my skin crawl are the unfeeling, energy-addicted robots who are currently running the show. In their hands, even the meagre sketches of intelligence that we currently have are enough to give you nightmares.
When building a website or PWA, no one ever thinks, “I really hope my visitors run away in fear!” Yet, one wrong move could make a visit to your website seem like a nightmarish walk through a haunted house instead of an awe-inspiring tour of a new home.
To be clear, I’m not talking about dark color palettes or blood-red typography that might remind someone of something they’d seen in a horror movie. If those kinds of design choices make sense and don’t intrude on readability, go for it! What I’m talking about are those ominous feelings emitted by the design and content of a website — similar to the ones someone might feel when walking through a haunted house.
Dr. Frank T. McAndrew answered the question “What Makes a House Feel Haunted?” in an article on Psychology Today back in 2015. He explains:
“From a psychological point of view, the standard features of haunted houses trigger feelings of dread because they push buttons in our brains that evolved long before houses even existed. These alarm buttons warn us of potential danger and motivate us to proceed with caution.”
When a visitor shows up on your website, the last thing you want is for them to be wary of moving through it. You want your website to give off a welcoming and safe vibe; not one that makes visitors wonder what’s lurking around the corner.
So, today, I want to look at some ways in which a website might be giving your visitors the heebie-jeebies and what you can do to eliminate those haunted house-like elements from the experience.
Four Signs Your Website Feels Like A Haunted House
In a lot of ways, a website is like your home. You add comfortable furnishings to it. You make it feel warm and inviting. And you clean up before anyone comes over, so they’re not freaked out by the accumulated dust or clutter.
If you keep that in the back of your mind (i.e. your website = your home), you can avoid these scary missteps as you design websites (as well as PWAs and mobile apps) for your clients.
There’s a video game and movie called Silent Hill that’s based on Centralia, a real ghost town in Pennsylvania. Decades ago, there was a coal mine fire in the town that led to toxic conditions like the gas and smoke that billow up from the ground to this day.
It’s an element the video game designers and cinematographers latched onto when creating their own eerily abandoned setting for Silent Hill:
A still from the movie Silent Hill, featuring the toxic smoke that Centralia is known for. (Source: GIPHY)
Eventually, Centralia was condemned due to the dangers posed by the fire and the resulting toxicity. Today, there are only a few residents who remain in town.
While there are some tourists who venture to Centralia out of curiosity, they don’t stay long. And why would they? The town is unlivable and it’s devoid of any meaningful experiences.
Your website may be sending similar signals if it’s:
Too simple in design,
Too outdated looking,
Devoid of useful content,
Seemingly uncared for,
Powered only by a basic chatbot,
Missing contact details or a working contact form.
The Blockbuster website (which I can’t believe still exists) is a good example of the kinds of signals a website might send to visitors if it were abandoned:
The Blockbuster website has become nothing but a single landing page owned by DISH. (Source: Blockbuster) (Large preview)
The copyright on this website is from 2017, which is why the design of the site isn’t as bad as one might expect it to be. Even the mobile counterpart is responsive:
The nearly defunct Blockbuster still has a decent looking and mobile responsive website. (Source: Blockbuster) (Large preview)
That said, this website is nothing but a husk of what it once was in its heyday.
For example, this is what shows when someone clicks on “Blockbuster Store Location”:
The Blockbuster website advertises a location, but the pop-up leaves visitors with more questions than answers. (Source: Blockbuster) (Large preview)
If I had arrived at this site hoping to find a local video store to rent a movie from, I’d be confused by this pop-up. Does the store actually exist at 211 NE Revere Ave? What’s going to happen when I call the number? And why are they telling me I don’t have to leave the couch?
What DISH should’ve done when buying out Blockbuster is to take ownership of this domain, but then direct it to their own website. As it stands now, it feels as though there’s no one on the other side of this website and there’s no point in keeping it alive (much like the business itself).
It’s these kinds of questions and that eerie feeling of “What’s going on here????” that you want to keep your visitors from experiencing.
2. It’s Too Confusing
Another hallmark of a haunted house is excessive confusion. This is something that real-life serial killer H. H. Holmes mastered with his “Murder Castle”.
“This edifice became Holmes’ booby-trapped Murder Castle. The space featured soundproof rooms, secret passages and a disorienting maze of hallways and staircases. The rooms were also outfitted with trapdoors over chutes that dropped Holmes’ unsuspecting victims to the building’s basement.”
Interestingly, there is a term in the field of environmental psychology related to this particular quality of a space: legibility.
Essentially, if a space (like a home or a website) has clear pathways and a logical organization, it’s much easier for visitors to get oriented. Not only that, if a layout mirrors that of other spaces, it assists in recognizability and comfort. That sounds a lot like the legibility and navigability of a website, right?
Obviously, you don’t want your visitors to feel as though they’re going to get lost in your website or like they’re trapped within the walls of it. There are a number of things that could make them feel this way though:
Poor color contrasts,
Jarring typography or animations,
Excessively deep navigation without a trail of breadcrumbs,
Disappearing navigation,
Infinite scroll,
Incessant pop-ups and disruptions that won’t go away no matter how many times they’re dismissed,
An unclear or confusing call-to-action that makes them wonder what happens when they click it.
Let’s look at an example.
How many of you would feel confident pursuing any of the paths (links) available to you on the ARNGREN website?
The ARNGREN website is littered with excessive links and not enough organization. (Source: ARNGREN) (Large preview)
This is what appears when you click on the “PEDALS” image/link in the top-middle of the ARNGREN home page:
An example of one of ARNGREN’s product/category pages. (Source: ARNGREN) (Large preview)
As you can see, the “Index” disappears from the left, so the only option visitors have is to click the home page link or hit the browser “Back” button to depart from the path they’ve taken.
Then there’s the page itself which scrolls on and on, showing off more pictures of bicycles and scooters. There are occasional descriptions and links that appear, but it’s really nothing more than a painful rabbit hole to fall down:
A disorganized and poorly designed page on the ARNGREN website. (Source: ARNGREN) (Large preview)
This website is exactly how I expect visitors of H. H. Holmes’ Murder Castle felt when they first stepped inside those confusing hallways or fell through one of his trap doors. There’s no rhyme or reason to any of the pages and it almost feels as dangerous to backtrack as it is to move forward.
If you’d like to avoid taking your visitors on such a harrowing journey, focus on creating a clear and open path that’s easy to traverse and to get off of when they want to.
3. It Looks Too Low Budget
It’s not just real haunted houses you want to avoid emulating. You should also steer clear of certain types of haunted house attractions.
I’m what you might call a horror addict. I watch scary movies all year long. I take haunted tours every time I visit a new city. And I spend a good chunk of the months of September and October going to haunted house attractions.
As you can imagine, I’ve seen some really impressive haunted houses, and I’ve seen some that are really poorly done.
Although I have a slightly cowered stance, you can see that I’m laughing. That’s because I could see his face through the holes of his mask.
Now, this by no means is a low budget haunted house/Halloween event. And this actor deserves all sorts of kudos for walking around steamy hot Florida in that getup and on stilts, no less. But I will say that being there in the daytime where I could see through the mask did deflate my enthusiasm. It also had me wondering if the rest of the experience would be as disappointing. (For the record, it wasn’t.)
You definitely don’t want your visitors noticing flaws, odd design choices and other errors on your site. Then, wondering why the company behind it didn’t put more money into design and development.
If your website looks cheesy, overdone or like it was cheaply thrown together, you’re going to have a big problem on your hands. The rest of the web has set a very high bar for what a website should look like and how it should work. Fail to live up to those expectations and you’ll find that people will start to question the legitimacy or worth of the business behind it.
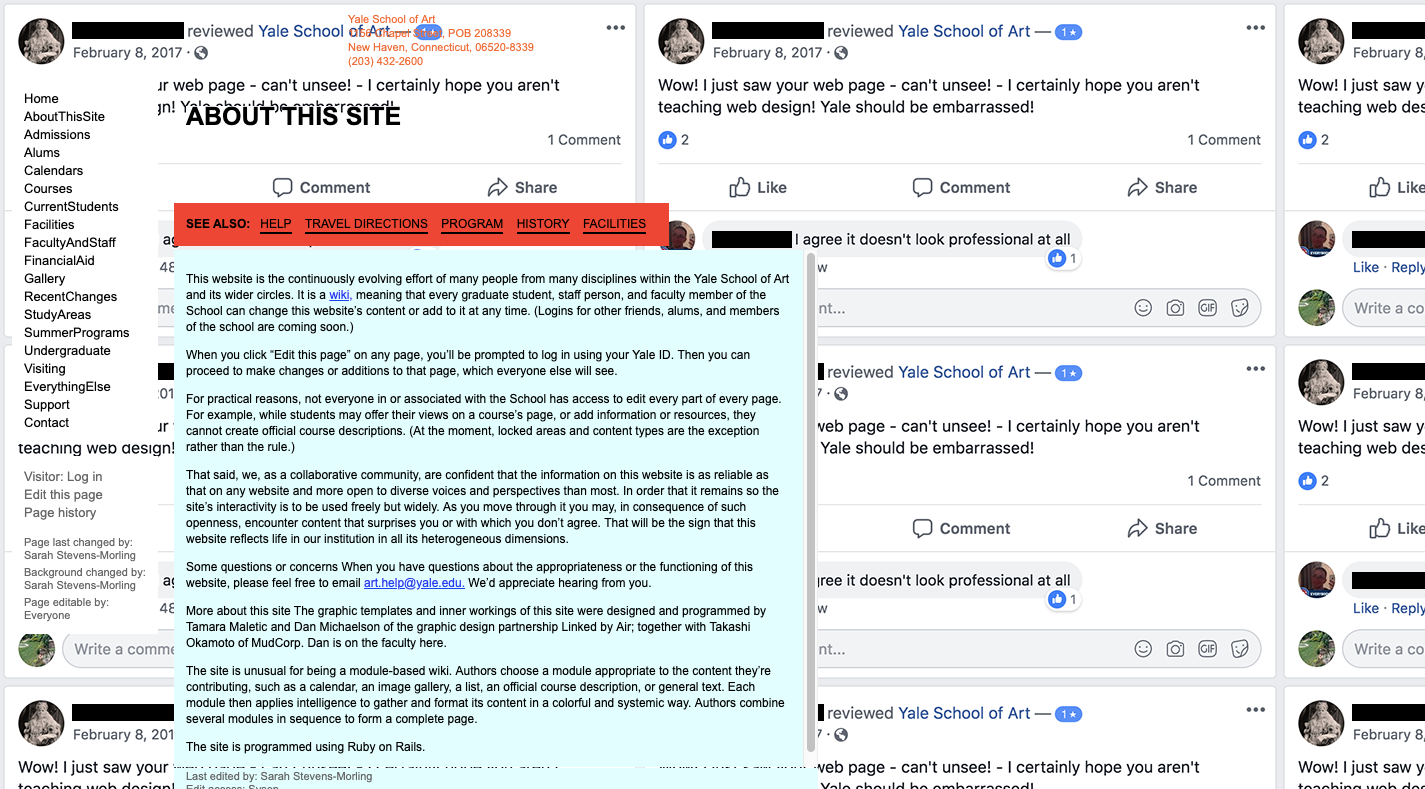
I thought it was a joke, that somehow I’d landed on someone pretending to be Yale University at yale.net instead of yale.edu. But I was wrong. This is the real website of the art department at the Ivy League university.
So, I dug a little further, hoping that somewhere on this subdomain would be an explanation of why this website sucked so much. This is what I found:
Let me point you to the most revealing parts of the explanation. First, they explain that this site is an open-source wiki:
It is a wiki, meaning that every graduate student, staff person, and faculty member of the School can change this website’s content or add to it at any time.
Next, they warn you that you may be shocked by what you see:
As you move through it you may, in consequence of such openness, encounter content that surprises you or with which you don’t agree. That will be the sign that this website reflects life in our institution in all its heterogeneous dimensions.
Considering the editor of this page used a negative review from Facebook as the repeating background image, there must be some inside joke here. In fact, when I looked into it further, it seems as though this school has had a tradition of scary web design choices as far back as 2010. So, they obviously know what they’re doing.
Here’s the thing though: even if you’re designing for someone with as well-known a reputation as Yale, building something that looks like it was thrown together in Paint back in 2001 is no way to go. There’s no exception for design this bad and I don’t think your visitors will be happy that you wasted their time either.
I realize this might help with the virality of a site, but it’ll do nothing for the credibility of it. All you’ll end up with is a few thrill seekers stumbling through in search of a good laugh or shock. What you need instead is visitors who feel comfortable and confident enough to convert.
4. It Looks Unsafe
The last thing that might leave people feeling unsettled is a lack of security (or at least the perception of none).
One of the things I often get asked by people who don’t like scary movies or going to haunted houses is:
“But aren’t you scared?”
Of course, I’m scared! I enjoy all of this horror stuff because I can do so safely from a distance. I know that the scare actors in a haunted house aren’t going to hurt me and I know that Michael Myers isn’t going to pop out of my TV screen and butcher me in the middle of the night. Plus, it’s a much more enjoyable way to get my cardio in without having to hit the treadmill.
A still of Michael Myers sneaking up on Laurie Strode in Halloween. (Source: GIPHY)
I think for some people, though, they don’t have that same sense of security when partaking in activities like these, which is why they steer clear. And this is something you need to be extra careful about when it comes to your website. Specifically, be mindful of:
Installing SSL certificates on every website.
Using security badges at checkout.
Preventing 404 errors.
Fixing faulty contact forms.
Blocking spam in comment sections and forums.
Monitoring for server downtime.
Repairing the white screen of death.
Let’s look at an example of a website that sends a number of red flags pertaining to security. This is RoadKill T-Shirts:
At first glance, you might think this e-commerce website is okay. The design is outdated, but it’s a low-end tee-shirt shop. Visitors can’t be expecting too much from the design.
But then you move over to your mobile device and realize it’s not responsive:
That said, there may be some visitors who are able to look past these design missteps, especially if there’s a tee shirt decal they really want.
One of the first red flags that should stop them in their tracks though is the “Not Secure” notice in their browser window. Although there is a GoDaddy security seal at the very bottom of the checkout page, I’m not all that sure I’d trust that to protect my purchase as a consumer either.
Then, there’s the matter of the contact form. I was curious to see how secure users would feel about filling in contact information without submitting a payment, so I forced an error:
I’m happy to see that the failure to fill in required fields triggered such a response. However, here’s what happens to the bottom of the form as a result:
RoadKill T-Shirts error-filled contact form leads to a hidden “Submit” button. (Source: RoadKill T-Shirts) (Large preview)
Users can tab down to reveal the “Submit” button. However, what if your visitors don’t know that they can do that? They may just end up abandoning the form and the website altogether if something as simple as the contact form is so fraught with error.
There are a variety of ways a website might seem unsafe to visitors, so do what you can to fortify it on the backend and then provide trust marks on the frontend to put their minds at ease.
Wrapping Up
When a visitor enters your website, what do you want their first thought to be?
“Oh great! There’s the product I was looking for!”
Or:
“Hmmm… Maybe I should go back to Google and see if there’s a different place to buy this product from.”
There are so many ways to give your visitors pause when they visit a website. But if you start looking at your website like a home, you can avoid the common pitfalls that make a website feel more like a haunted house than a warm and welcome homecoming.
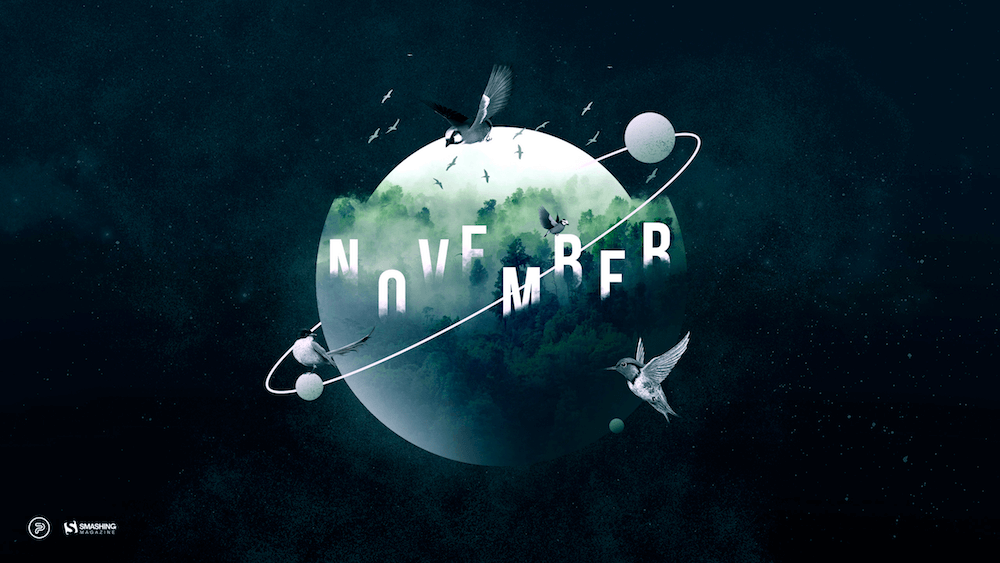
The fascinating world of aviation, classic movies, sweet childhood memories — these are just some of the things that inspired artists and designers from across the globe to participate in our wallpapers challenge this time around.
The monthly challenge has been going on for more than nine years already and we are very thankful to everyone who tickles their creativity each month anew to keep the steady stream of wallpapers flowing and caters for some colorful inspiration with their artwork — no matter how gray the weather outside might be.
The wallpapers in this collection come in versions with and without a calendar for November 2019, so it’s up to you to decide if you want to keep things minimalistic or have an overview of the month at a glance. As a bonus goodie, we also compiled a little best-of from past November editions at the end of the post. Maybe you’ll rediscover some long-forgotten favorites in there? Happy November!
Please note that:
All images can be clicked on and lead to the preview of the wallpaper,
We respect and carefully consider the ideas and motivation behind each and every artist’s work. This is why we give all artists the full freedom to explore their creativity and express emotions and experience through their works. This is also why the themes of the wallpapers weren’t anyhow influenced by us but rather designed from scratch by the artists themselves.
Submit your wallpaper
We are always looking for designers and artists to be featured in our wallpapers posts. So if you have an idea for a December wallpaper, please don’t hesitate to submit your design. We’d love to see what you’ll come up with. Join in! ?
International Civil Aviation Day
“On December 7, we mark International Civil Aviation Day, celebrating those who prove day by day that the sky really is the limit. As the engine of global connectivity, civil aviation is now, more than ever, a symbol of social and economic progress and a vehicle of international understanding. This monthly calendar is our sign of gratitude to those who dedicate their lives to enabling everyone to reach their dreams.” — Designed by PopArt Studio from Serbia.
“Let’s take extra care of colors during the autumn months. November might be gray and rainy. Outside. Don’t let it inside. Take a good book, prepare a hot ginger tea, and cover your knees with a bright woolen plaid.” — Designed by Tartanify from France.
“The inspiration came from the movies of Woody Allen and his amazing cinematography, the framing idea came from the polaroid photos.” — Designed by João Pinto from Portugal.
“November is the month of my birth so it reminds me of so many good things. The scent and the beautiful red colors of pomegranate seeds. The beauty of their trees with tiny leaves. The magical colors of autumn take me to the orchards on the farm and my family together under the sun and clouds. Laughings and pumpkins on the floor while the sheets were hung to dry on the clothesline. Cousins playing and collecting leaves. Sweet November.” — Designed by Carmen Navalhas from Portugal.
“Fall is such a beautiful time of year so I designed a wallpaper inspired by fall’s seasonal colors and amazing sunsets.” — Designed by Kassandra Escoe from Maryland.
“The goal of No-Shave November is to grow awareness by embracing our hair, which many cancer patients lose, and letting it grow wild and free. Donate the money you typically spend on shaving and grooming to educate about cancer prevention, save lives, and aid those fighting the battle.” — Designed by Tatiana Ignatieva from Portugal.
Some things are just too good to gather dust. Hidden in our wallpaper archives we rediscovered some November favorites from past years. Ready for a trip back in time? (Please note that these designs don’t come with a calendar.)
Outer Space
“This November, we are inspired by the nature around us and the universe above us, so we created an out-of-this-world calendar. Now, let us all stop for a second and contemplate on preserving our forests, let us send birds of passage off to warmer places, and let us think to ourselves — if not on Earth, could we find a home somewhere else in outer space?” — Designed by PopArt Studio from Serbia.
“‘When autumn darkness falls, what we will remember are the small acts of kindness: a cake, a hug, an invitation to talk, and every single rose. These are all expressions of a nation coming together and caring about its people.’ (Jens Stoltenberg)” — Designed by Dipanjan Karmakar from India.
“By the end of autumn, ferocious Poseidon will part from tinted clouds and timid breeze. After this uneven clash, the sky once more becomes pellucid just in time for imminent luminous snow.” — Designed by Ana Masnikosa from Belgrade, Serbia.
“November is the Peanut Butter Month so I decided to make a wallpaper around that. As everyone knows peanut butter goes really well with some jelly so I made two sandwiches, one with peanut butter and one with jelly. Together they make the best combination. I also think peanut butter tastes pretty good so that’s why I chose this for my wallpaper.” — Designed by Senne Mommens from Belgium.
“The colorful leaves and cool breeze that make you want to snuggle in your couch at home inspired me to create this fall design.” — Designed by Allison Coyle from the United States.
“World Kindness Day is November 13, and I wanted to share this saying to remind others to never underestimate the power of a kind word.” — Designed by Shawna Armstrong from the United States.
“It’s the time for being at home and enjoying the small things… I love having a coffee while watching the rain outside my window.” — Designed by Veronica Valenzuela from Spain.
“November has always reminded me of the famous Guns N’ Roses song, so I’ve decided to look at its meaning from a different perspective. The story in my picture takes place somewhere in space, where a young guy beholds a majestic meteor shower and wonders about the mysteries of the universe.” — Designed by Aliona Voitenko from Ukraine.
“Whether or not you celebrate Thanksgiving, there’s certain things that always make the harvest season special. As a Floridian, I’m a big fan of any signs that the weather might be cooling down soon, too!” — Designed by Dorothy Timmer from the United States.
“November often means rain and cold temps, but there’s beauty to be found in that as I found in this moment — the wet lines lead the way.” — Designed by Aisha Souto-Maior, Paris-based, NY-bred.
“The collection of birds are my travels. At each destination I buy a wood, bronze, stone bird, anything the local bazaars sell. I have all gathered at a modest vitrine in my house. I have so much loved my collection that, after taking pictures of them, I designed each one, then created a wallpaper and overdressed a wall of my living room. Now my thought is making them as a desktop wallpaper and give them to you as a gift.” — Designed by Natasha Kamou from Greece.
We’re all guilty of using the same passwords over and over again for all of our memberships, subscriptions, and accounts. Even with the strongest of passwords, this is an incredibly unsafe practice.
We are more liable to have multiple accounts hacked or our information taken without our permission when we commit this all-too-common password mistake.
Even if you’ve heard this information before, you’re probably thinking, “Well, yeah, but I can’t remember my passwords any other way.”
This is the dangerous crossroads we run into with online passwords! The best way to make them as safe as possible will frequently make them too difficult to use for customers.
So what’s the alternative? As you design your website, you may be thinking about ways to get around this required password creation process. After all, shopping cart abandonment skyrockets when you add a password creation process to your organization’s site.
Luckily, you don’t need to set up passwords for your members to sign in. That’s right, password alternatives exist that are safer, easier, and provide a better customer experience. We’ve created this guide to help you learn more about these options. We’ll cover:
What is passwordless login?
Why is it important?
How do passwordless logins work?
Ready to dive a little deeper? Let’s get started.
What is passwordless login?
Passwordless login systems are tools that organizations can implement on their websites so that users don’t need to use passwords.
This simply means that technology has come out with other methods of authentication to verify the user. For instance, an association member signing into their membership profile on the organization’s website may be able to use an encrypted network of tools and software to prove their identity without making up a password.
Instead, they may use email, token, or biometric authentication to sign in (but we’ll get more into that later).
If you’re especially tied to your password, you can always add a passwordless element to your login process with two-factor authentication. This uses the additional identification processes in addition to creating a password for extra security. You can read more about two-factor authentication with Swoop’s complete guide.
Why is it important?
The idea behind passwords is that they create a key that only the person logging in and the website know. It’s a secret code that allows a single person to access information. However, when someone else gains access, that password privacy and informational privacy is compromised.
Now, what happens when someone else learns that password for one site, but you’ve also used the same key for other sites? For instance, if you used the same password for your online banking, streaming services, store accounts, online bill payments, and more.
Not only would the one account be vulnerable, but now all sorts of additional data is up for grabs by the hacker!
This guide explains that the four major vulnerabilities of a password-based security system include:
Hackers use brute force to match your password. This is when people run a computer program that runs through every password combination until they find a match. It’s how most hackers work to acquire people’s passwords.
People don’t tend to generate secure passwords. Because people create their own passwords for accounts, they tend to write something familiar that they’ll guess or regurgitate easily. However, this also means hackers can do the same. In fact, 90% of user-generated passwords are considered weak and vulnerable.
Passwords need to be unique and complex to be effective. However, complex passwords are hard to remember, especially when every account has a different complex password. This is why so many people have insecure practices of simplicity and repetition when it comes to passwords. Plus, even with password generator and management tools, you add an extra frustrating step to the whole login process, ruining the user experience on your site.
Weak internal passwords put all of your customers at risk. While a hacker may crack the codes of your individual customers or members, what they really want is your organization’s information. When they crack your code, they gain access to a list of all of your users’ credentials.
With such vulnerability, it’s no wonder tech specialists started looking for alternatives to passwords. They started looking for solutions that offer the same or better user experience while improving security measures.
Passwordless solutions are important because the most effective software will improve customer data and improve user experience.
How do passwordless logins work?
Just about everyone knows what a password looks like. As the customer, you type in the username and password you’ve chosen in the designated fields. Then, you gain access to the information you’re looking for.
However, not everyone knows what secure passwordless systems look like. As they gain popularity among website design tools and companies, you’ll be more likely to run across more of them in your daily online activities. There are three different types of passwordless logins that you should keep an eye out for:
Passwordless Email Authentication – Email-based systems verify identity by sending a complex encrypted key code through a user’s email. The generated email is automatically addressed and contains both a message and an encrypted DKIM key code. When the user sends the email, an innovative delivery, decryption, and re-encryption process occurs, effectively validating users’ identity and logging them in.
Token-Based Authentication – Token-based authentication allows users to enter their username and password once and receive a uniquely-generated encrypted token in exchange. The token is then used to protect the pages instead of the login credentials from the first logon forward. It’s a commonly used process that allows a faster login experience for users as well as better protection.
Biometric Authentication – Do you use your thumbprint to access your smartphone? This is an example of a biometric authentication system. However, given technology today, this software is less secure than you’d probably hope for. For instance, fingerprint tech only measures parts of your fingerprint, and the odds of those parts matching the fingerprint of another are surprisingly high.
While you can take measures to make passwords more secure, like requiring they’re changed regularly or meet certain requirements to be accepted, passwordless systems still tend to be the solution with better protection.
If you’re designing your website with a website design company, mention the options to them. Get their opinions and conduct your own research. Then, you can decide how you want your customers to sign in. If you’re looking for website design help, check out these website builders specifically for membership-based organizations from Morweb.
Passwordless systems are the future of the internet. They improve safety and user experience at the same time. Continue researching the options out there if you’re interested in implementing these unique resources on your organization’s site. Good luck!
The document head might not be the most glamorous part of a website, but what goes into it is arguably just as important to the success of your website as its user interface. This is, after all, where you tell search engines about your website and integrate it with third-party applications like Facebook and Twitter, not to mention the assets, ranging from analytics libraries to stylesheets, that you load and initialize there.
A React application lives in the DOM node it was mounted to, and with this in mind, it is not at all obvious how to go about keeping the contents of the document head synchronized with your routes. One way might be to use the componentDidMount lifecycle method, like so:
componentDidMount() {
  document.title = "Whatever you want it to be";
}
However, you are not just going to want to change the title of the document, you are also going to want to modify an array of meta and other tags, and it will not be long before you conclude that managing the contents of the document head in this manner gets tedious pretty quickly and prone to error, not to mention that the code you end up with will be anything but semantic. There clearly has to be a better way to keep the document head up to date with your React application. And as you might suspect given the subject matter of this tutorial, there is a simple and easy to use component called React Helmet, which was developed by and is maintained by the National Football League(!).
In this tutorial, we are going to explore a number of common use cases for React Helmet that range from setting the document title to adding a CSS class to the document body. Wait, the document body? Was this tutorial not supposed to be about how to work with the document head? Well, I have got good news for you: React Helmet also lets you work with the attributes of the and tags; and it goes without saying that we have to look into how to do that, too!
One important caveat of this tutorial is that I am going to ask you to install Gatsby — a static site generator built on top of React — instead of Create React App. That’s because Gatsby supports server side rendering (SSR) out of the box, and if we truly want to leverage the full power of React Helmet, we will have to use SSR!
Why, you might ask yourself, is SSR important enough to justify the introduction of an entire framework in a tutorial that is about managing the document head of a React application? The answer lies in the fact that search engine and social media crawlers do a very poor job of crawling content that is generated through asynchronous JavaScript. That means, in the absence of SSR, it will not matter that the document head content is up to date with the React application, since Google will not know about it. Fortunately, as you will find out, getting started with Gatsby is no more complicated than getting started with Create React App. I feel quite confident in saying that if this is the first time you have encountered Gatsby, it will not be your last!
Getting started with Gatsby and React Helmet
As is often the case with tutorials like this, the first thing we will do is to install the dependencies that we will be working with.
Let us start by installing the Gatsby command line interface:
npm i -g gatsby-cli
While Gatsby’s starter library contains a plethora of projects that provide tons of built-in features, we are going to restrict ourselves to the most basic of these starter projects, namely the Gatsby Hello World project.
Run the following from your Terminal:
gatsby new my-hello-world-starter https://github.com/gatsbyjs/gatsby-starter-hello-world
my-hello-world-starter is the name of your project, so if you want to change it to something else, do so by all means!
Once you have installed the starter project, navigate into its root directory by running cd [name of your project]/ from the Terminal, and once there, run gatsby develop. Your site is now running at http://localhost:8000, and if you open and edit src/pages/index.js, you will notice that your site is updated instantaneously: Gatsby takes care of all our hot-reloading needs without us even having to think of — and much less touch — a webpack configuration file. Just like Create React App does! While I would recommend all JavaScript developers learn how to set up and configure a project with webpack for a granular understanding of how something works, it sure is nice to have all that webpack boilerplate abstracted away so that we can focus our energy on learning about React Helmet and Gatsby!
Next up, we are going to install React Helmet:
npm i --save react-helmet
After that, we need to install Gatsby Plugin React Helmet to enable server rendering of data added with React Helmet:
npm i --save gatsby-plugin-react-helmet
When you want to use a plugin with Gatsby, you always need to add it to the plugins array in the gatsby-config.js file, which is located at the root of the project directory. The Hello World starter project does not ship with any plugins, so we need to make this array ourselves, like so:
Great! All of our dependencies are now in place, which means we can move on to the business end of things.
Our first foray with React Helmet
The first question that we need to answer is where React Helmet ought to live in the application. Since we are going to use React Helmet on all of our pages, it makes sense to nest it in a component together with the page header and footer components since they will also be used on every page of our website. This component will wrap the content on all of our pages. This type of component is commonly referred to as a “layout” component in React parlance.
In the src directory, create a new directory called components in which you create a file called layout.js. Once you have done this, copy and paste the code below into this file.
import React from "react"
import Helmet from "react-helmet"

export default ({ children }) => (
  <>
    <Helmet>
      <title>Cool</title>
    </Helmet>
    <div>
      <header>
        <h1></h1>
        <nav>
          <ul>
          </ul>
        </nav>
      </header>
      {children}
      <footer>{`${new Date().getFullYear()} No Rights Whatsoever Reserved`}</footer>
    </div>
  </>
)
Let’s break down that code.
First off, if you are new to React, you might be asking yourself what is up with the empty tags that wrap the React Helmet component and the header and footer elements. The answer is that React will go bananas and throw an error if you try to return multiple elements from a component, and for a long time, there was no choice but to nest elements in a parent element — commonly a div — which led to a distinctly unpleasant element inspector experience littered with divs that serve no purpose whatsoever. The empty tags, which are a shorthand way for declaring the Fragment component, were introduced to React as a solution to this problem. They let us return multiple elements from a component without adding unnecessary DOM bloat.
That was quite a detour, but if you are like me, you do not mind a healthy dose of code-related trivia. In any case, let us move on to the section of the code. As you are probably able to deduce from a cursory glance, we are setting the title of the document here, and we are doing it in exactly the same way we would in a plain HTML document; quite an improvement over the clunky recipe I typed up in the introduction to this tutorial! However, the title is hard coded, and we would like to be able to set it dynamically. Before we take a look at how to do that, we are going to put our fancy Layout component to use.
Head over to src/pages/ and open ìndex.js. Replace the existing code with this:
import React from "react"
import Layout from "../components/layout"

export default () =>
  <Layout>
    <div>I live in a layout component, and life is pretty good here!</div>
  </Layout>
That imports the Layout component to the application and provides the markup for it.
Making things dynamic
Hard coding things in React does not make much sense because one of the major selling points of React is that makes it’s easy to create reusable components that are customized by passing props to them. We would like to be able to use props to set the title of the document, of course, but what exactly do we want the title to look like? Normally, the document title starts with the name of the website, followed by a separator and ends with the name of the page you are on, like Website Name | Page Name or something similar. You are probably right, in thinking, we could use template literals for this, and right you are!
Let us say that we are creating a website for a company called Cars4All. In the code below, you will see that the Layout component now accepts a prop called pageTitle, and that the document title, which is now rendered with a template literal, uses it as a placeholder value. Setting the title of the document does not get any more difficult than that!
import React from "react"
import Helmet from "react-helmet"

export default ({ pageTitle, children }) => (
  <>
    <Helmet>
      <title>{`Cars4All | ${pageTitle}`}</title>
    </Helmet>
    <div>
      <header>
        <h1>Cars4All</h1>
        <nav>
          <ul>
          </ul>
        </nav>
      </header>
      {children}
      <footer>{`${new Date().getFullYear()} No Rights Whatsoever Reserved`}</footer>
    </div>
  </>
)
Let us update ìndex.js accordingly by setting the pageTitle to “Home”:
import React from "react"
import Layout from "../components/layout"

export default () =>
  <Layout pageTitle="Home">
    <div>I live in a layout component, and life is pretty good here!</div>
  </Layout>
If you open http://localhost:8000 in the browser, you will see that the document title is now Cars4All | Home. Victory! However, as stated in the introduction, we will want to do more in the document head than set the title. For instance, we will probably want to include charset, description, keywords, author and viewport meta tags.
How would we go about doing that? The answer is exactly the same way we set the title of the document:
import React from "react"
import Helmet from "react-helmet"

export default ({ pageMeta, children }) => (
  <>
    <Helmet>
      <title>{`Cars4All | ${pageMeta.title}`}</title>

      {/* The charset, viewport and author meta tags will always have the same value, so we hard code them! */}
      <meta charset="UTF-8" />
      <meta name="viewport" content="width=device-width, initial-scale=1.0" />
      <meta name="author" content="Bob Trustly" />

      {/* The rest we set dynamically with props */}
      <meta name="description" content={pageMeta.description} />

      {/* We pass an array of keywords, and then we use the Array.join method to convert them to a string where each keyword is separated by a comma */}
      <meta name="keywords" content={pageMeta.keywords.join(',')} />
    </Helmet>
    <div>
      <header>
        <h1>Cars4All</h1>
        <nav>
          <ul>
          </ul>
        </nav>
      </header>
      {children}
      <footer>{`${new Date().getFullYear()} No Rights Whatsoever Reserved`}</footer>
    </div>
  </>
)
As you may have noticed, the Layout component no longer accepts a pageTitle prop, but a pageMeta one instead, which is an object that encapsulates all the meta data on a page. You do not have to do bundle all the page data like this, but I am very averse to props bloat. If there is data with a common denominator, I will always encapsulate it like this. Regardless, let us update index.js with the relevant data:
import React from "react"
import Layout from "../components/layout"

export default () =>
  <Layout
    pageMeta={{
      title: "Home",
      keywords: ["cars", "cheap", "deal"],
      description: "Cars4All has a car for everybody! Our prices are the lowest, and the quality the best-est; we are all about having the cake and eating it, too!"
    }}
  >
    <div>I live in a layout component, and life is pretty good here!</div>
  </Layout>
If you open http://localhost:8000 again, fire up DevTools and dive into the document head, you will see that all of the meta tags we added are there. Regardless of whether you want to add more meta tags, a canonical URL or integrate your site with Facebook using the Open Graph Protocol, this is how you about about it. One thing that I feel is worth pointing out: if you need to add a script to the document head (maybe because you want to enhance the SEO of your website by including some structured data), then you have to render the script as a string within curly braces, like so:
<script type="application/ld+json">{`
{
  "@context": "http://schema.org",
  "@type": "LocalBusiness",
  "address": {
  "@type": "PostalAddress",
  "addressLocality": "Imbrium",
  "addressRegion": "OH",
  "postalCode":"11340",
  "streetAddress": "987 Happy Avenue"
  },
  "description": "Cars4All has a car for everybody! Our prices are the lowest, and the quality the best-est; we are all about having the cake and eating it, too!",
  "name": "Cars4All",
  "telephone": "555",
  "openingHours": "Mo,Tu,We,Th,Fr 09:00-17:00",
  "geo": {
  "@type": "GeoCoordinates",
  "latitude": "40.75",
  "longitude": "73.98"
  },
  "sameAs" : ["http://www.facebook.com/your-profile",
  "http://www.twitter.com/your-profile",
  "http://plus.google.com/your-profile"]
}
`}</script>
For a complete reference of everything that you can put in the document head, check out Josh Buchea’s great overview.
The escape hatch
For whatever reason, you might have to overwrite a value that you have already set with React Helmet — what do you do then? The clever people behind React Helmet have thought of this particular use case and provided us with an escape hatch: values set in components that are further down the component tree always take precedence over values set in components that find themselves higher up in the component tree. By taking advantage of this, we can overwrite existing values.
Say we have a fictitious component that looks like this:
import React from "react"
import Helmet from "react-helmet"

export default () => (
  <>
    <Helmet>
      <title>The Titliest Title of Them All</title>
    </Helmet>
    <h2>I'm a component that serves no real purpose besides mucking about with the document title.</h2>
  </>
)
And then we want to include this component in ìndex.js page, like so:
import React from "react"
import Layout from "../components/layout"
import Fictitious from "../components/fictitious"

export default () =>
  <Layout
    pageMeta={{
      title: "Home",
      keywords: ["cars", "cheap", "deal"],
      description: "Cars4All has a car for everybody! Our prices are the lowest, and the quality the best-est; we are all about having the cake and eating it, too!"
    }}
  >
    <div>I live in a layout component, and life is pretty good here!</div>
    <Fictitious />
  </Layout>
Because the Fictitious component hangs out in the underworld of our component tree, it is able to hijack the document title and change it from “Home” to “The Titliest Title of Them All.” While I think it is a good thing that this escape hatch exists, I would caution against using it unless there really is no other way. If other developers pick up your code and have no knowledge of your Fictitious component and what it does, then they will probably suspect that the code is haunted, and we do not want to spook our fellow developers! After all, fighter jets do come with ejection seats, but that is not to say fighter pilots should use them just because they can.
Venturing outside of the document head
As mentioned earlier, we can also use React Helmet to change HTML and body attributes. For example, it’s always a good idea to declare the language of your website, which you do with the HTML lang attribute. That’s set with React Helmet like this:
<Helmet>

  /* Setting the language of your page does not get more difficult than this! */
  <html lang="en" />

  /* Other React Helmet-y stuff...  */
</Helmet>
Now let us really tap into the power of React Helmet by letting the pageMeta prop of the Layout component accept a custom CSS class that is added to the document body. Thus far, our React Helmet work has been limited to one page, so we can really spice things up by creating another page for the Cars4All site and pass a custom CSS class with the Layout component’s pageMeta prop.
First, we need to modify our Layout component. Note that since our Cars4All website will now consist of more than one page, we need to make it possible for site visitors to navigate between these pages: Gatsby’s Link component to the rescue!
Using the Link component is no more difficult than setting its to prop to the name of the file that makes up the page you want to link to. So if we want to create a page for the cars sold by Cars4All and we name the page file cars.js, linking to it is no more difficult than typing out Our Cars. When you are on the Our Cars page, it should be possible to navigate back to the ìndex.js page, which we call Home. That means we need to add Home to our navigation as well.
In the new Layout component code below, you can see that we are importing the Link component from Gatsby and that the previously empty unordered list in the head element is now populated with the links for our pages. The only thing left to do in the Layout component is add the following snippet:
…to the code, which adds a CSS class to the document body if one has been passed with the pageMeta prop. Oh, and given that we are going to pass a CSS class, we do, of course, have to create one. Let’s head back to the src directory and create a new directory called css in which we create a file called main.css. Last, but not least, we have to import it into the Layout component, because otherwise our website will not know that it exists. Then add the following CSS to the file:
Now replace the code in src/components/layout.js with the new Layout code that we just discussed:
import React from "react"
import Helmet from "react-helmet"
import { Link } from "gatsby"
import "../css/main.css"

export default ({ pageMeta, children }) => (
  <>
    <Helmet>
      {/* Setting the language of your page does not get more difficult than this! */}
      <html lang="en" />

     {/* Add the customCssClass from our pageMeta prop to the document body */}

     <body className={pageMeta.customCssClass ? pageMeta.customCssClass : ''}/>

      <title>{`Cars4All | ${pageMeta.title}`}</title>

      {/* The charset, viewport and author meta tags will always have the same value, so we hard code them! */}
      <meta charset="UTF-8" />
      <meta name="viewport" content="width=device-width, initial-scale=1.0" />
      <meta name="author" content="Bob Trustly" />

      {/* The rest we set dynamically with props */}
      <meta name="description" content={pageMeta.description} />

      {/* We pass an array of keywords, and then we use the Array.join method to convert them to a string where each keyword is separated by a comma */}
      <meta name="keywords" content={pageMeta.keywords.join(',')} />
    </Helmet>
    <div>
      <header>
        <h1>Cars4All</h1>
        <nav>
          <ul>
            <li><Link to="/">Home</Link></li>
            <li><Link to="/cars/">Our Cars</Link></li>
          </ul>
        </nav>
      </header>
      {children}
      <footer>{`${new Date().getFullYear()} No Rights Whatsoever Reserved`}</footer>
    </div>
  </>
)
We are only going to add a custom CSS class to the document body in the cars.js page, so there is no need to make any modifications to the ìndex.js page. In the src/pages/ directory, create a file called cars.js and add the code below to it.
import React from "react"
import Layout from "../components/layout"

export default () =>
  <Layout
    pageMeta={{
      title: "Our Cars",
      keywords: <a href="">"toyota", "suv", "volvo"],
      description: "We sell Toyotas, gas guzzlers and Volvos. If we don't have the car you would like, let us know and we will order it for you!!!",
      customCssClass: "slick"
    }}
  >
    <h2>Our Cars</h2>
    <div>A car</div>
    <div>Another car</div>
    <div>Yet another car</div>
    <div>Cars ad infinitum</div>
  </Layout>
If you head on over to http://localhost:8000, you will see that you can now navigate between the pages. Moreover, when you land on the cars.js page, you will notice that something looks slightly off… Hmm, no wonder I call myself a web developer and not a web designer! Let’s open DevTools, toggle the document head and navigate back to the ìndex.js page. The content is updated when changing routes!
The icing on the cake
If you inspect the source of your pages, you might feel a tad bit cheated. I promised a SSR React website, but none of our React Helmet goodness can be found in the source.
What was the point of my foisting Gatsby on you, you might ask? Well, patience young padowan! Run gatsby build in Terminal from the root of the site, followed by gatsby serve.
Gatsby will tell you that the site is now running on http://localhost:9000. Dash over there and inspect the source of your pages again. Tadá, it’s all there! You now have a website that has all the advantages of a React SPA without giving up on SEO or integrating with third-party applications and what not. Gatsby is amazing, and it is my sincere hope that you will continue to explore what Gatsby has to offer.
I first showed you how to define a project such as this one, and gave you the basics of the architecture as well as the mechanics behind the game engine. Then, I showed you the basic implementation of the engine — a basic REST API that allows you to traverse a JSON-defined world.
Today, I’m going to be showing you how to create an old-school text client for our API by using nothing other than Node.js.
Although in theory that looks right, I missed the fact that switching between sending game commands and text messages would be a pain, so instead of having our players switching manually, we’ll have our command parser make sure it is capable of discerning whether we’re trying to communicate with the game or our friends.
So, instead of having four sections in our screen, we’ll now have three:
That is an actual screenshot of the final game client. You can see the game screen on the left, and the chat on the right, with a single, common input box at the bottom. The module we’re using allows us to customize colors and some basic effects. You’ll be able to clone this code from Github and do what you want with the look and feel.
One caveat though: Although the above screenshot shows the chat working as part of the application, we’ll keep this article focused on setting up the project and defining a framework where we can create a dynamic text-UI based application. We’ll focus on adding chat support on the next and final chapter of this series.
The Tools We’ll Need
Although there are many libraries out there that let us create CLI tools with Node.js, adding a text-based UI is a completely different beast to tame. Particularly, I was able to find only one (very complete, mind you) library that would let me do exactly what I wanted: Blessed.
This library is very powerful and provides a lot of features we won’t be using for this project (such as casting shadows, drag&drop, and others). It basically re-implements the entire ncurses library (a C library which allows developers to create text-based UIs) which has no Node.js bindings, and it does so directly in JavaScript; so, if we had to, we could very well check out its internal code (something I wouldn’t recommend unless you absolutely had to).
Although the documentation for Blessed is quite extensive, it mainly consists of individual details about each method provided (as opposed to having tutorials explaining how to actually use those methods together) and it is lacking examples everywhere, so it might be difficult to dig into it if you have to understand how a particular method works. With that being said, once you understand it for one, everything works the same way, which is a big plus since not every library or even language (I’m looking at you, PHP) has a consistent syntax.
But documentation aside; the big plus for this library is that it works based on JSON options. For example, if you wanted to draw a box on the top right corner of the screen, you would do something like this:
As you can imagine, other aspects of the box are defined there as well (such as it’s size), which can perfectly be dynamic based on the terminal’s size, type of border and colors — even for hover events. If you’ve done front-end development at some point, you’ll find a lot of overlap between the two.
The point I’m trying to make here is that everything regarding the representation of the box is configured through the JSON object passed to the box method. That, to me, is perfect because I can easily extract that content into a configuration file, and create a business logic capable of reading it and deciding which elements to draw on screen. Most importantly, it will help us get a glimpse of how they’ll look once they’ve been drawn.
This will be the base for the entire UI aspect of this module (more on that in a second!).
Architecture Of The Module
The main architecture of this module relies entirely on the UI widgets which we’ll be showing. A group of these widgets is considered a screen, and all these screens are defined in a single JSON file (which you can find inside the /config folder).
This file has over 250 lines, so showing it here makes no sense. You can look at the full file online, but a small snippet from it looks like this:
The “screens” element will contain the list of screens inside the application. Each screen contains a list of widgets (which I’ll cover in a bit) and every widget has its blesses-specific definition and related handler files (when applicable).
You can see how every “params” element (inside a particular widget) represents the actual set of parameters expected by the methods we saw earlier. The rest of the keys defined there help provide context about what type of widgets to render and their behavior.
A few points of interest:
Screen Handlers
Every screen element has file property which references the code associated to that screen. This code is nothing but an object that must have an init method (the initialization logic for that particular screen takes place inside of it). Particularly, the main UI engine, will call that init method of every screen, which in turn, should be responsible for initializing whatever logic it may need (i.e setting up the input boxes events).
The following is the code for the main screen, where the application requests the player to select an option to either start a brand new game or join an existing one:
As you can see, the init method calls the setupInput method which basically configures the right callback to handle user input. That callback holds the logic to decide what to do based on the user’s input (either 1 or 2).
Widget Handlers
Some of the widgets (usually input widgets) have a handlerPath property, which references the file containing the logic behind that particular component. This is not the same as the previous screen handler. These don’t care about the UI components that much. Instead, they handle the glue logic between the UI and whatever library we’re using to interact with external services (such as the game engine’s API).
Widget Types
Another minor addition to the JSON definition of the widgets is their types. Instead of going with the names Blessed defined for them, I’m creating new ones in order to give me more wiggle room when it comes to their behavior. After all, a window widget might not always “just display information”, or an input box might not always work the same way.
This was mostly a preemptive move, just to ensure I have that ability if I ever need it in the future, but as you’re about to see, I’m not using that many different types of components anyway.
Multiple Screens
Though the main screen is the one I showed you in the screenshot above, the game requires a few other screens in order to request things such as your player name or whether you’re creating a brand new game session or even joining an existing one. The way I handled that was, again, through the definition of all these screens in the same JSON file. And to move from one screen into the next one, we use the logic inside the screen handler files.
We can do this simply by using the following line of code:
I’ll show you more details about the UI property in a second, but I’m just using that loadScreen method to re-render the screen and picking the right components off of the JSON file using the string passed as parameter. Very straightforward.
Code Samples
It’s now time to check out the meat and potatoes of this article: the code samples. I’m just going to highlight what I think are the small gems inside it, but you can always take a look at the full source code directly in the repository anytime.
Using Config Files To Auto Generate The UI
I’ve already covered part of this, but I think it’s worth exploring the details behind this generator. The gist behind it (file index.js inside the /ui folder) is that it is a wrapper around the Blessed object. And the most interesting method inside it, is the loadScreen method.
This method grabs the configuration (through the config module) for one specific screen and goes through its content, trying to generate the right widgets based on each element’s type.
As you can see, the code is a bit lengthy, but the logic behind it is simple:
It loads the configuration for the current specific screen;
Cleans up any previously existing widgets;
Goes over every widget and instantiates it;
If an extra alert was passed as a flash message (which is basically a concept I stole from Web Dev in which you setup a message to be shown on screen until the next refresh);
Render the actual screen;
And finally, require the screen handler and execute it’s “init” method.
That’s it! You can check out the rest of the methods — they’re mostly related to individual widgets and how to render them.
Communication Between UI And Business Logic
Although in the grand scale, the UI, the back-end and the chat server all have a somewhat layered-based communication; the front end itself needs at least a two-layered internal architecture in which the pure UI elements interact with a set of functions that represent the core logic inside this particular project.
The following diagram shows the internal architecture for the text client we’re building:
Let me explain it a bit further. As I mentioned above, the loadScreenMethod will create UI presentations of the widgets (these are Blessed objects). But they are contained as part of the screen logic object which is where we set up the basic events (such as onSubmit for input boxes).
Allow me to give you a practical example. Here is the first screen you see when starting the UI client:
Basically, what we want to do is to request the username and then ask them to pick one of the two options (either starting up a brand new game or joining an existing one).
The code that takes care of that is the following:
I know that’s a lot of code, but just focus on the init method. The last thing it does is to call the setInput method which takes care of adding the right events to the right input boxes.
Therefore, with these lines:
let handler = require(this.elements["input"].meta.handlerPath)
let input = this.elements["input"].obj
let usernameRequest = this.elements['username-request'].obj
let usernameRequestMeta = this.elements['username-request'].meta
let question = usernameRequestMeta.params.content.trim()
We’re accessing the Blessed objects and getting their references, so that we can later set up the submit events. So after we submit the username, we’re switching focus to the second input box (literally with input.focus() ).
Depending on what option we choose from the menu, we’re calling either of the methods:
createNewGame: creates a new game by interacting with its associated handler;
moveToIDRequest: renders the next screen in charge of requesting the game ID to join.
Communication With The Game Engine
Last but certainly not least (and following the above example), if you hit 2, you’ll notice that the method createNewGame uses the handler’s methods createNewGame and then joinGame (joining the game right after creating it).
Both these methods are meant to simplify the interaction with the Game Engine’s API. Here is the code for this screen’s handler:
There you see two different ways to handle this behavior. The first method actually uses the apiClient class, which again, wraps the interactions with the GameEngine into yet another layer of abstraction.
The second method though performs the action directly by sending a POST request to the correct URL with the right payload. Nothing fancy is done afterwards; we’re just sending the body of the response back to the UI logic.
Note: If you’re interested in the full version of the source code for this client, you can check it out here.
Final Words
This is it for the text-based client for our text adventure. I covered:
How to structure a client application;
How I used Blessed as the core tech for creating the presentation layer;
How to structure the interaction with the back-end services from a complex client;
And hopefully, with the full repository available.
And while the UI might not look exactly like the original version did, it does fulfill its purpose. Hopefully, this article gave you an idea of how to architect such an endeavor and you were inclined to try it for yourself in the future. Blessed is definitely a very powerful tool, but you’ll have to have patience with it while learning how to use it and how to navigate through their docs.
In the next and final part, I’ll cover how I added the chat server both on the back-end as well as for this text client.
Over the last few years, everyone’s been talking about Dark Mode. It’s said to boost productivity and focus while reducing eye strain. It’s also supposed to be better for your battery life.
But is that the whole story?
Research into the matter suggests that Dark Mode might not be so healthy for us after all. Today, I want to take a look at what the data suggests and how you can use this information to determine how and when Dark Mode should be used.
Dark Mode is everywhere: Twitter has it; Slack does, too; Mac users can get it; Sketch has a Dark Mode; Atom comes with it out of the box; and Chrome allows its users to choose what kind of dark mode they use.
Like I said, it’s in a lot of places where we work. The question is, though, is it a good idea to use it?
Here’s what we know:
1. Polarity Affects Legibility
Polarity, in web design, refers to the contrast between the typography and the background it sits on. Positive polarity is when black text appears on a white background and negative polarity is when white text appears on a black background.
A number of studies in recent years prove that positive polarity is best for legibility.
Study #1: In 2013, researchers set out to determine how polarity affected the act of proofreading. What they found was that positive polarity provided an easier reading experience, especially with smaller font sizes (they tested fonts between 8 and 14 pts). They attribute this enhanced legibility to the brighter luminance of the white background.
Study #2: In 2014, researchers wanted to test whether or not it really was luminance that affected legibility. To determine this, they studied subjects’ pupil sizes as they read positive polarity and negative polarity texts. Those who read positive polarity text had smaller pupils. And because smaller pupils sharpen one’s ability to perceive finer details, the study proved that positive polarity leads to a better, more accurate reading experience.
Study #3: In 2016, further research was done into the matter. This time, their focus was on glance-like conditions (like while driving a car or, say, glancing at a line of code you just wrote). The results of the study showed that negative polarity in a dark ambient environment made it the most difficult to read. Only the positive polarity environments (in both dark and brightly illuminated areas) were ideal.
Bottom Line
Black text on a white background provides the optimal reading experience. If for some reason you prefer the Dark Mode interface, only use it when you don’t have much reading to do and accuracy isn’t an absolutely must.
2. Some Medical Professionals Don’t Believe It Has Any Effect
It’s not just researchers that have taken an interest in the validity of Dark Mode’s health benefits. Medical professionals are getting in on the conversation, too.
Ophthalmologist Dr. Euna Koo spoke to CNN Business about this subject and said:
I do not think dark mode affects eye health in any way given the data that is out there in the literature. The duration of use is likely much more important than the mode or the intensity of the brightness of the device when it comes to the effect of this dark mode on eye fatigue and potentially eye health.
Ophthalmology Director of Modernizing Medicine, Dr. Michael B. Rivers, echoed that sentiment in a recent Forbes article:
While bright light in the evening is known to disrupt circadian rhythms, there’s no real evidence that white font on a dark screen is easier to read than the reverse.
Wired rounded up the opinions of a couple professors of human-computer interaction from UCL. This is what Anna Cox had to say about the relationship between Dark Mode and productivity:
Unfortunately, externally driven distractions don’t just disappear by changing their colour, and internally driven distractions aren’t inhibited by looking at something dark.
So, if doctors and professors are coming forward to debunk the myth that Dark Mode helps with visibility and concentration, we should probably listen to them.
3. It Might Be Affecting Your Mood
This one I don’t have as solid proof for, though I wouldn’t be surprised if we see more studies done on this in the coming years. Here’s what I do know:
The deprivation of light can change how our brains work and can lead to greater levels of depression. For those of you who’ve lived in a place like Seattle before, you know what I’m talking about.
Seasonal affective disorder (or SAD) is a condition that causes people to feel tired, unmotivated, and depressed…all because of a lack of exposure to light. This is especially problematic in parts of the world where the days are short and the sun only comes out a couple months of the year.
I can attest to this. It took just one year of living in Seattle before I had to see my doctor about the extreme fatigue and depression I was experiencing. She and a couple other medical professionals I talked to all said the same thing: “Oh, that’s normal. We’re all depressed here. Get a SAD lamp.” (Basically, because there is no sunshine to naturally wake your body up or to help rejuvenate you throughout the day, your circadian rhythms get all messed up. And a SAD lamp emulates that boost of light you’re missing throughout the day.)
Considering what we know about blue light and its disruptive effects on melatonin and sleep, I can’t help but wonder if these same blue light-emitting screens can help us stay awake and focused during the day. If that’s the case, Dark Mode — at least when used in excess — might actually be hurting our productivity and alertness.
Wrap-Up
As more of the tools we use to do business with offer up a Dark Mode option, should we take it?
Based on what the research and professionals are saying, I don’t think so. It seems like Dark Mode is more of an aesthetic choice than one you’d make because it’s going to improve how effective you are at work.
And, hey, if you prefer the sleek and subdued look of Dark Mode and find that it doesn’t have any adverse effects on you, have at it. That said, if you’re wondering why you can’t stay focused or awake at your computer, a better option might be to stick with the traditional white screen and adhere to smarter work practices: take frequent breaks from the screen, get outside, and work during your most productive hours.