Archive

Archive for May, 2021

Serverless Functions: The Secret to Ultra-Productive Front-End Teams

May 31st, 2021 No comments

Modern apps place high demands on front-end developers. Web apps require complex functionality, and the lion’s share of that work is falling to front-end devs:

  • building modern, accessible user interfaces
  • creating interactive elements and complex animations
  • managing complex application state
  • meta-programming: build scripts, transpilers, bundlers, linters, etc.
  • reading from REST, GraphQL, and other APIs
  • middle-tier programming: proxies, redirects, routing, middleware, auth, etc.

This list is daunting on its own, but it gets really rough if your tech stack doesn’t optimize for simplicity. A complex infrastructure introduces hidden responsibilities that introduce risk, slowdowns, and frustration.

Depending on the infrastructure we choose, we may also inadvertently add server configuration, release management, and other DevOps duties to a front-end developer’s plate.

Software architecture has a direct impact on team productivity. Choose tools that avoid hidden complexity to help your teams accomplish more and feel less overloaded.

The sneaky middle tier — where front-end tasks can balloon in complexity

Let’s look at a task I’ve seen assigned to multiple front-end teams: create a simple REST API to combine data from a few services into a single request for the frontend. If you just yelled at your computer, “But that’s not a frontend task!” — I agree! But who am I to let facts hinder the backlog?

An API that’s only needed by the frontend falls into middle-tier programming. For example, if the front end combines the data from several backend services and derives a few additional fields, a common approach is to add a proxy API so the frontend isn’t making multiple API calls and doing a bunch of business logic on the client side.

There’s not a clear line to which back-end team should own an API like this. Getting it onto another team’s backlog — and getting updates made in the future — can be a bureaucratic nightmare, so the front-end team ends up with the responsibility.

This is a story that ends differently depending on the architectural choices we make. Let’s look at two common approaches to handling this task:

  • Build an Express app on Node to create the REST API
  • Use serverless functions to create the REST API

Express + Node comes with a surprising amount of hidden complexity and overhead. Serverless lets front-end developers deploy and scale the API quickly so they can get back to their other front-end tasks.

Solution 1: Build and deploy the API using Node and Express (and Docker and Kubernetes)

Earlier in my career, the standard operating procedure was to use Node and Express to stand up a REST API. On the surface, this seems relatively straightforward. We can create the whole REST API in a file called server.js:

const express = require('express');

const PORT = 8080;
const HOST = '0.0.0.0';

const app = express();

app.use(express.static('site'));

// simple REST API to load movies by slug
const movies = require('./data.json');

app.get('/api/movies/:slug', (req, res) => {
  const { slug } = req.params;
  const movie = movies.find((m) => m.slug === slug);

  res.json(movie);
});

app.listen(PORT, HOST, () => {
  console.log(`app running on http://${HOST}:${PORT}`);
});

This code isn’t too far removed from front-end JavaScript. There’s a decent amount of boilerplate in here that will trip up a front-end dev if they’ve never seen it before, but it’s manageable.

If we run node server.js, we can visit http://localhost:8080/api/movies/some-movie and see a JSON object with details for the movie with the slug some-movie (assuming you’ve defined that in data.json).

Deployment introduces a ton of extra overhead

Building the API is only the beginning, however. We need to get this API deployed in a way that can handle a decent amount of traffic without falling down. Suddenly, things get a lot more complicated.

We need several more tools:

  • somewhere to deploy this (e.g. DigitalOcean, Google Cloud Platform, AWS)
  • a container to keep local dev and production consistent (i.e. Docker)
  • a way to make sure the deployment stays live and can handle traffic spikes (i.e. Kubernetes)

At this point, we’re way outside front-end territory. I’ve done this kind of work before, but my solution was to copy-paste from a tutorial or Stack Overflow answer.

The Docker config is somewhat comprehensible, but I have no idea if it’s secure or optimized:

FROM node:14
WORKDIR /usr/src/app
COPY package*.json ./
RUN npm install
COPY . .
EXPOSE 8080
CMD [ "node", "server.js" ]

Next, we need to figure out how to deploy the Docker container into Kubernetes. Why? I’m not really sure, but that’s what the back end teams at the company use, so we should follow best practices.

This requires more configuration (all copy-and-pasted). We entrust our fate to Google and come up with Docker’s instructions for deploying a container to Kubernetes.

Our initial task of “stand up a quick Node API” has ballooned into a suite of tasks that don’t line up with our core skill set. The first time I got handed a task like this, I lost several days getting things configured and waiting on feedback from the backend teams to make sure I wasn’t causing more problems than I was solving.

Some companies have a DevOps team to check this work and make sure it doesn’t do anything terrible. Others end up trusting the hivemind of Stack Overflow and hoping for the best.

With this approach, things start out manageable with some Node code, but quickly spiral out into multiple layers of config spanning areas of expertise that are well beyond what we should expect a frontend developer to know.

Solution 2: Build the same REST API using serverless functions

If we choose serverless functions, the story can be dramatically different. Serverless is a great companion to Jamstack web apps that provides front-end developers with the ability to handle middle tier programming without the unnecessary complexity of figuring out how to deploy and scale a server.

There are multiple frameworks and platforms that make deploying serverless functions painless. My preferred solution is to use Netlify since it enables automated continuous delivery of both the front end and serverless functions. For this example, we’ll use Netlify Functions to manage our serverless API.

Using Functions as a Service (a fancy way of describing platforms that handle the infrastructure and scaling for serverless functions) means that we can focus only on the business logic and know that our middle tier service can handle huge amounts of traffic without falling down. We don’t need to deal with Docker containers or Kubernetes or even the boilerplate of a Node server — it Just Works™ so we can ship a solution and move on to our next task.

First, we can define our REST API in a serverless function at netlify/functions/movie-by-slug.js:

const movies = require('./data.json');

exports.handler = async (event) => {
  const slug = event.path.replace('/api/movies/', '');
  const movie = movies.find((m) => m.slug === slug);

  return {
    statusCode: 200,
    body: JSON.stringify(movie),
  };
};

To add the proper routing, we can create a netlify.toml at the root of the project:

[[redirects]]
  from = "/api/movies/*"
  to = "/.netlify/functions/movie-by-slug"
  status = 200

This is significantly less configuration than we’d need for the Node/Express approach. What I prefer about this approach is that the config here is stripped down to only what we care about: the specific paths our API should handle. The rest — build commands, ports, and so on — is handled for us with good defaults.

If we have the Netlify CLI installed, we can run this locally right away with the command ntl dev, which knows to look for serverless functions in the netlify/functions directory.

Visiting http://localhost:888/api/movies/booper will show a JSON object containing details about the “booper” movie.

So far, this doesn’t feel too different from the Node and Express setup. However, when we go to deploy, the difference is huge. Here’s what it takes to deploy this site to production:

  1. Commit the serverless function and netlify.toml to repo and push it up on GitHub, Bitbucket, or GitLab
  2. Use the Netlify CLI to create a new site connected to your git repo: ntl init

That’s it! The API is now deployed and capable of scaling on demand to millions of hits. Changes will be automatically deployed whenever they’re pushed to the main repo branch.

You can see this in action at https://serverless-rest-api.netlify.app and check out the source code on GitHub.

Serverless unlocks a huge amount of potential for front-end developers

Serverless functions are not a replacement for all back-ends, but they’re an extremely powerful option for handling middle-tier development. Serverless avoids the unintentional complexity that can cause organizational bottlenecks and severe efficiency problems.

Using serverless functions allows front-end developers to complete middle-tier programming tasks without taking on the additional boilerplate and DevOps overhead that creates risk and decreases productivity.

If our goal is to empower frontend teams to quickly and confidently ship software, choosing serverless functions bakes productivity into the infrastructure. Since adopting this approach as my default Jamstack starter, I’ve been able to ship faster than ever, whether I’m working alone, with other front-end devs, or cross-functionally with teams across a company.


The post Serverless Functions: The Secret to Ultra-Productive Front-End Teams appeared first on CSS-Tricks.

You can support CSS-Tricks by being an MVP Supporter.

Categories: Designing, Others Tags:

Local: Always Getting Better

May 31st, 2021 No comments

I’ve been using Local for ages. Four years ago, I wrote about how I got all my WordPress sites running locally on it. I just wanted to give it another high five because it’s still here and still great. In fact, much great than it was back then.

Disclosure, Flywheel, the makers of Local, sponsor this site, but this post isn’t sponsored. I just wanted to talk about a tool I use. It’s not the only player in town. Even old school MAMP PRO is has gotten a lot better and many devs seem to like it. People that live on the command line tend to love Laravel Valet. There is another WordPress host getting in on the game here: DevKinsta.

The core of Local is still very much the same. It’s an app you run locally (Windows, Mac, or Linux) and it helps you spin up WordPress sites incredibly easily. Just a few choices and clicks and it’s going. This is particularly useful because WordPress has dependencies that make it run (PHP, MySQL, a web server, etc) and while you can absolutely do that by hand or with other tools, Local does it in a containerized way that doesn’t mess with your machine and can help you run locally with settings that are close to or entirely match your production site.

That stuff has always been true. Here are things that are new, compared to my post from four years ago!

  • Sites start up nearly instantaneously. Maybe around a year or a bit more ago Local had a beta build they dubbed Local “Lightning” because it was something of a re-write that made it way faster. Now it’s just how Local works, and it’s fast as heck.
  • You can easily pull and push sites to production (and/or staging) very easily. Back then, you could pull I think but not push. I still wire up my own deployment because I usually want it to be Git-based, but the pulling is awfully handy. Like, you sit down to work on a site, and first thing, you can just yank down a copy of production so you’re working with exactly what is live. That’s how I work anyway. I know that many people work other ways. You could have your local or staging environment be the source of truth and do a lot more pushing than pulling.
  • Instant reload. This is refreshing for my little WordPress sites where I didn’t even bother to spin up a build process or Sass or anything. Usually, those build processes also help with live reloading, so it’s tempting to reach for them just for that, but no longer needed here. When I do need a build process, I’ll often wire up Gulp, but also CodeKit still works great and its server can proxy Local’s server just fine.
  • One-click admin login. This is actually the feature that inspired me to write this post. Such a tiny quality of life thing. There is a button that says Admin. You can click that and, rather than just taking you to the login screen, it auto-logs you in as a particular admin user. SO NICE.
  • There is a plugin system. My back-end friends got me on TablePlus, so I love that there is an extension that allows me to one-click open my WordPress DBs in TablePlus. There is also an image optimizer plugin, which scans the whole site for images it can make smaller. I just used that the other day because might as well.

That’s not comprehensive of course, it’s just a smattering of features that demonstrate how this product started good and keeps getting better.

Bonus: I think it’s classy how they shout out to the open source shoulders they stand on:


The post Local: Always Getting Better appeared first on CSS-Tricks.

You can support CSS-Tricks by being an MVP Supporter.

Categories: Designing, Others Tags:

Top Blogging Platforms Worth Considering in 2021

May 31st, 2021 No comments

Want to know which of the top blogging platforms you should consider using this year?

Blogging is still one of the best ways to draw attention to your brand, generate thought leadership, and build your credibility. Research suggests that US internet users spend 3x more of their browsing time on blogs than on email. Additionally, people view about 20 billion blog pages on average each month. 

So, how do you join the blogging revolution? You’ll need the right platform. 

Essentially, a blogging platform is a CMS (Content Management System) which supports blog creation. Many come with additional tools like SEO support and integrations with email marketing too. There are tons of great blogging platforms out there, which means knowing where to start searching can be tough. To help you, we’ve put together this list of the leading blogging platforms.

What to Look for in a Blogging Platform

Before we sort through our list of the leading blogging platforms, let’s start with a quick overview of what the best blogging solutions typically include. Notably, depending on what you’re going to be using your blog for, you may have other features to prioritize besides those listed here. These features will act as a starting point for your comparisons:

Ease of Use

Uploading, publishing, and sharing your blog shouldn’t be a headache. 

There are many website builders out there that seem to have blogging tacked on as an “extra” rather than having it built into the foundations of the software. This often leads to a clunky backend experience when you’re building your site. 

If you’re a new blogger or don’t want to spend time messing around with HTML and coding, make sure that your blogging environment is easy to use. The simpler it is to distribute your content, the more likely you’ll stick to your blogging strategy. 

Cost and Revenue Opportunities

Many of the top blogging platforms come with a fee to think about. Even if you use an open-source platform for blogging, you still need to consider domain names, hosting, and security costs. Finding the right balance between spend and return on investment is crucial. 

Remember, just because a blogging platform is cheap doesn’t mean it’s good value. Similarly, expensive software may not be the best for your business. Ideally, you want something that’s going to deliver a good blogging experience, combined with plenty of opportunities to grow your readership for the lowest possible price. 

If you want to get the best return on investment, focus on the kind of monetization options you can access with each platform. Medium, for instance, has a partner program that allows you to earn money on the posts that customers read. Platforms like Wix, WordPress, and Squarespace can all offer earning opportunities too. You can use them to place certain content behind a paywall, create subscriptions, and sell products or services. 

Marketing and Growth Tools

Most blogging platforms will come with at least some tools to help you build your online presence. Wix and WordPress integrate with Google marketing, so you can purchase PPC campaigns and track your organic content through an SEO dashboard. 

The majority of CMS tools equipped with blogging capabilities also come with integrations for your email marketing service. This ensures you can create automated campaigns that inform your audience whenever a new blog post goes live. 

One of the best things about WordPress is how many plugins you can access to boost your readership levels. Access to extra tools like SEO solutions, landing form creators, and pop-ups can all boost your chances of converting and capturing leads. 

Custom Branding

If you’re keen to save money on your blogging platform, you might be tempted to start with a free version of a popular service. This is fine when you’re just testing the waters. However, you will need to spend extra if you want to remove the ads that other website builders put on your site. For instance, Wix’s free version will place ads on your pages and show the Wix identity in your footer. 

To build your own brand identity, you’re going to need to replace that CMS branding with your own. Look for a blogging service where you can buy your own domain name, customize your themes, and add your own colors, images, and logos into the mix. 

While tools like Medium won’t run ads on your campaigns, they also don’t allow you to customize your site to showcase your brand personality. It’s much easier to build a memorable identity when you can control what your site looks like. 

Upkeep and Maintenance

This ties in a little with the “ease of use” factor above. Before you invest in any blogging platform, think about how much work it’s going to require. A hosted blogging platform is pretty easy to manage because you don’t have to worry about security and uptime yourself.

Products like Wix and Squarespace will give you access to SSL certificates, patch security issues on your behalf, and handle other complicated site maintenance issues. WordPress and other open-source solutions require you to take more of a hands-on approach. You’ll need to manage your own web hosting and check the security of your site regularly. 

Flexibility

This feature is often overlooked in some guides to the best blogging platforms, but it’s also growing increasingly more important in today’s digital age. If you want your website to work for years to come, you need to make sure it’s flexible. This could mean that you look for something that allows you to upload different kinds of content, like written blogs and connecting podcasts. 

It could also mean investing in a service that has a lot of integrations and add-on options available. Plugins are fantastic for extending the functionality of your blog without having to move your entire site to another location. 

The right plugins can even allow you to transform your blog into a store if you decide to start selling your services or products later. 

The Best Blogging Platforms for 2021

Now we’ve covered what to look for in a blogging platform, we can begin to explore some of the top platforms on the market today. We’ve chosen these platforms for their ease of use, flexibility, performance, customization options, and value. 

WordPress

The best-known and most popular blogging platform in the world, WordPress is the go-to choice for most bloggers and website creators. Currently, there are around 64 million websites actively using WordPress as their chosen CMS. Usage stats also show that around 400 million people visit WordPress websites every month. 

WordPress powers most of the internet as one of the most flexible and easy-to-use platforms around. The biggest decision most users need to make is between WordPress.com and WordPress.org. 

You can create a blog for free at WordPress.com, and the company will host your site for you. However, you have to use a subdomain (rather than your own domain) with the free version. You’ll also lose control of your ads with the free package until you upgrade to a premium plan. 

A personal plan on WordPress.com starts at about $4 per month, and it removes all ads from your site. The more functionality you need, the more you’ll need to upgrade. WordPress.com is very easy to use and requires minimal initial setup, but it’s not very scalable. There are no custom themes, and you don’t technically “own” your blog this way. 

WordPress.org is a different story. With WordPress.org, you’re accessing an open-source blogging platform that allows you to build your site from scratch. You do need to purchase your own domain name and hosting with this service, but the software is free to use. 

WordPress.org is a lot more appealing to most bloggers because it’s so customizable. Features include:

  • Free and premium themes that you can customize to suit your brand;
  • Thousands of plugins to help with security, SEO, subscriptions, and more;
  • Gutenberg block editors to make creating and publishing blogs easy;
  • Tons of SEO friendly solutions to help you stand out online;
  • Access to a huge community of experts;
  • Infinite control over your design options;
  • Advanced user permissions and roles.

Pricing: WordPress.org is different from most blogging platforms because the foundation technology is free. You just pay for the a-la-carte options, like plugins, hosting, and domain name subscriptions. This means you can choose how expensive your site is going to be.

Pros:

  • Extremely easy to use with lots of community support available;
  • Free platform (though you do need to pay for the domain and hosting);
  • Lots of customization and plugin options to expand site functionality;
  • Search engine friendly as-standard, to help you grow;
  • Plenty of ways to make your brand stand out.

Cons:

  • It can be difficult to control your own website at first;
  • You have to manage your own backup and security;
  • Extra costs can quickly build up.

Squarespace

Squarespace is one of the more popular website design and blogging tools for people with a creative streak. Unlike WordPress.org, Squarespace gives you everything you need to build your own website straight out of the box. This includes hosting, the option to purchase your own domain name, and access to a range of beautiful templates. 

Squarespace stands out for its focus on small business owners. You can choose from a range of stunning designs and customize them however you choose with a convenient drag-and-drop builder. There’s also a fantastic customer service experience available from Squarespace, with a team that’s ready to help you with anything you need. 

Like many other hosted blogging platforms, you start on Squarespace by choosing the templates you like and customizing from there. There are some limitations in what you can do here, particularly if you have a lot of coding knowledge, making Squarespace less appealing to growing companies or larger brands. On the plus side, you do get features like:

  • Dedicated blogging templates to get you started;
  • Categories, tags, and featured post options;
  • Built-in scheduling for your blog posts;
  • Contributor roles and permissions;
  • Analytics to track your readers’ favorite posts;
  • Email marketing tools;
  • Social media and SEO solutions built-in;
  • Mobile app access.

Pricing: Compared to some of the other leading blogging solutions on the market, Squarespace is also quite affordable. The personal package at $12 per month will power a website with a stunning blog. You can also upgrade to the Business version for $18 per month, or if you decide to start selling your own products through your blog, you can transition to “Basic Commerce” at $26 per month.

Pros:

  • Squarespace is easy to use for beginners;
  • Fantastic range of stunning templates included;
  • SEO, email marketing, and social media marketing included;
  • SSL and HTTPS support;
  • Access to eCommerce features on some plans;
  • Useful analytics tools.

Cons:

  • Not very scalable for bigger brands;
  • Limited in terms of integrations and customization.

Medium

Medium is a different kind of blogging platform to many of the options mentioned here. This isn’t a tool you can use to build your own websites, like Wix or Squarespace. Instead, it’s a community you join with a monthly membership fee. 

Medium comes with a built-in audience, so you can immediately start speaking to customers and generating results from your content. As mentioned above, there’s also a Partner Program, which is free to join. The Partner Program allows you to earn money if people are reading your blogs regularly. 

For companies or individuals who just want to generate brand awareness but don’t want to invest in an entire blog-ready website yet, Medium can be a powerful choice. You can easily share posts and view what other people are posting. The biggest downside is that you can’t build an entire community and earn a fortune through your website with Medium. 

Medium is more like a social networking site, where you can begin to develop thought leadership than a true space to carve out your piece of the online world. But it does feature things like:

  • An easy-to-use environment for publishing content;
  • Analytics and insights into your campaigns;
  • Some design customization for your blog layout;
  • Access to a pre-existing audience of readers;
  • Support for monetization in the Partner program;
  • Access to picture uploading options;
  • Mobile-responsive blog posts.

Pricing: You don’t have to be a paid member of Medium to sign up for the partner program and start publishing blogs. This does make it a pretty good way to enhance your existing blogging strategy if you’re trying to generate more attention online. 

Pros:

  • Free to use for Partners and creators;
  • Excellent for appealing to already-engaged customers;
  • Easy to use, with no coding required;
  • No requirement to create a website or pay for hosting;
  • Communicate with a team of like-minded people.

Cons:

  • Limited customization options;
  • No ownership over your audience or readership;
  • Limitations to how you can make money (no ads).

LinkedIn

LinkedIn is among the most popular platforms for professionals in the world. It’s the go-to place for people in search of reliable ways to develop their professional network. Currently, there are around 756 million members on LinkedIn. When they’re not searching for connections with their peers or chatting about work opportunities, they’re checking out the content on the platform. 

If you’re keen to develop your position as a thought leader but prefer social media accounts to full websites, LinkedIn is the perfect choice. The more you publish on LinkedIn, the more you’ll attract new people who might want to work with you, invest in your company, or just work as part of your team. 

LinkedIn is a great place to generate attention if you’re in the B2B marketplace because most professionals already have their own account. You can also earn social proof by getting people to “endorse” your work. Some of the features of LinkedIn for bloggers include:

  • Private messaging for interactions with connections;
  • Notifications to help you keep track of valuable content;
  • A full profile posting section where you can publish your blogs;
  • A convenient network of active B2B professionals;
  • Endorsements for social proof;
  • A resume and blogging platform in one (you can list your skills);
  • Job searching and employee searching features.

Pricing: It’s free to access a basic membership with LinkedIn, but you will be limited on some of the features you can unlock. For instance, you can only send messages to people already in your network, and you’ll have limited analytics. LinkedIn Premium gives you slightly more functionality, with Business accounts starting at around $29.95 per month. 

Pros: 

  • Tons of people ready to read your blogs;
  • Great for building your professional network;
  • Good environment for thought leadership;
  • Access to extra tools like job listings;
  • Notifications to keep you on top of relevant posts;
  • Engagement options like private messaging;
  • Reports and insights.

Cons: 

  • No access to full website branding;
  • Limits to how you can monetize your content;
  • You don’t own the site or your traffic.

Wix

Easily one of the most popular website building solutions for beginners, Wix can help you build both a blog and a fully-featured website. You can even design your own store with Wix and start selling products whenever you choose. 

Wix is a straightforward site builder which you can use to build a site in a matter of minutes. There are hundreds of website themes to choose from, and you can also add as many customizations as you choose with the convenient drag-and-drop editor. The blog manager section of the CMS is also simple and intuitive, with SEO and analytics built in already. 

Wix aims to make jumping into blogging as quick and painless as possible. Elements like comments, social tools, hashtags, and subscriber forms are already available, and you can add further plugins if you choose. There’s also the option to include sharing buttons for social media accounts like Twitter, Facebook, and more. Features of Wix include:

  • An extensive range of blog templates;
  • Drag-and-drop customization (no coding required);
  • Subscriber forms, comments, likes, and categories;
  • Social media connections;
  • Extra features like store access;
  • Analytics and insights;
  • Quick and easy blogging interface.

Pricing: 

The most basic features of the Wix website builder are free to use. With a free Wix account, you’ll get a subdomain where you can’t choose the name of your own website, unfortunately. However, you can add a custom domain for only $4.50 per month. If you want a full premium plan with Wix, costs start at $8.50 per month and extend to $24.50 per month.

Pros:

  • Lots of pre-built blogging themes;
  • Easy customization options with no coding skills required;
  • Quick and easy to load and publish blogs;
  • Connections with social media platforms;
  • Access to various third-party apps and integrations;
  • Free option for beginners.

Cons:

  • Some limitations to the free account;
  • Ecommerce features are limited to paid plans;
  • Not as scalable for bigger companies.

Ghost

Lesser known than some of the options we’ve discussed so far but still brimming with value, Ghost is a minimalist blogging platform that’s all about content creation. Ghost promises a range of ways for you to turn your blogging into a business, with access to customizable templates, newsletter integrations, premium subscriptions, and more. 

The dashboard for Ghost is clean and intuitive, with access to simple sections where you can add tags to your posts, create drafts, track published content, and access valuable insights. You’ll have an easy view of important metrics like email open rates and numbers of paid members at a glance. You can also find integrations to make your Ghost experience even better. 

Ghost works alongside things like Buffer, Stripe, Twitter, Slack, MailChimp, and many other tools so you can take your blog to the next level. There’s no need for any coding knowledge, and because everything is written in JavaScript, it’s ultra-fast too. Features include:

  • Easy-to-use and intuitive interface;
  • Blogging and writing focused;
  • Clean and clutter-free design;
  • Integrations with various powerful tools;
  • Super-fast JavaScript coding;
  • Lots of templates and customizations;
  • Comment, mobile apps, A/B testing, and more;
  • Analytics and reporting.

Pricing: There’s a 14-day free trial to get you started with Ghost, then subscriptions start at $9 per month when billed annually for up to 1,000 members, 1 staff user, 2k views per month, and an SSL and CDN. The same plan is $15 per month billed monthly. Prices go all the way up to $199 per month billed annually, or $249 per month for 1 million views per month, 35,000 members, 15 staff users, and a 99.99% uptime SLA. 

Pros: 

  • Focus on writing and blogging;
  • Clutter-free and clean backend environment;
  • Easy to use and speedy performance;
  • Lots of packages to choose from;
  • Great integration options.

Cons:

  • Some limitations in scalability;
  • Complicated setup when installed;
  • Not a huge number of themes.

Choosing Your Blogging Platform

Whether you’re blogging because you want to build your personal brand or you’re looking for a way to strengthen sales opportunities for your company, you’re going to need the right blogging platform. The options above are just some of the best blogging solutions available right now. 

Remember, do your research and explore the free versions available whenever possible, so you can confidently invest in the software that’s best for you.


Featured image via Unsplash.

Source

The post Top Blogging Platforms Worth Considering in 2021 first appeared on Webdesigner Depot.

Categories: Designing, Others Tags:

Is There An Easier Way To Onboard New Staff Remotely?

May 31st, 2021 No comments

Growing your team is an exciting time, but if you’re trying to onboard your new staff remotely it can be a challenge.

It can be harder to tell how they’re doing and there’s less opportunity for casual introductions and informal meetings when you’re not in the same place. So it’s important to find ways to bring new staff up to speed, engage them with the work, and make them feel like part of the team.

In this article, we take a look at ways in which you can improve your onboarding process for new remote staff.

Set them up with the right equipment 

The first step towards effectively onboarding your new team members is to set them up for success. Provide all the equipment and resources that they might need so that there’s nothing holding them back from doing their job well. 

You shouldn’t be asking staff to use their own personal computers and phones. Not only are there security issues with employees using their own devices, but they might not be suitable for the work you’re asking them to do. And you want to help your employees create a clear line between work and home life, which is harder if they’re handling client calls on their personal cell at all hours of the day. 

Aside from the essentials, go above and beyond by providing all the extra little bits they might need such as: 

  • A suitable desk chair 
  • Second computer screen 
  • Keyboard and mouse
  • Notepads, pens, diaries

All these things are going to make new staff feel valued and like you’re investing in them, which will boost their engagement. 

Collate essential resources 

When you’re working remotely and most things are online, it’s easy to end up with different documents and files stored in various places or shared via different channels. But to help your new team get up to speed quickly, make sure that you centralize all the key resources and information that they’re going to need. 

If you don’t have one already then using an intranet system could be a good idea. Choose one like Happeo that’s specifically designed for remote businesses — as you can see in these reviews it’s a more versatile platform than other intranets and can be tailored to your exact requirements.

Put together a list of all the essential systems and tools that your business uses. This will include everything from email, instant messaging, and cloud storage to more specific tools like project management and time tracking. Run through this list before they start to ensure they’re set up with accounts. And then put together an outline of what each thing is used for, how to get started, and their login details.

Create comprehensive training courses

It’s important to train your new staff in a coherent and organized way so that they feel like they know what they’re doing. 

When you’re working remotely it can be easy to forget to show new staff everything. You can show them the basics but there are likely to be certain processes or little things that you just do as a habit that you don’t think to share with them.

The best way to overcome this is to create a training course that teaches them all the specifics they will need to know about how your business works and what they have to do. Work with other team members to pin down exactly how each process runs or how you use different software to do the job and provide them with all the details they need for their day-to-day work. 

You can use a platform like Teachable to create a bespoke training course that covers exactly what you need. From reading teachable reviews you can see that it’s more user-friendly than traditional learning management systems, which will help you to put together a course that engages and inspires your new staff.

Set out clear expectations

Remote working is often more flexible than if you’re working in an office, but you need to clearly outline exactly what that means for new staff. If you are offering flexible hours then there are a few things you should clarify:

  • Do you expect them to pick hours that work for them and then stick with the same hours each day?
  • Do you have core hours that you expect your team to be available for?
  • Are there other team members that your new staff needs to coordinate their hours with?
  • How do you accommodate things like appointments or childcare?
  • Are there any expectations to work overtime and how is this handled?

Using a time tracking system is going to be a good idea to track your remote team as it grows. For example, tools like Toggl make it easier to monitor working hours and let you see how long projects and tasks are taking. 

You should outline other expectations such as targets that you expect them to meet, how long certain tasks should take them if you have tight deadlines, and the exact responsibilities of their role.

It’s also important to cover things like how to communicate internally, especially if you’re using multiple channels such as instant messaging, email, video calls, and phone calls. Make it clear which ones you want staff to use, and how to escalate any important or urgent issues.

Setting out expectations and procedures from the beginning will ensure that your staff knows exactly what to do and how to do it.

Introduce them to everyone

It’s especially hard to get to know everyone when you’re starting a job remotely, but at the same time setting up a company-wide video call to introduce them might be overwhelming. Make a plan for your new staff to meet everyone gradually in the first week or two, whether it’s in small team meetings or one-to-one meetings in a smaller business.

Assign one person to look after your new staff for the first month so that they have enough support and know who to go to with questions. Organize regular check-ins with them at the end of each day for the first week, and then once or twice the following weeks so that they aren’t left wondering or worrying about anything.

Overall, to make it easier to onboard new staff remotely, you just need to put together a clear plan so that they know what they’re doing and feel like part of the team. Focus on getting them up to speed as quickly as possible, provide all the resources they’ll need, and get them working as soon as possible.

Photo by Andrew Neel from Pexels

Categories: Others Tags:

Popular Design News of the Week: May 24 2021 – May 30, 2021

May 30th, 2021 No comments

Every day design fans submit incredible industry stories to our sister-site, Webdesigner News. Our colleagues sift through it, selecting the very best stories from the design, UX, tech, and development worlds and posting them live on the site.

The best way to keep up with the most important stories for web professionals is to subscribe to Webdesigner News or check out the site regularly. However, in case you missed a day this week, here’s a handy compilation of the top curated stories from the last seven days. Enjoy!

DOOM Captcha – Captchas Don’t Have to be Boring

82% of Developers Get This 3 Line CSS Quiz Wrong

20 Best New Websites, May 2021

Looking to Leave WordPress Behind? You’re Not Alone

Savecmd – Save Your Terminal History in the Cloud

Helsinki Design System

Best Things for Everything

7 Elements of a Highly Usable Landing Page

Paradigm-Shifting Concepts in Product Design

DaisyUI – Free UI Components Plugin for Tailwind CSS

Sublime Text 4 – Text Editing, Done Right

Google Wants to Sacrifice Chrome’s Usability to Make Room for More Clickbait

24 Stunning Examples of Movie Industry Websites

Who Has the Fastest F1 Website in 2021?

ImagineAI – Instantly Generate Django & Node Code for Your Backend App

Source

The post Popular Design News of the Week: May 24 2021 – May 30, 2021 first appeared on Webdesigner Depot.

Categories: Designing, Others Tags:

How Do Artists Use SEO Tools in 2021?

May 28th, 2021 No comments

In the modern world, the main challenge for contemporary artists is getting noticed. Many paint great pictures, but not many achieve real success and recognition.

To become a famous artist and start selling paintings, you need to promote yourself.

Due to the pandemic, traditional exhibitions of young artists in galleries remain in question and attract only a limited circle of people interested in art. But the Internet opens up tremendous opportunities for artists as well. Having thought out a thorough promotion strategy and using SEO techniques, any artist can acquaint interested people with his/her works and start selling paintings. So, today we’ll take a look at how SEO helps artists get promoted online.

Why artists need SEO in 2021

Nowadays, many art sites are featuring the best artists in their field, like Gagosian, Artsy, Artsper, etc. Surely, if you want to become famous, you need to be listed there. In addition, Pinterest, Instagram, and other social networks are a must for any artist who wants to get more fans and maybe an offer from a famous gallery. 

But the reality is that the competition in the contemporary art market is very strong. If you really want to be successful and become not just one of the local painters but a respected artist and make your living selling your paintings, you should not lose sight of such a way as having a website and promoting it. 

The main advantage of having a website is that the focus here is on your artwork that allows you to drive more sales, of course. Social media is an overcrowded marketplace for artists because you become one of many accounts that everyone follows and simply lose your identity. You can showcase your best works, provide ways to connect with you quickly, and increase your online presence by ranking top positions in Google search. You want as many people as possible to know about you and have the opportunity to evaluate your artwork without comparing them with dozens of other artists’ works on neighboring pages.

Still, while a large number of artists have sites, few of them actually do promotion work. Most sites just stay there half-empty and without traffic. Such artists stay unknown and can’t sell their paintings to earn their living. To make yourself famous and start getting orders, you need to attract an audience interested in art. This is where SEO comes in. SEO is a strategy to get your website ranked high – at the top of the search results for specific queries. If a person Googles your name or some query like “cool paintings,” they may come across your website and become a great fan of your artwork!

by Andrew Miroshnichenko

Here’s how artists can benefit from search engine optimization:

  1. You get free traffic to your website.
  2. Thanks to relevant keywords, your site is visited only by those who are really interested in art.
  3. You increase your brand awareness – more people will know about you.
  4. Your site is ranked higher by Google. According to a study, more than 70% of all traffic goes to sites from the first page of search results. If a person is looking for a painting to buy and sees your site on the SERP, there is a greater chance that they will visit you.
  5. It is easier for gallery owners and agents to find information about you and contact you.

Tools to use for better SEO promotion of an artist website 

Whether you’re working on your website on your own or have hired an SEO specialist, you’ll need this set of basic tools and services to succeed:

  1. SE Ranking for website audit, keyword, and competitor research. SE Ranking is a versatile tool to get your site ranked #1 even if you do not have enough experience in SEO. It automatically analyzes your keywords (their density, difficulty, who’s ranked for them) and finds related keywords to expand your semantic core. All you need to do is to follow the platform’s guidelines to improve website performance.
  2. ImageOptim for Google Image optimization. This free tool optimizes images to increase their loading speed. It reduces file sizes, removes junk data like comments, embedded thumbnails, metadata from cameras, etc. The service supports all popular image formats and is easy to use. 
  3. Grammarly for content optimization. Everything you write on your website should be grammatically correct and engaging. Grammarly checks your texts for all kinds of mistakes and bland or unclear content. It also helps to keep the website copy consistent, engaging, and in your tone of voice.  
  4. Hootsuite for social media marketing and management. Hootsuite is for experienced digital marketing. They have created lots of useful tools for social media management such as a set of custom social streams, find social conversations (based on keywords, hashtags, locations), and tonnes of monitoring apps. In total, the tool connected over 35 social media platforms, that is impressive!

SEO for artists in action

Okay, let’s look at how SEO for artists works on examples of different artists who pay attention to SEO and rank high in the SERP. To get the same result, you can follow these simple steps to achieve success as well:

1. Selecting the proper domain 

The trick here is that the domain name matches the artist’s name. The best option is www.yourname.com. In this case, even if you have very little content on your website, it will still get higher in the Google search results in a few months. For example, Jordan Casteel doesn’t have text on his website’s main page at all but still ranks high because of the domain matching his name.

2. Using the name of the artist in the homepage snippet 

It consists of the title and description. If you don’t specify it manually, your CMS will generate it automatically. But it won’t be good for SEO, so come up with your own relevant and catchy title and description and mention your name and who you are (artist). 

TIP. If you use WordPress, install the Yoast SEO plugin. It will help you write titles and meta descriptions and tell you if they are good or not from the SEO perspective. 

3. Using relevant keywords

Whether you are an artist or run an art gallery, you probably want your site to be found not only by your name but also by other keywords, like “best modern artists”, “art gallery”, “paintings for sale”, etc. To rank for such queries, you first need to build a semantic core. To do this, you can use the services, which we will talk about below.

Also, you can take advantage of Google suggestions. Just start typing your query in the search box, and you will see what other users are looking for in your topic. In fact, these are your keywords.

Spread your keywords across the pages and write engaging content. While portfolio sites generally have a minimum of text, you can get a lot of organic traffic from optimized articles on your blog.

TIP. Use the SE Ranking keywords research tool to collect the most relevant keywords, similar queries, and long-tail keywords. And don’t forget to update your lists of keywords from time to time. 

4. Optimizing names of images 

To make your paintings visible in Google Images, when someone googles your name, label both the image file and the Alt-text in a relevant way. An example of a good caption is Celestial Flowers (2018) by Takashi Murakami. This applies to all images wherever you upload them – on Pinterest, your website, social media, or Wikipedia.

5. Improving website loading speed 

The problem with many online portfolios is that they consist mostly of a lot of images. Large and heavy images slow down your site’s loading speed, which is one of the main indicators for getting your site to the top. At the same time, many artists do not want to compress their images, as the quality is lost a little. But here’s what you can do:

  • implement lazy load;
  • remove EXIF data;
  • use a CDN;
  • leverage browsing caching;
  • specify image dimensions;
  • minimize redirects;
  • add a small and cacheable favicon.

TIP. Use the Google PageSpeed Insights tool to test your site loading speed. It’s totally free and will give you lots of recommendations! 

https://www.machmetrics.com/speed-blog/wp-content/uploads/2018/09/pagespeed-insights.png

6. Optimizing the social media profile 

Facebook, Twitter, and Instagram also rank well in Google for names and brands. Use your full name on your personal and business pages, mention your occupation, optimize your image and cover. The more social networks you use, the better – if you optimize all your profiles accordingly, the SERP for your name will consist only of these pages (plus your website). 

TIP. Managing multiple social networks can be time-consuming. In this case, use the Hootsuite service – it allows you to manage all your social networks in one account. 

7. Adding information to Google My Business

If you have a gallery or art workshop, add information about it to Google My Business. The main feature here is to provide the complete information:

  • Address;
  • Contacts;
  • Business hours;
  • Categories;
  • Short description;
  • Add attributes, like accessibility options, Wi-Fi, payment types, etc.;
  • Verify your ownership. 

8. Creating a Wikipedia page 

It’s kind of a PRO step, still a very effective one. Having your own Wikipedia page increases the trust of both people and search engines. The problem is that not everyone can create and edit pages on Wikipedia, and unverified or advertising information is removed from there. Therefore, here are some tips for you:

  1. Hire a Wikipedia contributor. First of all, you can’t write a Wikipedia article about yourself. Second, this platform has specific guidelines a dedicated writer is familiar with.  
  2. Collect sources and write a draft based on them. Every fact you mention should be backed by reliable sources – other websites, statistics, mentions in magazines, etc. Look at Wikipedia pages of other artists and follow their format. Basically, a Wikipedia article on a specific artist consists of their early years and education, featured artworks, exhibitions, etc. 
  3. Hand your draft to the hired writer and make changes if needed. The main thing is to make your article as neutral as possible – no promotion, facts only.  Provide your article with a nice photo (and don’t forget to optimize it for Google Images!) and wait until it’s published.
by Andrii Ferens

Summary

Very few artists earn their living by selling their artworks. This is largely because few people know about these artists. They are exhibited only in local galleries and hope for a bit of luck. However, if you pay attention to marketing and SEO, you can become one of the most famous contemporary artists and start selling your paintings. We hope our tips will help you develop your site and succeed!

Categories: Others Tags:

The Best Affiliate Marketing Fraud Prevention Tools

May 28th, 2021 No comments

Affiliate marketing has developed into one of the most valuable techniques in acquiring new customers for online businesses… but with this growth comes more risk of criminal activities

As the world continues its journey of digitalization, affiliate marketing can be an extremely effective method in discovering specific niches that might have been previously unreachable pre-internet through mediums such as unique blogs or social media influencers.

Businesses have the ability to add tracked links to their content which then leads to a different firm’s store or product page, with the affiliate taking a percentage based on the agreement.

As an example of a successful affiliate model, the British consumer finance information and discussion website Money Saving Expert (MSE) bases its entire business model from affiliated links.

MSE operates entirely on a cost-per-acquisition (CPA) basis and gets paid a commission if a customer purchases the linked product.

As explained by the company’s ‘How this site is financed’ page, the site does not offer any of its own paid products, accept external advertisements or sponsored posts.

It’s an incredibly powerful method and sees huge successes across the world… Yet, according to Juniper’s report Future Digital Advertising: Artificial Intelligence & Advertising Fraud 2019-2023, advertisers’ total loss to fraud will rise to $100 billion by 2023. 

What exactly is affiliate fraud?

Affiliate fraud is when a person/organization unethically utilizes a campaign for their own personal gain or advantage. This includes activities that go directly against the terms and conditions of an affiliate marketing program. 

It comes in several forms, among the most common are:

  1. Traffic diverting 
    • Taking traffic from the legitimate affiliate and misleading the customer to the fraudster’s landing page
  2. Spamming
    • A range of options with this method such as auto-refreshing a page, using software, or spamming directly from a referral link. 
  3. URL hijacking/site cloning
    • Fraudsters take over site domains close to the company’s name or their product(s) to take up a referral from the redirect. Site cloning is similar however the criminal will copy the legitimate affiliate’s sites and content to mislead prospects. 
      • Site cloning brings even higher risk due to the fact the main source is losing relevant traffic as well as income.
  4. Fake clicks or referrals 
    • Utilizing scripts/software to emulate human actions to generate false clicks or transactions
  5. Cookie stuffing 
    • The fraudster deposits multiple affiliate cookies on a user’s browser, in order to claim the commission out of sales happening from that browser.
  6. Illegal transactions and stolen information
    • Most common with fraud, the criminals will make purchases using stolen credit card credentials or register using fake identification which in turn can cause heavy chargeback fees. 

Methbot Arrests

Alexander Zhukov and the ongoing ‘Methbot’ is one of the most notorious affiliate fraud cases in recent years. 

Zhukov, who was arrested in 2018, is alleged to have acquired more than $7 million from merchants by simulating humans viewing ads on fabricated web pages.

The lawyer involved with the case noted: “Before, it was boys and girls in Russia sitting in boiler rooms clicking manual clicks in order to get apparent traffic to defraud affiliates. Now it’s done by bots.”

Defence tools

Despite the potential risks, affiliate fraud detection is more affordable than ever thanks to the many solutions available to the market now, and ensuring you have multiple layers of protection is by far the most important factor in combating affiliate fraud.

For example, monitoring the quality of customer traffic is one sure way to understand whether or not the affiliate is bogus. 

If your fraud detection solution enables you to regulate and track data, you will quickly spot a phony partner through transactions that are approved, reviewed, or declined. These risk rules can analyze variables such as the user’s IP address, connection attempts, and the average time from conversion to checkout. 

If you want to block illegitimate traffic to your site completely, device fingerprinting is perhaps the most effective way to do so. 

This solution is able to scan the end users’ software and hardware configuration and record them as ID numbers/hashes. 

Additional checks can always present a good idea to begin with such as:

  • Does the affiliate have an active website?
  • Does its content match the product(s) being affiliated? 
  • Is the website optimized for SEO etc?

Answering all these questions will help form a holistic profile of your customer at the acquisition stage in real-time.  


Photo by Markus Winkler on Unsplash

Categories: Others Tags:

Adding A Commenting System To A WYSIWYG Editor

May 28th, 2021 No comments

In recent years, we’ve seen Collaboration penetrate a lot of digital workflows and use-cases across many professions. Just within the Design and Software Engineering community, we see designers collaborate on design artifacts using tools like Figma, teams doing Sprint and Project Planning using tools like Mural and interviews being conducted using CoderPad. All these tools are constantly aiming to bridge the gap between an online and a physical world experience of executing these workflows and making the collaboration experience as rich and seamless as possible.

For the majority of the Collaboration Tools like these, the ability to share opinions with one another and have discussions about the same content is a must-have. A Commenting System that enables collaborators to annotate parts of a document and have conversations about them is at the heart of this concept. Along with building one for text in a WYSIWYG Editor, the article tries to engage the readers into how we try to weigh the pros and cons and attempt to find a balance between application complexity and user experience when it comes to building features for WYSIWYG Editors or Word Processors in general.

Representing Comments In Document Structure

In order to find a way to represent comments in a rich text document’s data structure, let’s look at a few scenarios under which comments could be created inside an editor.

  • Comments created over text that has no styles on it (basic scenario);
  • Comments created over text that may be bold/italic/underlined, and so on;
  • Comments that overlap each other in some way (partial overlap where two comments share only a few words or fully-contained where one comment’s text is fully contained within text of another comment);
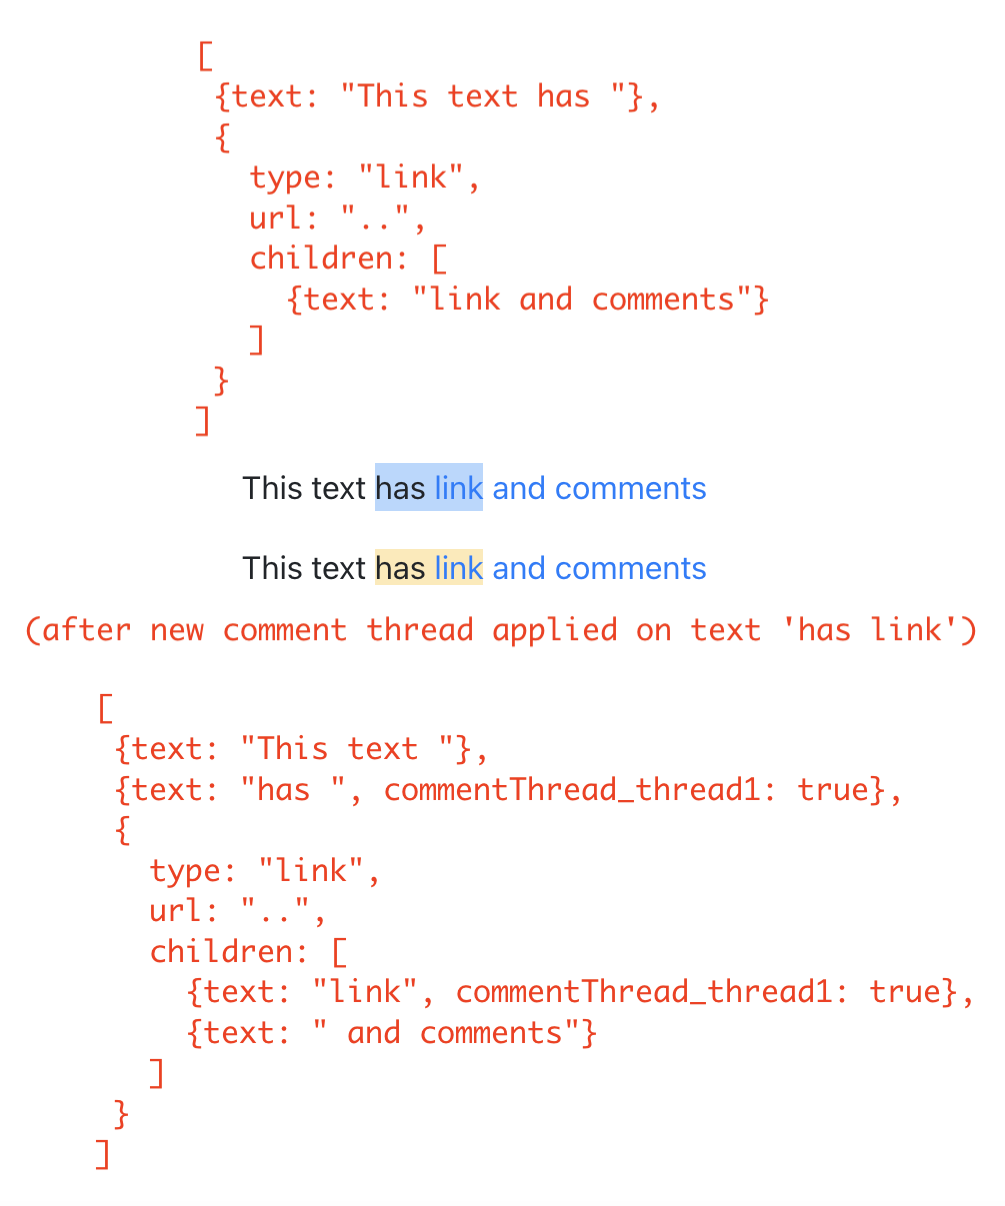
  • Comments created over text inside a link (special because links are nodes themselves in our document structure);
  • Comments that span multiple paragraphs (special because paragraphs are nodes in our document structure and comments are applied to text nodes which are paragraph’s children).

Looking at the above use-cases, it seems like comments in the way they can come up in a rich text document are very similar to character styles (bold, italics etc). They can overlap with each other, go over text in other types of nodes like links and even span multiple parent nodes like paragraphs.

For this reason, we use the same method to represent comments as we do for character styles, i.e. “Marks” (as they are so called in SlateJS terminology). Marks are just regular properties on nodes — speciality being that Slate’s API around marks (Editor.addMark and Editor.removeMark) handles changing of the node hierarchy as multiple marks get applied to the same range of text. This is extremely useful to us as we deal with a lot of different combinations of overlapping comments.

Comment Threads As Marks

Whenever a user selects a range of text and tries to insert a comment, technically, they’re starting a new comment thread for that text range. Because we would allow them to insert a comment and later replies to that comment, we treat this event as a new comment thread insertion in the document.

The way we represent comment threads as marks is that each comment thread is represented by a mark named as commentThread_threadID where threadID is a unique ID we assign to each comment thread. So, if the same range of text has two comment threads over it, it would have two properties set to the truecommentThread_thread1 and commentThread_thread2. This is where comment threads are very similar to character styles since if the same text was bold and italic, it would have both the properties set to truebold and italic.

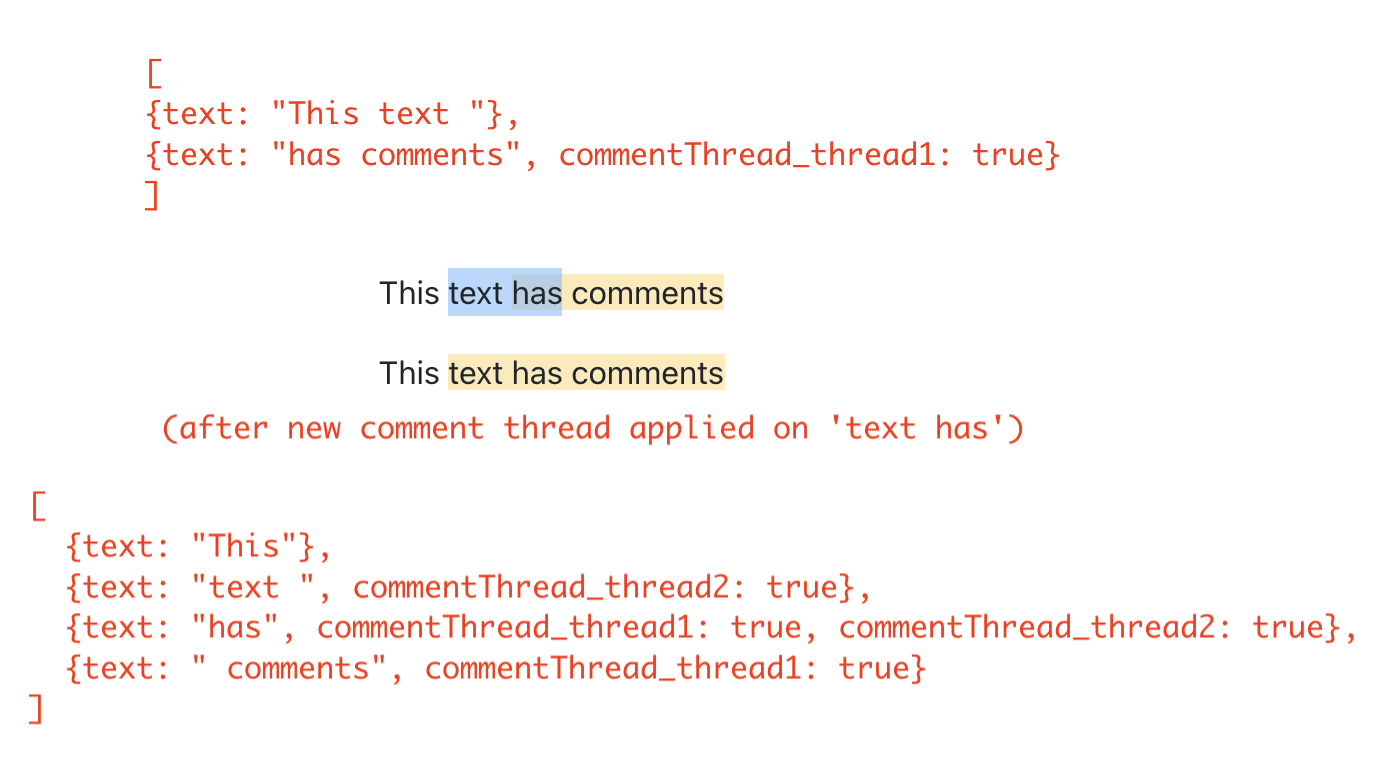
Before we dive into actually setting this structure up, it’s worth looking at how the text nodes change as comment threads get applied to them. The way this works (as it does with any mark) is that when a mark property is being set on the selected text, Slate’s Editor.addMark API would split the text node(s) if needed such that in the resulting structure, text nodes are set up in a way that each text node has the exact same value of the mark.

To understand this better, take a look at the following three examples that show the before-and-after state of the text nodes once a comment thread is inserted on the selected text:

Highlighting Commented Text

Now that we know how we are going to represent comments in the document structure, let’s go ahead and add a few to the example document from the first article and configure the editor to actually show them as highlighted. Since we will have a lot of utility functions to deal with comments in this article, we create a EditorCommentUtils module that will house all these utils. To start with, we create a function that creates a mark for a given comment thread ID. We then use that to insert a few comment threads in our ExampleDocument.

# src/utils/EditorCommentUtils.js

const COMMENT_THREAD_PREFIX = "commentThread_";

export function getMarkForCommentThreadID(threadID) {
  return `${COMMENT_THREAD_PREFIX}${threadID}`;
}

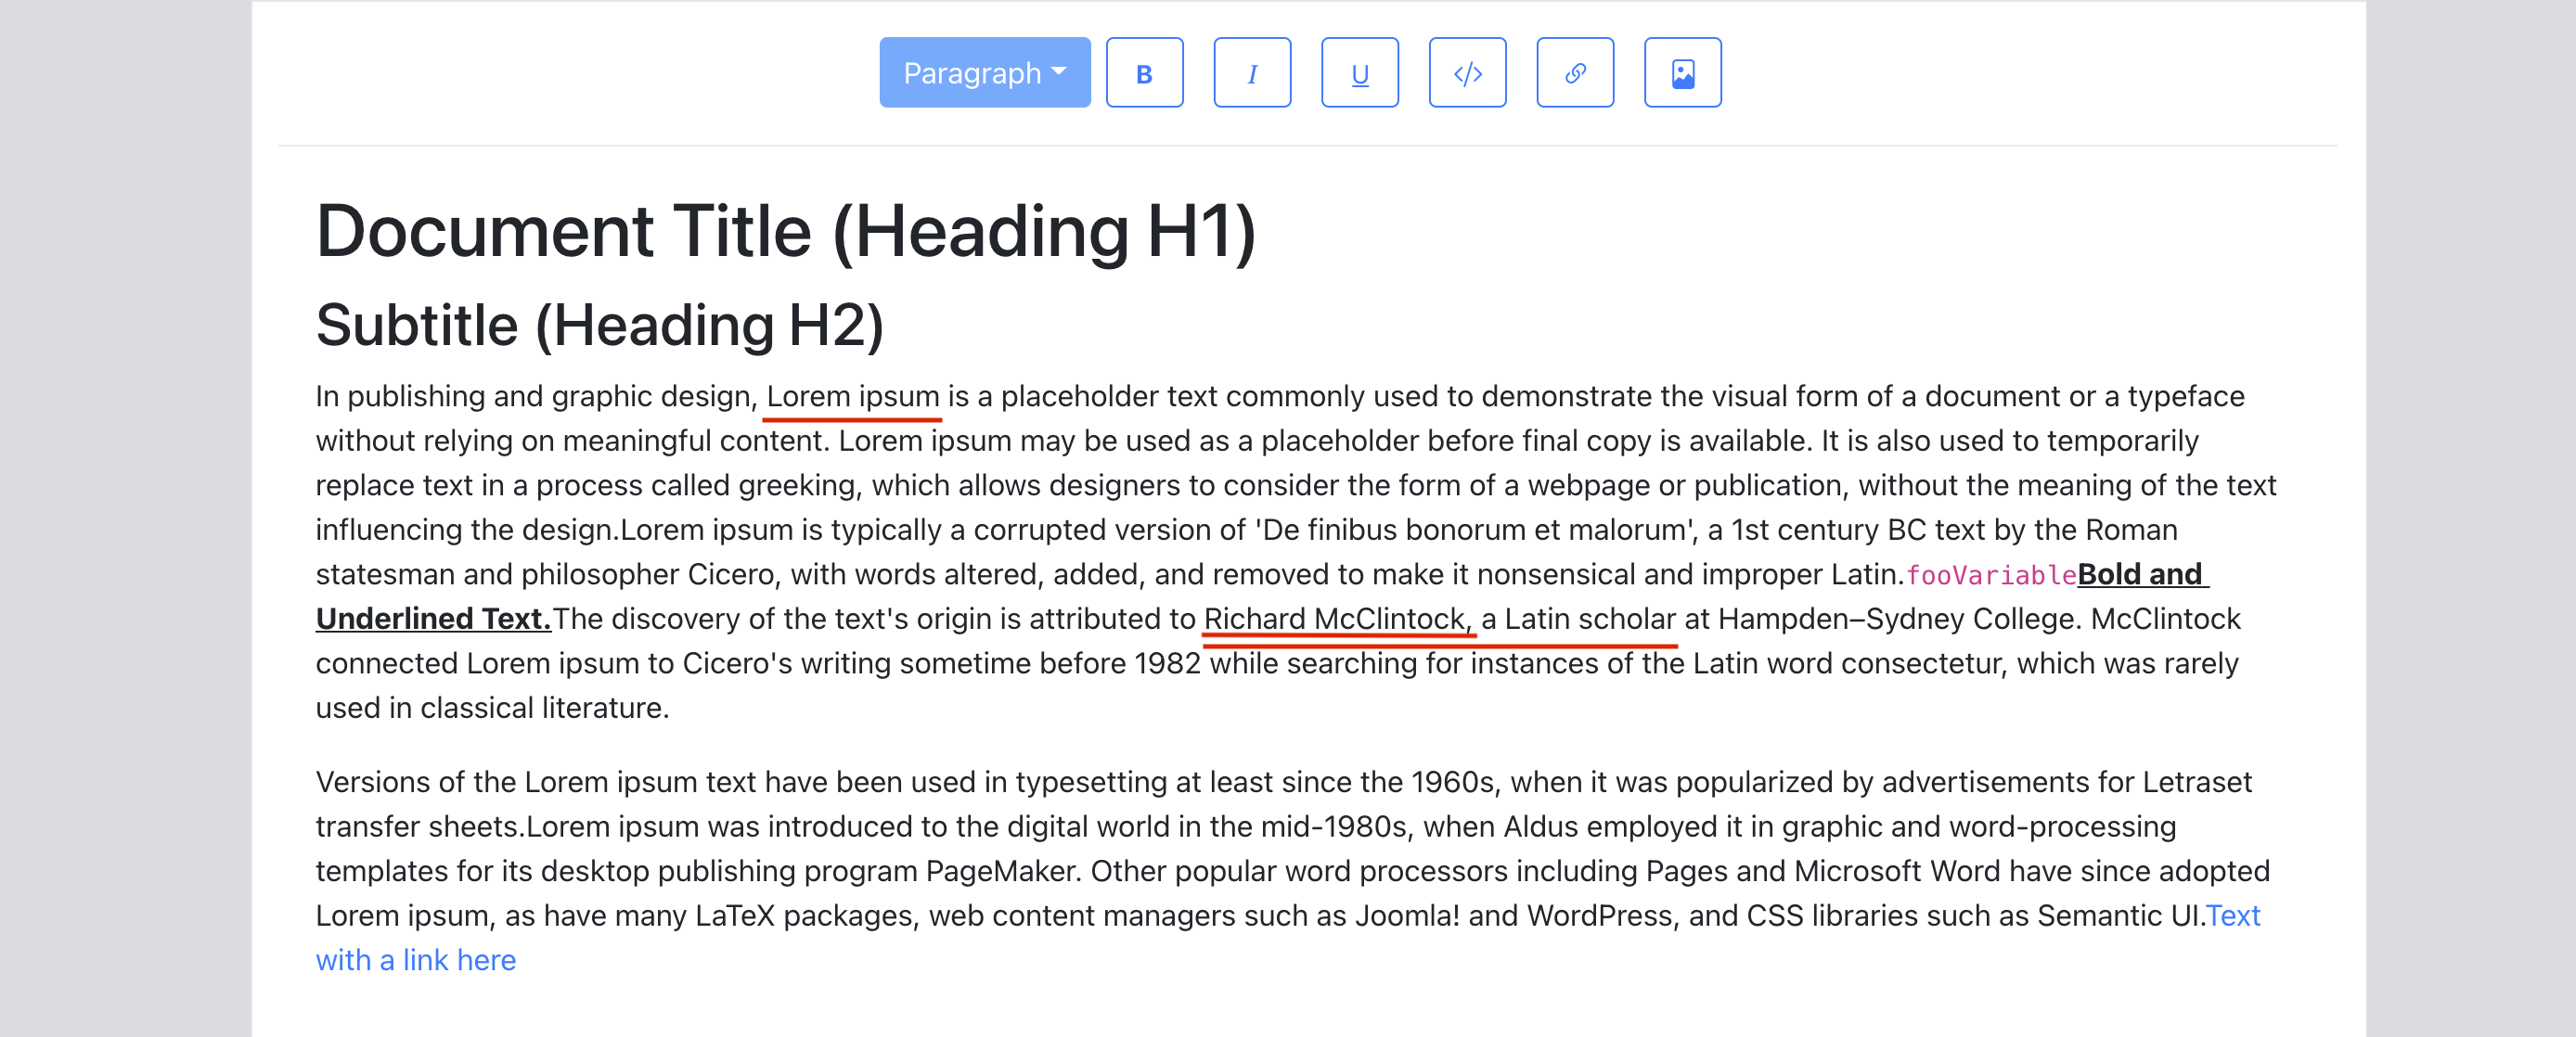
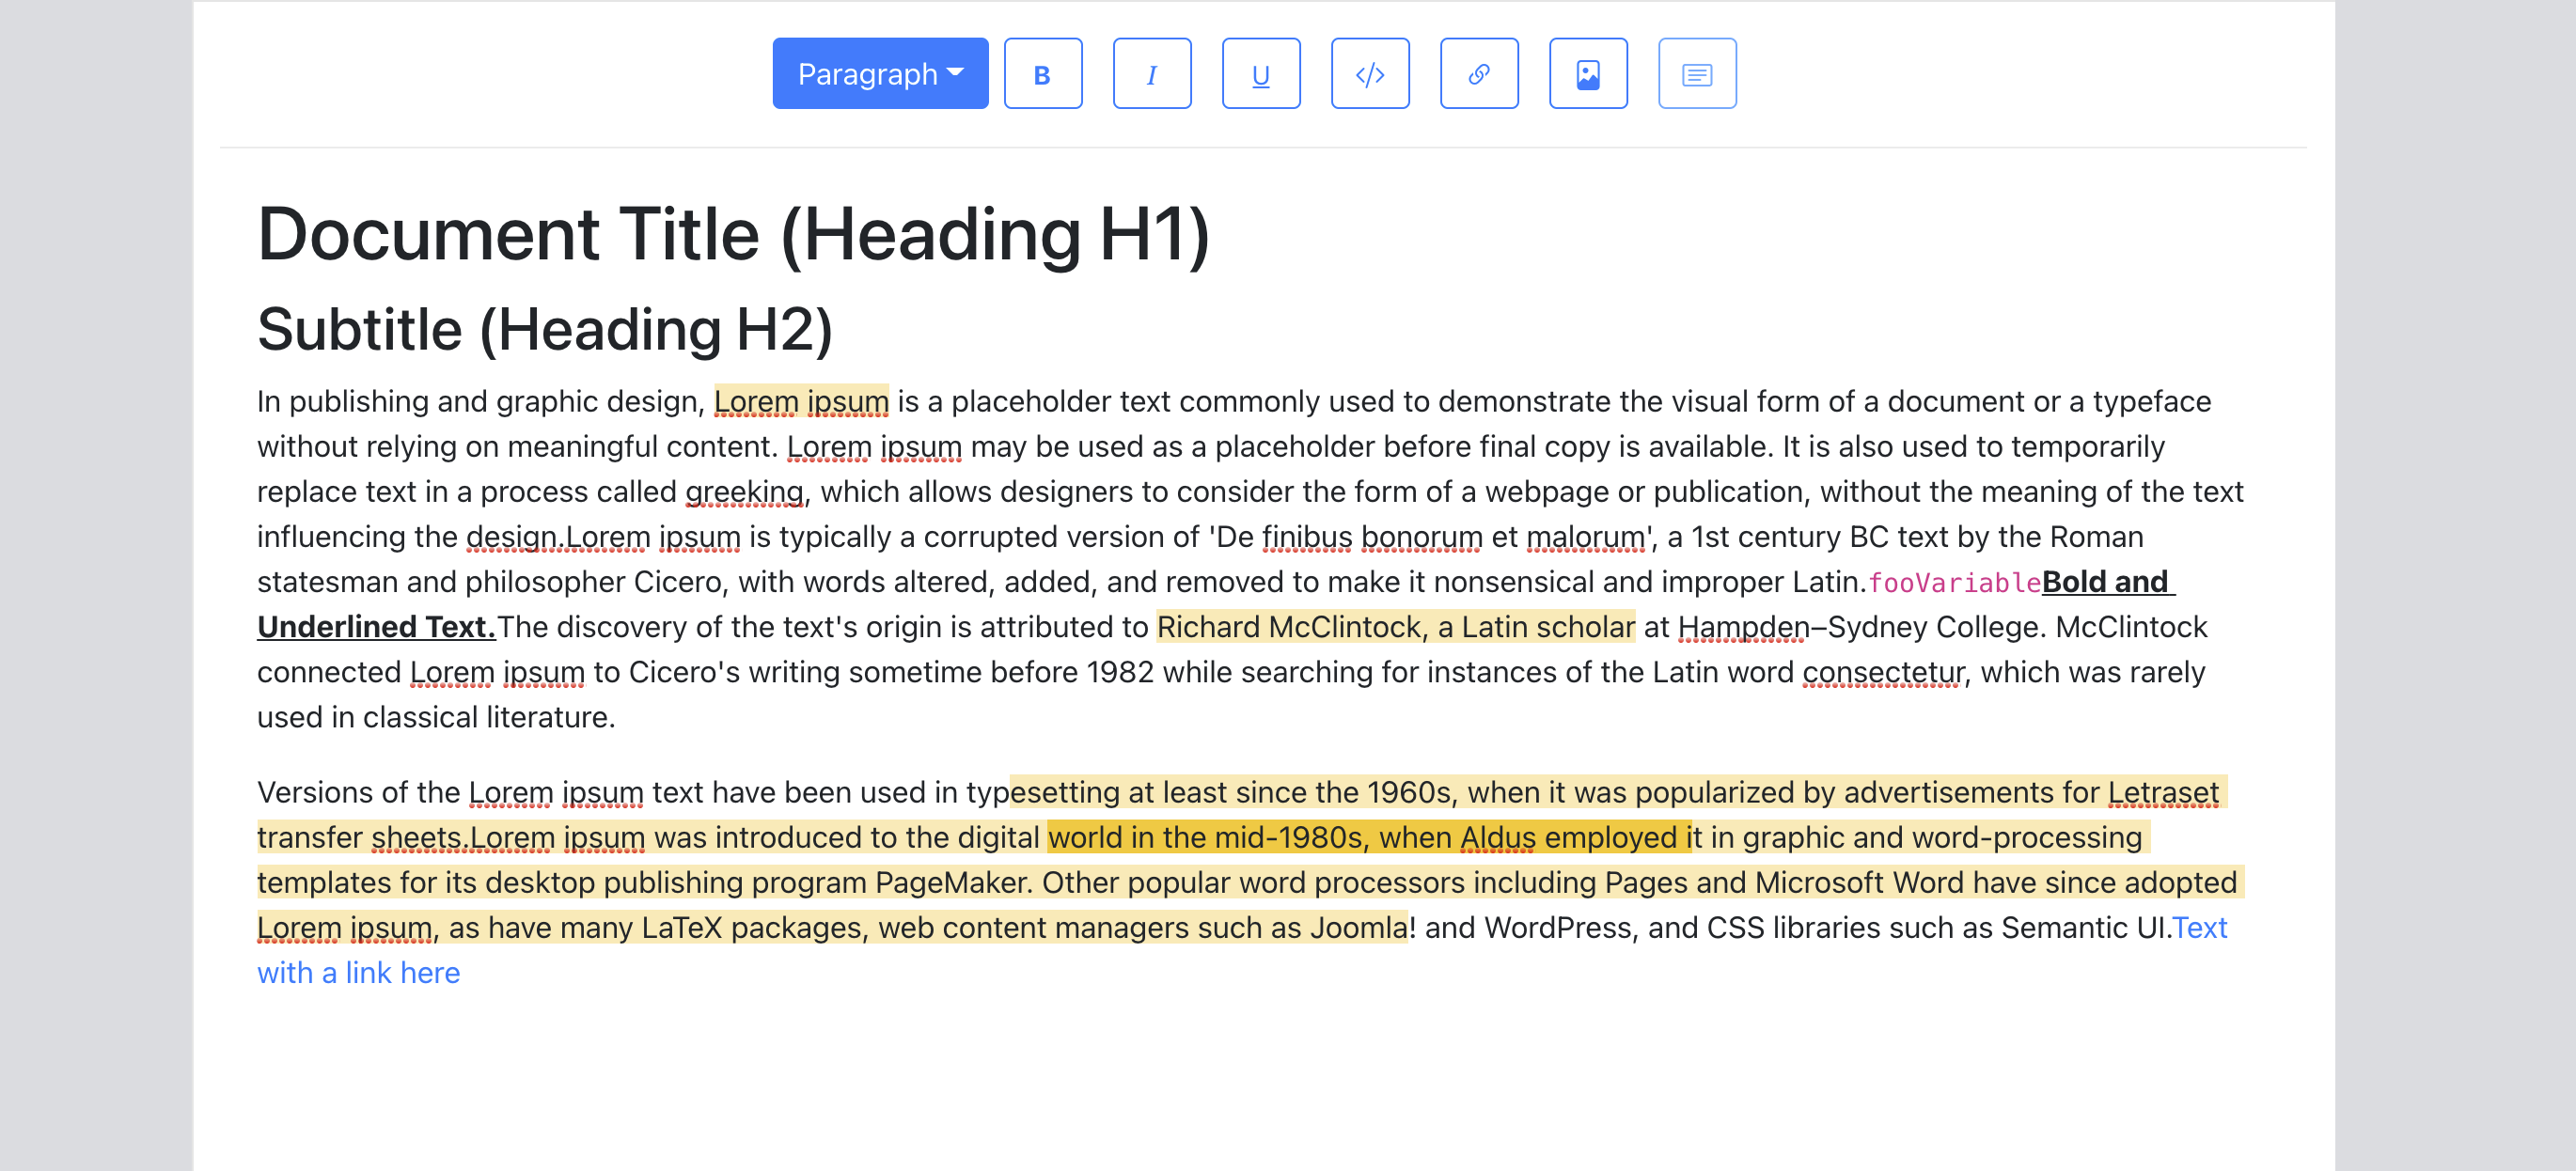
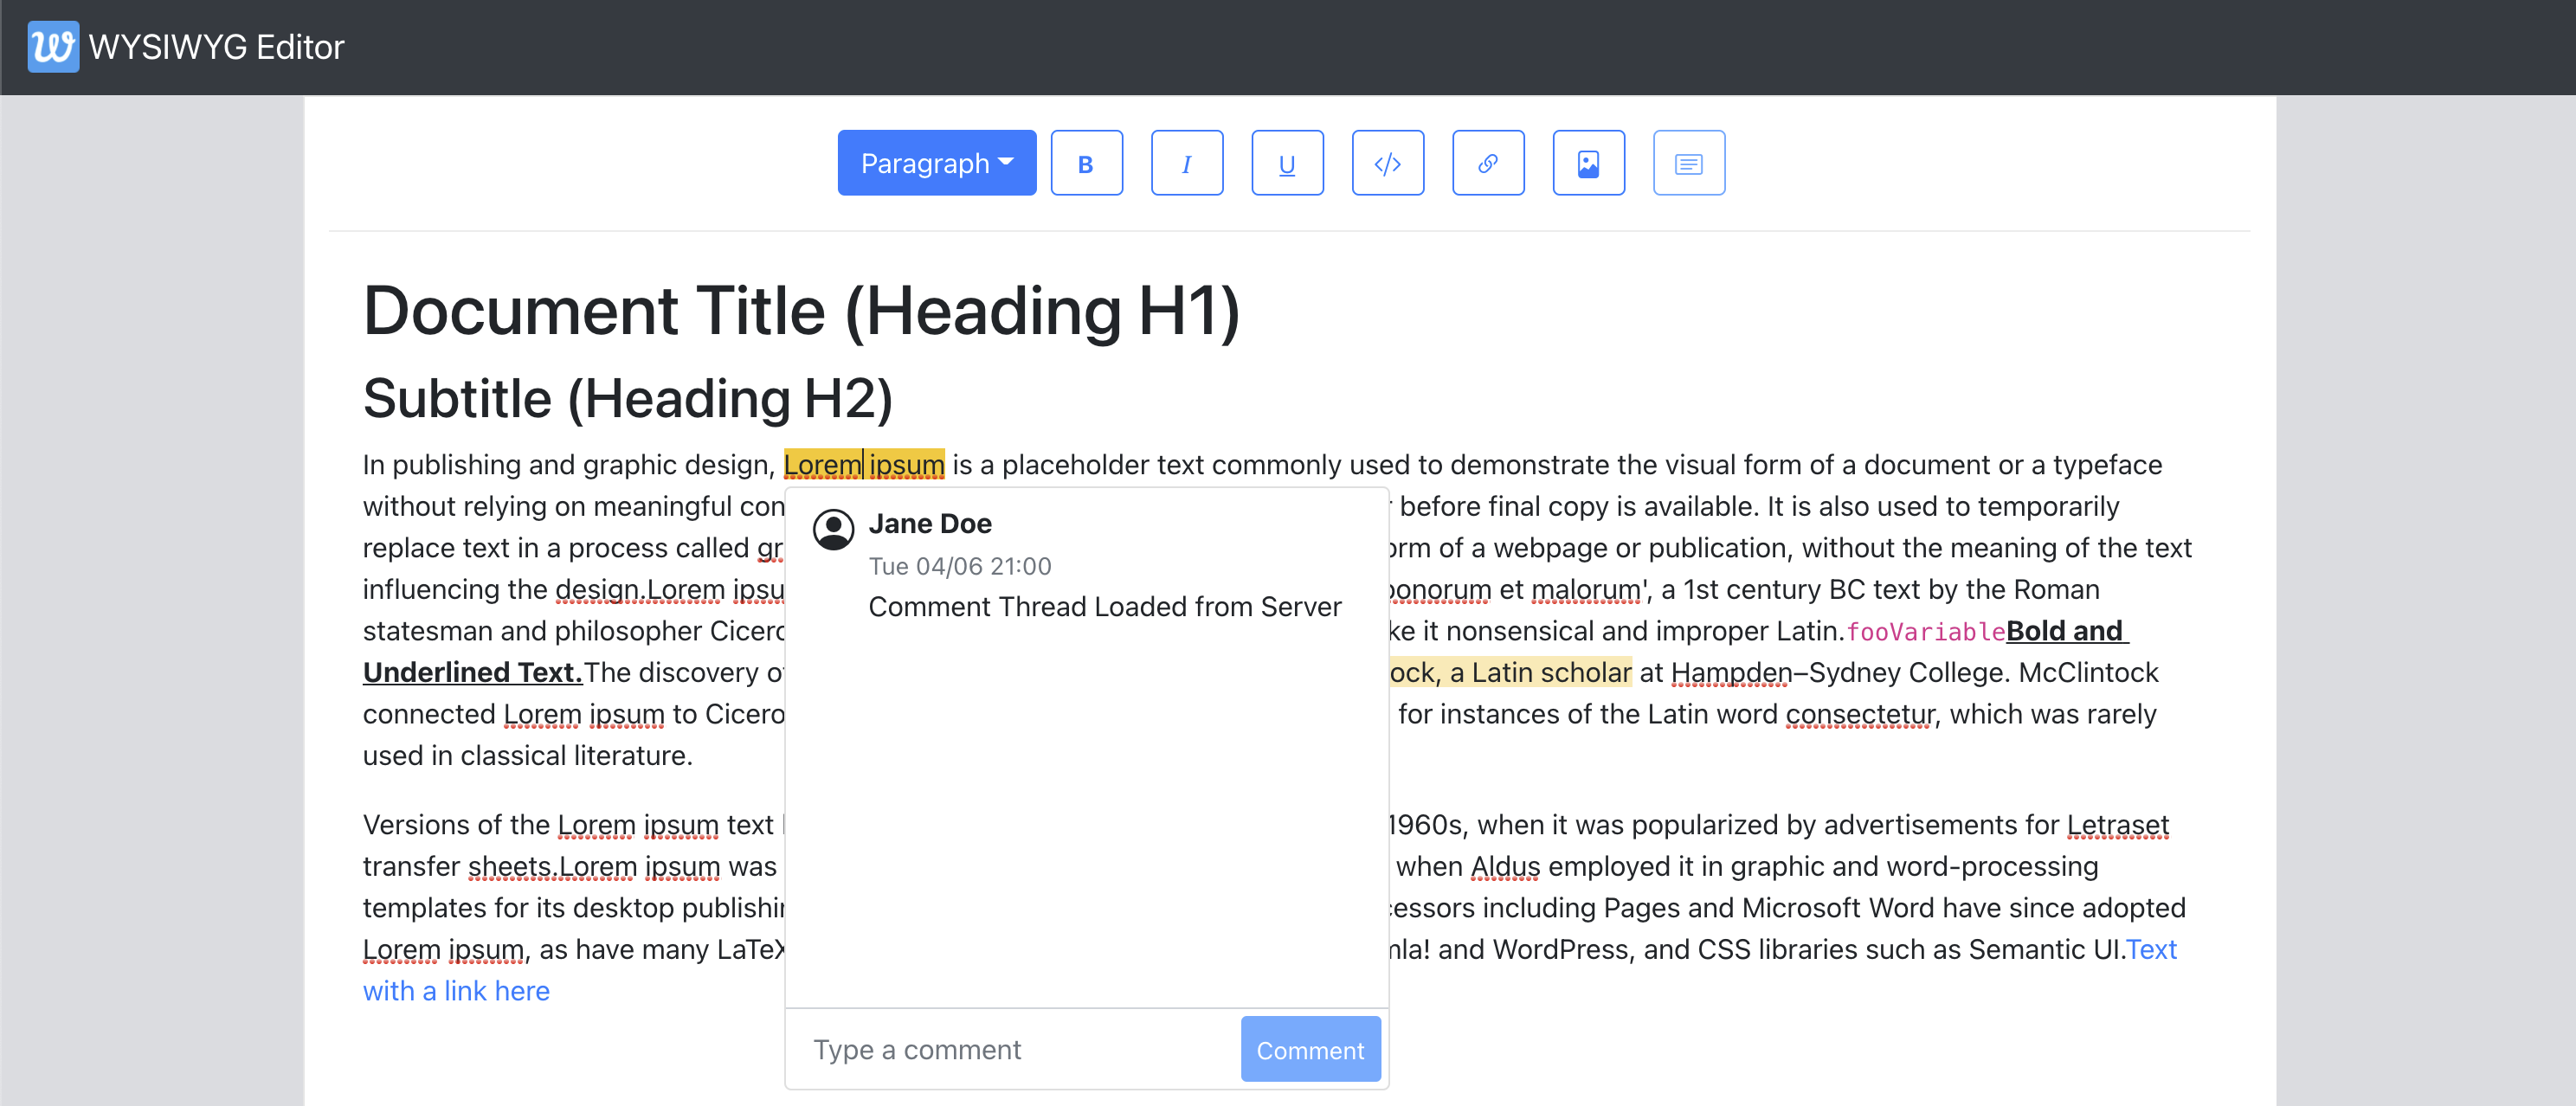
Below image underlines in red the ranges of text that we have as example comment threads added in the next code snippet. Note that the text ‘Richard McClintock’ has two comment threads that overlap each other. Specifically, this is a case of one comment thread being fully contained inside another.

# src/utils/ExampleDocument.js
import { getMarkForCommentThreadID } from "../utils/EditorCommentUtils";
import { v4 as uuid } from "uuid";

const exampleOverlappingCommentThreadID = uuid();

const ExampleDocument = [
   ...
   {
        text: "Lorem ipsum",
        [getMarkForCommentThreadID(uuid())]: true,
   },
   ...
   {
        text: "Richard McClintock",
        // note the two comment threads here.
        [getMarkForCommentThreadID(uuid())]: true,
        [getMarkForCommentThreadID(exampleOverlappingCommentThreadID)]: true,
   },
   {
        text: ", a Latin scholar",
        [getMarkForCommentThreadID(exampleOverlappingCommentThreadID)]: true,
   },
   ...
];

We focus on the UI side of things of a Commenting System in this article so we assign them IDs in the example document directly using the npm package uuid. Very likely that in a production version of an editor, these IDs are created by a backend service.

We now focus on tweaking the editor to show these text nodes as highlighted. In order to do that, when rendering text nodes, we need a way to tell if it has comment threads on it. We add a util getCommentThreadsOnTextNode for that. We build on the StyledText component that we created in the first article to handle the case where it may be trying to render a text node with comments on. Since we have some more functionality coming that would be added to commented text nodes later, we create a component CommentedText that renders the commented text. StyledText will check if the text node it’s trying to render has any comments on it. If it does, it renders CommentedText. It uses a util getCommentThreadsOnTextNode to deduce that.

# src/utils/EditorCommentUtils.js

export function getCommentThreadsOnTextNode(textNode) {
  return new Set(
     // Because marks are just properties on nodes,
    // we can simply use Object.keys() here.
    Object.keys(textNode)
      .filter(isCommentThreadIDMark)
      .map(getCommentThreadIDFromMark)
  );
}

export function getCommentThreadIDFromMark(mark) {
  if (!isCommentThreadIDMark(mark)) {
    throw new Error("Expected mark to be of a comment thread");
  }
  return mark.replace(COMMENT_THREAD_PREFIX, "");
}

function isCommentThreadIDMark(mayBeCommentThread) {
  return mayBeCommentThread.indexOf(COMMENT_THREAD_PREFIX) === 0;
}

The first article built a component StyledText that renders text nodes (handling character styles and so on). We extend that component to use the above util and render a CommentedText component if the node has comments on it.

# src/components/StyledText.js

import { getCommentThreadsOnTextNode } from "../utils/EditorCommentUtils";

export default function StyledText({ attributes, children, leaf }) {
  ...

  const commentThreads = getCommentThreadsOnTextNode(leaf);

  if (commentThreads.size > 0) {
    return (
      <CommentedText
      {...attributes}
     // We use commentThreads and textNode props later in the article.
      commentThreads={commentThreads}
      textNode={leaf}
      >
        {children}
      </CommentedText>
    );
  }

  return <span {...attributes}>{children}</span>;
}

Below is the implementation of CommentedText that renders the text node and attaches the CSS that shows it as highlighted.

# src/components/CommentedText.js

import "./CommentedText.css";

import classNames from "classnames";

export default function CommentedText(props) {
  const { commentThreads, ...otherProps } = props;
  return (
    <span
      {...otherProps}
      className={classNames({
        comment: true,
      })}
    >
      {props.children}
    </span>
  );
}

# src/components/CommentedText.css

.comment {
  background-color: #feeab5;
}

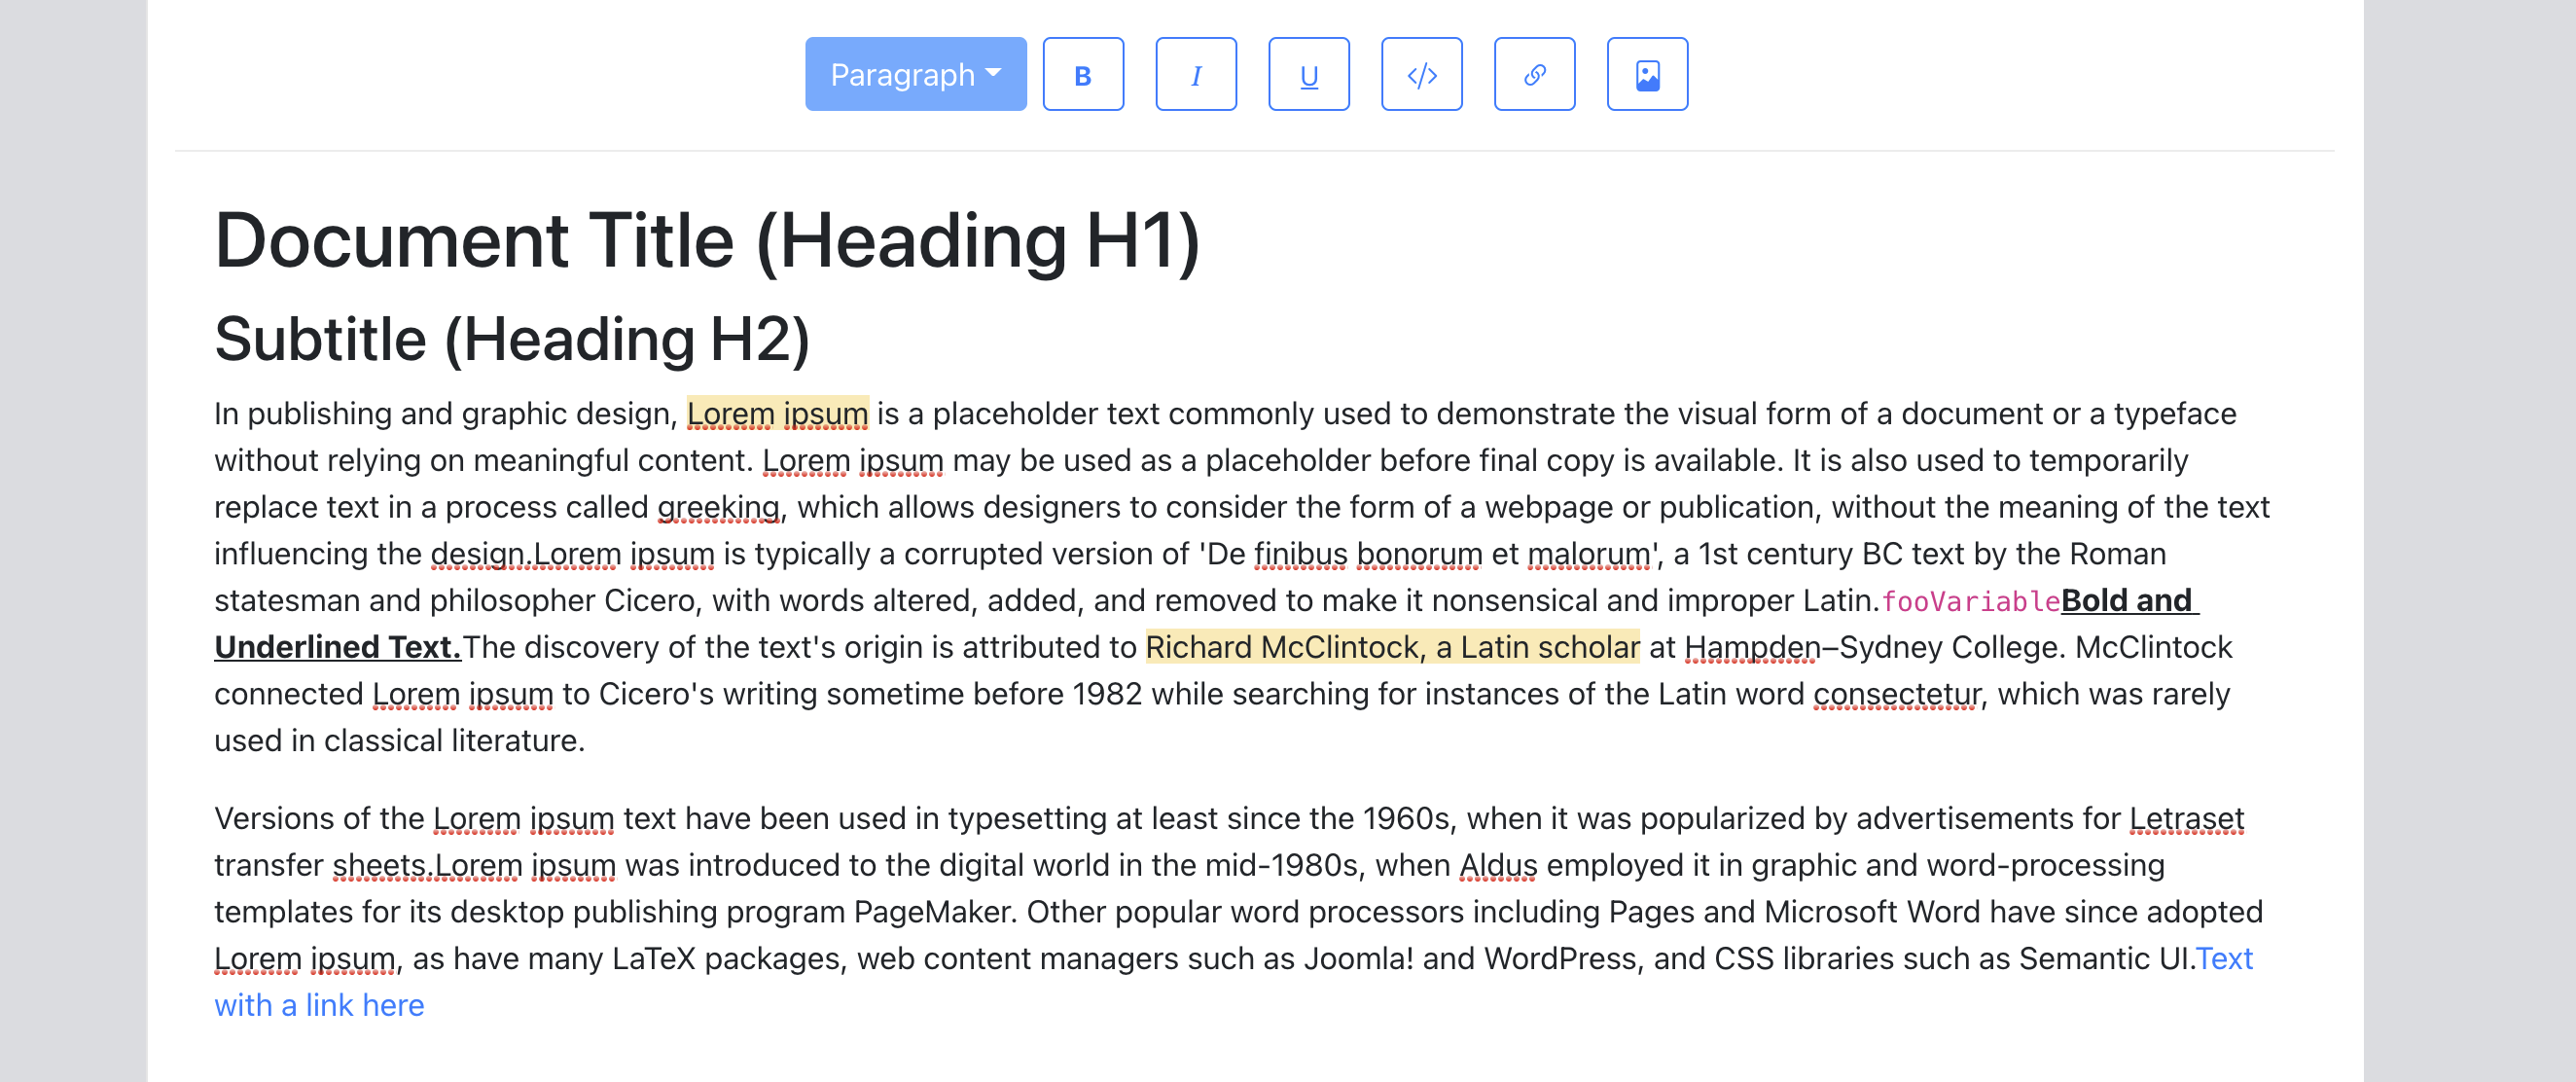
With all of the above code coming together, we now see text nodes with comment threads highlighted in the editor.

Note: The users currently cannot tell if certain text has overlapping comments on it. The entire highlighted text range looks like a single comment thread. We address that later in the article where we introduce the concept of active comment thread which lets users select a specific comment thread and be able to see its range in the editor.

UI Storage For Comments

Before we add the functionality that enables a user to insert new comments, we first setup a UI state to hold our comment threads. In this article, we use RecoilJS as our state management library to store comment threads, comments contained inside the threads and other metadata like creation time, status, comment author etc. Let’s add Recoil to our application:

> yarn add recoil

We use Recoil atoms to store these two data structures. If you’re not familiar with Recoil, atoms are what hold the application state. For different pieces of application state, you’d usually want to set up different atoms. Atom Family is a collection of atoms — it can be thought to be a Map from a unique key identifying the atom to the atoms themselves. It’s worth going through core concepts of Recoil at this point and familiarizing ourselves with them.

For our use case, we store comment threads as an Atom family and then wrap our application in a RecoilRoot component. RecoilRoot is applied to provide the context in which the atom values are going to be used. We create a separate module CommentState that holds our Recoil atom definitions as we add more atom definitions later in the article.

# src/utils/CommentState.js

import { atom, atomFamily } from "recoil";

export const commentThreadsState = atomFamily({
  key: "commentThreads",
  default: [],
});

export const commentThreadIDsState = atom({
  key: "commentThreadIDs",
  default: new Set([]),
});

Worth calling out few things about these atom definitions:

  • Each atom/atom family is uniquely identified by a key and can be set up with a default value.
  • As we build further in this article, we are going to need a way to iterate over all the comment threads which would basically mean needing a way to iterate over commentThreadsState atom family. At the time of writing this article, the way to do that with Recoil is to set up another atom that holds all the IDs of the atom family. We do that with commentThreadIDsState above. Both these atoms would have to be kept in sync whenever we add/delete comment threads.

We add a RecoilRoot wrapper in our root App component so we can use these atoms later. Recoil’s documentation also provides a helpful Debugger component that we take as it is and drop into our editor. This component will leave console.debug logs to our Dev console as Recoil atoms are updated in real-time.

# src/components/App.js

import { RecoilRoot } from "recoil";

export default function App() {
  ...

  return (
    <RecoilRoot>
      >
         ...
        <Editor document={document} onChange={updateDocument} />

    </RecoilRoot>
  );
}
# src/components/Editor.js

export default function Editor({ ... }): JSX.Element {
  .....

  return (
    <>
      <Slate>
         .....
      </Slate>
      <DebugObserver />
   </>
);

function DebugObserver(): React.Node {
   // see API link above for implementation.
}

We also need to need to add code that initializes our atoms with the comment threads that already exist on the document (the ones we added to our example document in the previous section, for instance). We do that at a later point when we build the Comments Sidebar that needs to read all the comment threads in a document.

At this point, we load our application, make sure there are no errors pointing to our Recoil setup and move forward.

Adding New Comments

In this section, we add a button to the toolbar that lets the user add comments (viz. create a new comment thread) for the selected text range. When the user selects a text range and clicks on this button, we need to do the below:

  1. Assign a unique ID to the new comment thread being inserted.
  2. Add a new mark to Slate document structure with the ID so the user sees that text highlighted.
  3. Add the new comment thread to Recoil atoms we created in the previous section.

Let’s add a util function to EditorCommentUtils that does #1 and #2.

# src/utils/EditorCommentUtils.js

import { Editor } from "slate";
import { v4 as uuidv4 } from "uuid";

export function insertCommentThread(editor, addCommentThreadToState) {
    const threadID = uuidv4();
    const newCommentThread = {
        // comments as added would be appended to the thread here.
        comments: [],
        creationTime: new Date(),
        // Newly created comment threads are OPEN. We deal with statuses
        // later in the article.
        status: "open",
    };
    addCommentThreadToState(threadID, newCommentThread);
    Editor.addMark(editor, getMarkForCommentThreadID(threadID), true);
    return threadID;
}

By using the concept of marks to store each comment thread as its own mark, we’re able to simply use the Editor.addMark API to add a new comment thread on the text range selected. This call alone handles all the different cases of adding comments — some of which we described in the earlier section — partially overlapping comments, comments inside/overlapping links, comments over bold/italic text, comments spanning paragraphs and so on. This API call adjusts the node hierarchy to create as many new text nodes as needed to handle these cases.

addCommentThreadToState is a callback function that handles step #3 — adding the new comment thread to Recoil atom . We implement that next as a custom callback hook so that it’s re-usable. This callback needs to add the new comment thread to both the atoms — commentThreadsState and commentThreadIDsState. To be able to do this, we use the useRecoilCallback hook. This hook can be used to construct a callback which gets a few things that can be used to read/set atom data. The one we’re interested in right now is the set function which can be used to update an atom value as set(atom, newValueOrUpdaterFunction).

# src/hooks/useAddCommentThreadToState.js

import {
  commentThreadIDsState,
  commentThreadsState,
} from "../utils/CommentState";

import { useRecoilCallback } from "recoil";

export default function useAddCommentThreadToState() {
  return useRecoilCallback(
    ({ set }) => (id, threadData) => {
      set(commentThreadIDsState, (ids) => new Set([...Array.from(ids), id]));
      set(commentThreadsState(id), threadData);
    },
    []
  );
}

The first call to set adds the new ID to the existing set of comment thread IDs and returns the new Set(which becomes the new value of the atom).

In the second call, we get the atom for the ID from the atom family — commentThreadsState as commentThreadsState(id) and then set the threadData to be its value. atomFamilyName(atomID) is how Recoil lets us access an atom from its atom family using the unique key. Loosely speaking, we could say that if commentThreadsState was a javascript Map, this call is basically — commentThreadsState.set(id, threadData).

Now that we have all this code setup to handle insertion of a new comment thread to the document and Recoil atoms, lets add a button to our toolbar and wire it up with the call to these functions.

# src/components/Toolbar.js

import { insertCommentThread } from "../utils/EditorCommentUtils";
import useAddCommentThreadToState from "../hooks/useAddCommentThreadToState";

export default function Toolbar({ selection, previousSelection }) {
  const editor = useEditor();
  ...

  const addCommentThread = useAddCommentThreadToState();

  const onInsertComment = useCallback(() => {
    const newCommentThreadID = insertCommentThread(editor, addCommentThread);
  }, [editor, addCommentThread]);

return (
    <div className="toolbar">
       ...
      <ToolBarButton
        isActive={false}
        label={<i className={bi ${getIconForButton("comment")}} />}
        onMouseDown={onInsertComment}
      />
    </div>
  );
}

Note: We use onMouseDown and not onClick which would have made the editor lose focus and selection to become null. We’ve discussed that in a little more detail in the link insertion section of the first article.

In the below example, we see the insertion in action for a simple comment thread and an overlapping comment thread with links. Notice how we get updates from Recoil Debugger confirming our state is getting updated correctly. We also verify that new text nodes are created as threads are being added to the document.

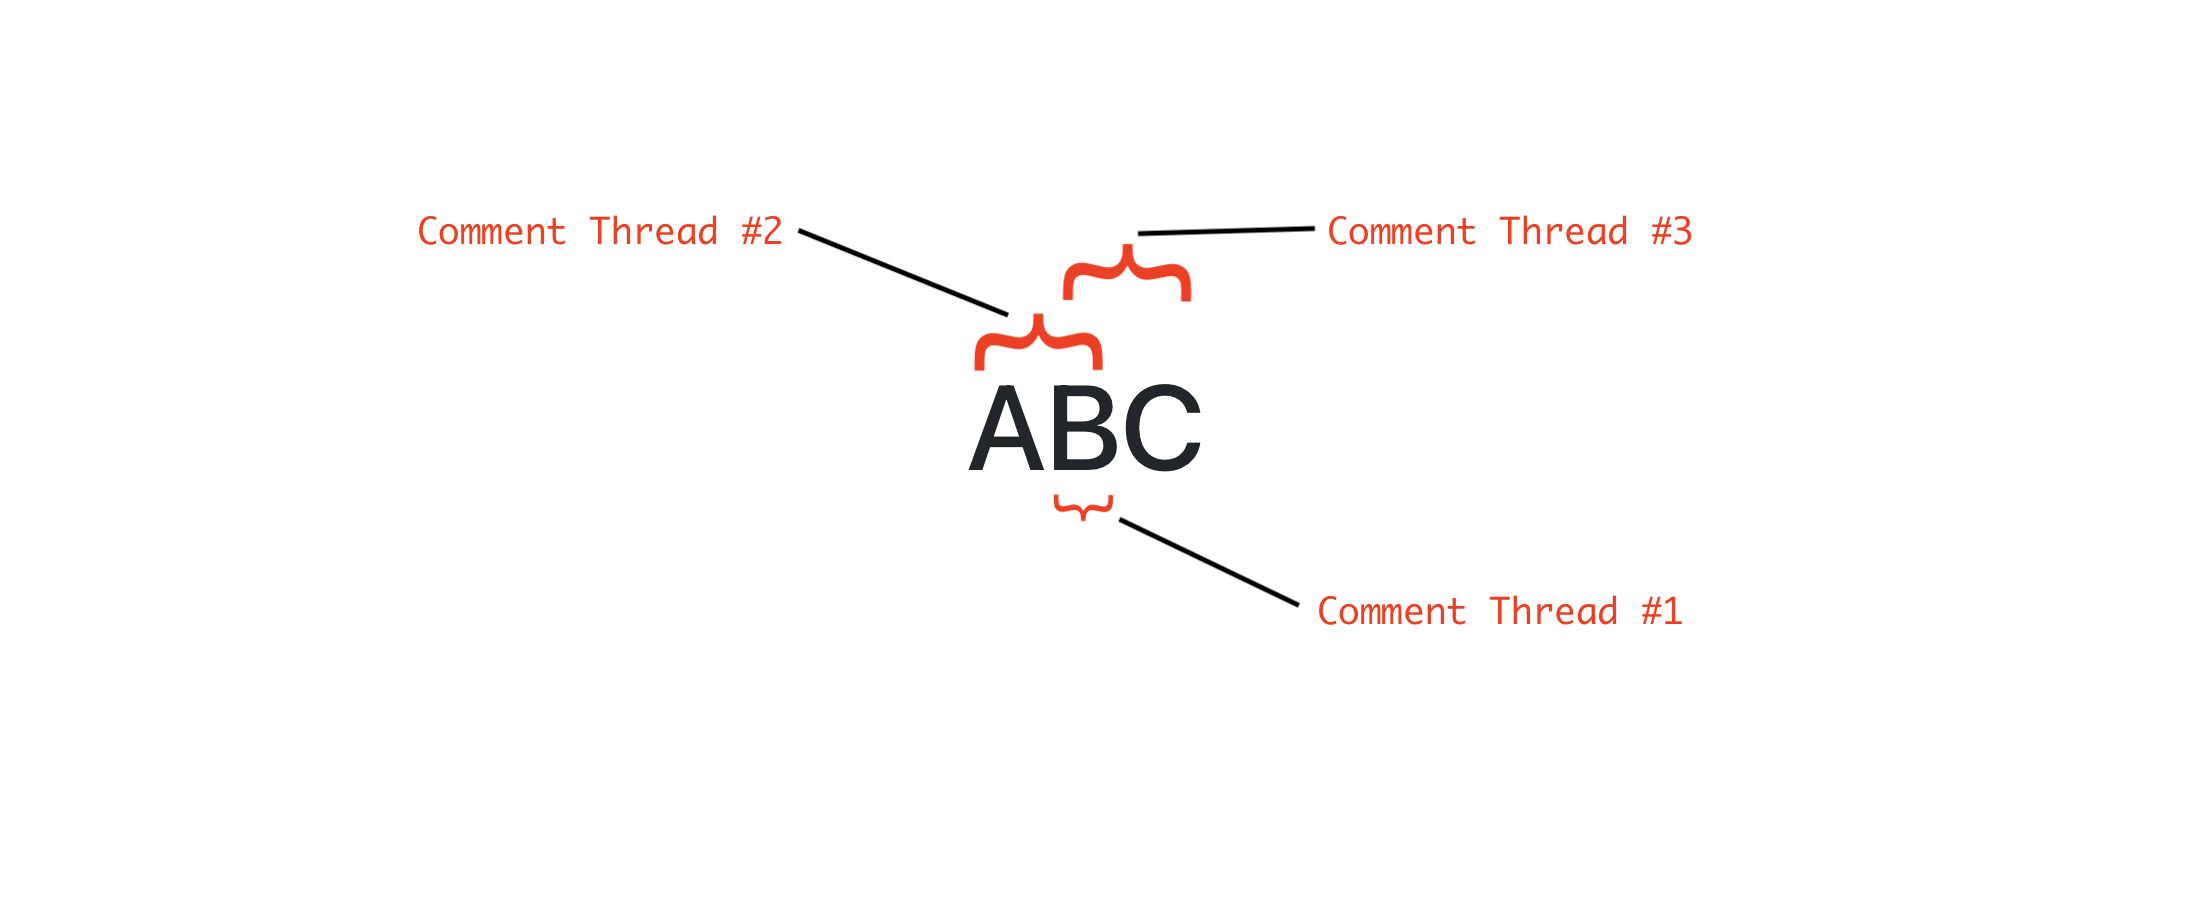
In the above example, the user inserts the following comment threads in that order:

  1. Comment Thread #1 over character ‘B’ (length = 1).
  2. Comment Thread #2 over ‘AB’ (length = 2).
  3. Comment Thread #3 over ‘BC’ (length = 2).

At the end of these insertions, because of the way Slate splits the text nodes with marks, we will have three text nodes — one for each character. Now, if the user clicks on ‘B’, going by the shortest length rule, we select thread #1 as it is the shortest of the three in length. If we don’t do that, we wouldn’t have a way to select Comment Thread #1 ever since it is only one-character in length and also a part of two other threads.

Although this rule makes it easy to surface shorter-length comment threads, we could run into situations where longer comment threads become inaccessible since all the characters contained in them are part of some other shorter comment thread. Let’s look at an example for that.

Let’s assume we have 100 characters (say, character ‘A’ typed 100 times that is) and the user inserts comment threads in the following order:

  1. Comment Thread # 1 of range 20,80
  2. Comment Thread # 2 of range 0,50
  3. Comment Thread # 3 of range 51,100

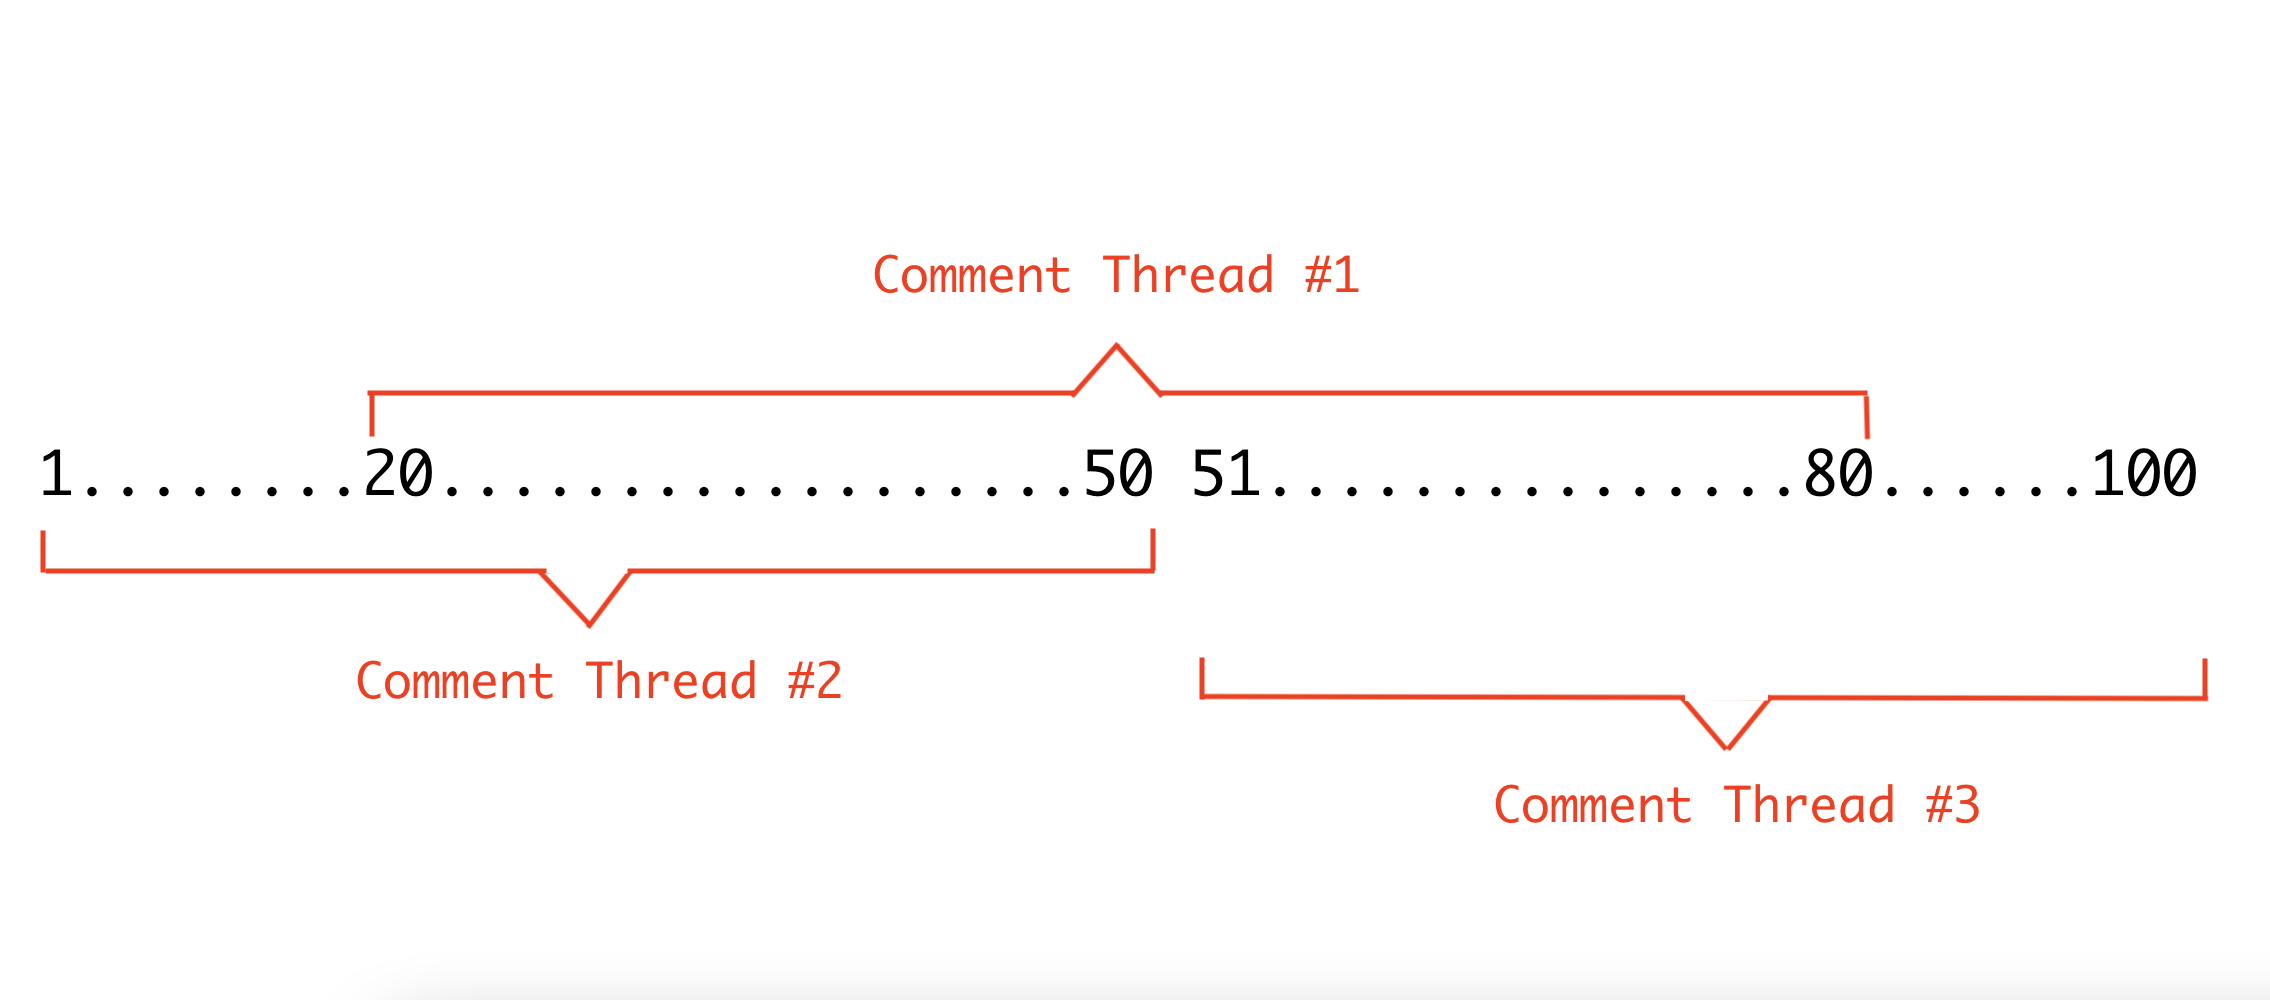
As you can see in the above example, if we follow the rule we just described here, clicking on any character between #20 and #80, would always select threads #2 or #3 since they are shorter than #1 and hence #1 would not be selectable. Another scenario where this rule can leave us undecided as to which comment thread to select is when there are more than one comment threads of the same shortest length on a text node.

For such combination of overlapping comments and many other such combinations that one could think of where following this rule makes a certain comment thread inaccessible by clicking on text, we build a Comments Sidebar later in this article which gives user a view of all the comment threads present in the document so they can click on those threads in the sidebar and activate them in the editor to see the range of the comment. We still would want to have this rule and implement it as it should cover a lot of overlap scenarios except for the less-likely examples we cited above. We put in all this effort around this rule primarily because seeing highlighted text in the editor and clicking on it to comment is a more intuitive way of accessing a comment on text than merely using a list of comments in the sidebar.

Insertion Rule

The rule is:

“If the text user has selected and is trying to comment on is already fully covered by comment thread(s), don’t allow that insertion.”

This is so because if we did allow this insertion, each character in that range would end up having at least two comment threads (one existing and another the new one we just allowed) making it difficult for us to determine which one to select when the user clicks on that character later.

Looking at this rule, one might wonder why we need it in the first place if we already have the Shortest Comment Range Rule that allows us to select the smallest text range. Why not allow all combinations of overlaps if we can use the first rule to deduce the right comment thread to show? As some of the examples we’ve discussed earlier, the first rule works for a lot of scenarios but not all of them. With the Insertion Rule, we try to minimize the number of scenarios where the first rule cannot help us and we have to fallback on the Sidebar as the only way for the user to access that comment thread. Insertion Rule also prevents exact-overlaps of comment threads. This rule is commonly implemented by a lot of popular editors.

Below is an example where if this rule didn’t exist, we would allow the Comment Thread #3 and then as a result of the first rule, #3 would not be accessible since it would become the longest in length.

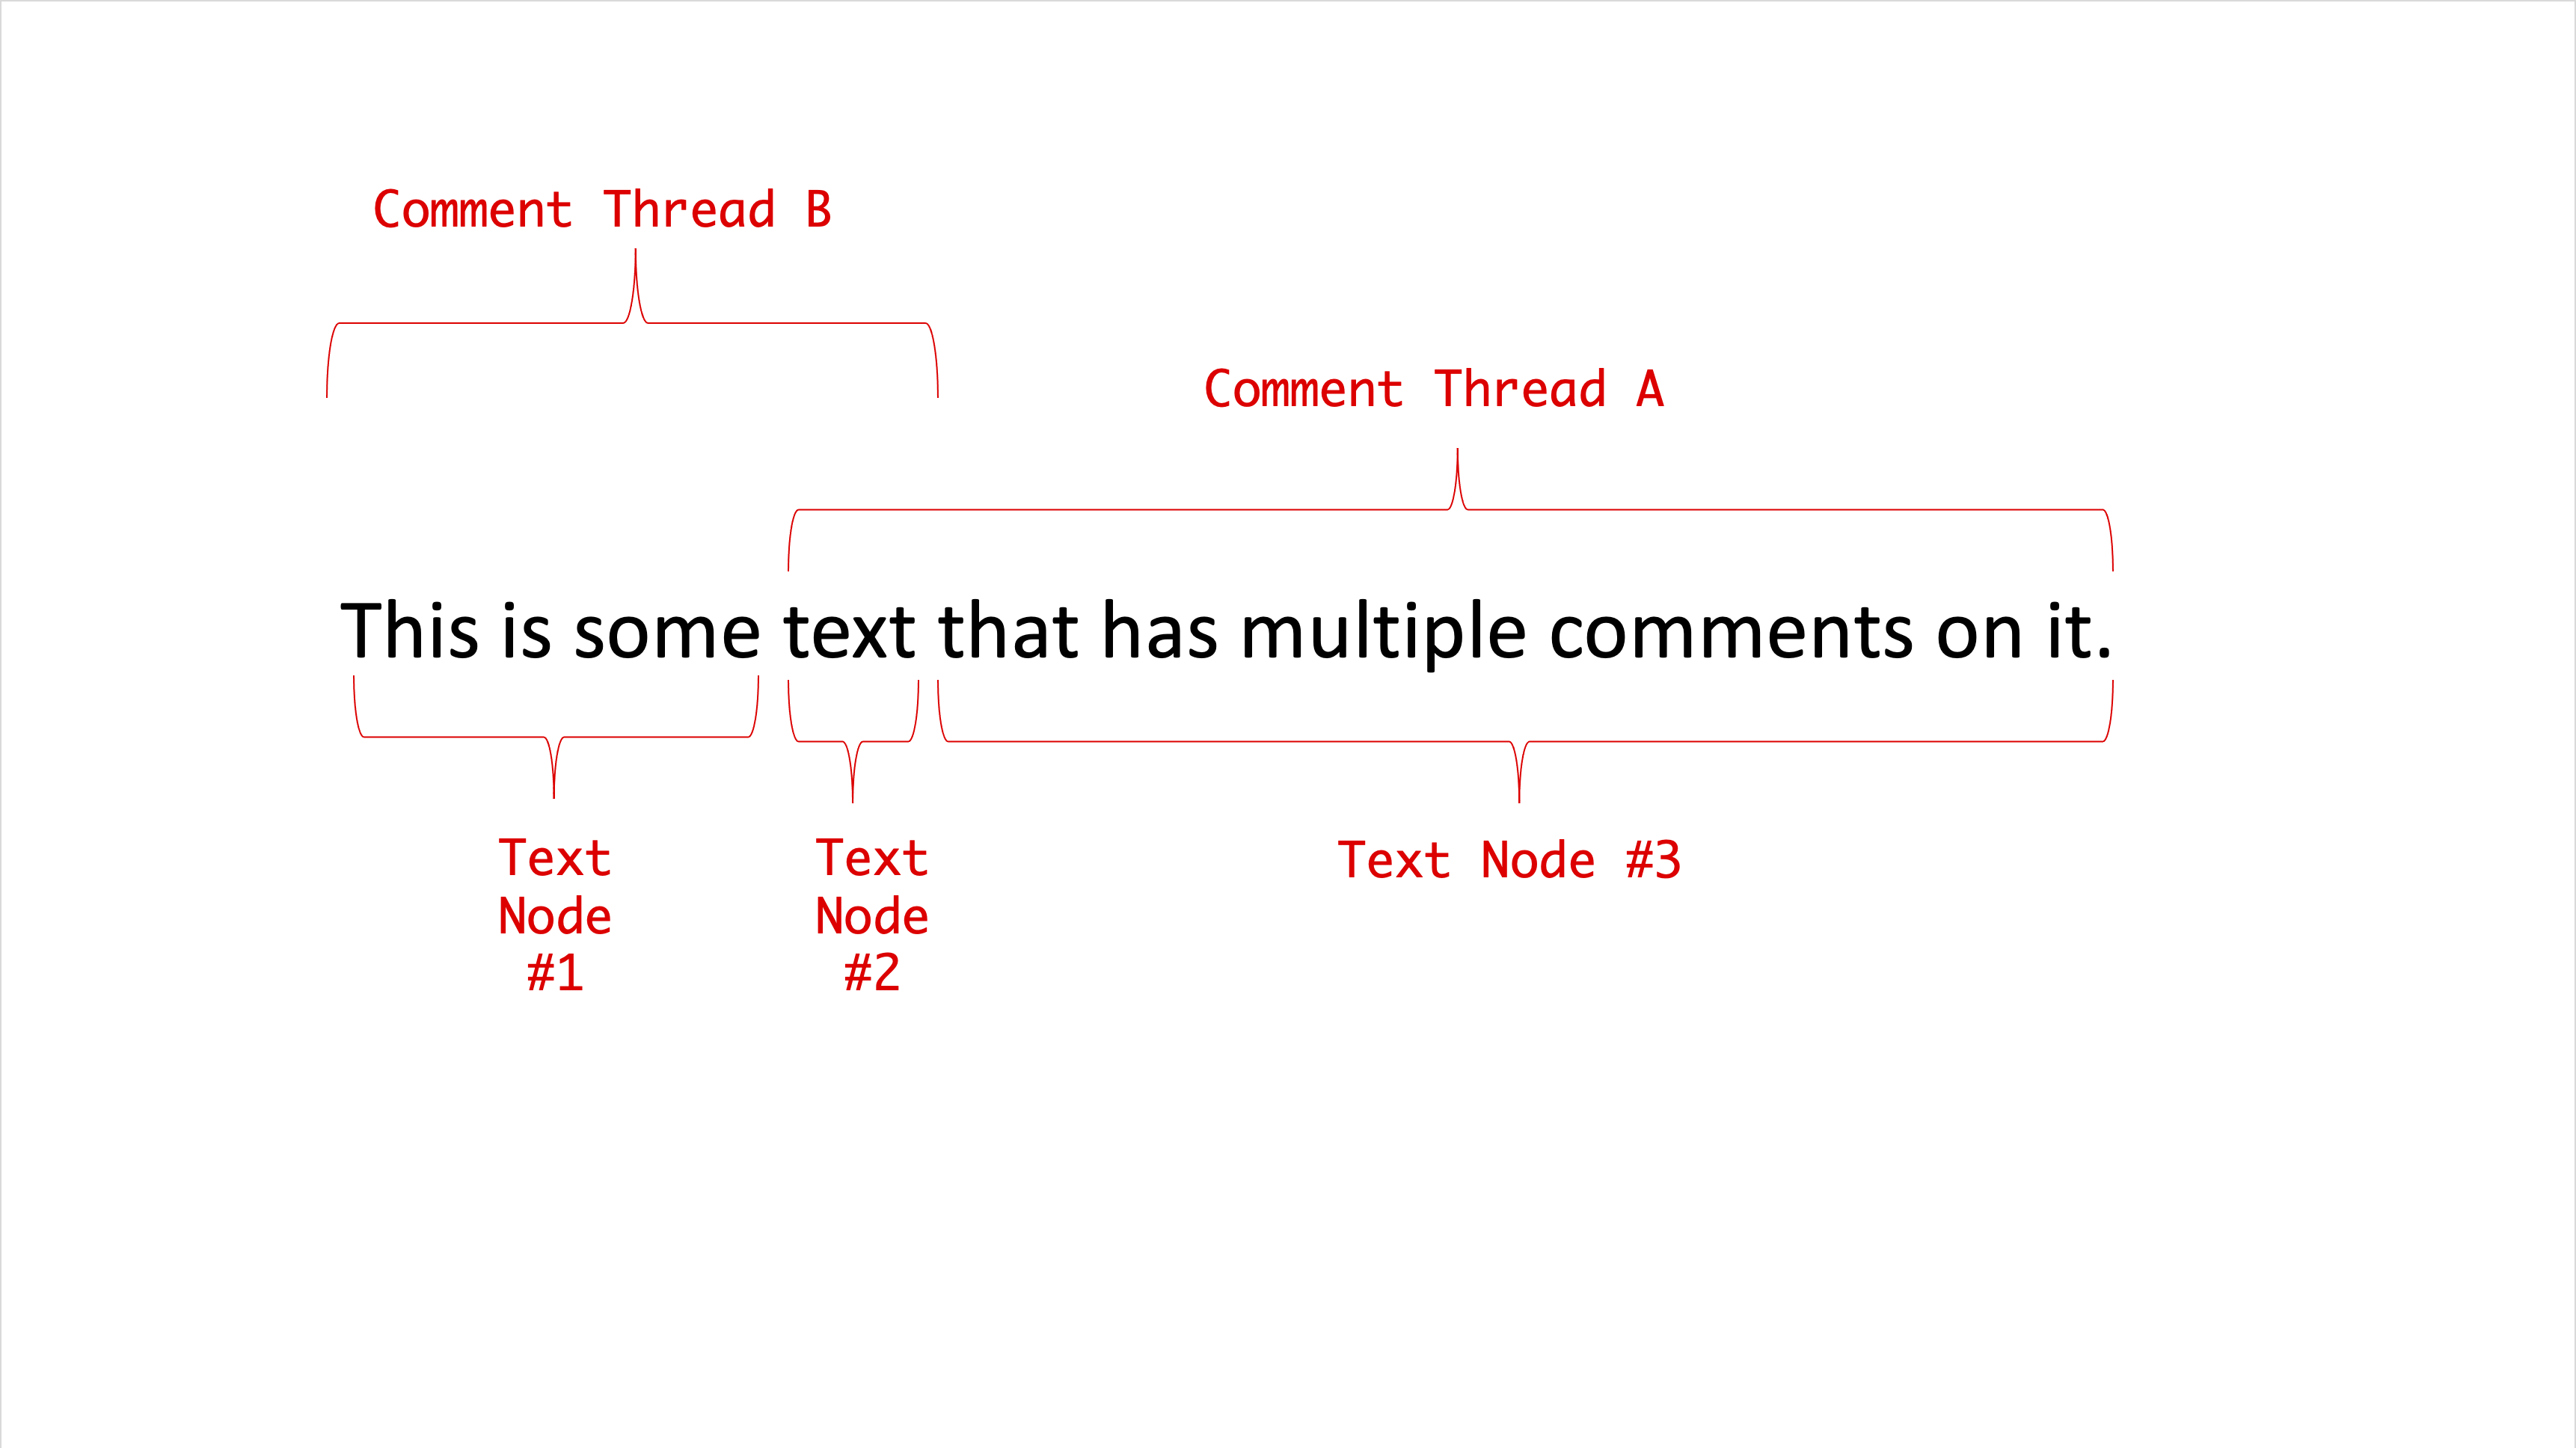
In this example, let’s assume we don’t wait for intersection to become 0 and just stop when we reach the edge of a comment thread. Now, if the user clicked on #2 and we start traversal in reverse direction, we’d stop at the start of text node #2 itself since that’s the start of the comment thread A. As a result, we might not compute the comment thread lengths correctly for A & B. With the implementation above traversing the farthest edges (text nodes 1,2, and 3), we should get B as the shortest comment thread as expected.

To see the implementation visually, below is a walkthrough with a slideshow of the iterations. We have two comment threads A and B that overlap each other over text node #3 and the user clicks on the overlapping text node #3.

Now that we have all the code in to make selection of comment threads work, let’s see it in action. To test our traversal code well, we test some straightforward cases of overlap and some edge cases like:

  • Clicking on a commented text node at the start/end of the editor.
  • Clicking on a commented text node with comment threads spanning multiple paragraphs.
  • Clicking on a commented text node right before an image node.
  • Clicking on a commented text node overlapping links.

Now that our state is correctly initialized, we can start implementing the sidebar. All our comment threads in the UI are stored in the Recoil atom family — commentThreadsState. As highlighted earlier, the way we iterate through all the items in a Recoil atom family is by tracking the atom keys/ids in another atom. We’ve been doing that with commentThreadIDsState. Let’s add the CommentSidebar component that iterates through the set of ids in this atom and renders a CommentThread component for each.

# src/components/CommentsSidebar.js

import "./CommentSidebar.css";

import {commentThreadIDsState,} from "../utils/CommentState";
import { useRecoilValue } from "recoil";

export default function CommentsSidebar(params) {
  const allCommentThreadIDs = useRecoilValue(commentThreadIDsState);

  return (
    <Card className={"comments-sidebar"}>
      <Card.Header>Comments</Card.Header>
      <Card.Body>
        {Array.from(allCommentThreadIDs).map((id) => (
          <Row key={id}>
            <Col>
              <CommentThread id={id} />
            </Col>
          </Row>
        ))}
      </Card.Body>
    </Card>
  );
}

Now, we implement the CommentThread component that listens to the Recoil atom in the family corresponding to the comment thread it is rendering. This way, as the user adds more comments on the thread in the editor or changes any other metadata, we can update the sidebar to reflect that.

As the sidebar could grow to be really big for a document with a lot of comments, we hide all comments but the first one when we render the sidebar. The user can use the ‘Show/Hide Replies’ button to show/hide the entire thread of comments.

# src/components/CommentSidebar.js

function CommentThread({ id }) {
  const { comments } = useRecoilValue(commentThreadsState(id));

  const [shouldShowReplies, setShouldShowReplies] = useState(false);
  const onBtnClick = useCallback(() => {
    setShouldShowReplies(!shouldShowReplies);
  }, [shouldShowReplies, setShouldShowReplies]);

  if (comments.length === 0) {
    return null;
  }

  const [firstComment, ...otherComments] = comments;
  return (
    <Card
      body={true}
      className={classNames({
        "comment-thread-container": true,
      })}
    >
      <CommentRow comment={firstComment} showConnector={false} />
      {shouldShowReplies
        ? otherComments.map((comment, index) => (
            <CommentRow key={comment-${index}} comment={comment} showConnector={true} />
          ))
        : null}
      {comments.length > 1 ? (
        <Button
          className={"show-replies-btn"}
          size="sm"
          variant="outline-primary"
          onClick={onBtnClick}
        >
          {shouldShowReplies ? "Hide Replies" : "Show Replies"}
        </Button>
      ) : null}
    </Card>
  );
}

We’ve reused the CommentRow component from the popover although we added a design treatment using showConnector prop that basically makes all the comments look connected with a thread in the sidebar.

Now, we render the CommentSidebar in the Editor and verify that it shows all the threads we have in the document and correctly updates as we add new threads or new comments to existing threads.

# src/components/Editor.js

return (
    <>
      <Slate ... >
       .....
        <div className={"sidebar-wrapper"}>
          <CommentsSidebar />
            </div>
      </Slate>
    </>
);

We now move on to implementing a popular Comments Sidebar interaction found in editors:

Clicking on a comment thread in the sidebar should select/activate that comment thread. We also add a differential design treatment to highlight a comment thread in the sidebar if it’s active in the editor. To be able to do so, we use the Recoil atom — activeCommentThreadIDAtom. Let’s update the CommentThread component to support this.

# src/components/CommentsSidebar.js

function CommentThread({ id }) {

const [activeCommentThreadID, setActiveCommentThreadID] = useRecoilState(
    activeCommentThreadIDAtom
  );

const onClick = useCallback(() => {
setActiveCommentThreadID(id); }, [id, setActiveCommentThreadID]); ... return ( <Card body={true} className={classNames({ "comment-thread-container": true, "is-active": activeCommentThreadID === id,
})} onClick={onClick} > .... </Card> );

If we look closely, we have a bug in our implementation of sync-ing the active comment thread with the sidebar. As we click on different comment threads in the sidebar, the correct comment thread is indeed highlighted in the editor. However, the Comment Popover doesn’t actually move to the changed active comment thread. It stays where it was first rendered. If we look at the implementation of the Comment Popover, it renders itself against the first text node in the editor’s selection. At that point in the implementation, the only way to select a comment thread was to click on a text node so we could conveniently rely on the editor’s selection since it was updated by Slate as a result of the click event. In the above onClick event, we don’t update the selection but merely update the Recoil atom value causing Slate’s selection to remain unchanged and hence the Comment Popover doesn’t move.

A solution to this problem is to update the editor’s selection along with updating the Recoil atom when the user clicks on the comment thread in the sidebar. The steps do this are:

  1. Find all text nodes that have this comment thread on them that we are going to set as the new active thread.
  2. Sort these text nodes in the order in which they appear in the document (We use Slate’s Path.compare API for this).
  3. Compute a selection range that spans from the start of the first text node to the end of the last text node.
  4. Set the selection range to be the editor’s new selection (using Slate’s Transforms.select API).

If we just wanted to fix the bug, we could just find the first text node in Step #1 that has the comment thread and set that to be the editor’s selection. However, it feels like a cleaner approach to select the entire comment range as we really are selecting the comment thread.

Let’s update the onClick callback implementation to include the steps above.

const onClick = useCallback(() => {

    const textNodesWithThread = Editor.nodes(editor, {
      at: [],
      mode: "lowest",
      match: (n) => Text.isText(n) && getCommentThreadsOnTextNode(n).has(id),
    });

    let textNodeEntry = textNodesWithThread.next().value;
    const allTextNodePaths = [];

    while (textNodeEntry != null) {
      allTextNodePaths.push(textNodeEntry[1]);
      textNodeEntry = textNodesWithThread.next().value;
    }

    // sort the text nodes
    allTextNodePaths.sort((p1, p2) => Path.compare(p1, p2));

    // set the selection on the editor
    Transforms.select(editor, {
      anchor: Editor.point(editor, allTextNodePaths[0], { edge: "start" }),
      focus: Editor.point(
        editor,
        allTextNodePaths[allTextNodePaths.length - 1],
        { edge: "end" }
      ),
    });

   // Update the Recoil atom value.
    setActiveCommentThreadID(id);
  }, [editor, id, setActiveCommentThreadID]);

Note: allTextNodePaths contains the path to all the text nodes. We use the Editor.point API to get the start and end points at that path. The first article goes through Slate’s Location concepts. They’re also well-documented on Slate’s documentation.

Let’s verify that this implementation does fix the bug and the Comment Popover moves to the active comment thread correctly. This time, we also test with a case of overlapping threads to make sure it doesn’t break there.

With the bug fix, we’ve enabled another sidebar interaction that we haven’t discussed yet. If we have a really long document and the user clicks on a comment thread in the sidebar that’s outside the viewport, we’d want to scroll to that part of the document so the user can focus on the comment thread in the editor. By setting the selection above using Slate’s API, we get that for free. Let’s see it in action below.

With that, we wrap our implementation of the sidebar. Towards the end of the article, we list out some nice feature additions and enhancements we can do to the Comments Sidebar that help elevate the Commenting and Review experience on the editor.

Resolving And Re-Opening Comments

In this section, we focus on enabling users to mark comment threads as ‘Resolved’ or be able to re-open them for discussion if needed. From an implementation detail perspective, this is the status metadata on a comment thread that we change as the user performs this action. From a user’s perspective, this is a very useful feature as it gives them a way to affirm that the discussion about something on the document has concluded or needs to be re-opened because there are some updates/new perspectives, and so on.

To enable toggling the status, we add a button to the CommentPopover that allows the user to toggle between the two statuses: open and resolved.

# src/components/CommentThreadPopover.js

export default function CommentThreadPopover({
  editorOffsets,
  selection,
  threadID,
}) {
  …
  const [threadData, setCommentThreadData] = useRecoilState(
    commentThreadsState(threadID)
  );

  ...

  const onToggleStatus = useCallback(() => {
    const currentStatus = threadData.status;
    setCommentThreadData((threadData) => ({
      ...threadData,
      status: currentStatus === "open" ? "resolved" : "open",
    }));
  }, [setCommentThreadData, threadData.status]);

  return (
    <NodePopover
      ...
      header={
        <Header
          status={threadData.status}
          shouldAllowStatusChange={threadData.comments.length > 0}
          onToggleStatus={onToggleStatus}
        />
      }
    >
      <div className={"comment-list"}>
          ...
      </div>
    </NodePopover>
  );
}

function Header({ onToggleStatus, shouldAllowStatusChange, status }) {
  return (
    <div className={"comment-thread-popover-header"}>
      {shouldAllowStatusChange && status != null ? (
        <Button size="sm" variant="primary" onClick={onToggleStatus}>
          {status === "open" ? "Resolve" : "Re-Open"}
        </Button>
      ) : null}
    </div>
  );
}

Before we test this, let’s also give the Comments Sidebar a differential design treatment for resolved comments so that the user can easily detect which comment threads are un-resolved or open and focus on those if they want to.

# src/components/CommentsSidebar.js

function CommentThread({ id }) {
  ...
  const { comments, status } = useRecoilValue(commentThreadsState(id));

 ...
  return (
    <Card
      body={true}
      className={classNames({
        "comment-thread-container": true,
        "is-resolved": status === "resolved",
        "is-active": activeCommentThreadID === id,
      })}
      onClick={onClick}
    >
       ...
</Card> ); }

Conclusion

In this article, we built the core UI infrastructure for a Commenting System on a Rich Text Editor. The set of functionalities we add here act as a foundation to build a richer Collaboration Experience on an editor where collaborators could annotate parts of the document and have conversations about them. Adding a Comments Sidebar gives us a space to have more conversational or review-based functionalities to be enabled on the product.

Along those lines, here are some of features that a Rich Text Editor could consider adding on top of what we built in this article:

  • Support for @ mentions so collaborators could tag one another in comments;
  • Support for media types like images and videos to be added to comment threads;
  • Suggestion Mode at the document level that allows reviewers to make edits to the document that appear as suggestions for changes. One could refer to this feature in Google Docs or Change Tracking in Microsoft Word as examples;
  • Enhancements to the sidebar to search conversations by keyword, filter threads by status or comment author(s), and so on.
Categories: Others Tags:

6 Benefits of Making your Website a PWA

May 27th, 2021 No comments

Progressive web applications (PWA) are known as websites built with web technologies, namely HTML, CSS, and JavaScript but have the look and feel of a native app.

The key functionality offered by PWAs include push notifications, add to the home screen feature and offline mode.

This technology offers businesses multiple advantages. It comes as no surprise that brands are eager to turn their websites into fast-loading and secure PWAs. Entrepreneurs find this transformation a great way to enhance user experience. Also, businesses manage to increase conversion rates and drive sales with the help of PWAs.

In this blog post, we will give our insights into the main advantages of progressive web apps. Besides, you will know how businesses can benefit from using progressive web app development services.

1. Higher customer engagement and re-engagement

Businesses can interact with their customers with the help of progressive web apps in many ways.

First, brands can send clients to push notifications to inform them about new arrivals and discounts. Also, users are notified about the current status of their orders and get personalized offers.

This strategy will be specifically beneficial for e-commerce companies. By sending push notifications, they increase the average time spent on the website. Thus, online marketplaces get better chances of converting visitors into customers. 

As a result, push notifications are a powerful marketing channel that helps improve brand visibility and drive sales.

Magenest highlights the following popular uses of push notifications in the e-commerce industry.

Moreover, the “Add to Home Screen” feature of progressive web applications, allows consumers to come back to the website much faster. As a result, it becomes easier for them to re-engage with their favorite brands.

Finally, PWA technology helps increase users’ reach. The recent statistics show that many users are not eager to download a native app to communicate with businesses. The main reasons are limited storage, technical issues, confusion, and excessive advertising. 

In this regard, PWAs offering a user experience that is close to that of a native app, clearly offer an advantage. Users don’t have to go through a long install process, and not much device storage is occupied, which makes progressive web apps a good alternative.

What about successful cases of PWA implementation? Actually, there are plenty of them. Take Pinterest as an example. This social media company got fantastic results after turning its website into a PWA.

Pinterest had the task of providing users with improved performance. Besides, they wanted to speed up the page load time and decrease the bounce rate. Finally, the brand aimed at offering customers low bandwidth usage. Transition to a progressive web app in 2017 helped the brand reach these goals.

Results:

  • 40% increase in average session time;
  • 44% growths in ad revenue;
  • 60% rise in engagement.

2. Improved search ranking

Since the release of mobile-first indexing in 2018, Google has been prioritizing fast and mobile-friendly websites. That is why PWAs possessing these qualities can become a silver bullet for your business.

First, progressive web apps in their nature are mobile-friendly websites. It means that users do not download them from app stores but an app to the home screens of their devices.

Besides, it will not be hard for Google to discover and index your website. It means that when users are looking for products or services you offer, they will find your site, and you will have better chances to get traffic and leads.

3. Better conversion rate

The slow response speed and poor performance can result in a high bounce rate. It means users leave your website and seek other alternatives.

Luckily we have PWAs noted for high speed. With this technology, users can add the desired item to the shopping cart much faster, and complete their purchase as well.

Also, brands can benefit from using a location tracking feature. This functionality will allow them to target the relevant consumers at the right time. Buyers will get personalized messages on the abandoned shopping cart.

Also, users can be notified about seasonal discounts that can encourage them to make a purchase.

Thus, the location tracking feature gives brands the opportunity to boost their conversion rate.

Wego is a Singaporean travel metasearch engine. Re-engagement with the target audience was crucial for this company. Also, Wego wanted to improve the user experience and the website’s performance. For these purposes, Progressive Web App was developed in 2017.

Results:

  • 12% more organic visitors;
  • 3X rise in a click-through rate through faster ads;
  • 20%  drop in bounce rate;
  • 26% increased number of visitors;
  • 95% conversion rate boost (50% on iOS devices);
  • 35% increase in average session duration on iOS devices.

4. Reduced cost of a mobile solution

When it comes to Native app development, businesses should build, maintain, and promote a separate version for Android and iOS operating systems. Entrepreneurs have to hire two teams to get a working solution.

As a result, the mobile app development cost becomes two times as expensive.

That’s why you should give progressive web applications a try. As for the PWA technology, it supposes building one cross-platform application. An experienced PWA development team will build it much faster than two separate versions of your app.

As you can see, PWA development is a great way to cut down expenses on creating a mobile app.

5. Offline mode

PWAs can show good performance even on unstable networks. Built-in Service Workers cache the important content of a progressive web app automatically. It means that there is no need to download it each time you open the application. 

Also, the required information is accessible for them even without an Internet connection. People living in rural communities where Internet connection is unstable can benefit greatly from using PWAs as well as consumers during the day.

6. Improved security

These days security incidents and cyber-attacks are a pressing issue for many businesses and not without reason.

“Cybint Solutions” provides alarming statistics. According to their recent findings, 64% of businesses have suffered from web-based attacks.

Given that, security becomes a significant aspect you should not leave unattended. Negligence here can harm your brand reputation significantly.

The PWA technology is noted for its improved security. PWAs carefully protect transmitted data. In addition, they prevent men-in-the-middle attacks by using the HTTP protocol and SSL certificate.

Conclusion

As you can see, progressive web apps provide businesses with endless opportunities. They serve as a great tool for engaging with customers and increasing the conversion rate.

So it is high time to invest in turning your website into a fast-loading and secure PWA if you have not done this yet.


Photo by Sigmund on Unsplash

Categories: Others Tags: