Archive

Archive for February, 2019

I Spun up a Scalable WordPress Server Environment with Trellis, and You Can, Too

February 28th, 2019 No comments

A few years back, my fledgling website design agency was starting to take shape; however, we had one problem: managing clients’ web servers and code deployments. We were unable to build a streamlined process of provisioning servers and maintaining operating system security patches. We had the development cycle down pat, but server management became the bane of our work. We also needed tight control over each server depending on a site’s specific needs. Also, no, shared hosting was not the long term solution.

I began looking for a prebuilt solution that could solve this problem but came up with no particular success. At first, I manually provisioned servers. This process quickly proved to be both monotonous and prone to errors. I eventually learned Ansible and created a homegrown conglomeration of custom Ansible roles, bash scripts and Ansible Galaxy roles that further simplified the process — but, again, there were still many manual steps needed to take before the server was 100%.

I’m not a server guy (nor do I pretend to be one), and at this point, it became apparent that going down this path was not going to end well in the long run. I was taking on new clients and needed a solution, or else I would risk our ability to be sustainable, let alone grow. I was spending gobs of time typing arbitrary sudo apt-get update commands into a shell when I should have been managing clients or writing code. That’s not to mention I was also handling ongoing security updates for the underlying operating system and its applications.

Tell me if any of this sounds familiar.

Serendipitously, at this time, the team at Roots had released Trellis for server provisioning; after testing it out, things seemed to fall into place. A bonus is that Trellis also handles complex code deployments, which turned out to be something else I needed as most of the client sites and web applications that we built have a relatively sophisticated build process for WordPress using Composer, npm, webpack, and more. Better yet, it takes just minutes to jumpstart a new project. After spending hundreds of hours perfecting my provisioning process with Trellis, I hope to pass what I’ve learned onto you and save you all the hours of research, trials, and manual work that I wound up spending.

A note about Bedrock

We’re going to assume that your WordPress project is using Bedrock as its foundation. Bedrock is maintained by the same folks who maintain Trellis and is a “WordPress boilerplate with modern development tools, easier configuration, and an improved folder structure.” This post does not explicitly explain how to manage Bedrock, but it is pretty simple to set up, which you can read about in its documentation. Trellis is natively designed to deploy Bedrock projects.

A note about what should go into the repo of a WordPress site

One thing that this entire project has taught me is that WordPress applications are typically just the theme (or the child theme in the parent/child theme relationship). Everything else, including plugins, libraries, parent themes and even WordPress itself are just dependencies. That means that our version control systems should typically include the theme alone and that we can use Composer to manage all of the dependencies. In short, any code that is managed elsewhere should never be versioned. We should have a way for Composer to pull it in during the deployment process. Trellis gives us a simple and straightforward way to accomplish this.

Getting started

Here are some things I’m assuming going forward:

  • The code for the new site in the directory ~/Sites/newsite
  • The staging URL is going to be https://newsite.statenweb.com
  • The production URL is going to be https://newsite.com
  • Bedrock serves as the foundation for your WordPress application
  • Git is used for version control and GitHub is used for storing code. The repository for the site is: git@github.com:statenweb/newsite.git

I am a little old school in my local development environment, so I’m foregoing Vagrant for local development in favor of MAMP. We won’t go over setting up the local environment in this article.

I set up a quick start bash script for MacOS to automate this even further.

The two main projects we are going to need are Trellis and Bedrock. If you haven’t done so already, create a directory for the site (mkdir ~/Sites/newsite) and clone both projects from there. I clone Trellis into a /trellis directory and Bedrock into the /site directory:

cd ~/Sites/newsite
git clone git@github.com:roots/trellis.git
git clone git@github.com:roots/bedrock.git site
cd trellis
rm -rf .git
cd ../site
rm -rf .git

The last four lines enable us to version everything correctly. When you version your project, the repo should contain everything in ~/Sites/newsite.

Now, go into trellis and make the following changes:

First, open ~/Sites/newsite/trellis/ansible.cfg and add these lines to the bottom of the [defaults] key:

vault_password_file = .vault_pass
host_key_checking = False

The first line allows us to use a .vault_pass file to encrypt all of our vault.yml files which are going to store our passwords, sensitive data, and salts.

The second host_key_checking = False can be omitted for security as it could be considered somewhat dangerous. That said, it’s still helpful in that we do not have to manage host key checking (i.e., typing yes when prompted).

Ansible vault password

Photo by Micah Williams on Unsplash

Next, let’s create the file ~/Sites/newsite/trellis/.vault_pass and enter a random hash of 64 characters in it. We can use a hash generator to create that (see here for example). This file is explicitly ignored in the default .gitignore, so it will (or should!) not make it up to the source control. I save this password somewhere extremely secure. Be sure to run chmod 600 .vault_pass to restrict access to this file.

The reason we do this is so we can store encrypted passwords in the version control system and not have to worry about exposing any of the server’s secrets. The main thing to call out is that the .vault_pass file is (and should not be) not committed to the repo and that the vault.yml file is properly encrypted; more on this in the “Encrypting the Secret Variables” section below.

Setting up target hosts

Photo by N. on Unsplash

Next, we need to set up our target hosts. The target host is the web address where Trellis will deploy our code. For this tutorial, we are going to be configuring newsite.com as our production target host and newsite.statenweb.com as our staging target host. To do this, let’s first update the production servers address in the production host file, stored in ~/Sites/newsite/trellis/hosts/production to:

[production]
newsite.com

[web]
newsite.com

Next, we can update the staging server address in the staging host file, which is stored in ~/Sites/newsite/trellis/hosts/staging to:

[staging]
newsite.statenweb.com

[web]
newsite.statenweb.com

Setting up GitHub SSH Keys

For deployments to be successful, SSH keys need to be working. Trellis takes advantage of how GitHub’ exposes all public (SSH) keys so that you do not need to add keys manually. To set this up go into the group_vars/all/users.yml and update both the web_user and the admin_user object’s keys value to include your GitHub username. For example:

users:
  - name: '{{ web_user }}'
		groups:
		  - '{{ web_group }}'
		keys:
		  - https://github.com/matgargano.keys
  - name: '{{ admin_user }}'
		groups:
		  - sudo
		keys:
		  - https://github.com/matgargano.keys

Of course, all of this assumes that you have a GitHub account with all of your necessary public keys associated with it.

Site Meta

We store essential site information in:

  • ~/Sites/newsite/trellis/group_vars/production/wordpress_sites.yml for production
  • ~/Sites/newsite/trellis/group_vars/staging/wordpress_sites.yml for staging.

Let’s update the following information for our staging wordpress_sites.yml:

wordpress_sites:
	newsite.statenweb.com:
		site_hosts:
		  - canonical: newsite.statenweb.com
		local_path: ../site 
		repo: git@github.com:statenweb/newsite.git
		repo_subtree_path: site 
		branch: staging
		multisite:
			enabled: false
		ssl:
			enabled: true
			provider: letsencrypt
		cache:
			enabled: false

This file is saying that we:

  • removed the site hosts redirects as they are not needed for staging
  • set the canonical site URL (newsite.statenweb.com) for the site key (newsite.statenweb.com)
  • defined the URL for the repository
  • the git repo branch that gets deployed to this target is staging, i.e., we are using a separate branch named staging for our staging site
  • enabled SSL (set to true), which will also install an SSL certificate when the box provisions

Let’s update the following information for our production wordpress_sites.yml:

wordpress_sites:
	newsite.com:
		site_hosts:
		  - canonical: newsite.com
				redirects:
				  - www.newsite.com
		local_path: ../site # path targeting local Bedrock site directory (relative to Ansible root)
		repo: git@github.com:statenweb/newsite.git
		repo_subtree_path: site 
		branch: master
		multisite:
			enabled: false
		ssl:
			enabled: true
			provider: letsencrypt
		cache:
			enabled: false

Again, what this translates to is that we:

  • set the canonical site URL (newsite.com) for the site key (newsite.com)
  • set a redirect for www.newsite.com
  • defined the URL for the repository
  • the git repo branch that gets deployed to this target is master, i.e., we are using a separate branch named master for our production site
  • enabled SSL (set to true), which will install an SSL certificate when you provision the box

In the wordpress_sites.yml you can further configure your server with caching, which is beyond the scope of this guide. See Trellis’ documentation on FastCGI Caching for more information.

Secret Variables

Photo by Kristina Flour on Unsplash

There are going to be several secret pieces of information for both our staging and production site including the root user password, MySQL root password, site salts, and more. As referenced previously, Ansible Vault and using .vault_pass file makes this a breeze.

We store this secret site information in:

  • ~/Sites/newsite/trellis/group_vars/production/vault.yml for production
  • ~/Sites/newsite/trellis/group_vars/staging/vault.yml for staging

Let’s update the following information for our staging vault.yml:

vault_mysql_root_password: pK3ygadfPHcLCAVHWMX

vault_users:
	- name: "{{ admin_user }}"
		password: QvtZ7tdasdfzUmJxWr8DCs
		salt: "heFijJasdfQbN8bA3A"

vault_wordpress_sites:
	newsite.statenweb.com:
		env:
			auth_key: "Ab$YTlX%:Qt8ij/99LUadfl1:U]m0ds@N<3@x0LHawBsO$(gdrJQm]@alkr@/sUo.O"
			secure_auth_key: "+>Pbsd:|aiadf50;1Gz;.Z{nt%Qvx.5m0]4n:L:h9AaexLR{1B6.HeMH[w4$>H_"
			logged_in_key: "c3]7HixBkSC%}-fadsfK0yq{HF)D#1S@Rsa`i5aW^jW+W`8`e=&PABU(s&JH5oPE"
			nonce_key: "5$vig.yGqWl3G-.^yXD5.ddf/BsHx|i]>h=mSy;99ex*Saj<@lh;3)85D;#|RC="
			auth_salt: "Wv)[t.xcPsA}&/]rhxldafM;h(FSmvR]+D9gN9c6{*hFiZ{]{,#b%4Um.QzAW+aLz"
			secure_auth_salt: "e4dz}_x)DDg(si/8Ye&U.p@pB}NzHdfQccJSAh;?W)>JZ=8:,i?;j$bwSG)L!JIG"
			logged_in_salt: "DET>c?m1uMAt%hj3`8%_emsz}EDM7R@44c0HpAK(pSnRuzJ*WTQzWnCFTcp;,:44"
			nonce_salt: "oHB]MD%RBla*#x>[UhoE{hm{7j#0MaRA#fdQcdfKe]Y#M0kQ0F/0xe{cb|g,h.-m"

Now, let’s update the following information for our production vault.yml:

vault_mysql_root_password: nzUMN4zBoMZXJDJis3WC
vault_users:
	- name: "{{ admin_user }}"
		password: tFxea6ULFM8CBejagwiU
		salt: "9LgzE8phVmNdrdtMDdvR"
vault_wordpress_sites:
	newsite.com:
		env:
			db_password: eFKYefM4hafxCFy3cash
			# Generate your keys here: https://roots.io/salts.html
			auth_key: "|4xA-:Pa=-rT]&!-(%*uKAcd</+m>ix_Uv,`/(7dk1+;b|ql]42gh&HPFdDZ@&of"
			secure_auth_key: "171KFFX1ztl+1I/P$bJrxi*s;}.>S:{^-=@*2LN9UfalAFX2Nx1/Q&i&LIrI(BQ["
			logged_in_key: "5)F+gFFe}}0;2G:k/S>CI2M*rjCD-mFX?Pw!1o.@>;?85JGu}#(0#)^l}&/W;K&D"
			nonce_key: "5/[Zf[yXFFgsc#`4r[kGgduxVfbn::<+F<$jw!WX,lAi41#D-Dsaho@PVUe=8@iH"
			auth_salt: "388p$c=GFFq&hw6zj+T(rJro|V@S2To&dD|Q9J`wqdWM&j8.KN]y?WZZj$T-PTBa"
			secure_auth_salt: "%Rp09[iM0.n[ozB(t;0vk55QDFuMp1-=+F=f%/Xv&7`_oPur1ma%TytFFy[RTI,j"
			logged_in_salt: "dOcGR-m:%4NpEeSj>?A8%x50(d0=[cvV!2x`.vB|^#G!_D-4Q>.+1K!6FFw8Da7G"
			nonce_salt: "rRIHVyNKD{LQb$uOhZLhz5QX}P)QUUo!Yw]+@!u7WB:INFFYI|Ta5@G,j(-]F.@4"

The essential lines for both are that:

  • The site key must match the key in wordpress_sites.yml we are using newsite.statenweb.com: for staging and newsite.com: for production
  • I randomly generated vault_mysql_root_password, password, salt, db_password, and db_password. I used Roots’ helper to generate the salts.

I typically use Gmail’s SMTP servers using the Post SMTP plugin, so there’s no need for me to edit the ~/Sites/newsite/group_vars/all/vault.yml.

Encrypting the Secret Variables

Photo by Markus Spiske on Unsplash

As previously mentioned we use Ansible Vault to encrypt our vault.yml files. Here’s how to encrypt the files and make them ready to be stored in our version control system:

cd ~/Sites/newsite/trellis
ansible-vault encrypt group_vars/staging/vault.yml group_vars/production/vault.yml

Now, if we open either ~/Sites/newsite/trellis/group_vars/staging/vault.yml or ~/Sites/newsite/trellis/group_vars/production/vault.yml, all we’ll get is garbled text. This is safe to be stored in a repository as the only way to decrypt it is to use the .vault_pass. It goes without saying to make extra sure that the .vault_pass itself does not get committed to the repository.

A note about compiling, transpiling, etc.

Another thing that’s out of scope is setting up Trellis deployments to handle a build process using build tools such as npm and webpack. This is example code to handle a custom build that could be included in ~/Sites/newsite/trellis/deploy-hooks/build-before.yml:

---

-
	args:
		chdir: "{{ project.local_path }}/web/app/themes/newsite"
	command: "npm install"
	connection: local
	name: "Run npm install"

-
	args:
		chdir: "{{ project.local_path }}/web/app/themes/newsite"
	command: "npm run build"
	connection: local
	name: "Compile assets for production"

-
	name: "Copy Assets"
	synchronize:
		dest: "{{ deploy_helper.new_release_path }}/web/app/themes/newsite/dist/"
		group: no
		owner: no
		rsync_opts: "--chmod=Du=rwx,--chmod=Dg=rx,--chmod=Do=rx,--chmod=Fu=rw,--chmod=Fg=r,--chmod=Fo=r"
		src: "{{ project.local_path }}/web/app/themes/newsite/dist/"

These are instructions that build assets and moves them into a directory that I explicitly decided not to version. I hope to write a follow-up guide that dives specifically into that.

Provision

Photo by Bill Jelen on Unsplash

I am not going to go in great detail about setting up the servers themselves, but I typically would go into DigitalOcean and spin up a new droplet. As of this writing, Trellis is written on Ubuntu 18.04 LTS (Bionic Beaver) which acts as the production server. In that droplet, I would add a public key that is also included in my GitHub account. For simplicity, I can use the same server as my staging server. This scenario is likely not what you would be using; maybe you use a single server for all of your staging sites. If that is the case, then you may want to pay attention to the passwords configured in ~/Sites/newsite/trellis/group_vars/staging/vault.yml.

At the DNS level, I would map the naked A record for newsite.com to the IP address of the newly created droplet. Then I’d map the CNAME www to @. Additionally, the A record for newsite.statenweb.com would be mapped to the IP address of the droplet (or, alternately, a CNAME record could be created for newsite.statenweb.com to newsite.com since they are both on the same box in this example).

After the DNS propagates, which can take some time, the staging box can be provisioned by running the following commands.

First off, it;’s possible you may need to run this before anything else:

ansible-galaxy install -r requirements.yml

Then, install the required Ansible Galaxy roles before proceeding:

cd ~/Sites/newsite/trellis
ansible-playbook server.yml -e env=staging

Next up, provision the production box:

cd ~/Sites/newsite/trellis
ansible-playbook server.yml -e env=production

Deploy

If all is set up correctly to deploy to staging, we can run these commands:

cd ~/Sites/newsite/trellis
ansible-playbook deploy.yml -e "site=newsite.statenweb.com env=staging" -i hosts/staging

And, once this is complete, hit https://newsite.statenweb.com. That should bring up the WordPress installation prompt that provides the next steps to complete the site setup.

If staging is good to go, then we can issue the following commands to deploy to production:

cd ~/Sites/newsite/trellis
ansible-playbook deploy.yml -e "site=newsite.com env=production" -i hosts/production

And, like staging, this should also prompt installation steps to complete when hitting https://newsite.com.

Go forth and deploy!

Hopefully, this gives you an answer to a question I had to wrestle with personally and saves you a ton of time and headache in the process. Having stable, secure and scalable server environments that take relatively little effort to spin up has made a world of difference in the way our team works and how we’re able to accommodate our clients’ needs.

While we’re technically done at this point, there are still further steps to take to wrap up your environment fully:

  • Add dependencies like plugins, libraries and parent themes to ~/Sites/newsite/composer.json and run composer update to grab the latest manifest versions.
  • Place the theme to ~/Sites/newsite/site/themes/. (Note that any WordPress theme can be used.)
  • Include any build processes you’d need (e.g. transpiling ES6, compiling SCSS, etc.) in one of the deployment hooks. (See the documentation for Trellis Hooks).

I have also been able to dive into enterprise-level continuous integration and continuous delivery, as well as how to handle premium plugins with Composer by running a custom Composer server, among other things, while incurring no additional cost. Hopefully, those are areas I can touch on in future posts.

Trellis provides a dead simple way to provision WordPress servers. Thanks to Trellis, long gone are the days of manually creating, patching and maintaining servers!

The post I Spun up a Scalable WordPress Server Environment with Trellis, and You Can, Too appeared first on CSS-Tricks.

Categories: Designing, Others Tags:

Keen makes it a breeze to build and ship customer-facing metrics

February 28th, 2019 No comments

(This is a sponsored post.)

Keen is an analytics tool that makes it wonderfully easy to collect data. But Keen is unique in that it is designed not just to help you look at that data, but to share that data with your own customers! Customer-facing metrics, as it were.

Keen works just the way you would hope: it’s super easy to install, has great docs, makes it very easy to customize to collect exactly what you need, and crucially, it is just as easy to query it and get the data you want to build the visualizations you need. As I’m sure you well know: you only improve what you measure, and what you measure is unique to your business and your customers.

Doesn’t it tickle your brain a little? What kind of metrics might your customers want to see in relation to your app? What kind of features might they pay for?

The idea of Customer-Facing Metrics is that you can deliver personalized data to your user right through the front-end of the app. It could be the fundamental offering of your app! Or it could be a bonus paid feature, a lot of people love looking at their numbers! Imagine a social platform where users are able to see their most popular content, check the sources of the traffic, and explore all that through time and other filters.

Customer facing data, powered by Keen

Have you ever seen an incredible data visualization and imagined how that could be useful in your own app? You can probably follow a tutorial to help you build the visual part, but those tutorials generally assume you already have the data and skip over that part. Keen helps you with the hard part: collecting, storing, and querying all that data. Not to mention scales as you do.

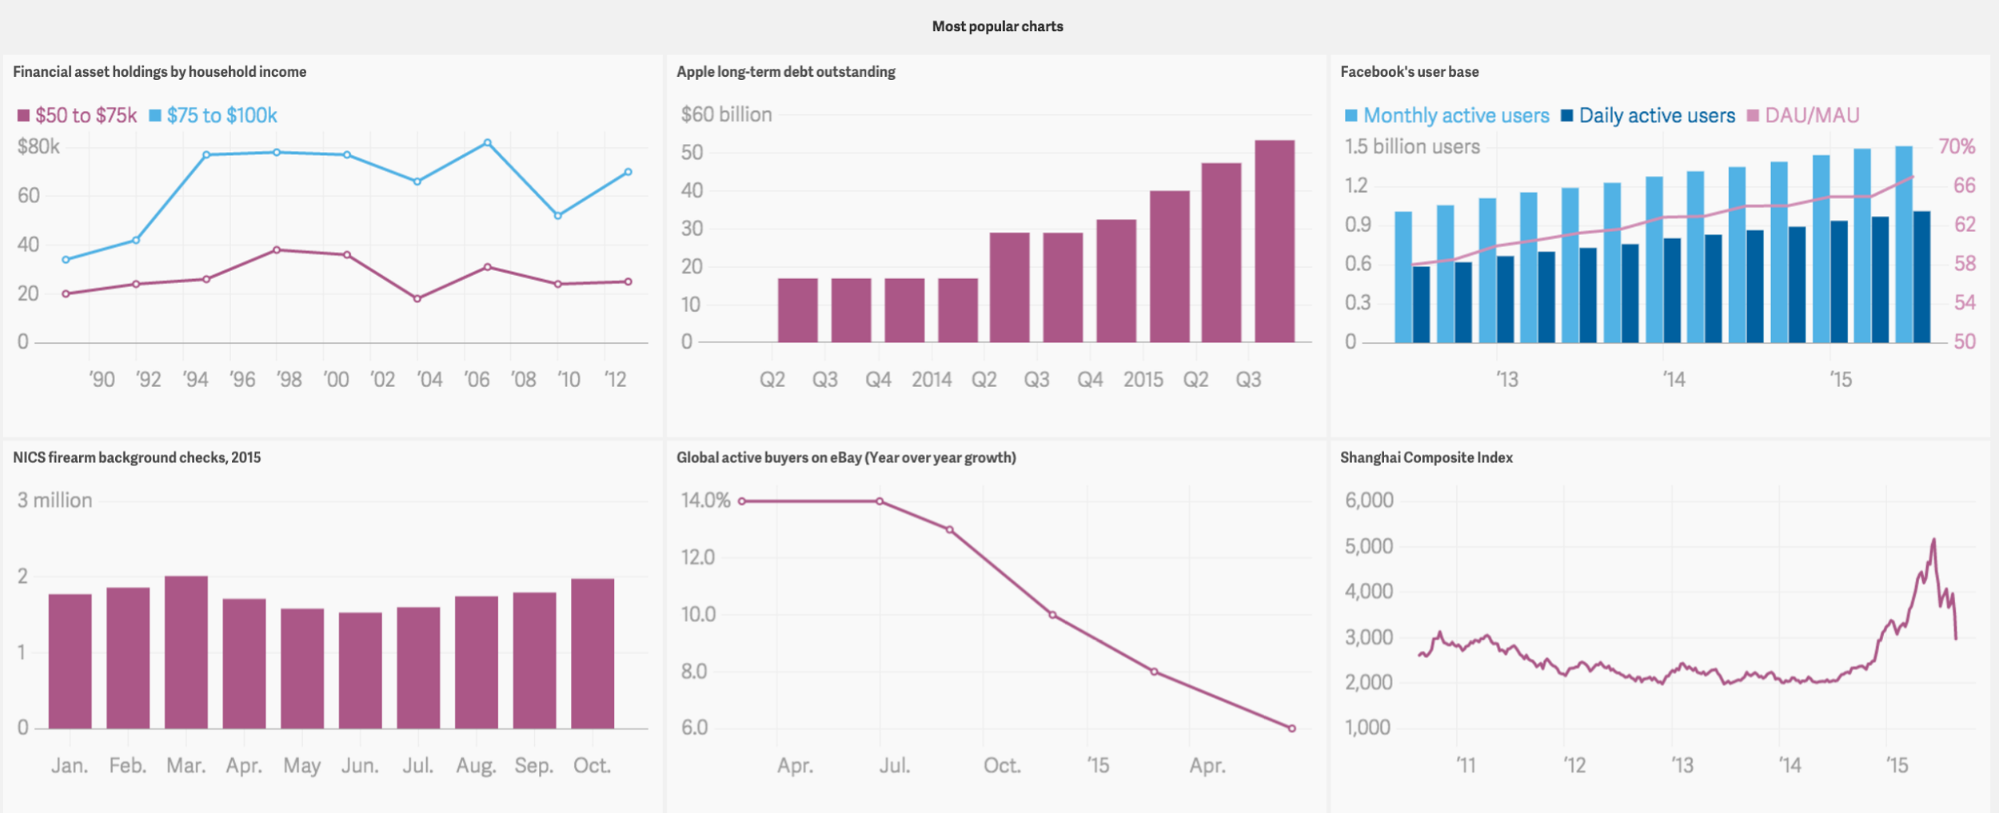
Charts from Quartz, powered by Keen

Part of the beauty of Keen is how easy it is to get started. It works in whatever stack you’ve got in any language. Just a few lines of code to get up and running and get a proof of concept going.

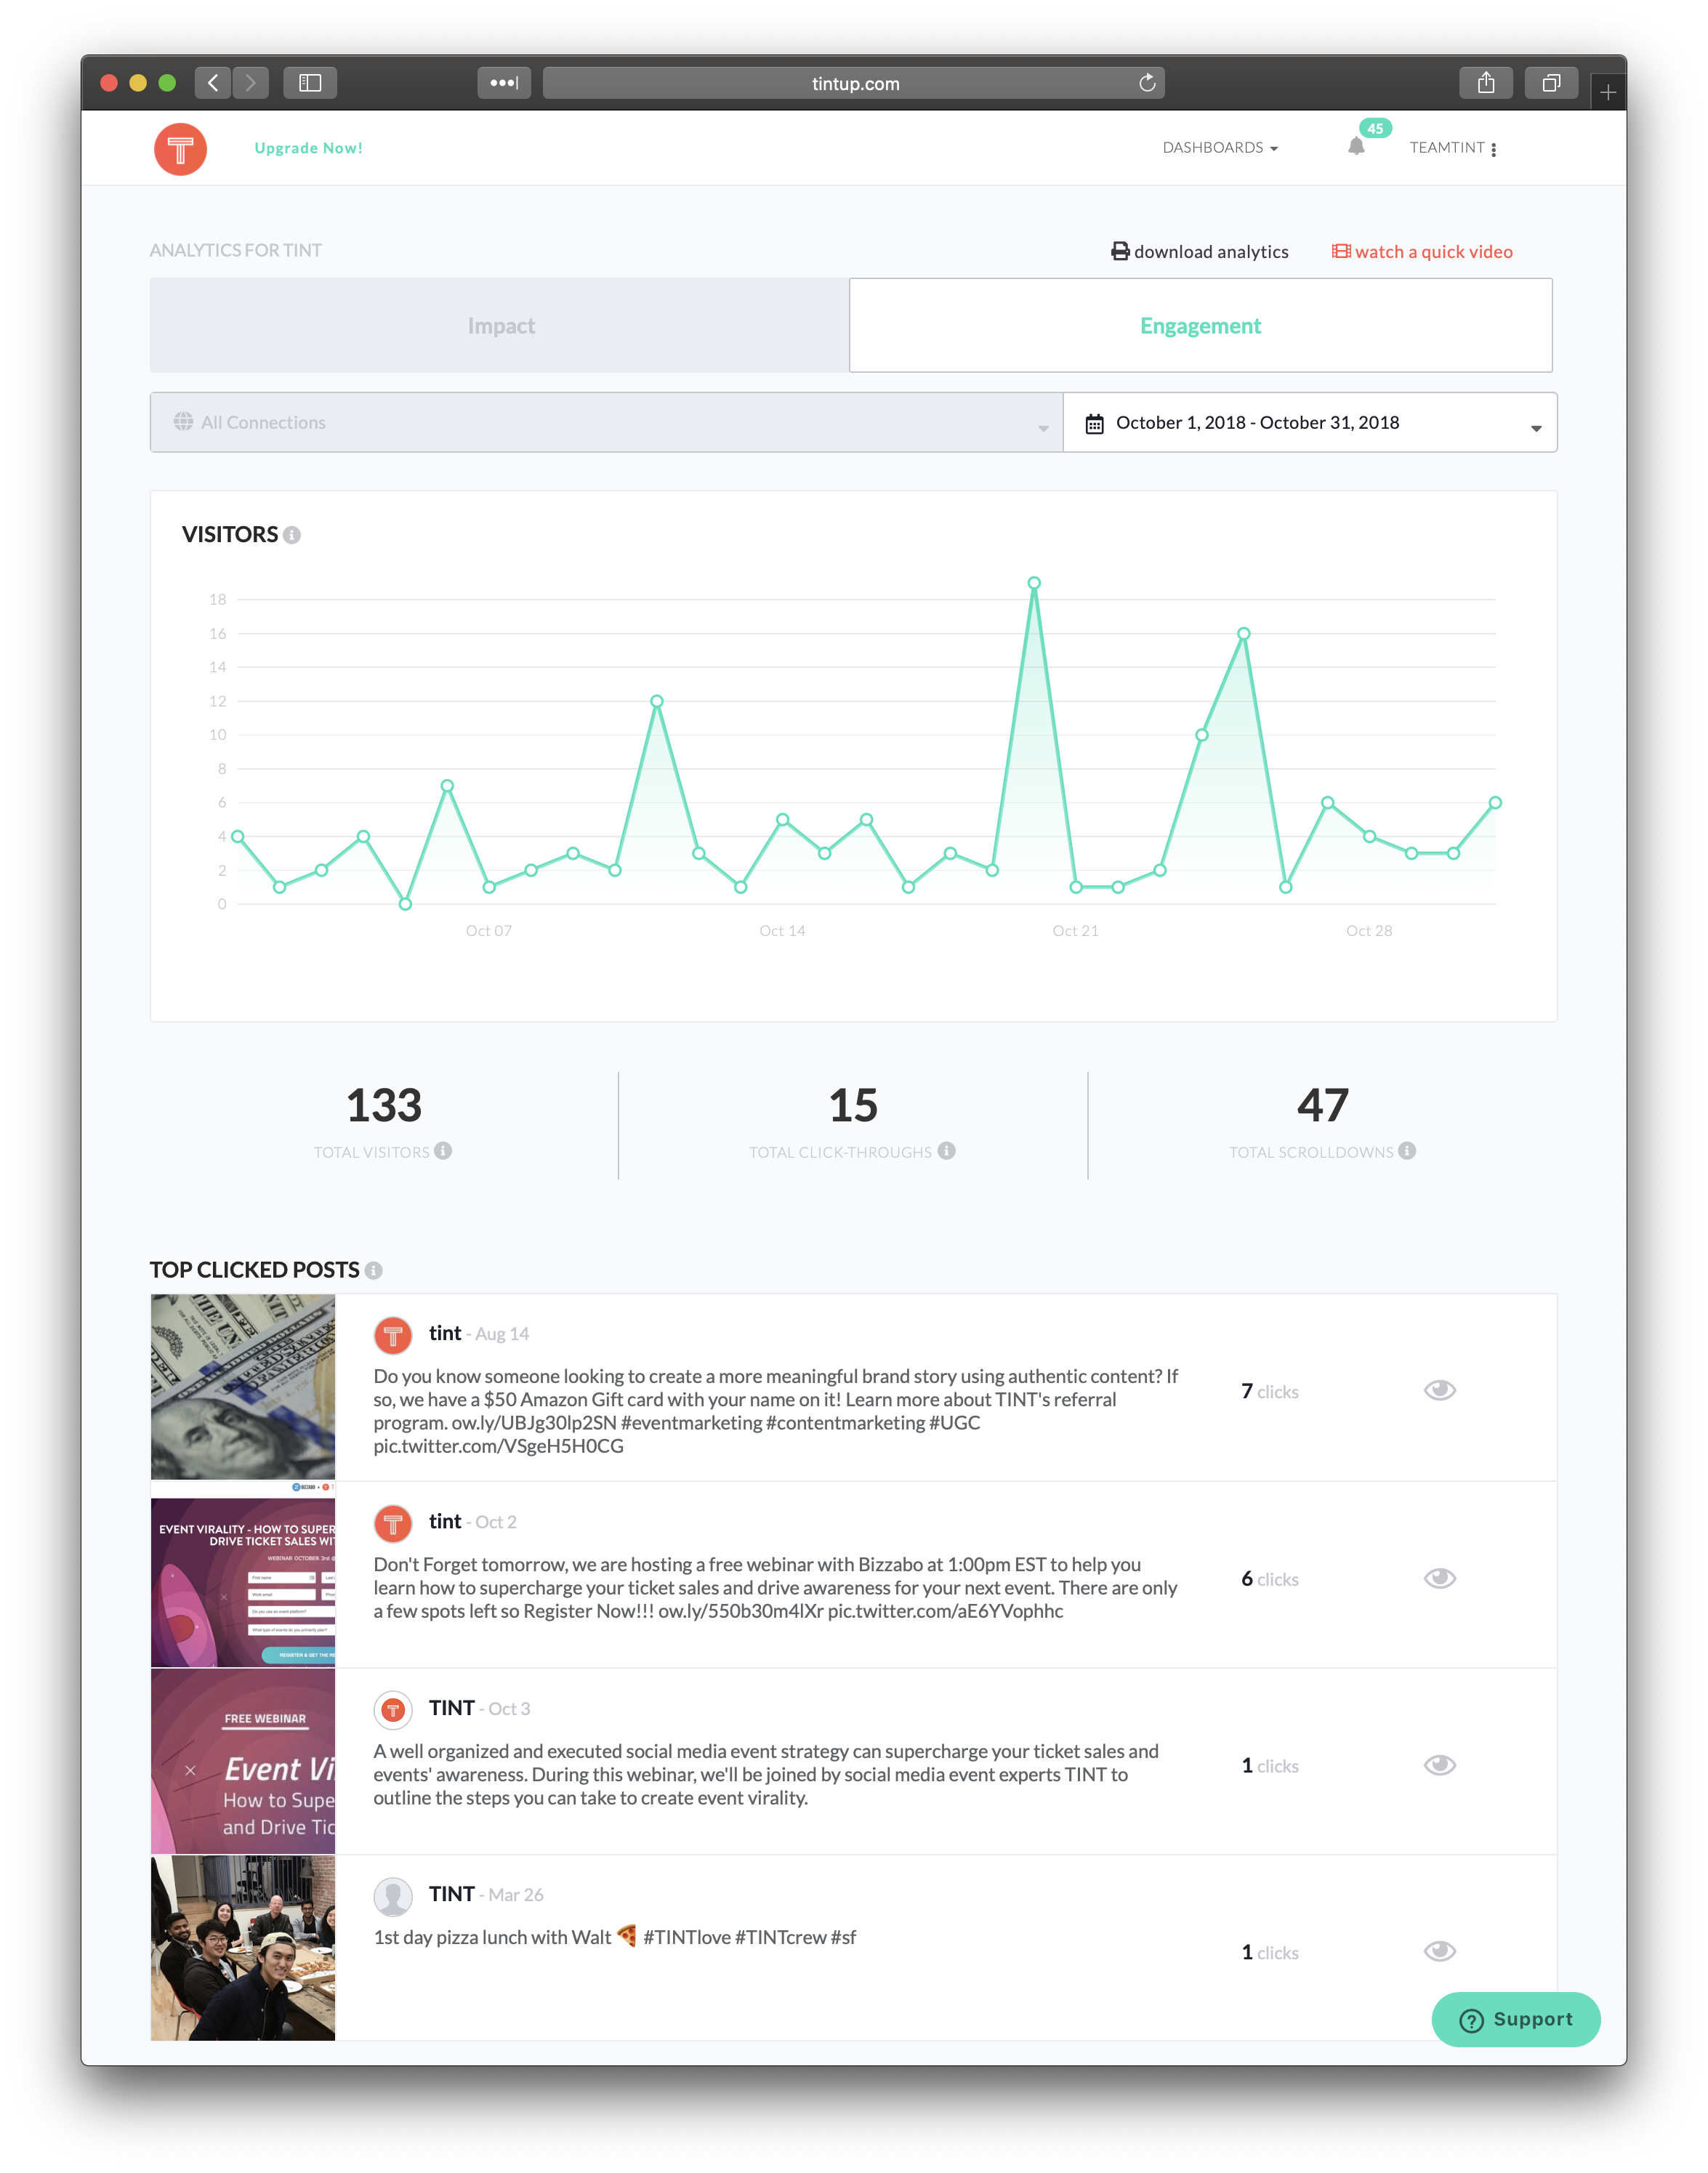
In fact, if you’re using Keen for the web, you might be interested in the Auto-Collector, which means you don’t have to configure and send events manually, it will collect all pageviews, clicks, and form submissions automatically. That’s particularly nice as you can answer questions you might have instantly, because you’ve already collected the information, you don’t need to configure new collections and then wait. This is particularly great to help you get a proof-of-concept up very quickly and start figuring out things that your customers are sure to be interested in.

Auto-Collector Dashboard

Start prototyping today with Auto-Collector:

Sign up for Keen

Direct Link to ArticlePermalink

The post Keen makes it a breeze to build and ship customer-facing metrics appeared first on CSS-Tricks.

Categories: Designing, Others Tags:

A Bit of Performance

February 28th, 2019 No comments

Here’s a great post by Roman Komarov on what he learned by improving the performance of his personal website. There’s a couple of neat things he does to tackle font loading in particular, such as adding the tags for fonts. This will encourage those font files to download a tiny bit faster which prevents that odd flash of un-styled text we know all too well. Roman also subsets his font files based on language which I find super interesting – as only certain pages of his website use Cyrillic glyphs.

He writes:

I was digging into some of the performance issues during my work for a few weeks, and I thought that it can be interesting to see how those could be applied to my site. I was already quite happy with how it performed (being just a small static site) but managed to find a few areas to improve.

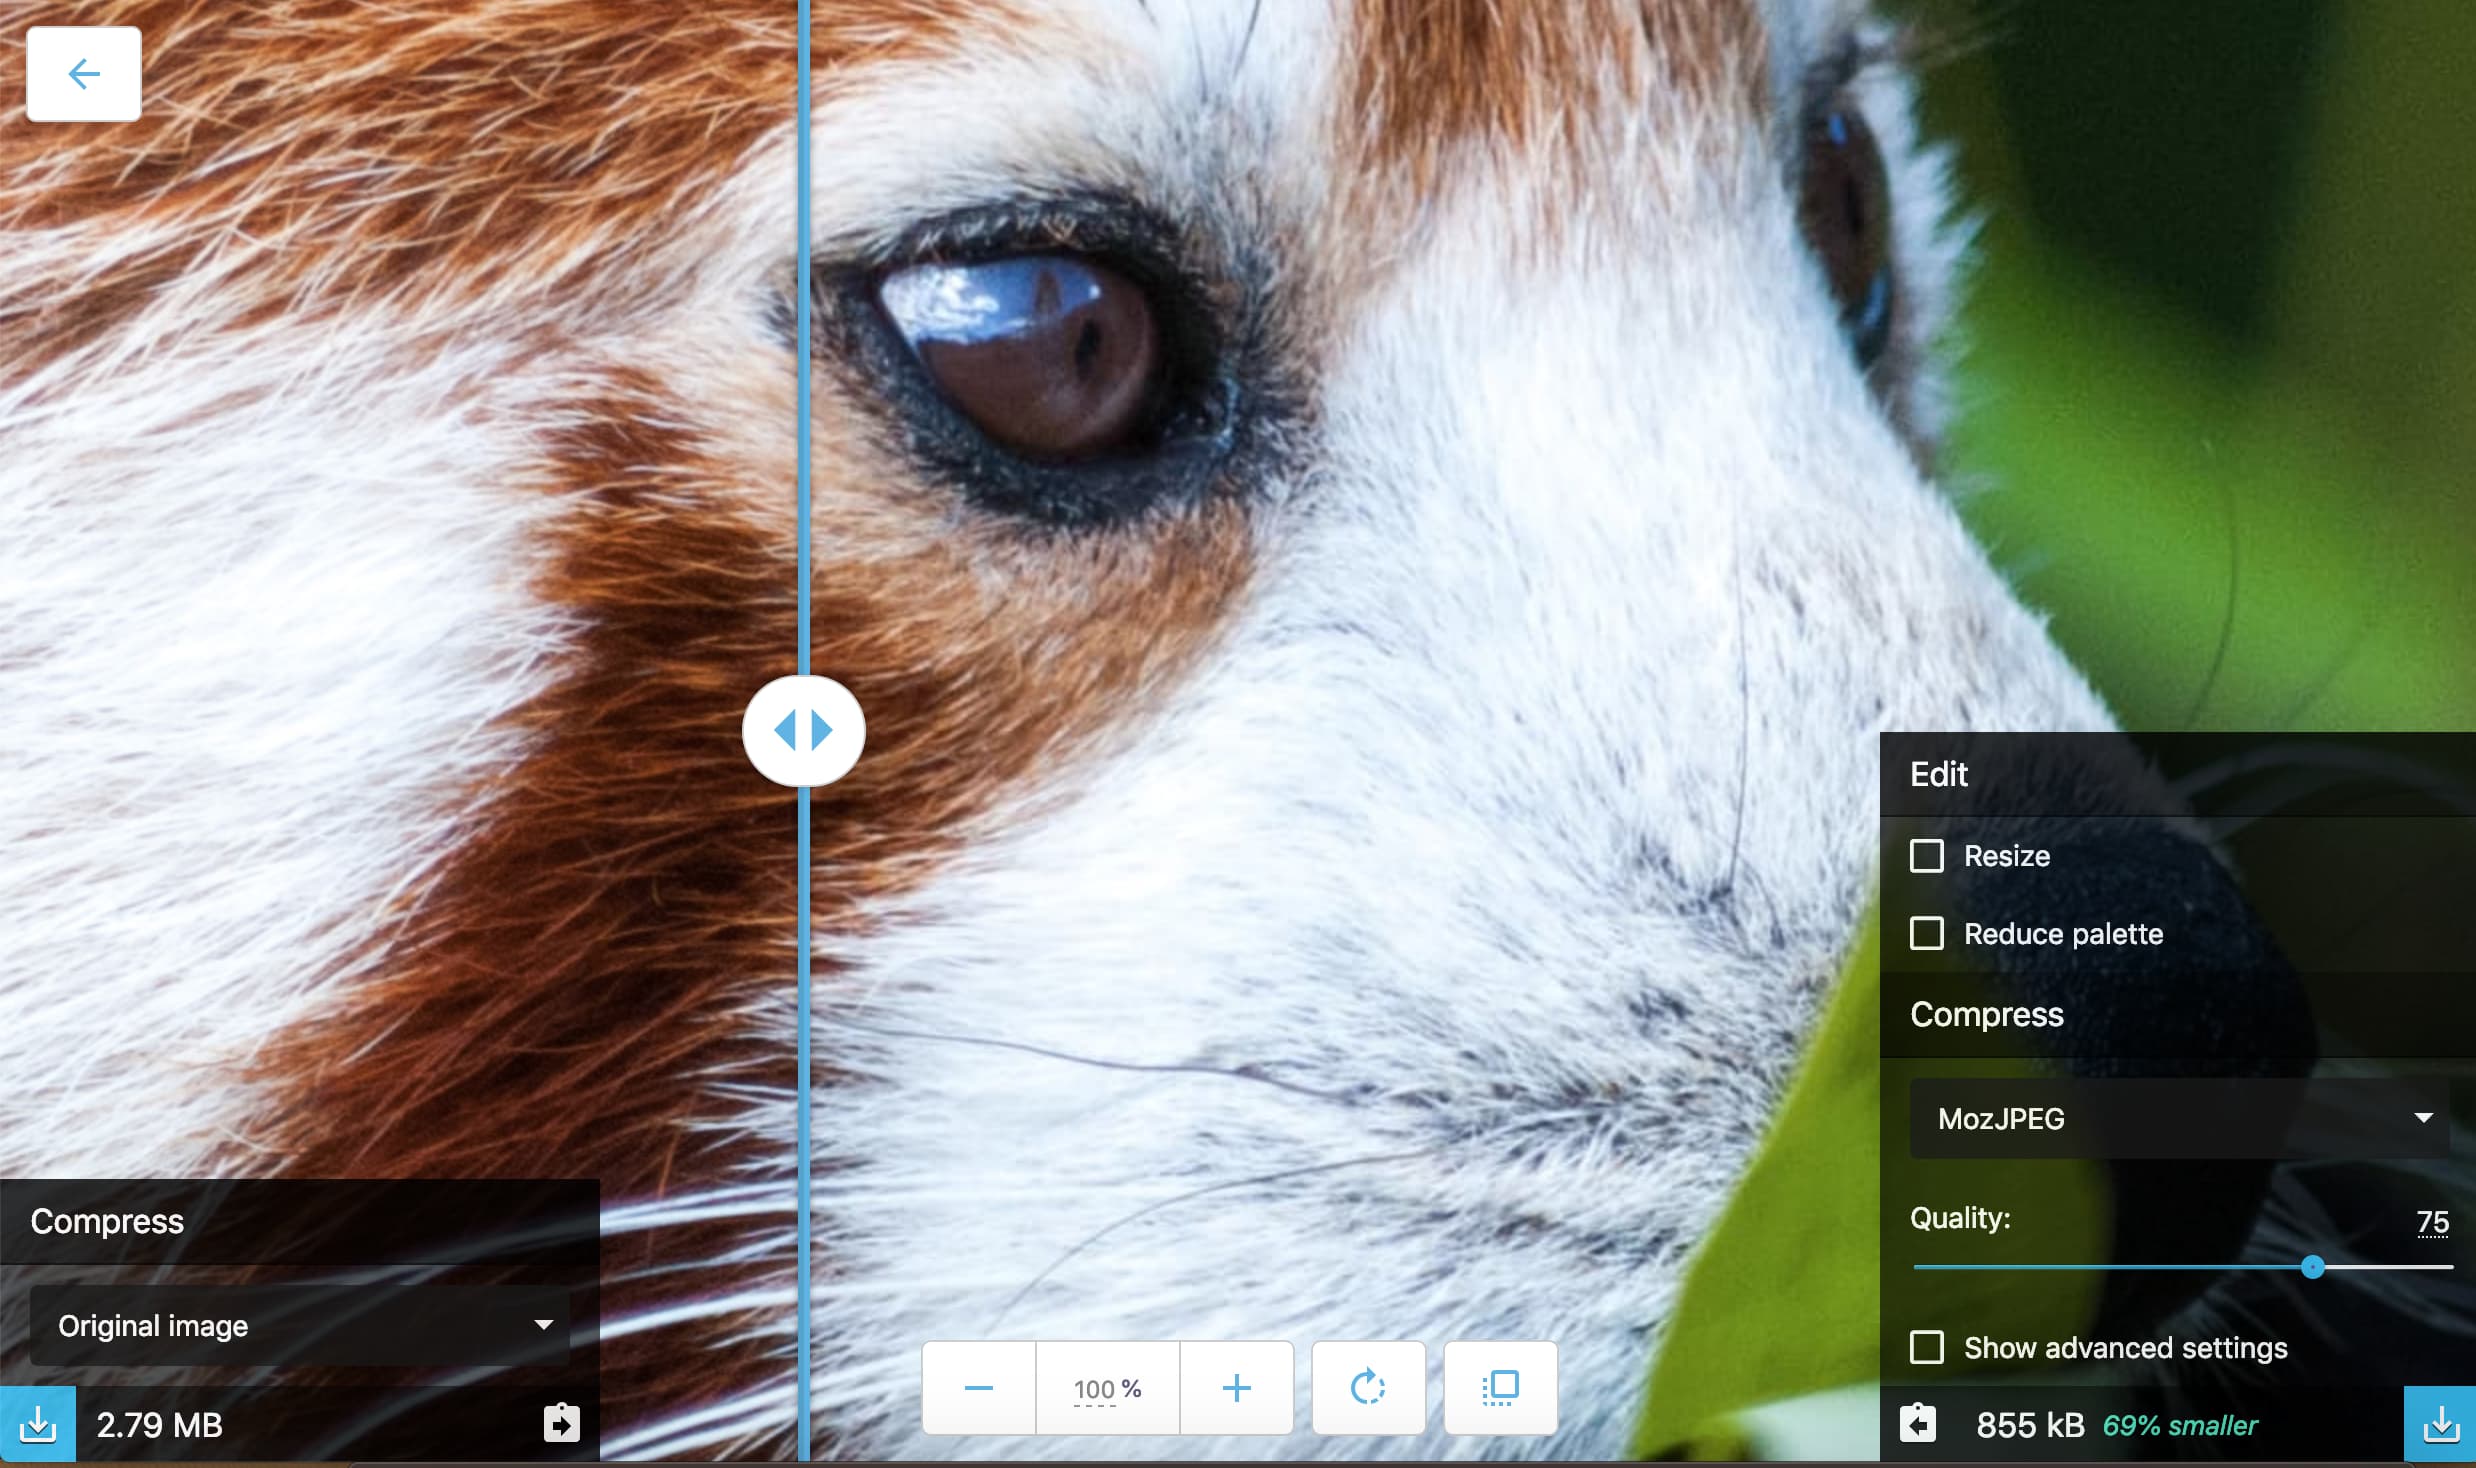
I had also never heard of Squoosh, which happens to be an incredible image optimization tool that looks like this when you’re editing an image:

With that slider in the middle, it shows the difference between the original image and the newly optimized one, which is both super neat and helpful.

Direct Link to ArticlePermalink

The post A Bit of Performance appeared first on CSS-Tricks.

Categories: Designing, Others Tags:

10 Real-World Reasons Designers Should Know SEO

February 28th, 2019 No comments

For web designers today, creating a website can mean a whole lot than just functionality, usability and aesthetic appeal. Today, every new-born website requires a thorough integration of Search Engine Optimization (SEO) protocols to become crawlable and get indexed by search engines such as Google.

A good website can attract great amounts of traffic. However, to make sure your traffic is relevant, geo-specific, and hails from the target segment, you must utilize SEO properly. According to one piece of HubSpot research, 77% of people research a brand before getting in touch with it. This means your site design, structure, content, and marketing practices must be spot on if you want spectacular search results!

Both off-page and on-page SEO are imperative to the ranking process for any website on Google. Here, we are going to discuss why web designers should know about on-page SEO well enough to create a website that not only attracts visitors, but also ranks on top of Google search engine result pages (SERPs).

1. Higher Rankings

On-page SEO involves many elements such as HTTP status code, URLs and their friendliness with the search engine. Other aspects include the correct addition of meta tags, descriptions and further heading tags on your search link on Google SERPs. All of these elements make a huge difference in on-page SEO. Therefore, a web designer who knows these details must know when to apply them in the right order so that the website receives higher rankings on Google.

2. Greater Search Accuracy

With the growing number of internet users, the demand of the data has also increased. There are so many brands for a similar product, over hundreds of online stores, and numerous branches of the same brand. Before any potential customer makes an appearance in a store, they are highly likely to search them on the internet. The statistics clearly support this as 18% more shoppers prefer Google over Amazon for searching a product and 136% of times a search engine is preferred over other websites for the same purpose. Similarly, local searches lead 50% of the mobile users to take a tour to the nearby store within 24 hours. This further necessitates web designers to readily know about on-page SEO so that the client’s business page is more visible on web.

3. More Mobile Traffic

The state of inbound reporting suggests that generating traffic is one of the main marketing challenges faced by website designers and marketers. Website designers have the opportunity to integrate SEO metrics from the start and not only make the website more user-friendly, but device responsive as well. According to marketing technology facts by Sweor 57% of the mobile users abandon a brand’s website if it has a poor mobile responsive website. SEO helps you improve these flaws and add in high-quality visual content for better marketing. Designers can use this to their advantage and focus on building an attractive, rankable and responsive website.

4. Higher Engagement

In the present era, every online brand is reflection of how far up it is on Google rankings. On-page SEO helps build a strong network of internal linking that keeps the user engaged on the website by offering them more valuable information on the right time.

It also helps brings exposure to those sectors of the website that need more attention and helps generate a positive user experience from the visitor. This helps the brand focus on its goals and deploy different marketing strategies to boost revenues.

5. Impartial Benefits for SMEs

While large businesses may dominate the small ones in terms of size, operations and employee strength, SEO does not discriminate between SMEs and Large enterprises. SEO does not require a sizeable investment and most entrepreneurs and SMEs can afford hiring a few resources or even build their own department. However, SMEs with constrained budgets may not be able afford a dedicated department for SEO. Therefore, web designers must know SEO beforehand since there is no guarantee they will get any guidance from the company when the website gets live.

6. More Quality Traffic

Designing a website with proper on-page SEO helps Google’s spiders to crawl through your URLs faster and index your pages more relevantly on their SERPs. Research conducted by Moz suggests that 71.33% of clicks made on a website are present on the first page of search results. This means that more and quality traffic would be driven to your website generating more leads, increasing the conversion rates and ROI as well.

7. Using Innovative Technologies

Content has a direct effect on your customers. According MindMeld, 60% of the users have started using voice search features to interact with search engines when making queries. This means that the designers now need to optimize the website and content for voice search as well. According to Backlinko, the average word length that helps rank the website in the first page of Google is 1890 words. Also, the use of most suitable keywords gives your website ranking a boost bringing it on the first result page of the search engine. To get more advanced SEO features, web designers also deploy SEO extensions for more optimized performance and cost effectiveness.

8. Increases Page Loading Speed

Every website designer knows that loading speed plays a deciding role in online rankings as well as user experience. Some of the factors that lower the webpage speed are the large images, bad URLs and coding, and themes with too many widgets. Thus, knowing on-page SEO helps the designer avoid such errors when designing the website, improving its loading speeds far more efficiently as compared to when it is operational.

9. Greater User Experience

You must be wondering how SEO improves the UX, right? Well, good SEO offers informative, readable and highly usable content to the readers. Also, it helps to design a visually attractive website that is nicely navigated and performs well. These features make users happy and enhance their experience on the web page. So if you’re planning to leave a long lasting impression right from the start, you must put in some on-page SEO from the beginning.

10. Cost-Effectiveness

Its irrefutable that SEO has a great cost advantage. A skilled web designer knows how well systematic integration of on-page SEO can save costs that can pile up later if the website starts getting traffic. Everything from page titles, meta descriptions, meta tags, URL structure, body tags, keyword density down to image SEO must be prepared prior to its operation stage. Neglecting these key points can be detrimental to the website’s overall progress and may result on expensive retro-fitting at a later date.

Featured image via Unsplash

Add Realistic Chalk and Sketch Lettering Effects with Sketch’it – only $5!

Source

Categories: Designing, Others Tags:

Fresh Spring Vibes For Your Desktop (March 2019 Wallpapers Edition)

February 28th, 2019 No comments

Fresh Spring Vibes For Your Desktop (March 2019 Wallpapers Edition)

Fresh Spring Vibes For Your Desktop (March 2019 Wallpapers Edition)

Cosima Mielke

2019-02-28T10:05:48+01:002019-02-28T09:28:09+00:00

Spring is coming! With March just around the corner, nature is slowly but surely awakening from its winter sleep. And, well, even if spring seems far away in your part of the world, this month’s wallpaper selection is bound to at least get your ideas springing.

Just like every month since more than nine years already, artists and designers from across the globe got out their favorite tools and designed unique wallpapers to cater for some fresh inspiration on your desktop and mobile screens. The wallpapers come in versions with and without a calendar for March 2019 and can be downloaded for free. A big thank-you to everyone who submitted their designs! As a little bonus goodie, we also added some favorites from past years’ March editions at the end of this post. Now which one will make it to your screen?

Please note that:

  • All images can be clicked on and lead to the preview of the wallpaper,
  • You can feature your work in our magazine by taking part in our Desktop Wallpaper Calendar series. We are regularly looking for creative designers and artists to be featured on Smashing Magazine. Are you one of them?

Further Reading on SmashingMag:

Time To Wake Up

“Rays of sunlight had cracked into the bear’s cave. He slowly opened one eye and caught a glimpse of nature in blossom. Is it spring already? Oh, but he is so sleepy. He doesn’t want to wake up, not just yet. So he continues dreaming about those sweet sluggish days while everything around him is blooming.” — Designed by PopArt Studio from Serbia.

Queen Bee

“Spring is coming! Birds are singing, flowers are blooming, bees are flying… Enjoy this month!” — Designed by Melissa Bogemans from Belgium.

Queen Bee

Bunny O’Hare

“When I think of March I immediately think of St. Patrick’s Day and my Irish heritage… and then my head fills with pub music! I had fun putting a twist on this month’s calendar starring my pet rabbit. Erin go Braugh.” — Designed by Heather Ozee from the United States.

Bunny O'Hare

A Bite Of Spring

Designed by Ricardo Gimenes from Sweden.

A Bite Of Spring

Balance

“International Women’s Day on March 8th is the inspiration behind this artwork. Through this artwork, we wish a jovial, strong and successful year ahead for all women around the world.” — Designed by Sweans Technologies from London.

Balance

Stunning Beauty

“A recent vacation to the Philippines led me to Palawan, specifically El Nido, where I was in awe of the sunset. I wanted to emphasize the year in the typography as a reminder that, even though we are three months in, our resolutions are still fresh and new and waiting for us to exceed them! Photograph shot by @chrishernando, whose companionship and permission I am so grateful for.” — Designed by Mary Walker from the United States.

Stunning Beauty

Spring Time!

“Spring is here! Giraffes are starting to eat the green leaves.” — Designed by Veronica Valenzuela from Spain.

Spring Time!

Banished

“The legend of St. Patrick banishing snakes from Ireland.” — Designed by Caitey Kennedy from the United States.

Banished

Oldies But Goodies

In more than nine years running this community project, a lot of wallpaper gems have accumulated in our archives. Let’s take a look back and rediscover some March favorites from past years. Please note that these wallpapers don’t come with a calendar.

Let’s Get Outside

“Let’s get outside and seize the beginning of Spring. Who knows what adventures might await us there?” — Designed by Lívia Lénárt from Hungary.

Let's Get Outside!

The Unknown

“I made a connection, between the dark side and the unknown lighted and catchy area.” — Designed by Valentin Keleti from Romania.

The Unknown

Imagine

Designed by Romana Águia Soares from Portugal.

Imagine

Spring Bird

Designed by Nathalie Ouederni from France.

Spring Bird

Ballet

“A day, even a whole month aren’t enough to show how much a woman should be appreciated. Dear ladies, any day or month are yours if you decide so.” — Designed by Ana Masnikosa from Belgrade, Serbia.

Ballet

Wake Up!

“Early spring in March is for me the time when the snow melts, everything isn’t very colorful. This is what I wanted to show. Everything comes to life slowly, as this bear. Flowers are banal, so instead of a purple crocus we have a purple bird-harbinger.” — Designed by Marek Kedzierski from Poland.

Wake Up!

Spring Is Coming!

“Spring is the best part of the year! Nature breaking free and spring awakening is symbolic of our awakening.” — Designed by Silvia Bukovac from Croatia.

Spring Is Coming!

Spring Is Inevitable!

“Spring is round the corner. And very soon plants will grow on some other planets too. Let’s be happy about a new cycle of life.” — Designed by Igor Izhik from Canada.

Spring Is Inevitable!

Tune In To Spring!

Designed by Iquadart from Belarus.

Tune in to spring!

Wake Up!

“I am the kind of person that prefers cold but I do love spring since it’s the magical time when flowers and trees come back to life and fill the landscape with beautiful colors.” — Designed by Maria Keller from Mexico.

Wake up!

Let’s Spring!

“After some freezing months, it’s time to enjoy the sun and flowers. It’s party time, colours are coming, so let’s spring!” — Designed by Colorsfera from Spain.

Let's spring!

MARCHing Forward!

“If all you want is a little orange dinosaur MARCHing (okay, I think you get the pun) across your monitor, this wallpaper was made just for you! This little guy is my design buddy at the office and sits by (and sometimes on top of) my monitor. This is what happens when you have designer’s block and a DSLR.” — Designed by Paul Bupe Jr from Statesboro, GA.

MARCHing forward!

Waiting For Spring

“As days are getting longer again and the first few flowers start to bloom, we are all waiting for Spring to finally arrive.” Designed by Naioo from Germany.

Smashing Wallpaper - march 12

March Fusion

Designed by Rio Creativo from Poland.

Smashing Wallpaper - march 12

Daydream

“A daydream is a visionary fantasy, especially one of happy, pleasant thoughts, hopes or ambitions, imagined as coming to pass, and experienced while awake.” Designed by Bruna Suligoj from Croatia.

Smashing Wallpaper - march 11

Sweet March

“Digital collage, based on past and coming spring. The idea is to make it eternal or at least make it eternal in our computers! Hope you like it.” Designed by Soledad Martelletti from Argentina.

Smashing Wallpaper - march 11

Knowledge

“Exploring new worlds is much like exploring your own mind, creativity and knowledge. The only way to learn what’s really inside you is by trying something new. The illustration is my very own vision of the knowledge. It’s placed in some mysterious habitat. It’s a space where people learn from each other, find new talents and study their own limits.” — Designed by Julia Wójcik from Poland.

Knowledge

Join In Next Month!

Please note that we respect and carefully consider the ideas and motivation behind each and every artist’s work. This is why we give all artists the full freedom to explore their creativity and express emotions and experience throughout their works. This is also why the themes of the wallpapers weren’t anyhow influenced by us but rather designed from scratch by the artists themselves.

Thank you to all designers for their participation. Join in next month!

Categories: Others Tags:

7 Important Steps After Installing the WordPress Platform

February 28th, 2019 No comments
wordpress Platform

You’ve taken the first steps towards building your own website after installing WordPress, but you’re wondering what’s next?

(You can refer to the WordPress installation guide here)

Well, WordPress is an incredible content management system (CMS) – the most popular in the world – and it is quite easy to learn. But, after installing WordPress and seeing the blank screen of the new website, moving ahead may seem intimidating.

After all, there are tons of unique ways to bring a WordPress site through its many themes and plugins. Not to mention basic requirements such as general setup adjustments that allow data analysis, contact form creation, and other essential information on the website.

Wordpress Platform

Here’s a checklist at your fingertips covering the first 7 steps you should complete making your site run.

1. Enter the site information (Title, Time Zone, Profile)

Website Title and Slogan In the WordPress control panel (which will be accessible immediately after installation), navigate to Settings> General. Here you can enter the website name and a slogan. Many websites choose to use the slogan space to display a brand motto.

Time zone
While you are still in the General section, scroll down to adjust the date and time format you want to display on the website, and the time zone in which it operates.

Profile
Profiles are implemented in the WordPress theme, and if you are blogging, your profile can be represented alongside uploaded posts. It’s a good idea to fill this short section earlier in the process.

From the dashboard, navigate to Users> Personal Profile. From here you will be able to enter your user name, contact information, a short biography, and a profile picture.

2. Delete unwanted content (examples of articles and themes)

Wordpress Platform

• Deleting article and page examples
If you look at the Dashboard articles section, you will see content as a blog post called “Hello World”. You can remove unwanted posts by navigating to Articles > All Articles and selecting the Garbage option. In the same way, to remove unwanted pages, go to Pages> All Pages and choose the garage option.

• Deleting default themes
You will also find default themes included with the WordPress installation by default. While you are already removing excess content, it is possible to delete other unwanted themes to clear your navigation and save space.
To delete a theme from the dashboard, navigate to Layout> Themes, then select the delete option in the lower right corner of the unwanted theme.
Note: Active themes cannot be deleted. If you want to remove an active theme, you will need to disable it before deleting it as usual.

3. Choose a WordPress theme

Provided by WordPress or third-party developers, the WordPress theme will determine the look of your website. Free or paid themes are available in the WordPress thematic directory.

While you should choose a theme based on taste and budget, it is important to keep in mind that paid themes offer wider customization options, frequent updates, more careful assistance, and easier functionality.

Also, it is important to remember that each theme is coded and works differently, so make sure you look at the support documentation when you modify the theme or check the compatibility of the modules.

4. Install plugins

wordpress platform

Plugins are great because they extend the functionality of WordPress sites and are essential for most sites. This is because WordPress is packaged with everything that is needed for the sites itself, so additional site features such as a list of products and services, two-factor authentication, payment processing, and more are possible only by installing plugins.

5. Securing the site

The real trick in keeping your site safe is a good security practice.
Strong passwords, a hidden address of the administrator and making sure your site is up to date is all needed to protect your website.

WordPress security plug-ins are available to further enhance site protection by adding additional features, such as two-factor authentication password protection.

Two-factor authentication requires a second user-specific code that changes during authentication to make strong passwords.

In addition, to demonstrate that your site is safe for users, you will want to install an SSL certificate.
SSL certificates protect against external attempts to intercept registered users.

6. Link your site to Google Analytics

Making and developing a website is one thing, but ensuring that it works well and continues to do this is something else.

To monitor website statistics and plan stronger strategies for your site, you’ll want to link it to Google Analytics.

This will allow you to analyze traffic, user behavior, and other useful information to better understand the audience. Virtually all successful companies follow their operational data to influence managerial decisions, which means you can not afford to neglect your own data.

7. Create a backup

With the preliminary steps completed, you are almost ready to launch the website. But, before doing so, it is worth creating a backup reserve.
This last task may seem easy to ignore, but it could become the most important.

Imagine that after all your work and effort you have made a popular and profitable site. But then somebody manages to break it and suddenly everything that you have worked is gone and nothing has ever been there.

Having a website backup, it can be restored.

However, remember that WordPress does not come with a backup system, so you will need to manually backup.

Read More at 7 Important Steps After Installing the WordPress Platform

Categories: Designing, Others Tags:

WorldWideWeb

February 27th, 2019 No comments

For the 30th anniversary of the web, CERN brought nine web nerds together to recreate the very first web browser — Or a working replication of it anyway, as you use it from your web browser, inception style.

Well done, Mark Boulton, John Allsopp, Kimberly Blessing, Jeremy Keith, Remy Sharp, Craig Mod, Martin Akolo Chiteri, Angela Ricci, and Brian Suda! I love that it was written in React and the font is an actual replication of what was used back then. What a cool project.

They even opened-sourced the code.

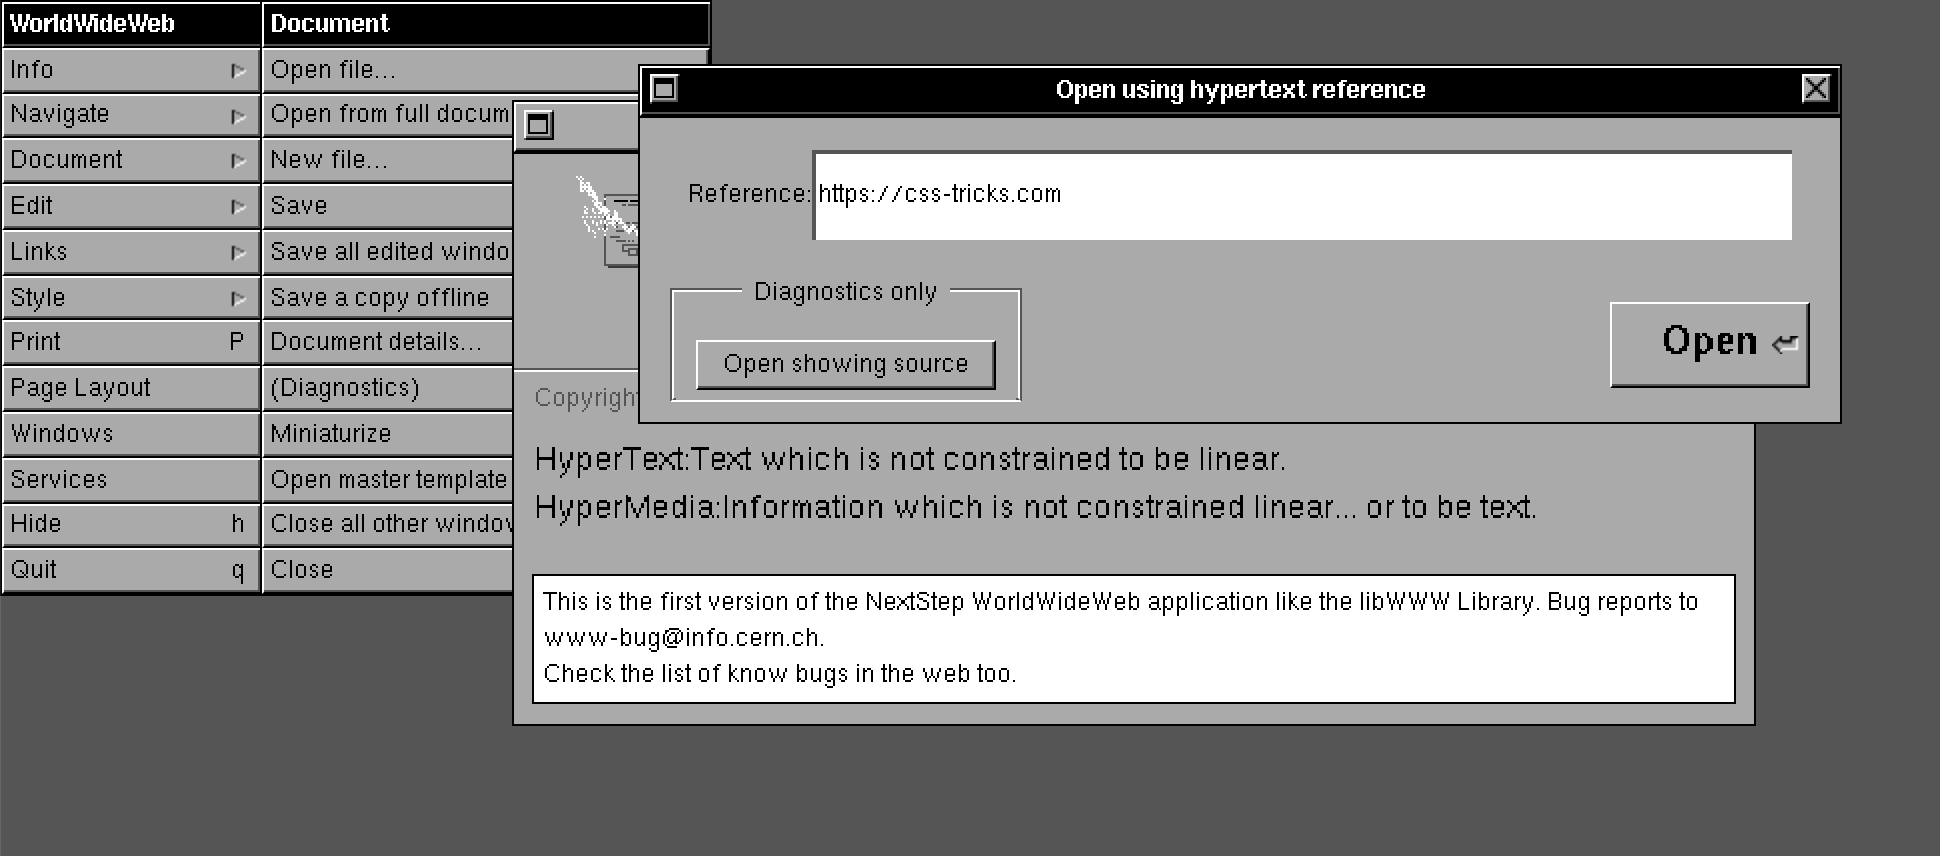
You can visit any site with Document > Open from full document reference:

CSS-Tricks ain’t too awful terrible, considering the strictness:

When this source code was written, there was no version number associated with HTML. Based on the source code, the following tags—the term ‘element’ was not yet used—were recognized:

  • ADDRESS
  • A
  • DL, DT, DD
  • H1, H2, H3, H4, H5, H6
  • HP1, HP2, HP3
  • ISINDEX
  • LI
  • LISTING
  • NEXTID
  • NODE
  • OL
  • PLAINTEXT
  • PRE
  • RESTOFFILE
  • TITLE
  • UL
  • XMP

Unrecognized tags were considered junk and ignored.

Direct Link to ArticlePermalink

The post WorldWideWeb appeared first on CSS-Tricks.

Categories: Designing, Others Tags:

Did you know that CSS Custom Properties can handle images too?

February 27th, 2019 No comments

So you might be aware of CSS Custom Properties that let you set a variable, such as a theme color, and then apply it to multiple classes like this:

:root {
  --theme: #777;
}

.alert {
  background: var(—-theme);
}

.button {
  background: var(—-theme);
}

Well, I had seen this pattern so often that I thought Custom Properties could only be used for color values like rgba or hex – although that’s certainly not the case! After a little bit of experimentation and sleuthing around, I realized that it’s possible to use Custom Properties to set image paths, too.

Here’s an example of that in action:

:root {
  --errorIcon: url(error.svg)
}

.alert {
  background-image: var(--errorIcon);
}

.form-error {
  background-image: var(--errorIcon);
}

Kinda neat, huh? I think this could be used to make an icon system where you could define a whole list of images in the :root and call it whenever you needed to. Or you could make it easier to theme certain classes based on their state or perhaps in a media query, as well. Remember, too, that custom properties can be overridden within an element:

:root {
  --alertIcon: url(alert-icon.svg)
}

.alert {
  background-image: var(--alertIcon);
}

.form-error {
  --alertIcon: url(alert-icon-error.svg)
  background-image: var(--alertIcon);
}

And, considering that custom properties are selectable in JavaScript, think about the possibilities of swapping out images as well. I reckon this might useful to know!

The post Did you know that CSS Custom Properties can handle images too? appeared first on CSS-Tricks.

Categories: Designing, Others Tags:

Text Wrapping & Inline Pseudo Elements

February 27th, 2019 No comments

I love posts like this. It’s just about adding a little icon to the end of certain links, but it ends up touching on a million things along the way. I think this is an example of why some people find front-end fun and some people rather dislike it.

Things involved:

  1. Cool [attribute] selectors that identify off-site links
  2. Deliberating on whether it’s OK to use additional HTML within links or not
  3. Usage of white-space
  4. Combining margin-left and padding-right to place icons into placeholder space
  5. Using custom properties to keep things easier
  6. Usage of inline SVG versus background SVG
  7. Considering inline versus inline-block
  8. Using masks

Direct Link to ArticlePermalink

The post Text Wrapping & Inline Pseudo Elements appeared first on CSS-Tricks.

Categories: Designing, Others Tags:

Control Icons with Font Size

February 27th, 2019 No comments

Here’s a nifty trick from Andy Bell that now seems a little obvious in hindsight: if you set an SVG to have a width and height of 1em then you can change the size of it with the font-size property.

Try and change the font-size on the body element below to see the icon scale with the text:

See the Pen
Font size controlled icon
by Andy Bell (@andybelldesign)
on CodePen.

You pretty much always want your icons to be aligned with text so this trick helps by creating that inherent relationship in your code. Pretty nifty, eh?

Direct Link to ArticlePermalink

The post Control Icons with Font Size appeared first on CSS-Tricks.

Categories: Designing, Others Tags: