It’s cool to see progressive enhancement being done even while using the fanciest of the fancy front-end technologies.
This is a button in a JSX React component that has a click handler applied directly to it that fires a data mutation Ajax request through Apollo GraphQL. That is about the least friendly environment for progressive enhancement I can imagine.
Hugo Giraudel writes that they do server-side rendering already, so the next tricky part is the click handler. Without JavaScript, the only mechanism we have for posting data is a , so that’s what they do. It submits to the /graphql endpoint with the data it needs to perform the mutation via hidden inputs, plus additional data on where to redirect upon success or failure.
Being mobile is incredibly important in today’s world. And since most of the work we do is digital, it’s better to have a laptop to take around with you so you can get the work done anywhere. If you are a video creator or an editor, you’ll probably need a powerful laptop, and powerful laptops are often quite heavy. You really need to think about where your priorities lie, and we’re going to help you choose the best laptop for video editing according to your needs.
With these super-speed laptops, non linear editing of the videos is easier than before, one can only imagine the cumbersome method of linear editing compared to editing using the best video editing laptops. The easiest way to describe the difference between linear and non linear editing is to know that, in non linear editing the editing can be done without destroying or harming the original footage. Also, the editing can be done from any part of the footage, without having to follow a linear process, hence the name, non linear editing.
Video content is quite important for businesses as well. 62% of the businesses use YouTube as a channel to post their content, and it’s only the second most popular platform for businesses to post videos on, the first one being Facebook.
90% of people discover new products or brands on YouTube according to Think With Google.
Now that we know how important video content is, we can move right on to choosing the best laptop for video editing.
Okay, this one is a given. 16-inch, 2019 MacBook Pro is quite powerful with Intel Core chip and AMD Radeon Pro 5300M or 5500M graphics card. The 16-inch display looks great, and it is not bulky either. It also has great speakers, so you’ll be in line with the sound as well. There is one downside though, it’s quite expensive with the $2399 to $2799 price range.
If you don’t want to throw your money around too much, Dell XPS 15 is a great choice. 9th Gen i9 chip, Nvidia GTX 1650 graphics card, 4K OLED Display. The only big problem with the Dell XPS used to be the webcam placement, and now they have fixed it by moving it from the bottom bezel to the top. It also only weighs 4.5 pounds, which makes it incredibly easy to carry around. It also comes with an extra SD slot.
Acer ConceptD line is a series of desktops and laptops specifically designed with designers and editors in mind. Acer ConceptD 7 has a 4K UHD display that covers 100% of the Adobe RGB, and it has the color accuracy of Delta E <2. We don't need to say that it is the perfect choice for color-grading. It also has the power of a gaming laptop without all the stuff that would be unnecessary for you if you are just looking for video editing. It has a Hexa-core Intel Core i7 processor and an Nvidia RTX 2080 graphics card. This device can handle Full HD and 4K processing.
With the optional OLED 4K display with a pixel density of 282 on the Razer Blade 15 looks amazing. It has an Nvidia RTX 2080 graphics card, which is capable of handling even the most demanding projects, on top of that it has a hexa-core Intel Core i7 processor and many different ports. It delivers great performance with an ultra-sharp display. The thing is, it’s quite expensive.
Huawei Matebook X Pro is a great and cheaper Macbook alternative. It comes equipped with a 3K LTPS display, an 8th generation i7 processor. The screen is 13’9 inch, so the MX250 is the graphics card we get. But don’t worry, it can handle light to moderate video editing works. It’s incredibly portable, it actually feels like a Macbook Air rather than a Macbook Pro in terms of weight. And if you happen to need a beefier graphics card, you can use the Thunderbolt 3 port to supplement the laptop with an external graphics card.
Graphics: Intel HD Graphics + optional Nvidia graphics up to GTX 1060
RAM: 16GB
Screen: 15.4-inch, 3240 x 2160 IPS
Storage: 256GB – 1TB SSD
SD card reader: Yes
Thunderbolt 3: No
Microsoft Surface Book 2 is an incredibly powerful 2-in-1 laptop. We understand that 2-in-1s would not be your go-to choice when it comes to video editing, but the Surface Book 2 has powerful enough components to handle video editing if you buy the model with the dedicated graphics card. It also has a great battery life and it’s light, so it’s great if you want to be more mobile. Again, the only downside is it’s pricey.
Lenovo Legion Y7000 is a great budget video editing laptop. It comes with an Nvidia GTX 1650 graphics card, 9th Gen Core i7 processor and a decent looking 15.6 IPS 1080p display. It’s a gaming laptop, but battery life isn’t too bad either.
Finally, another affordable choice. Acer’s Helios is a gaming laptop with Nvidia RTX 2070 graphics card and Hexa-core Intel Core i7 CPU. When you need to amp up the power, you can use the Turbo button that most of the gaming laptop has the increase the laptop’s performance by overclocking, and also there’s granular controlling over the fan so you don’t need to worry about extreme noise or your laptop overheating. It also supports up to 1TB SSD plus a 2TB HDD, so if you are working on 4K, it might become quite handy.
This list is our expert opinion when it comes to selecting the best laptop for video editing. Check all of them out and make a decision based on your needs and your budget, we hope that our list for the best laptop for video editing will help you find the best laptop for the price/performance ratio.
Feel free to add your suggestions to the comment section!
Outsourcing processes and projects have been a widely accepted business model over the past few years.
European companies that hire a Ukrainian development team for their development projects, or BPO companies outstaffing their offices and processes to countries on the other side of the world has been widespread. Despite its apparent popularity, outsourcing is not a simple undertaking. Various approaches have cropped up and been improved over the years. While considerations have gone beyond deciding whether hiring software developers in Ukraine or India is cheaper, and has expanded towards HIPAA compliance for global data privacy policies and cost-efficiency of various outsourcing methods.
What Does it Mean to Hire Nearshore Developers?
Outsourcing opportunities has been highly debated over the years, outsourcing vs outstaffing methods especially. But a more potent but misunderstood outsourcing approach is Nearshoring. Nearshore outsourcing is where you outsource to companies in geographically close areas, not exactly within the immediate area but those that are adjacent.
6 Myths About Nearshore Development Services
Outsourcing services can only be availed by large organizations
Most assume that large companies or organizations are the only ones that can afford to employ outsourcing services, much less employ nearshore services, given the effort and costs required to maintain such services. This is misleading. There is a wide breadth of outsourcing and nearshoring skills, experience, and services that can be employed by different organizations, businesses, and individuals. Businesses of all sizes can achieve the numerous benefits of this business approach. Enhancing organizational and operational flexibility and efficiency bring the most attractive benefits. Employing nearshoring services and teams greatly depend on the scope and limitations of your business needs and not its size.
Hidden costs inflate outsourcing services prices
Cost is an essential consideration in any form of recruitment, more so with employing outsourcing services. Businesses and organizations can save cost in certain areas by outsourcing projects or processes, but can also accrue new costs. Outsourcing requires to focus on communication, collaboration, and project and time management. These aspects can be costly if not managed well. Take an easter European IT company. It would be more cost-effective to hire a development team Ukraine-based or closer in proximity than hiring development teams in Asia or South America. Nearshore development services reduce costs considerably. The proximity alone ensures that there are more options for more manageable and cost-efficient communication and collaboration tools and processes. Handling outsourced projects and processes to nearshore development teams can be more sustainable in the long run.
Language and cultural barriers get in the way of communication
When working with outsourcing and nearshore teams and experts, there is a high probability of some level of cultural and language barrier that needs to be addressed. Cultural barriers can come in the form of different ways of approaching a problem or a process, as well as the difference in work ethics. Language barriers can hinder progress and cause delays in the project. There are ways of overcoming these obstacles. One of the easiest paths is to employ nearshore services instead. Nearshore services ensure that the experts and development teals that the company hires are geographically closer, and would have close to or similar language and culture. This leads to smoother communication and working relationships between the parties, and more efficient projects.
Varied and conflicting time-zones hinder project progress
There is a high probability of some level of cultural and language barrier that needs to be addressed when working with outsourcing and nearshore teams and experts. Cultural barriers can come in the form of different ways of approaching a problem or a process or work ethics. Language barriers can also hinder progress and cause delays in the project. There are ways of overcoming these obstacles. One of the easiest paths is to employ nearshore services instead. Nearshore services ensure that the experts and development teams hired are geographically closer. This proximity ensures similar language and culture. This leads to smoother communication and working relationships between the parties, and more efficient projects.
Limited experts available
Outsourcing projects globally gives businesses and organizations access to a global pool of experts and developers. This opens up the range of skills and experience that can be hired. This approach is more than just a rent a coder endeavor, it is a recruiting at an international level. In the case of having limited local expertise, one of the main benefits of widening recruitment to a global scale is to have more diversity in expertise and experience in potential development teams. In contrast, hiring nearshore development teams can be misconstrued as accessing a more limited pool of expertise. Nearshoring offers the same level of potential for recruitment diversity, but much closer proximity and better cost-effectiveness.
Outsourcing = Low Quality
Widening recruitment to a global scale can attract diverse kinds of skills, experiences, and expertise. Most people might misconstrue this as having low-quality development teams or work. Having diversity in the development teams or services for projects is beneficial in that this can introduce innovation and a wider perspective that would enhance the quality of projects and services. Quality of work is not only dependent on the skills of the development team but also its management and selection of services to employ. This is also applicable to hiring nearshore development teams. Companies and organizations still have that global access, but concentrated in nearby areas, which is more manageable and efficient.
Go and Hire a Nearshore Development Team!
Despite its popularity, outsourcing services and those that provide them still get the occasionalbad rep, mostly through bad research and misconceptions. But when approached and implemented right, the benefits can greatly enhance processes and provides more efficient and cost-effective solutions for businesses and organizations. Nearshore development services is a great way to either start on your outsourcing services journey or maintain a more cost-efficient outsourcing collaboration with all the outsourcing benefits. Nearshore software development European companies employing nearshoring Eastern European companies and service providers have shown great progress and results, such as companies hiring software developers in Ukraine and Romania. Nearshore development services provide both cost-effective project and operational management options along with the benefits of outsourcing to global services.
Our goal is not to build a platform; it’s to be cross all of them.
— Mark Zuckerberg
CSCS (Customized Scripting in C#) is an open-source scripting language implemented in C#. Syntactically it’s very similar to JavaScript, but it also has some similarities with Python. Some of these similarities are the keywords in the well-known if…elif…else construct, and also have the same variable scope definition as in Python (e.g. a variable defined inside of an if block or inside a loop will be also visible outside).
As opposed to JavaScript and Python, variables and functions in CSCS are case-insensitive. The primary goal of CSCS is to let the developer write as little code as possible. Also, the same code is used for both iOS and Android development. Additionally, CSCS can be used for Windows, Mac, and Unity development.
Note: You can read more about how Microsoft uses CSCS in their Maquette product (based on Unity) over here.
CSCS can be added to your project by embedding its C# source code into a Visual Studio Xamarin project. Unlike most other languages, you have full ownership of the CSCS source code and can easily add or modify its functionality. I’ll be sharing an example of this later on in the article.
Also, we are going to learn how to get started with CSCS and use some more advanced features that have been covered in other articles. Among these features, we are going to access a Web Service via Web Requests with JSON string parsing, and we’ll also be using SQLite on iOS and Android.
The easiest way to get started is to download a sample of a project using CSCS and start playing with the start.cscs file. This is what we’ll be doing in the next section: creating an iOS/Android app with basic GUI and events.
“Hello, World!” In CSCS
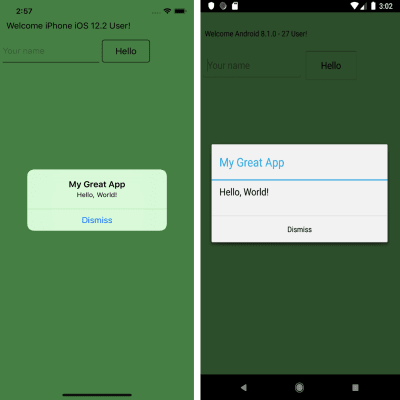
Let’s start with a relatively simple example of CSCS code that constructs a screen with a few widgets:
The image below shows the resulting user interface on an iPhone as well as an Android device after clicking on the “Hello” button and not typing anything in the “Text Edit” field:
“Hello, World!” on iPhone (left) and Android (right) (Large preview)
Let’s briefly go over the code above. It starts with the AutoScale() function call, and what that does is to tell the parser that the widget sizes are relative to the screen size, i.e. they will be auto-resized (the widget will look bigger on bigger screens and smaller on smaller screens). This setting could be also overridden per widget.
Note that there is no need to create a special handler on a button click. If you define a function with name widgetName_click(), it will be used as a handler when the user clicks on a widget called widgetName (it doesn’t have to be a button, it can actually be any widget). That’s why the function buttonHi_click() will be triggered as soon as the user clicks on the button.
You may have noticed that the GUI is constructed completely in code. This is done by supplying a relative widget location when adding it. The general format of a location command is the following:
The widget width and height will be relative to the screen size if the AutoScale() CSCS command was previously run. Also, the initial value (in case of a button) is the text shown on it. This can be changed anytime by invoking SetText(widgetName, newText).
Using Visual Studio Code To Debug CSCS
We can also use Visual Studio Code to debug CSCS scripts. If you want to develop apps for both Android and iOS, you need to use a Mac. After installing Visual Studio Code, install the CSCS Debugger and REPL extension.
In order to use the extension, add this line of code anywhere in your start.cscs CSCS script:
StartDebugger();
The following image below shows how you can use Visual Studio Code to debug and change the functionality of the “Hello, World!” app that we developed in the previous section. In the upcoming example, we’ll be adding a label and a button on the fly to the existing layout.
To do this, we just select the code to be executed by the parser and press Ctrl + 8. As a result, a label and a button will be added at the center of the screen. We also add a button handler that will update the new label with the current time on each button click.
Changing Layout on the fly with Visual Studio Code (Large preview)
Using SQLite In CSCS
SQLite is an ACID (Atomicity, Consistency, Isolation, Durability) type of a relational database, and was developed by Richard Hipp (the first version was released in 2000). In difference to other relational databases, like Microsoft SQL Server or Oracle Database, it’s embedded. (Embedded not only into the device, but also into the end program.) It’s included in the program as a very compact library, which is less than 500 KB in size. But two apps (released by the same developer) can read the same SQLite DB if the DB file path is known to both apps.
The advantage of SQLite is that it can be used without an extra installation on an iOS or an Android device. The disadvantage is that it obviously cannot hold as much data as a “normal” DB and also that it’s weakly typed (i.e. you can insert a string instead of an integer — it will then be converted to an integer or 0 on failure). On the other hand, the latter can be also seen as an advantage as well.
SQLite can be easily used from CSCS without extra import statements. Here’s a table that will help you get an overview of the main SQLite functions used in CSCS:
Command
Description
SQLInit(DBName)
Initializes a database or sets a database to be used with consequent DB statements.
SQLDBExists(DBName)
Checks whether the DB has been initialized. Also sets the database to be used with consequent DB statements.
SQLQuery(query)
Executes an SQL query (a select statement). Returns a table with records.
SQLNonQuery(nonQuery)
Executes an SQL non-query, e.g. an update, create or delete statement. Returns number of records affected.
SQLInsert(tableName, columnList, data)
Inserts passed table of data of records to the specified DB table. The columnList argument has the following structure: colName1,colName2,…,colNameN
Table 1: SQLite commands in CSCS
This is how the SQLInit() and SQLDBExists() functions are typically used:
DBName = "myDB.db1";

if (!SQLDBExists(DBName)) {
  create = "CREATE TABLE [Data] (Symbol ntext, Low real,
    High real, Close real, Volume real,
    Stamp text DEFAULT CURRENT_TIMESTAMP)";
  SQLNonQuery(create);
}


SQLInit(DBName);
We are going to see more examples of how you can select and insert data into an SQLite database later on. I’ll show you an example of how to write stock data that has been extracted from a Web Service into a local SQLite database.
Adding Custom Functionality To CSCS
In this section, we are going to see how you can extend the CSCS functionality. As an example, we are going to see the existing implementation of the CSCS Sleep function below.
To add custom functionality, all you need to do is create a new class by deriving from the ParserFunction class, overriding its Evaluate() method, and registering this class with the parser. Here’s a short version (without error checking):
class SleepFunction : ParserFunction
{
  protected override Variable Evaluate(ParsingScript script)
  {
    List  args = script.GetFunctionArgs();
    int sleepms = Utils.GetSafeInt(args, 0);
    Thread.Sleep(sleepms);

    return Variable.EmptyInstance;
  }
}
Registration of a class with the parser can be done anywhere in the initialization stage via the following command:
ParserFunction.RegisterFunction("Sleep", new SleepFunction());
That’s it! Now the Evaluate() method of the SleepFunction class will be invoked as soon as a “Sleep” token is extracted by the parser.
Note that CSCS is case insensitive (except the core control flow statements: if, elif, else, for, while, function, include, new, class, return, try, throw, catch, break, continue). This means that you can type either “sleep(100)” or “Sleep(100)” — both calls will suspend the executing thread for 100 milliseconds.
Processing JSON In CSCS
JSON (JavaScript Object Notation) is a lightweight data interchange format, consisting of attribute-value pairs and array-type pairs. It was developed by Douglas Crockford in the early 2000s (around same time when SQLite appeared as well).
In this section, we are going to learn how to parse JSON using CSCS.
The CSCS function to parse a JSON string is GetVariableFromJSON(jsonText). This function returns a hash table in which the keys are the attributes from the JSON string.
In the next section, we are going to see another example of parsing a JSON string from a Web Service.
An Example Of An App With SQLite, Web Requests And JSON
For an app using SQLite, a Web Service and JSON parsing, we are going to use Alpha Vantage Web Service. You can get an API Key for free but the free version allows accessing their web service no more than 5 times per minute.
Using Alpha Vantage, you can extract various financial data sets — including stock prices. This is what we are going to do in our sample app.
The image below shows how the Stocks apps looks on an iOS and on an Android device.
Extracting Stocks from Alpha Vantage Web Service on iOS (left) and Android (right) (Large preview)
The last two parameters are functions to invoke on completion of the web request. For example, in case of a failure, the following CSCS function will be called:
function OnFailure(object, errorCode, text)
{
  SetText(labelError, text);
  lockGui(false);
}
As a result, the user will get an error message as shown below:
But, if all is good, we are going to parse the JSON string and insert its contents into the SQLite DB.
function OnSuccess(object, errorCode, text)
{
  jsonFromText  = GetVariableFromJSON(text);
  metaData      = jsonFromText[0];
  result        = jsonFromText[1];

  symbol        = metaData["2. Symbol"];
  lastRefreshed = metaData["3. Last Refreshed"];
  allDates      = result.keys;

  dateData   = result[allDates[0]];
  high       = Round(dateData["2. high"],  2);
  low        = Round(dateData["3. low"],   2);
  close      = Round(dateData["4. close"], 2);
  volume     = dateData["5. volume"];
  stockData  = {symbol, low, high, close, volume};
  SQLInsert("Data","Symbol,Low,High,Close,Volume",stockData);

  if (++loadedStocks >= totalStocks) {
    getDataFromDB();
  } else {
    getData(stocks[loadedStocks]);
  }
}
In order to understand how we access different fields in the hash table above, let’s take a look at the actual string received from the Alpha Vantage web request:
As you can see, we get the latest date as the first element of the allDates array that consists all of the extracted dates.
Conclusion
Adding CSCS to your project is easy. All you need to do is simply embed the source code of CSCS as a module to your project — just like it’s done in a sample Xamarin project.
Do you use and extend CSCS scripting language in your projects? Leave a comment below — I’d be happy to hear from you!
Further Reading
If you want to explore the CSCS language a bit more, here are some of the articles I’ve written about on the topic:
Mobile app testing has been evolving rapidly over the years. Every now and then an automation testing tool gets released in the market. Technologies like DevOps and CI/CD are not only being used in Mobile App Development but also leveraged in testing.
There are so many mobile app testing cloud platforms wherein multiple devices are tested together. Now AI is a game-changer technology in mobile app testing which will further speed up the process of testing with accurate results.
Now let us see how AI can be leveraged in Mobile Application Testing.
AI enhances DevOps
DevOps speeds up the process of Automation testing by providing continuous feedback so that the bugs can be rectified at the earliest. The feedback data is retrieved with the help of monitoring tools. The monitoring tools use machine learning to analyse the issue and make suggestions. Similarly, teams can make use of multiple monitoring tools and then use machine learning to analyse and derive a single output data for better results.
AI increases the Speed of Automation
Functional Testing test suits are very lengthy, if a requirement of a very small change in the application pops up then you need to run the entire test suite. Already a lot of data is being generated if you are doing continuous integration. But it will take a lot of time to go through the data and search for common patterns. In such cases, machine learning can be utilized to identify common points. This will help you in knowing what is the minimum number of test cases required to make a small change in the application.
AI in Manual Testing
Manual Testing is the still most imperative part of testing. Non-functional and UI testing requires manual testers. Their efforts can be improved by AI testing which can add value by auto-exploring apps on real devices to make sure all the existing functionality and user flow works as expected. QA teams can use these AI testing tools to supplement their normal testing efforts, helping these teams get the best test coverage in limited time and with greater accuracy.
AI Testing Bot
One of the benchmarks which was set in the field of mobile app automation testing in 2019 was the introduction of AI Test Bots. So most of the AI testing tools emerging in the market leverage AI testing bots to help them with software testing. Basically what an AI Testing bot does is that it runs a quick health checkup of the mobile app and reports the result back to you. The conclusion you can find out from the report is that the bot has visited the most common paths in the app to see if there are any issues.
So more or less all the AI testing platforms use AI testing bots for finding the defect prone or low performing areas of the app and to perform automation testing.
One of the most efficient and reliable AI-powered bot testing engines is “Certifaya” from pCloudy. You just need to upload your application and sit back and relax. The steps are, first, you need to upload the application, provide the credentials if required and the last step is to submit the run. Once the run is complete, you will get the detailed health checkup of your app in the form of a report. You can make the report link public to share the report with others.
Once the report is ready you can analyze the result. You will find five main tabs in the report screen. Summary, Crash Test, Exploratory Bot Test, Crowd-Sourced test and Security.
Let’s explore each tab of Certifaya one by one
Summary: Summary tab gives you a high-level health check-up information about your app. This includes information about your CPU, memory, battery, network, and App performance score. You can see the app performance score for every device under which the run was conducted. Also, on the right-hand side of the screen, you will find the App info which provides the basic feature information about the device.
Insights: You can also see important insights and recommendations about the application under test. For example, if your app does not perform well on any of the selected devices then you will get to know this from Insights. Information like high memory consumption, version incompatibility information are provided in Insights. For example, You are missing around 9.5% of the world’s android users who are below the version 4.4, this recommendation clearly gives the information that the application under testing cannot be run on mobile versions less than 4.4.
Crash Test: Here the bot performs the monkey test of the app on all devices. Monkey testing is a technique in software testing where the user tests the application by providing random inputs and checking the behaviour (or try to crash the application). Mostly this technique is done automatically where the user enters any random invalid inputs and checks the behaviour. Also for this test, you get the detailed parameter of the device like the OS version, model no., manufacturer, screen resolution, etc. If you drill down further you will find the CPU and memory analysis etc. You can find the screenshot results of all the devices and can also download the crash log reports.
Exploratory Bot Test :
Here you can perform the manual test of all the devices under test.
Conclusion:
The speed with quality is what every brand wants to achieve in Mobile application testing and this revolution can be brought by non-other but next-generation technology called AI. It is going to be used for test suite optimization, it can be a great contributor in predictive analysis of the test cases, it can be responsible to perform log analytics, it can be used to identify the risk areas of the mobile application in order to prioritize regression testing. AI test bots are used to run a quick health checkup of the mobile app under test. So these are the few areas where AI is being actively leveraged for Mobile app testing. AI has abundant potential to spread its magic over mobile app testing world to speed up the complete process with the superior quality of the app.
We are currently looking for dynamic self-starting Experience Designers with a strong background in Ethnographic Design Research, ability to facilitate Design Thinking workshops and a strong portfolio with commercial work.
Experience Designer or Senior Experience Designer
Background in design from any discipline. Degree or diploma accepted.
At least 2+ years of relevant experience.
Possesses a strong portfolio of commercial projects underpinned by ethnographic research.
A competent Design Thinker with experience in facilitating workshops.
Exhibits a good command of technical design skills such as sketching, illustration, 3D CAD (optional), etc. in any combination.
Please send an introduction of yourself via our contact page. Links to an online CV and/or online portfolio are highly recommended. Only shortlisted candidates will be notified by email.
Unfortunately due to local employment laws, we can only accept applications from Singaporeans and PRs. This role is based in Singapore.
We are currently looking for dynamic self-starting Experience Designers with a strong background in Ethnographic Design Research, ability to facilitate Design Thinking workshops and a strong portfolio with commercial work.
Experience Designer or Senior Experience Designer
– Background in design from any discipline. Degree or diploma accepted.
– At least 2+ years of relevant experience.
– Possesses a strong portfolio of commercial projects underpinned by ethnographic research.
– A competent Design Thinker with experience in facilitating workshops.
– Exhibits a good command of technical design skills such as sketching, illustration, 3D CAD (optional), etc. in any combination.
– Please send an introduction of yourself via our contact page. Links to an online CV and/or online portfolio are highly recommended. Only shortlisted candidates will be notified by email.
– Unfortunately due to local employment laws, we can only accept applications from Singaporeans and PRs. This role is based in Singapore.
If you are familiar with SVG and CSS animations and started to work with them often, here are some ideas you might want to keep in mind before jumping into the job. This article will be about learning how to build and optimize your code with element, CSS Variables and CSS animations.
If you are a developer that likes to keep your code DRY or a big fan of Sass/CSS variables, there is a good chance that you will like this tag.
Let’s say you have an element that is repeated many times in your graphic. Instead of having a complex part of your code repeated many times in your SVG, you can define this part once and then clone it somewhere else in your document with the element. This will not only reduce an enormous amount of code, but also will make your markup simpler and easier to manipulate.
To start implementing the element, go to your SVG and follow this steps:
Identify the part of the code that you want to clone
Add an ID to that part
Link it inside your tag like this:
That’s it! Your new clone is ready, now you can change its attributes (e.g. x and y position) to fit your needs.
Let’s dive into a very convenient example
I want to share this real case where I needed to animate a big cube made of little cube units. (Imagine the classic Rubik’s Cube.)
We’ll start by drawing the cube unit in SVG using basic shapes and transforms:
Note that the shapes are grouped in a element so we can add the ID to the whole figure.
Next, let’s build a bigger cube cloning this unit. First, we need to wrap the cube from the previous example inside the tag inside the SVG. In the element we can put whatever we want to reuse, which could be a single shape, a group, a gradient.. almost any SVG element. They won’t render anywhere unless we use them outside this tag.
Then we can link the unit as many times as we want using its ID and change the x and y position on every clone like this:
Now we have to position every cube remembering that the last element will appear at the front, after that we’ll have our first big cube ready!
xlink:href is deprecated since SVG2, but is better to use it for compatibility purposes. In modern browsers you can just use href but I tested it on Safari and at the time of writing is not working there. If you use xlink:href make sure you include this namespace in your SVG tag: xmlns:xlink="http://www.w3.org/1999/xlink" (you won’t need it if you decide to use href).
Part 2: Using CSS variables to apply different styles to your reused graphic
I chose a main color for the cube, which is a lighter and a darker shade for the sides and a stroke color. But what if we want to make a second cube a different color?
We can replace the fills and strokes with CSS variables to make these attributes more flexible. That way, we’ll be able to reuse the same cube unit with another palette (instead of defining a second unit with different colors for a second cube).
Why not add a class to the new cube and change the fill color with CSS? We’ll do that, but first, try to inspect a element. You’ll notice it renders in the Shadow DOM. which means it is not vulnerable to scripts and styles, like elements in the normal DOM. Whatever values you define in the figure inside will be inherited by all its instances and you won’t be able to rewrite those with CSS. But if you replace those values with variables, then you’ll be able to control them in CSS.
In our cube unit, we’ll go through each side and replace the fill and stroke values with semantic variable names.
From here, we must duplicate the SVG to build a second cube. However, we don’t need to duplicate if we are keeping both in the same document. We can add a class to each SVG and control the color palette through CSS, redefining the values of the variable.
Let’s create a palette for the blue cube and another one for the pink cube:
This way, we can add as many cubes as we want and change all colors from one place.
Part 3: Reusing animations
The idea for this instance is to break the cubes on hover — something like an exploded view so some pieces will move away from the center when we place the cursor over the cubes.
CodePen Embed Fallback
Let’s start by defining two movements, one for each axis: move Y and move X. By dividing the animations in movements, we’ll be able to reuse them in every cube. The animations will consist of moving the cube from its initial position to 30px or 50px away in one direction. We can use a transform translate (X or Y ) to achieve that. For example:
@keyframes moveX {
  to { transform: translateX(-35px);  }
}
But if we want to be able to reuse this animation, it’s better to replace the numeric value with a variable, like this:
@keyframes moveX {
  to { transform: translateX(var(--translate, 35px)); }
}
If the variable is not defined, the default value will be 35px.
Now we need at least one class to bind to the animation. In this case, though, we need two classes to move cubes in the x-axis: .m-left and .m-right.
For the cube to move left, we need a negative value, but we can also declare a different number. We can define our variable like this inside the .m-left class:
.m-left { --translate: -50px; }
What’s happening here is we’re declaring that, when we add the class .m-left to one element, this will play the animation moveX (the one defined in the @keyframes) which will last two seconds to translate in the x-axis and reach a new position that is -50px left. Then, the animation alternates directions so that it moves from the last position and take two more seconds to go to its original state. And so on, because it’s an infinite loop.
We can declare another variable to the .m-right class but if we don’t, remember that it will take the 35px we declared at the beginning.
The default animation-play-state value is running but maybe we don’t want the cubes to move all the time. It would be very distracting and annoying to use on a site with some nearby content. So, let’s try to play the animation only on hover by adding this:
You can try it by yourself and will find that the animation is jumping super fast to the initial state every time we place the cursor out of the cube. To avoid it, we can add the value paused at the end of the animation shorthand:
Now the animation is paused but will be running on hover by adding this line of CSS:
svg:hover * {
  animation-play-state: running;
}
We can apply each class to different elements in the SVG. In the first blue cube, we are moving single cubes; in the second one, we’re applying those classes to groups of cubes.
One last thing…
It wasn’t until later that I realized I could reuse a single unit to build them all. I worked on the small cube to make it isometric enough so it could align easily with the other ones next to it. At this point, my unit was a , but I decided to replace it with SVG shapes to reduce the code and get cleaner markup.
I learned that it is better to take some time to analyze what can be done with SVG before drawing every single shape and dealing with a huge amount of code. It might take more time at the beginning, but will save you a lot of time and effort in the long run.
Here’s some legit CSS trickery from yuanchuan. There is this CSS property offset-path. Once upon a time, it was called motion-path and then it was renamed. I sort of rolled my eyes at the time, because the property is so obviously for animating things along a path. But you don’t have to use it for animation, hence the rename, and this example proves it!
The thing with setting elements on a path though, is that the whole element is plopped on that path. So if that element is, say, Chris, that entire word is placed at a single point on the path. yuanchuan’s trick is to break the string into letters-as-spans, then place each span along the path (with a different offset-distance).
There is a top-of-circle path applied to each span:
And it’s not just for letters! It’s good for all sorts of stuff!
CodePen Embed Fallback
Related notes:
This is way cleaner than an old method we blogged where each span had to use transform: rotate() with a common transform-origin point set down away from the letter itself.
SVG handles this without any hackery. (This isn’t totally a hack, but since you have to split into spans, you at least need to aria-label the parent, which then makes it feel hackier.)
Nitpick (I’m the worst): Don’t just make up HTML tags like this demo Pen on non-demo sites that people need to use.