Every day design fans submit incredible industry stories to our sister-site, Webdesigner News. Our colleagues sift through it, selecting the very best stories from the design, UX, tech, and development worlds and posting them live on the site.
The best way to keep up with the most important stories for web professionals is to subscribe to Webdesigner News or check out the site regularly. However, in case you missed a day this week, here’s a handy compilation of the top curated stories from the last seven days. Enjoy!”
In my last article we saw how CSS background properties allow us to create cool hover effects. This time, we will focus on the CSS text-shadow property to explore even more interesting hovers. You are probably wondering how adding shadow to text can possibly give us a cool effect, but here’s the catch: we’re not actually going to make any shadows for these text hover effects.
text-shadow but no text shadows?
Let me clear the confusion by showing the hover effects we are going to build in the following demo:
CodePen Embed Fallback
Without looking at the code many of you will, intuitively, think that for each hover effect we are duplicating the text and then independently animating them. Now, if you check the code you will see that none of the text is actually duplicated in the HTML. And did you notice that there is no use of content: "text" in the CSS?
The text layers are completely made with text-shadow!
The first thing to notice is that I am making the color of the actual text transparent (using #0000) in order to hide it. After that, I am using text-shadow to create two shadows where I am defining only two length values for each one. That means there’s no blur radius, making for a sharp, crisp shadow that effectively produces a copy of the text with the specified color.
That’s why I was able to claim in the introduction that there are no shadows in here. What we’re doing is less of a “classic” shadow than it is a simple way to duplicate the text.
We have two text layers that we move on hover. If we hide the overflow, then the duplicated text is out of view and the movement makes it appear as though the actual text is being replaced by other text. This is the main trick that that makes all of the examples in this article work.
Let’s optimize our code. I am using the value 1.2em a lot to define the height and the offset of the shadows, making it an ideal candidate for a CSS custom property (which we’re calling --h):
We can still go further and apply more calc()-ulations to streamline things to where we only use the text-shadow once. (We did the same in the previous article.)
In case you are wondering why I am adding an underscore to the --_t variable, it’s just a naming convention I am using to distinguish between the variables we use to control the effect that the user can update (like --h) and the internal variables that are only used for optimization purposes that we don’t need to change (like --_t ). In other words, the underscore is part of the variable name and has no special meaning.
We can also update the code to get the opposite effect where the duplicated text slides in from the top instead:
CodePen Embed Fallback
All we did is a small update to the text-shadow property — we didn’t touch anything else!
Hover effect #2
CodePen Embed Fallback
For this one, we will animate two properties: text-shadow and background. Concerning the text-shadow, we still have two layers like the previous example, but this time we will move only one of them while making the color of the other one transparent during the swap.
On hover, we move the white text layer to the top while changing the color of the other one to transparent. To this, we add a background-size animation applied to a gradient:
CodePen Embed Fallback
And finally, we add overflow: hidden to keep the animation only visible inside the element’s boundaries:
What we’ve done here is combine the CSS text-shadow and background properties to create a cool hover effect. Plus, we were able to use CSS variables to optimize the code.
If the background syntax looks strange to you, I highly recommend reading my previous article. The next hover effect also relies on an animation I detailed in that article. Unless you are comfortable with CSS background trickery, I’d suggest reading that article before continuing this one for more context.
In the previous article, you show us how to use only one variable to create the hover effect — is it possible to do that here?
Yes, absolutely! We can indeed use that same DRY switching technique so that we’re only working with a single CSS custom property that merely switches values on hover:
This hover effect is nothing but a combination of two effects we’ve already made: the secondhover effect of the previous article and the first hover effect in this article.
.hover-3 {
  /* the color  */
  --c: #1095c1;
  /* the height */
  --h: 1.2em;

  /* The first hover effect in this article */
  line-height: var(--h);
  color: #0000;
  overflow: hidden;
  text-shadow:
    0 calc(-1 * var(--_t, 0em)) var(--c),
    0 calc(var(--h) - var(--_t, 0em)) #fff;
  /* The second hover effect from the previous article */
  background:
    linear-gradient(var(--c) 0 0) no-repeat
    calc(200% - var(--_p, 0%)) 100% / 200% var(--_p, .08em);
  transition: .3s var(--_s, 0s), background-position .3s calc(.3s - var(--_s, 0s));
}
.hover-3:hover {
  --_t: var(--h);
  --_p: 100%;
  --_s: .3s
}
All I did was copy and paste the effects from those other examples and make minor adjustments to the variable names. They make for a neat hover effect when they’re combined! At first glance, such an effect may look complex and difficult but, in the end, it’s merely two relatively easy effects made into one.
Optimizing the code with the DRY switching variable technique should also be an easy task if we consider the previous optimizations we’ve already done:
This hover effect is an improvement of the second one. First, let’s introduce a clip-path animation to reveal one of the text layers before it moves:
CodePen Embed Fallback
Here’s another illustration to better understand what is happening:
Initially, we use inset(0 0 0 0) which is similar to overflow: hidden in that all we see is the actual text. On hover, we update the the third value (which represent the bottom offset) using a negative value equal to the height to reveal the text layer placed at the bottom.
From there, we can add this to the second hover effect we made in this article, and this is what we get:
CodePen Embed Fallback
We are getting closer! Note that we need to first run the clip-path animation and then everything else. For this reason, we can add a delay to all of the properties on hover, except clip-path:
transition: 0.4s 0.4s, clip-path 0.4s;
And on mouse out, we do the opposite:
transition: 0.4s, clip-path 0.4s 0.4s;
The final touch is to add a box-shadow to create the sliding effect of the blue rectangle. Unfortunately, background is unable to produce the effect since backgrounds are clipped to the content area by default. Meanwhile, box-shadow can go outside the content area.
If you look closely at the box-shadow, you will see it has the same values as the white text layer inside text-shadow. This is logical since both need to move the same way. Both will slide to the top. Then the box-shadow goes behind the element while text-shadow winds up on the top.
Here is a demo with some modified values to visualize how the layers move:
CodePen Embed Fallback
Wait, The background syntax is a bit different from the one used in the second hover effect!
Good catch! Yes, we are using a different technique with background that produces the same effect. Instead of animating the size from 0% to 100%, we are animating the position.
If we don’t specify a size on our gradient, then it take up the full width and height by default. Since we know the height of our element (--h) we can create a sliding effect by updating the position from 0 var(--h) to 0 0.
We could have used the background-size animation to get the same effect, but we just added another trick to our list!
In the demos, you also used inset(0 0 1px 0)… why?
I sometimes add or remove a few pixels or percentages here and there to refine anything that looks off. In this case, a bad line was appearing at the bottom and adding 1px removed it.
What about the DRY switch variable optimization?
I am leaving this task for you! After those four hover effects and the previous article, you should be able to update the code so it only uses one variable. I’d love to see you attempt it in the comments!
Your turn!
Let me share one last hover effect which is another version of the previous one. Can you find out how it’s done without looking at the code? It’s a good exercise, so don’t cheat!
CodePen Embed Fallback
Wrapping up
We looked at a bunch of examples that show how one element and few lines of CSS are enough to create some pretty complex-looking hover effects on text elements — no pseudo elements needed! We were even able to combine techniques to achieve even more complex animations with a small amount of effort.
If you’re interested in going deeper than the four text-shadow hover effects in this article, check my collection of 500 hover effects where I am exploring all kinds of different techniques.
Are you a creative person looking for the perfect career path to take? If so, there are not many more creative professions than that of a web designer.
However, becoming a web designer can be challenging, especially if you do not know where to start. For example, do you need to attend college to become a web designer? And what kind of computer and software do you need to own to be successful as a web designer?
This guide aims to answer all these questions and show you the steps you need to follow to build a career in web design.
Web Designer: Main Skills and Responsibilities
Generally speaking, a web designer is a professional who creates, manages, and maintains content for the web. Nothing is left out from designing pages and visual elements via programming languages and creating user-friendly websites.
Web Designer (Hard and Soft) Skills:
UX, UI, and visual design knowledge (web fonts, colors, etc.)
Management of design software (e.g., Adobe Photoshop)
Coding knowledge (HTML, CSS, JavaScript, etc.)
Time management
Communication skills
Problem-solving and teamwork skills
Research skills
Web Designer Responsibilities:
Plan and create web pages
Design appealing layouts
Use codes to create user-friendly pages
Ability to meet deadlines
Listen and advise clients
Able to work as part of a team and effectively solve occurring problems
Analyze the client’s niche, explore new web design opportunities/ innovative digital marketing approaches
If you feel overwhelmed reading this table, don’t be! You do not have to master all of the above skills. No one expects you to either. Becoming a top-notch web designer takes some dedication, but ultimately it’s nothing more than a series of steps. Let’s dive deeper into them.
Becoming a Web Designer: 7 Essential Steps
1. Gaining the Knowledge Needed: Theory and Certifications
Let’s start with the most common question, “Do I need to go to college to become a web designer?” Research shows that more than 65% of web designers are self-taught (fully or partially). Of course, that does not mean you can jump into design from the start.
Instead, we recommend that you learn some essential web design elements and how to use them in your future projects. This includes UX (user experience), UI (user interface), protocols, and patterns. The same goes for technical knowledge like programming languages, frameworks, and design software.
2. Developing Certain Skills
So, there are numerous aspects you can explore regarding technical skills. To be specific, your first steps in web design include developing the following skills:
Theory and certifications: Learning the theory to understand how the web and the market work
Web design tools: Finding the web design tools you need to start designing (.e.g Webflow, Sketch, Figma). This will allow you to learn how to prototype web design mock-ups.
Graphic design tools: Becoming familiar with software like Photoshop, Illustrator, etc.
Programming languages: Especially if you think of becoming a freelance web designer, you should at least learn how to use fundamental languages (HTML, JavaScript, CSS).
SEO (Search Engine Optimization): Learning how to optimize your web pages to rank on search engines is crucial.
3. Mastering Web Design Software
What software do you need as a beginner to start creating web designs? There are numerous apps that will help you gradually enter the fascinating world of web design.
When it comes to CMS platforms, WordPress is by far the most popular in the market. The good thing about WordPress is that it is very beginner-friendly and comes with thousands of pre-built themes and plugins that you can use when creating a website.
But the same is true for InVision Studio. Unlike WordPress, InVision Studio is specifically designed to help web designers prototype and design a website. Finally, when it comes to graphic design software, we recommend you start with Photoshop (for creating visual samples and prints) and Sketch (for UI designs).
4. Learning How Much Computing Power you Need
Although online CMS platforms like WordPress do not require special hardware, that’s not true for web design and graphic design software. To be precise, both InVision Studio and Photoshop have quite demanding system requirements.
Still, a mid-range desktop or an entry-level gaming laptop can easily handle such applications. You need a reliable CPU, 8 GB RAM, and a dedicated graphics card.
I find working with two screens perfect when it comes to prototyping. You do not need to spend thousands of dollars to buy a laptop or desktop for web design.
5. Practice, Practice, and Practice
As with any other profession, practice makes perfect in web design. Therefore, the good idea is to get involved with personal web design projects before you start seeking clients or applying for job offers. This way, you can gradually acquire the technical skills you need.
Also, by working on some personal projects first, you can build a professional portfolio.
6. Creating a Professional Portfolio
If you want to draw attention to your talent, you should have a comprehensive portfolio as a web designer. This way, potential customers to trust you by having a look at your work and previous experience.
When creating a portfolio, make sure to showcase all aspects of your work and make it user-friendly. In other words, think of your online portfolio representing your talent and treat it accordingly.
7. Choosing the Web Designer Type That Best Suits Your Needs and Preferences
Last but not least, before working as a web designer, you should know that there are three main types of web designers: Freelance web designers, Agency web designers, and In-house web designers.
If you prefer to be self-employed and believe that you have the required soft skills, freelancing is probably the best path.
On the other hand, working for an agency or a company is usually easier (especially for beginners) and will provide you with a stable income. But, in the end, it all depends on your needs and preferences.
Wrap Up
Being a web designer can be an exciting career. As long as you have the necessary dedication and willingness, nothing will stand in your way.
Learning different aspects of the profession and mastering specific software will only make you better. All you need to do is respond positively to (and ask for) incoming feedback and practice!
Great HR departments do a little of everything— they coordinate with the CEO on salaries and hiring, pick out the snacks in the break room, help the new hire who’s relocating find a house, and a lot more. They’re the architect of the company’s culture, a sympathetic ear for the kid in Marketing who’s having a bad week, and often the only thing protecting employees from their horrible bosses.
So how do they do it? Like any kind of success, HR success is built on habits. Let’s go over some of the habits that can make — or break — your HR department.
Culture is key
So much of an HR department’s work depends on company culture. A healthy, well-defined company culture only needs a light touch from HR, while an ambiguous or unhealthy one is going to generate friction, discontent, and inefficiency — making everyone’s job a lot tougher.
So how do you define and build a company culture? First, you have to understand the values, goals, and beliefs that define the company. If you’re a tech company, maybe you want to chase innovation and disruption; if you’re a real estate company, maybe you’re trying to save sellers and buyers money. This is where the company’s vision and mission statements come in. These documents are like a country’s constitution; they lay out the rules and structures.
Once these are defined, HR’s job is to make sure these values are built-in to everything they do. For example, hiring impacts company culture — candidates should be evaluated on their ability to add to the company’s existing culture and share a similar vision.
Get leadership on board
It’s a lot easier to build a thriving company culture when you’ve got buy-in from the top. A savvy HR department works closely with upper management to coordinate on company policies that reflect company values, as well as peripheral issues like compliance. A supportive and unified front from management will make sure things run smoothly, and encourage buy-in at the employee level.
Listening solves a lot of problems
When employees come to you to complain, always listen to them — and listen well. Often, employees will tell you exactly where the friction points and problem areas are in your workplace, essentially helping you do your job. Whether it’s just one or several employees sharing a complaint, be mindful of the long-term ramifications of not taking action. It serves a company well to engage with employees’ pain points regularly to maintain employee wellness and prevent burnout.
On the other hand, sometimes employees just want to vent. In these cases, listen, sympathize, and acknowledge. You may not need to take any further action; often, the mere act of listening is enough to dissipate an employee’s discontent and prevent the situation from escalating. Be sure to ask employees what a solution looks like for them.
Remember that rules are made to be broken (occasionally)
Which philosopher said, “there can be no justice without exceptions”? Whoever he was, he must have worked in HR. While one of HR’s most important responsibilities is to enforce company policy, a smart HR executive knows when to bend the rules and make an exception. Employees don’t like to feel subject to arbitrary, inflexible authority, and in times of high stress, like product launches or right before big deadlines, a few small exceptions can cultivate a lot of goodwill.
That being said, every company has fundamental policies that, if broken, should always lead to consequences. A smart HR executive knows when to make an exception and when not to.
Keep an eye on the big picture
Successful HR departments don’t restrict themselves to reductive definitions of HR— the minutiae of hiring, payroll, culture, and training. While those are all vital to the smooth functioning of a company, a great HR department has the vision to match the company’s.
That means you should have a general understanding of how each level of the company operates, who its most important clients and customers are, the various products and services offered, and even an idea of the market landscape. The better you know the company, the more effectively you can help achieve your collective goals. And exhibiting this kind of deep knowledge is one of the most effective ways of exhibiting your department’s value.
Don’t withhold praise
Company culture exists to produce positive outcomes — so when you see those positive outcomes happening, make sure you acknowledge them! Your top sales leaders may be raking in the commission, but a pat on the back from HR is arguably just as meaningful for their job satisfaction.
Praise makes employees feel good, drives their motivation and morale, and lets them know you notice their good work. It draws a straight line between company culture and its benefits — for everybody. Acknowledging employee accomplishments with praise is the secret to turning your company culture into an organic, self-sustaining organism.
Act as a role model
The best way to encourage positive employee behaviors is to demonstrate them yourselves. Employees look to HR for leadership, so HR professionals should make a conscious effort to embody the behaviors and values they’re trying to cultivate.
On the other hand, if they fail to exhibit the behaviors they’re trying to encourage, they could seem hypocritical — and employee morale and buy-in will surely remain low.
Don’t overlook your fellow employees when hiring
When a position opens up, always begin your candidate search internally. This is important for two reasons.
One, your employees will notice if you begin your search externally. It will make them feel that you don’t value them and that you don’t have their interests in mind. This can hasten talent loss. On the other hand, if they feel appreciated and have a sense that there’s the possibility of upward mobility, you will retain that top-quality talent.
The second reason is that, unless you’re looking for a candidate with very specialized skills that can’t be found within the company, your best candidate is almost certainly in-house. If you’ve cultivated a strong company culture it’s extremely unlikely that anyone from outside the company will have a better appreciation for and understanding of that company culture than someone who’s already under the same roof.
Hold everyone accountable
The other side of praise is accountability. Just as employees who exemplify or uphold company values deserve recognition, ones who undermine policies or break regulations should be held fully accountable for their actions. Your workforce will notice when you let a transgression slide, and if they sense you’re not committed to a rule or policy, it will be hard to make them respect it.
Accountability especially applies to upper management. If employees sense there’s one standard for the employees, and another standard for management, morale will quickly decline.
A breakdown of a simple app, from UI design to deployment, that shows off why coding is a magic tool for designers.
Figma, Adobe XD, Photoshop, Wacom Tablet, sketchbook… all tools for interfaces and web designers, yes? Take 2 minutes, and try to remember why you want to become a designer and why you enjoy designing stuff.
Chances are it’s because you like to create; you’re a creative person. Maybe you started with artistic experiences as a child, then turned that creative energy into problem-solving while continuing to express it visually: You became a designer, a creative problem solver.
Today, I’ll try to show you how coding is an underrated tool to express your creative problem-solving mindset by building a real SVG generator from scratch. So let’s get into it!
Step 1: Don’t get an idea; solve a problem
We didn’t go into deep business considerations here, but seeing problems you face and deciding to solve them yourself is a great way to start.
During client work, I needed some SVG waves for illustrations. So I looked for a wave generator: There were a ton of wavy colorful wave generators with parametric inputs but no simple, perfect sine waves generator. I decided to draw it on my math tool GeoGebra and then export it to SVG.
Okay, but not fast. And we like to get our jobs done quickly. But wait… Why don’t we create a perfect sine waves generator? Without equations & boring math software to open, just a curve and an export button. You got it, now let’s design it.
Quick tips: If you are looking for a problem, look for memes in your field. They always show a deep, painful, well-known problem.
Step 2: Design the solution simple as possible
Two main rules: First rule, think about who will use it; the second rule, predict what they expect from how it works. So who? Front-end developers. What are they waiting for? A curve that can be edited with direct feedback and an export button.
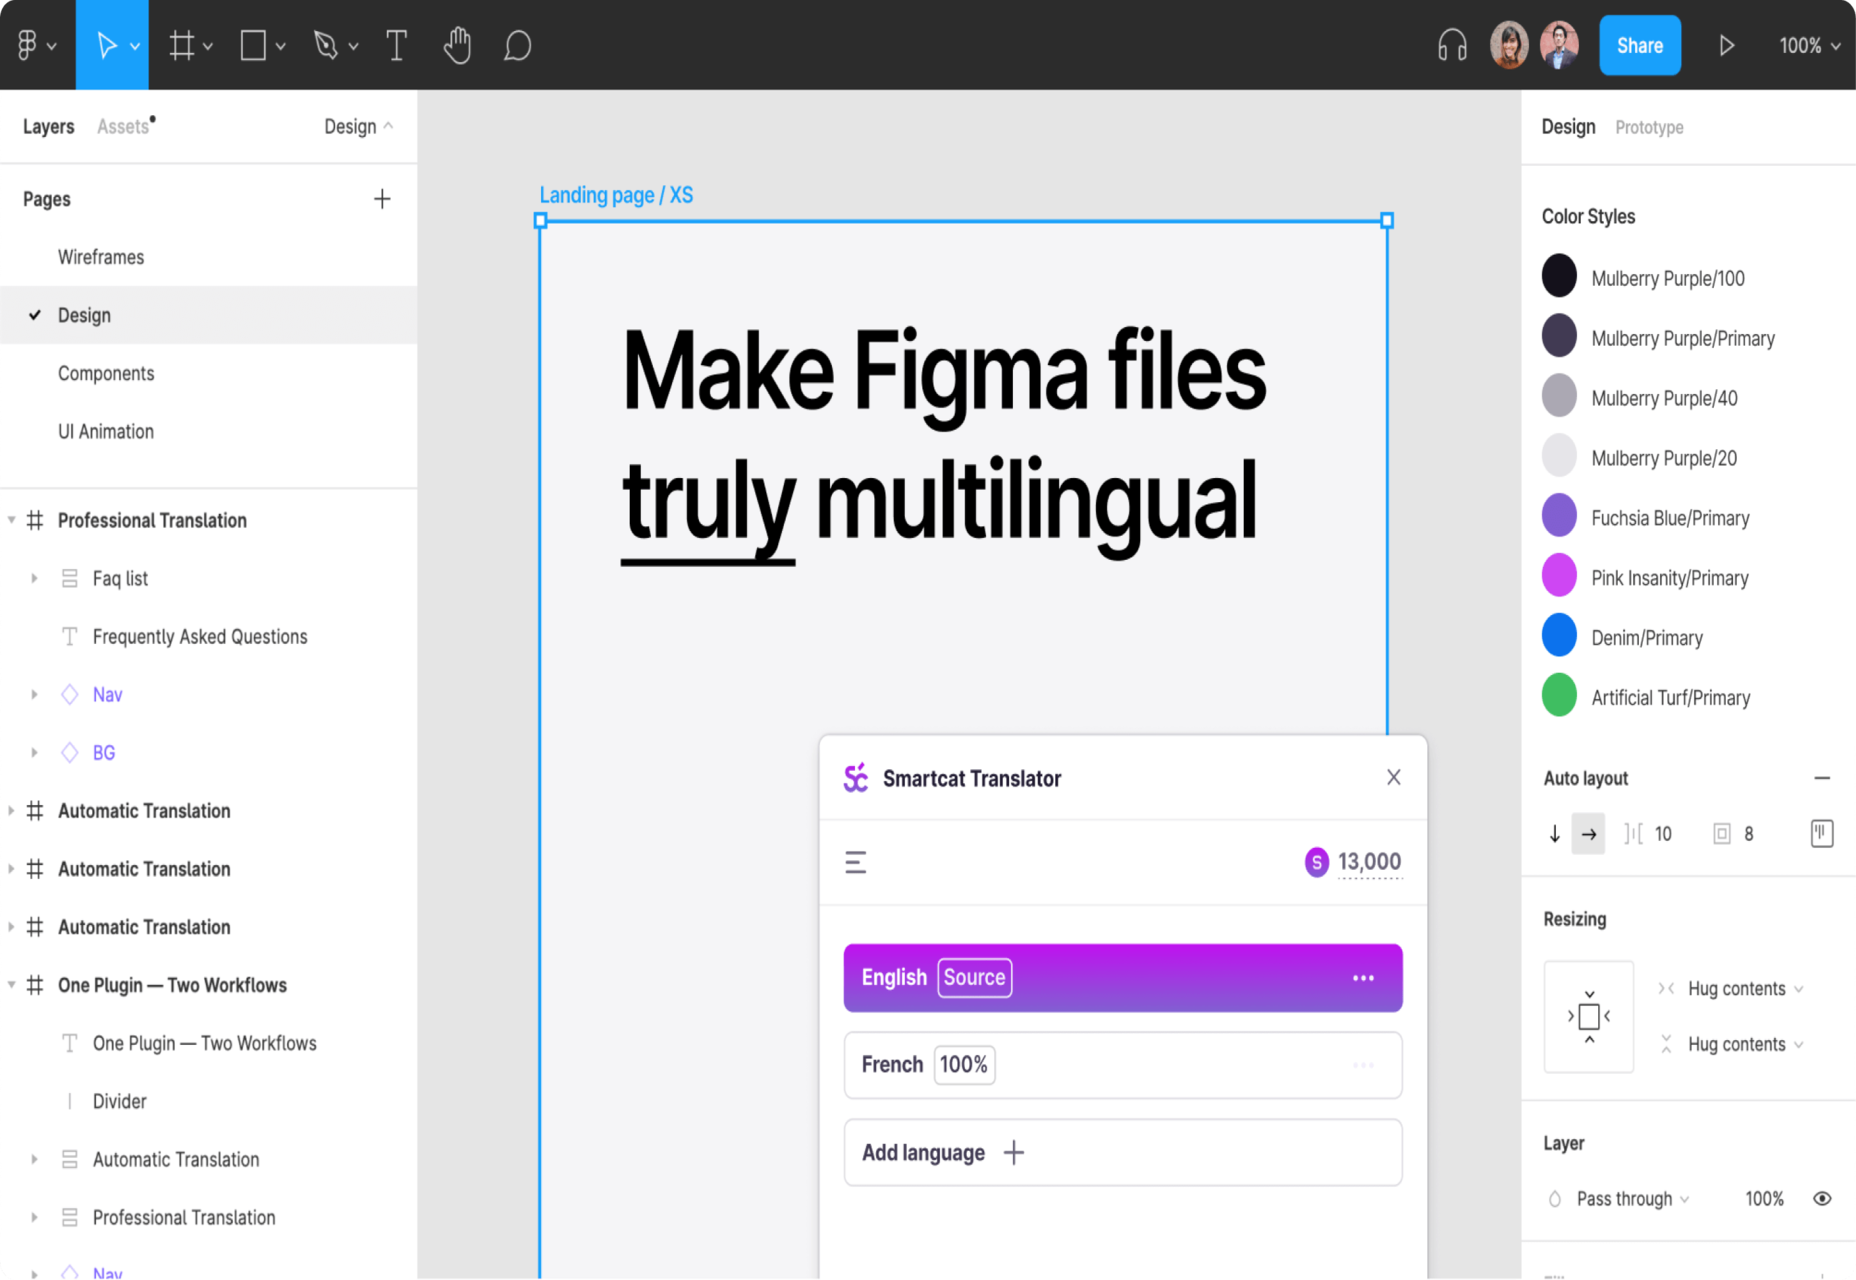
Wireframe design
High-Fi design
A quick tip: You can grab the Figma design of the app for more technical tips on the design.
Step 3: Build it for real
As a designer, stopping at step two is perfectly fine. But imagine if you could build what you design! You already know you can create everything you want.
You can see coding as a way to translate your UI that will surely end with a .com application that is usable by everyone. This is why “best languages” don’t matter; coding is just a tool to express your creativity and build stuff for others. And as a designer, a creative person, this might sound…interesting.
UI to functional app
Every web app interface can be translated from UI design to code with HTML/CSS/JS. There is how we can see the role of each of those 3 “languages”:
HTML: I want a button.
CSS: I want my button to look rounded.
JS: I want something to happen when I click on my button.
To build our app, I’ll use Svelte. Svelte is a JavaScript compiler that allows us to use all those three “languages” in one place. So, let’s see how code can translate our UI to functional things.
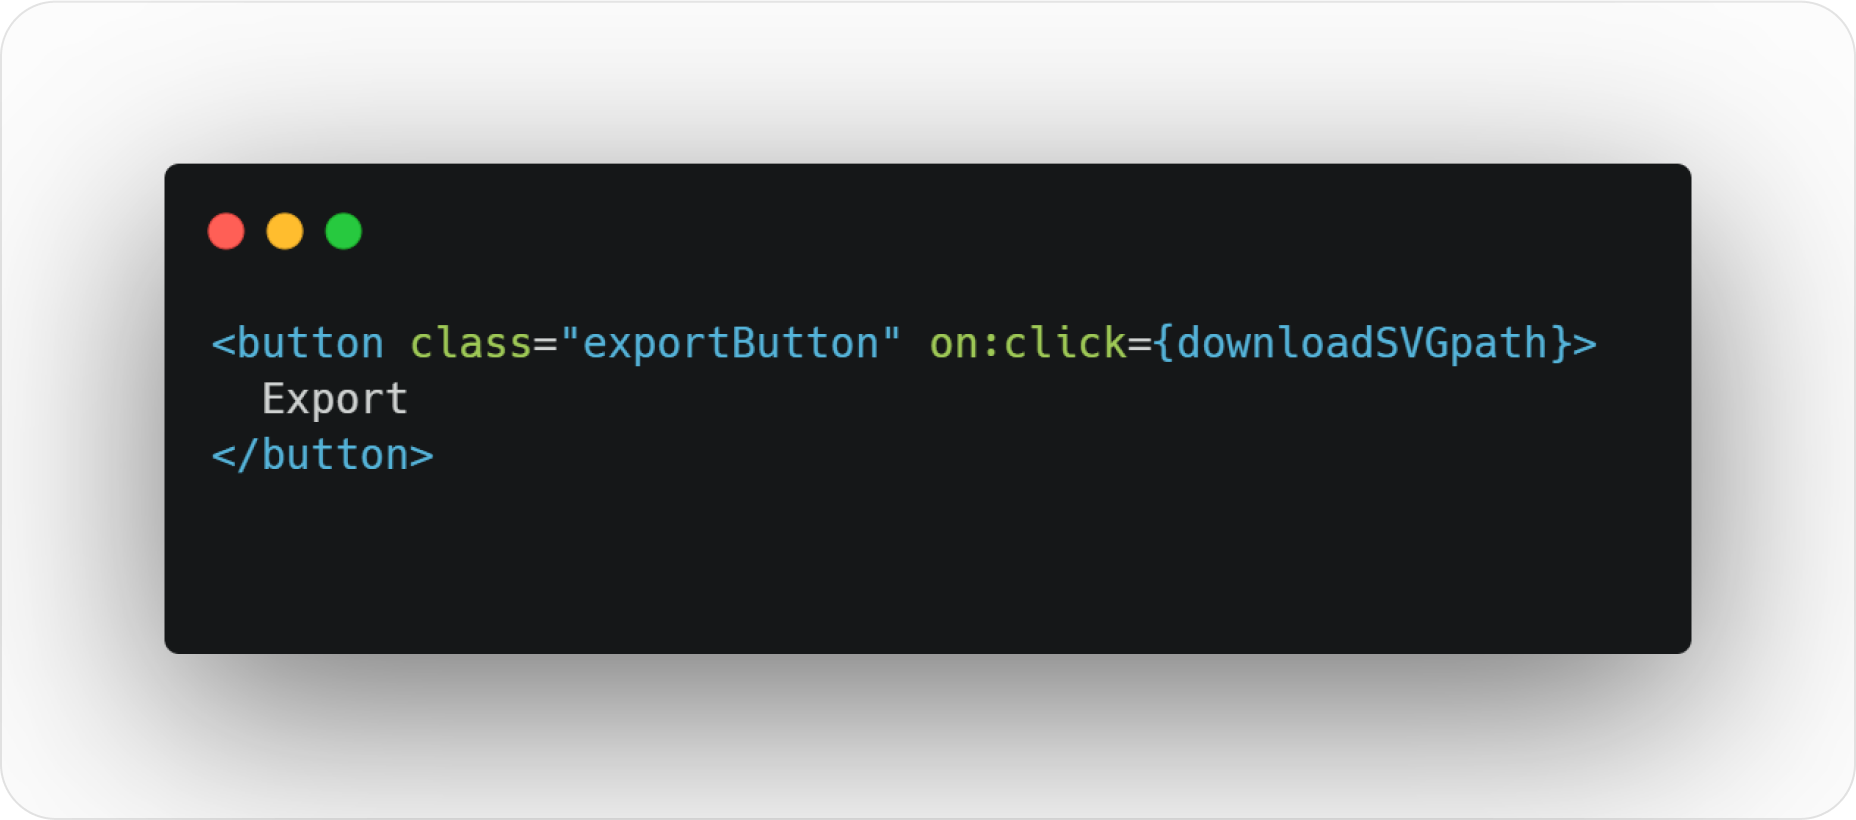
HTML button code
“Hey web browser, I want a button named “exportButton” and everything in a function named “downloadSVGpath” to be carried out when someone clicks on the button 🙂 Thanks”
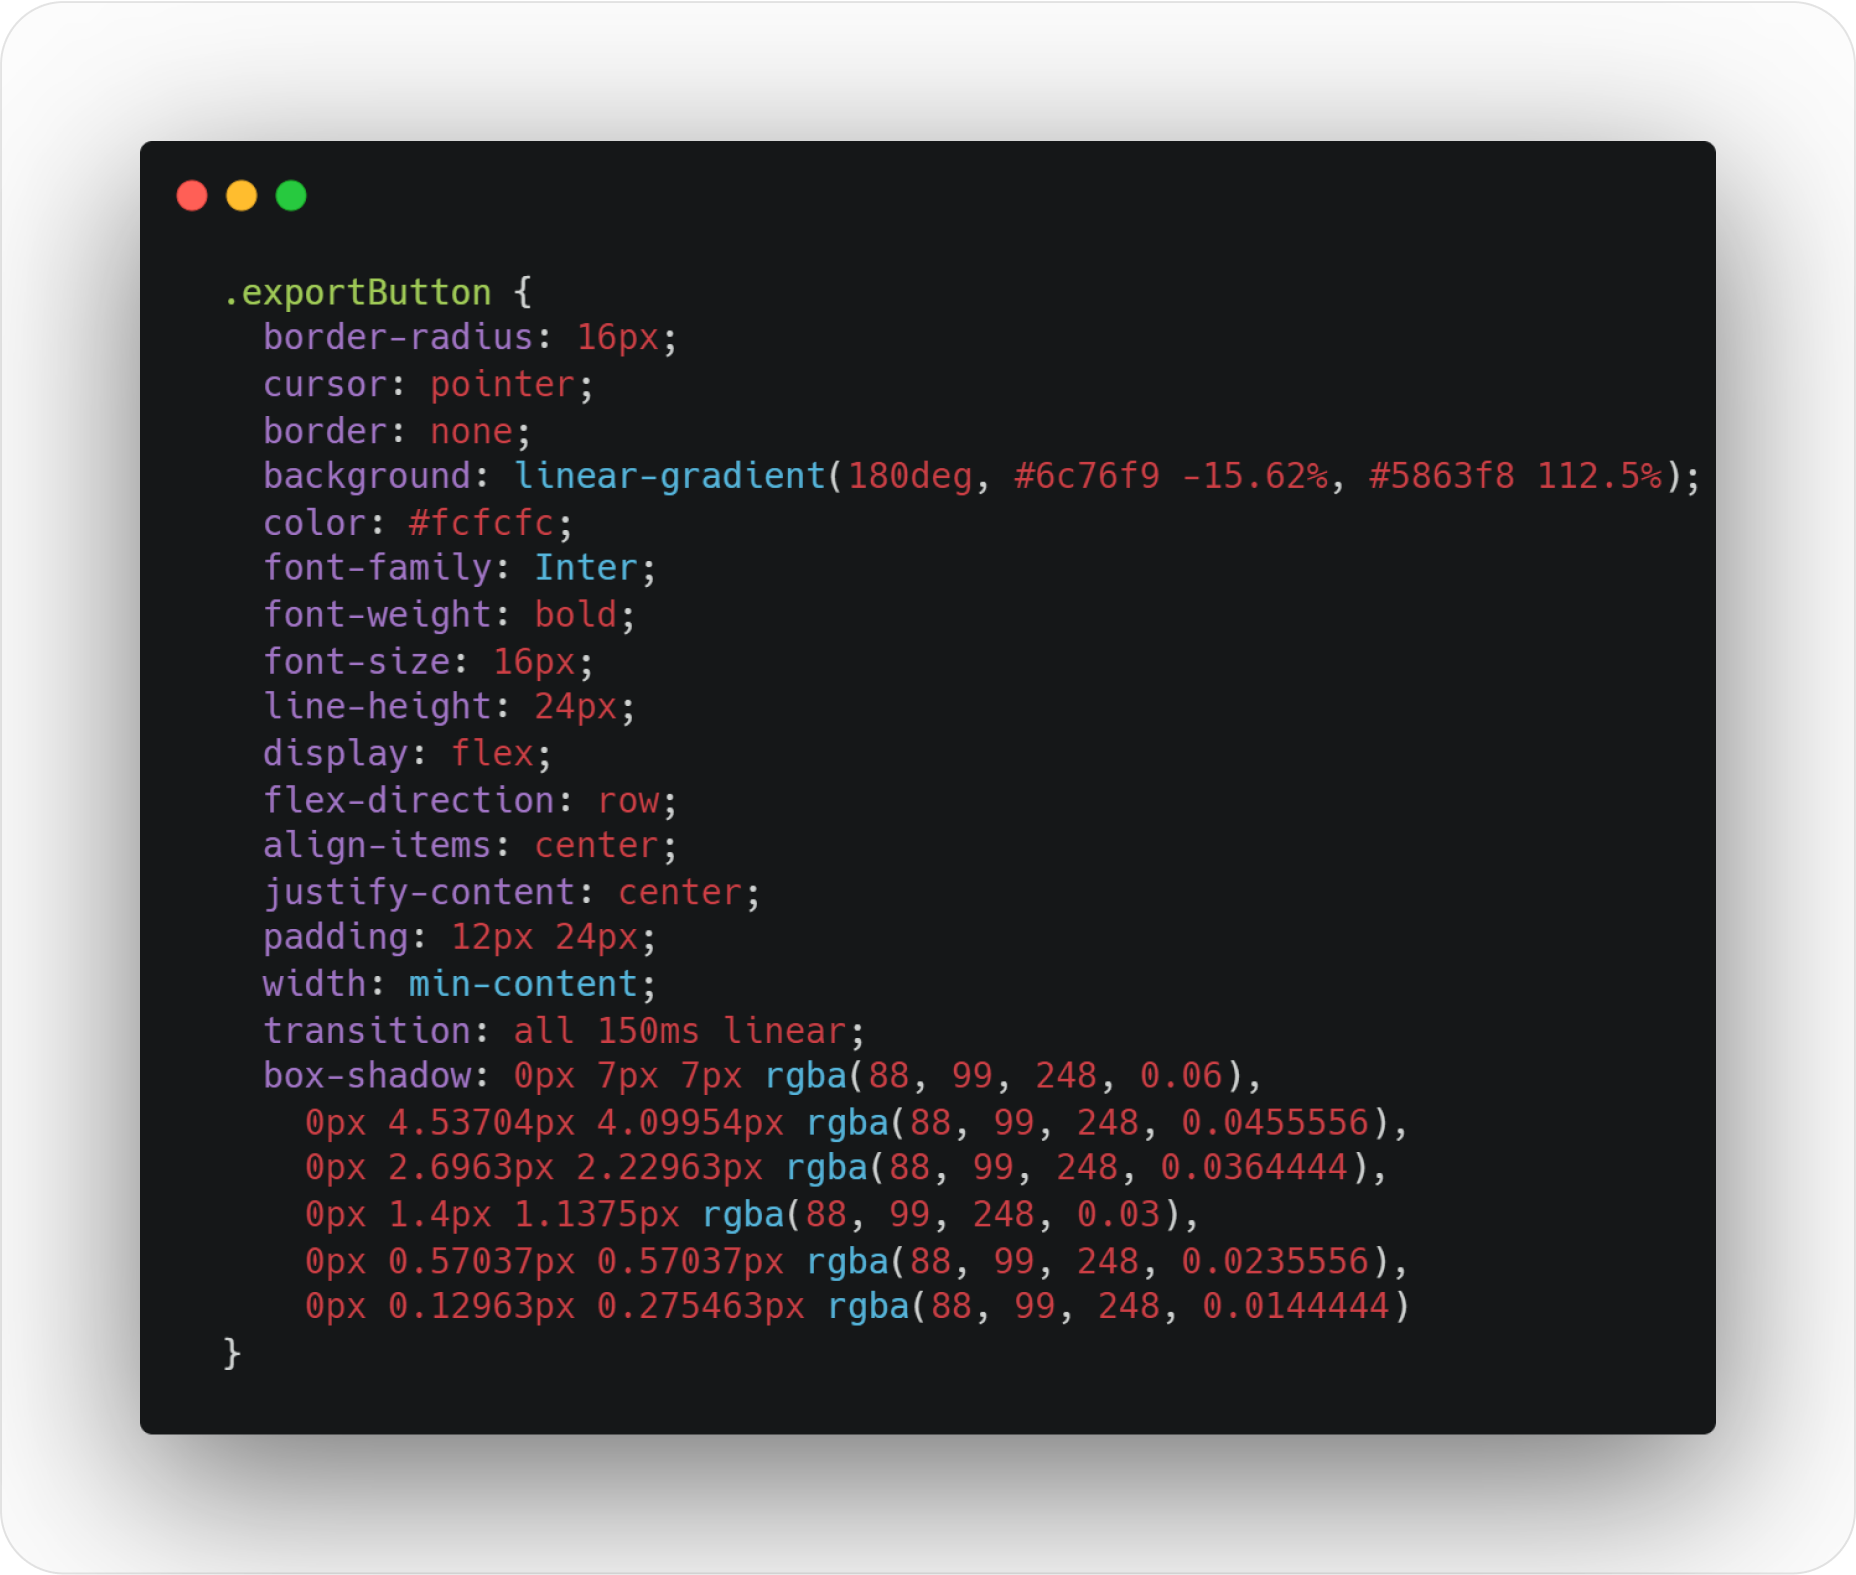
CSS style button code
“Hey web browser, I want you to apply these style rules to my basic HTML button: I want a beautiful rounded corner at 16px, a mouse pointer when we hover it, I don’t want any borders, but I want a cool color gradient as a background color. Then, I want the font inside the button to have its color set to #fcfcfc and use the Inter typeface (bold, please). Like my Figma design, I also want to center stuff in the button and add padding. Oh, and add a subtle shadow 🙂 Thanks.”
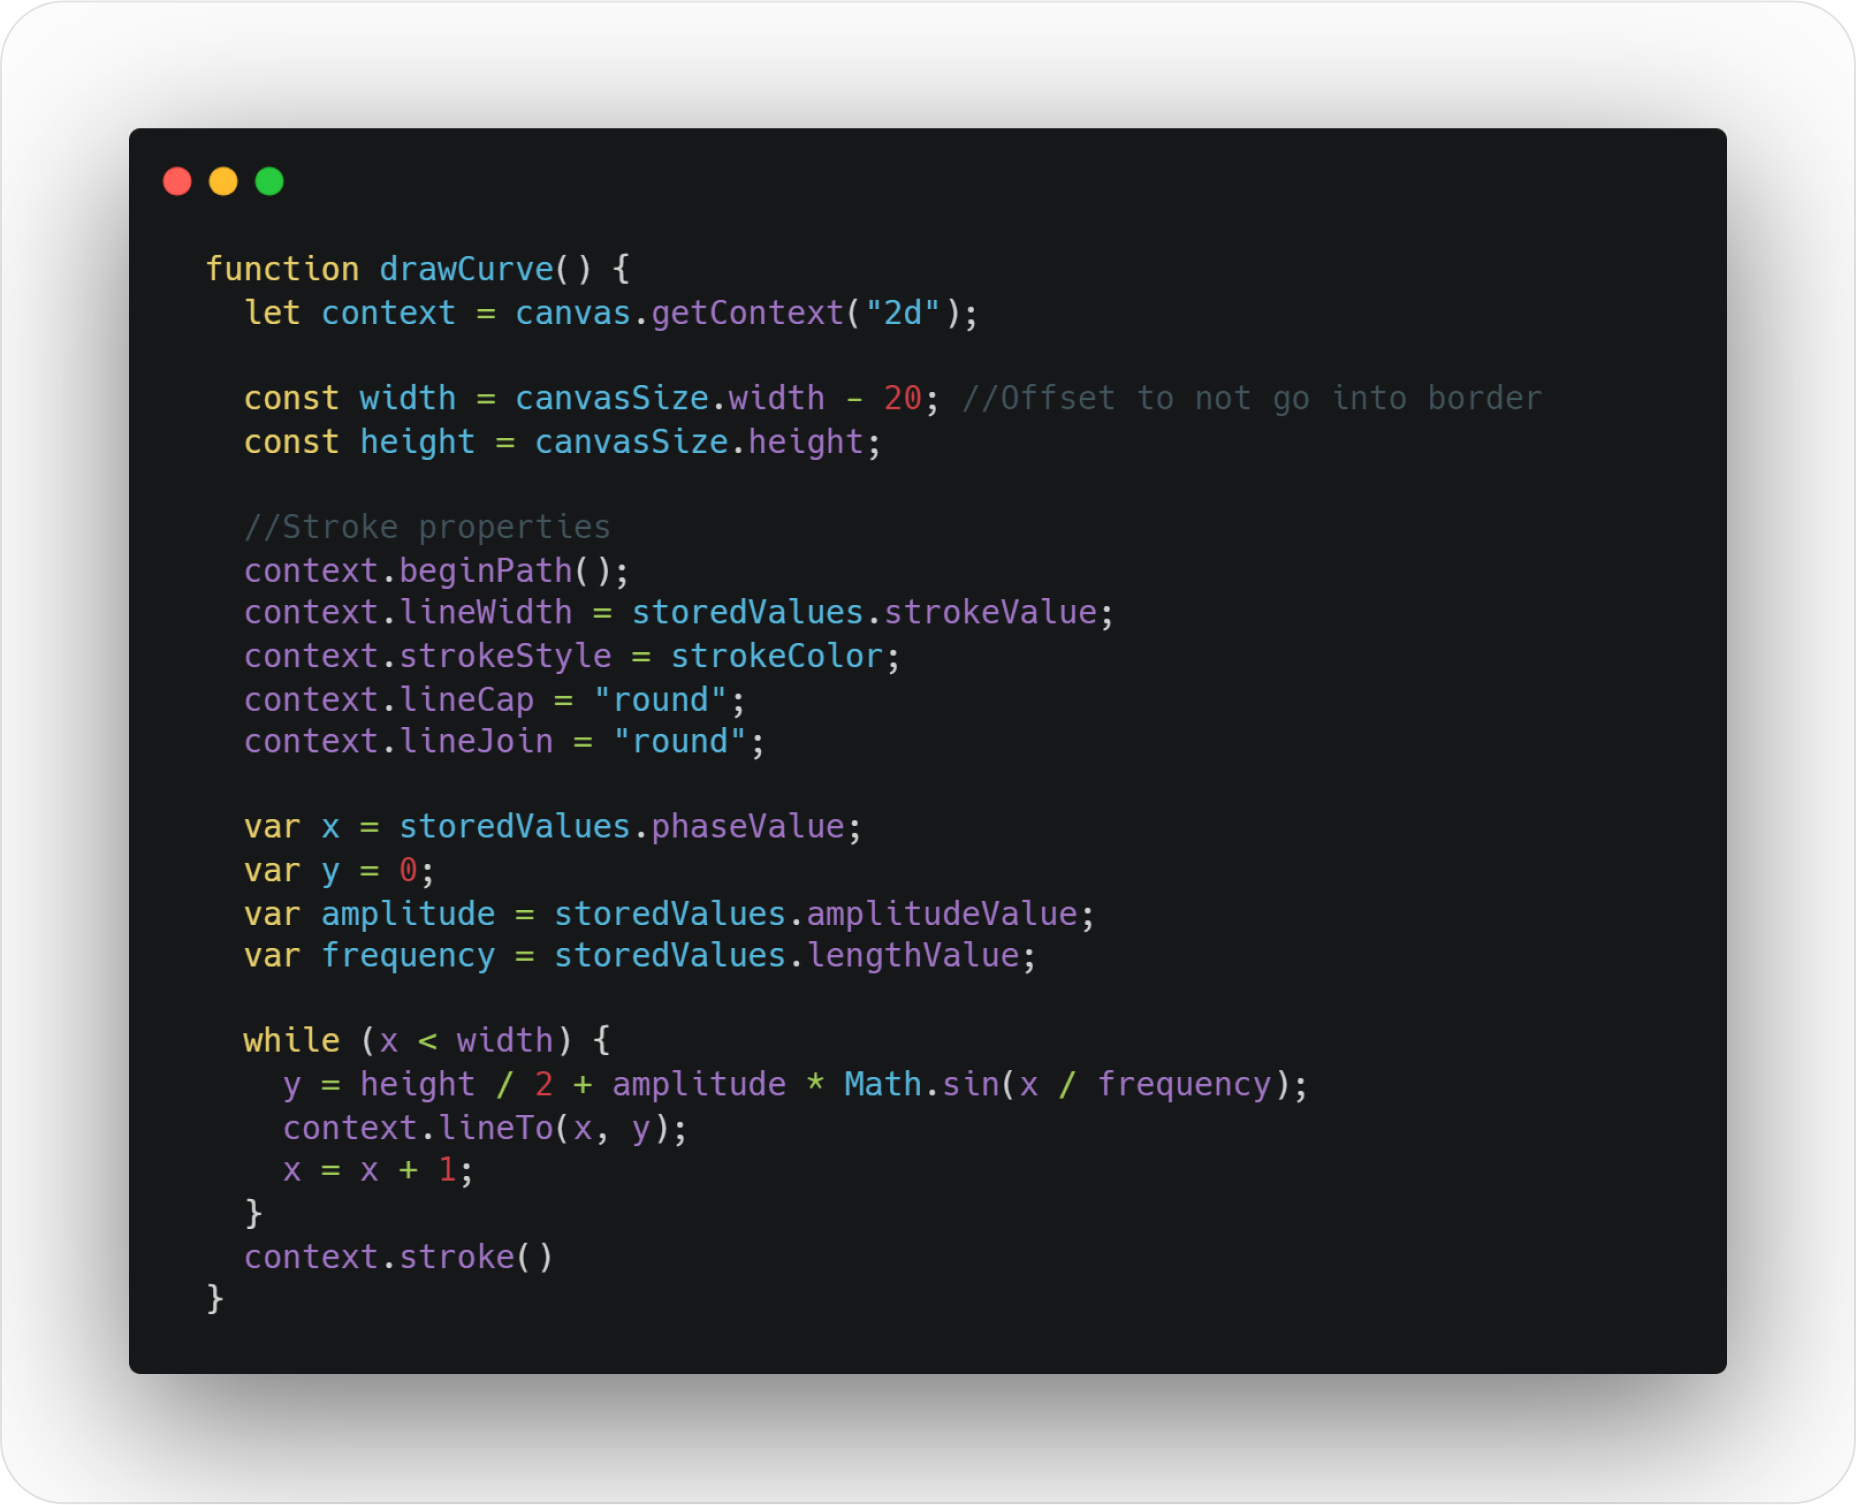
Drawing SVG curve function
“Hey, web browser, each time our slider moves, I want to run this function: I want you to draw a curve inside a frame that I have defined inside my HTML code. I also want my curve stroke to look rounded at each cap and have a color and width I’ve defined inside variables. You will take the sine function parameters from the stored values of the sliders. Finally, while your x variable hasn’t reached the total width in the x-axis of our frame, you will solve the y-axis point position of the sine equation and draw the curve 🙂 Thanks.”
Quick tips: You can grab the source code files of the app to explore them.
Summary
Coding is just a tool that allows us to translate our very visual metaphors into something that everybody can use. How cool is that?!
Coding helps us to envision our design goals and forces us to see beyond the visual range: how is my button will be supposed to work? How does it look when hovering? How my popup modal can be designed for mobile devices?
Coding allows us to create the weird idea we designed “just for fun” instead of pushing the design case study into our portfolio under the “personal project” tag.
Coding shows us how much work is required to achieve what we designed. So we can better understand our design clients’ needs, challenges, and resource management.
Coding is flexible. You can replicate the Netflix website pixel perfect with pure HTML/CSS, the Vue Framework, or any other Web framework.
According to Toshi Omagari, the author of Arcade Game Typography, the world’s first multi-colored digital font was created in 1982 for a never-released video game called Insector. Multi-colored fonts, sometimes called chromatic type, are still relatively rare on the web, even though the COLR font format has had full cross-browser support since 2018 (even in Internet Explorer!).
The technology opens up an entirely new vein of typographic creativity. While some of the color fonts I’ve seen have been lurid, at best, chromatic fonts are fun, innovative and attention-grabbing. With both the addition of a new CSS features — including the font-palette property and @font-palette-values rule — for controlling the color palette of color fonts and the evolution of the COLR font format, it’s a great time to dive in and experiment with with what modern web typography can do.
COLR support
I last wrote about color fonts in 2018. At the time, there were four different standards for multicolored typefaces: OpenType-SVG, COLR, SBIX, and CBDT/CBLC. You can use ChromaCheck to see what color font formats your own browser supports.
Google Chrome has marked OpenType-SVG as “wontfix” meaning that format will never be supported by Chrome or Edge. SBIX and CBDT/CBLC can mostly be ignored for use on the web as they’re both based on raster images and become blurry at larger font sizes. The large file size of bitmap-based fonts also makes them a bad choice for the web.
Ulrike Rausch is the creator of LiebeHeide, a bitmap color font which uncannily replicates the look of a ballpoint pen. “My biggest goal was always to reproduce handwritten text as authentically as possible,” she told me. “For LiebeHeide, I was finally able to simulate these handmade attributes with a font. The downside? All the PNG images in the font file add up and result in an enormous OTF file size. This might not be a problem for desktop applications, like Adobe InDesign, but for use on the web the font is hardly applicable.”
All browsers support COLR fonts (now generally referred to as COLRv0). Version 98 of Chrome (and Edge), released in February, added support for COLRv1, an evolution of the format.
This browser support data is from Caniuse, which has more detail. A number indicates that browser supports the feature at that version and up.
Desktop
Chrome
Firefox
IE
Edge
Safari
71
32
9
12
11
Mobile / Tablet
Android Chrome
Android Firefox
Android
iOS Safari
101
100
101
11.0-11.2
COLRv0 and COLRv1
Plakato from Underware foundry
COLRv1 is part of the OpenType 1.9 standard. While the initial COLRv0 lacked many of the creative possibilities of OpenType-SVG, COLRv1 matches those possibilities while avoiding certain drawbacks. COLRv0, for example, could only do solid colors whereas COLRv1 can do linear, radial,and conic gradients. The format also adds compositing and blending and allows for shape reuse to save on file size.
Typography expert Roel Nieskins explains: “I used to say the OpenType-SVG format was the best format as it offered the most versatility — until I realized this is just too complex for a low-level job like text rendering. It implements a basic subset of SVG on the font rendering level. But it doesn’t work well with other font tech (hinting, variable axes, etc.), and it’s a pain to implement. So, I switched sides to COLR. COLR basically re-uses everything that OpenType fonts already have. It ‘only’ adds layering, and the possibility to change the color of each layer. Simple, but effective.”
COLRv1 is entirely compatible with variable font axes, and there are already examples of variable COLR fonts like Merit Badge, Plakato Color and Rocher Color.
Here’s a striking example from Ulrike Rausch of what’s possible with the format, a (currently unreleased) typeface which digitally recreates the look of a neon sign:
Akiem Helmling of the type foundry Underware is enamored with COLRv1, telling me that “[t]he COLRv1 format can potentially have a similar (or even bigger) impact on type design than variable fonts had in recent years.” For Akiem, it’s undoubtedly the superior format. “All former color formats have been bad hacks to add colors to glyphs. While OpenType-SVG is regarded by some people as a good solution, it is, from my point of view, not at all. From a pragmatic point of view, SVG is a ‘locked room’ within the open structure of OpenType. There is no way to re-use or link data or to create a connection between other font tables and the SVG table. And because of this, we can not make a variable font with variable SVG data.”
It’s still early days for the format. Mozilla hasn’t yet shipped COLRv1 but has taken a positive position on the format, stating that it has “the potential to supersede OpenType-SVG fonts in web use.” Apple is reluctant to implement it in Safari.
COLRv1 fonts will still show up and be readable in these browsers but all the letter’s will be a single solid color (which you can set with the CSS color property, just like with a normal font). We’re yet to see many type foundries release COLRv1 typefaces, and some popular design tools like Figma don’t even support COLRv0, but I’m hopeful and believe it will be the future of color typography on the web. In the short time COLRv1 has been around there have already been some beautiful examples of what the technology can do, such as Reem Kufi and Bradley Initials.
COLR and CSS
If you’re using a color font, you probably want to be able to control its colors. Until now, that was impossible to do with CSS. The font-palette property brings the power to override the default color scheme of a typeface and apply your own. This property works on COLRv0 and COLRv1 typefaces. (Apple’s Myles Maxfield explains that SVG fonts can opt-in to using palettes, whereas all the colors of a COLR typeface are automatically overridden by CSS.)
Coming up with a decent color palette is a fine art. Some type designers have done the hard work for us and include alternative palettes inside the font. You can select from these different color schemes using base-palette in CSS.
How do you find out if a font offers an alternate palette? The site for the font might tell you. If not, there’s a handy tool called Wakamai Fondue that will list all the available color schemes (shown in the image below). For this example, I’ll use Rocher Color, a free variable color font from Henrique Beier with a Flintstones vibe. From looking at Wakamai Foundue we can see that this typeface uses four colors and comes with eleven different palette options.
Using base-palette: 0 will select the default color palette (in the case of Rocher, that’s shades of orange and a brown).
Using base-palette: 1 will select the first alternative palette defined by the creator of the typeface, and so on. In the following code example, I’m selecting a color palette that’s different shades of gray:
Of course, you might want to create your own palette to match your brand colors or to meet your own design sensibility. If you’re going to override all the colors then you don’t need to specify the base-palette.
Let’s take Bungee from pioneering type designer David Jonathan Ross as an example. It only uses two colors by default, red and white. In the following example, I’m overriding both colors of the font, so the base-palette doesn’t matter and is omitted:
Alternatively, you can set the base-palette as a starting point and selectively change just some of the colors. Below I’m using the gray color palette of Rocher, but overriding one color with a minty green:
When specifying override-colors it’s difficult to know which bit of the font will be overridden by which number — you have to play around and experiment and achieve the desired effect through trial and error.
Should you wish, you can even change the color of emoji fonts, such as Twemoji (shown below) or Noto. Here’s a fun demo from a font engineer at Google.
Current limitations
One regrettable limitation, at least for the time being is that CSS custom properties don’t work in @font-palette-values. That means the following is invalid:
Another limitation: animations and transitions from one font-palette to another don’t interpolate — meaning you can switch instantly from one palette to another, but can’t gradually animate between them. My dream of a luridly animated emoji font is sadly unrealized.
Browser support
font-palette and @font-palette-values have been supported in Safari since version 15.4, and landed in Chrome and Edge with the release of version 101.
This browser support data is from Caniuse, which has more detail. A number indicates that browser supports the feature at that version and up.
Desktop
Chrome
Firefox
IE
Edge
Safari
101
No
No
No
15.4
Mobile / Tablet
Android Chrome
Android Firefox
Android
iOS Safari
101
No
101
15.4
Use cases
You can probably already imagine how you might use color fonts in your own projects. There are a couple of specific use cases, though, that are worth calling out.
COLR and icon fonts
Icon fonts may no longer be the most popular method for displaying icons on the web (Chris explains why) but they are still widely used. If you use an icon font with multiple colors, like Duotone from FontAwesome or the two-tone icons from Material Design, font-palette could offer an easier method for customization.
If you support user generated content, your users probably use emojis. Today it’s very common to scan text and replace any emoji encountered with images to ensure consistent cross-platform rendering and the ability to support newer emojis than the OS supports. Those images then have to be switched back to text during clipboard operations.
If it receives greater browser support, COLRv1 emoji fonts will offer a far simpler approach. COLRv1 also comes with the benefit of looking crisp at any size, whereas native browser emojis get blurry and pixelated at larger font sizes.
Wrapping up
Before color fonts, typographic creativity on the web was limited to applying strokes or gradient fills with CSS. You could always do something more custom with a vector image, but that’s not real text — it can’t be selected by the user and copied to the clipboard, it can’t be searched on the page with Command+F, it isn’t read by screen readers or search engines, and you’d need to open Adobe Illustrator just to edit the copy.
Color fonts have the potential to really grab a user’s attention, making them perfect for landing pages and banners. They may not be something you reach for often, but they promise new expressive and creative possibilities for web design that can make your site stand out.
A slow-loading page is not just frustrating– it also directly impacts advertising conversions, bounce rate, user experience, and engagement.
According to research conducted by Portent, the first five seconds of page-load time have the highest impact on conversion rates. The study also found that the highest ecommerce conversion rates occur on pages with load times between 0-2 seconds.
Page speed is also a primary ranking factor in Google Search, and its importance to your site’s SERP positions is paramount. In 2021, Google rolled out the Page Experience update to enhance its algorithm, drawing even more attention to the importance of a fast-loading page.
These facts make the significance of fast-loading pages undeniable, especially when coupled with Google’s Mobile-First Indexing, which considers mobile sites before desktop sites for indexing and ranking.
So, what exactly is page speed, and why does it have such an important impact on almost all aspects of your landing page and website? Let’s find out.
This post will break down the importance of a fast-loading page, how fast your page should be, what slows it down, how to measure page speed, and ways to ensure a fast-loading page.
Why page speed matters
By definition, page speed is a measurement of how fast the content on your page loads. It can also be referred to as “page load time,” i.e., the time it takes to fully display the content on a specific page.
Page speed matters because the average users nowadays have dwindling attention spans. This makes it harder for advertisers to convince prospects to consider their offer—it becomes nearly impossible on a page that doesn’t load fast enough.
So, how fast is a fast-loading page?
What is a good page speed?
Though common practice dictates it should take less than 2 seconds for your page to load, there is no absolute “good page speed” number. The page speed depends on the type of page you have and how you measure it. In some cases, the important factor is time to interactive (TTI). For others, it’s the time it takes to load the first bits of content (FCP).
According to Microsoft speed specialist and computer scientist Harry Shum, a 0.25-second difference in page load time—faster or slower—is the magic number that gives brands a competitive advantage.
The bottom line–the faster your landing page loads, the better. If you want lightning-fast pages, you need to optimize all elements that slow down your landing page.
JavaScript issues. JavaScript plugins help add dynamic content to your pages. But when incorrectly implemented or overused, JavaScript can result in a significant delay in page load times.
Too much flash animation. Flash makes your landing pages more interactive, but it can also slow down your page load speed. The bigger the Flash file size, the more it will contribute to your page speed issues.
Unoptimized images. Beautiful, high-resolution photos may look impressive, but they require lots of bandwidth to load. However, image size isn’t the only issue– file formats can impact your site’s images’ loading time.
Large media files. Loading large media files is challenging for mobile devices. Large media files always take longer to load on smaller devices and mobile networks.
Too many HTTP requests. Whenever a user comes to your page, the web browser sends a request to your website’s server for information on the page. This file may contain text, images, or multimedia elements. When the server has fewer HTTP requests to make, the faster the site can load.
Lack of caching techniques. Caching allows you to store frequently used data points in the ”cached memory.” The cached content gets served from the cached memory on subsequent requests, speeding up the entire data retrieval process.
Bulky code. Bulky code, full of excessive white spaces, lazy inline CSS, empty new lines, inline styling, and unnecessary comments, make your website stylesheet unnecessarily larger and slow down your page.
Too many plugins. Every plugin on your page initiates separate file requests, which can slow down the load time. Too many plugins can delay loading time and lead to crashes or even security breaches on your site.
How to check your landing page speed?
To perform a full landing page speed audit, you can use the following tools.
Google Mobile Speed Score.The Score lets you quickly see which landing pages provide a fast mobile experience that may require your attention.Mobile speed score ranks mobile landing pages on a 10-point scale.
PageSpeed Insights. The free Google page load speed tool gives recommendations for page speed improvements and scores your page from 0 to 100 points. The higher your score, the more optimized for speed your site is. A score above 85 is a positive indication that your page is performing well. Anything lower indicates you have some work to do.
WebPageTest.The open-source website performance monitoring tool allows you to test connection throttling and run customized tests. You also can save and view your test history later if you create a free profile on the website.
How to create a seamless, fast-loading landing page experience
To get visitors to move beyond the ad click and convert, marketers need to create a seamless landing page experience.
Google recommends using Accelerated Mobile Pages (AMP) to create pages because the framework provides a faster, smoother, and more engaging mobile experience.
What is AMP?
AMP loads quickly because it’s designed for speed. Browsers have an easier time interpreting AMP HTML because it’s more streamlined and is specifically designed to help developers avoid common coding issues that lead to slow page loads.
AMP pages can also be served directly from Google AMP Cache. Whenever possible, Google will choose to serve the cached copy of the landing page, ensuring the page loads fast. Your AMP landing page can load from your web server when unable to serve from cache (due to feature incompatibility or other technical reasons). Although this is not as fast as serving from the cache, it is still much faster than the average non-AMP landing page.
Though AMP landing pages typically load 85% faster than the average page, the framework has Javascript and CSS limitations. This is not the case with Instapage’s Thor Render Engine™.
What is the Thor Render Engine™?
Instapage’s Thor Render Engine is the platform’s proprietary back-end technology that ensures your post-click pages load quickly so you never lose a lead to slow-loading pages.
The Thor Render Engine delivers 3x faster-loading landing pages without Javascript and CSS limitations, so you can easily capture visitor attention with responsive lightning-fast landing pages.
The best part is that you don’t need to do anything because the Thor Render Engine works silently behind the scenes to make your pages lightning fast. To create an optimized, personalized, fast-loading page, all you need to do is sign up for Instapage—the most advanced landing page platform.
Conclusion
Don’t miss out on advertising conversions and a high return on ad spend because of slow loading pages. Utilize solutions that allow you to create seamless, fast-loading landing page experiences for all your offers.
By now, you are probably familiar with one or more programming languages. But have you ever wondered how you could create your own programming language? And by that, I mean:
A programming language is any set of rules that convert strings to various kinds of machine code output.
In short, a programming language is just a set of predefined rules. And to make them useful, you need something that understands those rules. And those things are compilers, interpreters, etc. So we can simply define some rules, then, to make it work, we can use any existing programming language to make a program that can understand those rules, which will be our interpreter.
Compiler
A compiler converts codes into machine code that the processor can execute (e.g. C++ compiler).
Interpreter
An interpreter goes through the program line by line and executes each command.
Want to give it a try? Let’s create a super simple programming language together that outputs magenta-colored output in the console. We’ll call it Magenta.
Our simple programming language creates a codes variable that contains text that gets printed to the console… in magenta, of course.
Setting up our programming language
I am going to use Node.js but you can use any language to follow along, the concept will remain the same. Let me start by creating an index.js file and set things up.
class Magenta {
  constructor(codes) {
    this.codes = codes
  }
  run() {
    console.log(this.codes)
  }
}

// For now, we are storing codes in a string variable called `codes`
// Later, we will read codes from a file
const codes =
`print "hello world"
print "hello again"`
const magenta = new Magenta(codes)
magenta.run()
What we’re doing here is declaring a class called Magenta. That class defines and initiates an object that is responsible for logging text to the console with whatever text we provide it via a codes variable. And, for the time being, we’ve defined that codes variable directly in the file with a couple of “hello” messages.
If we were to run this code we would get the text stored in codes logged in the console.
OK, now we need to create a what’s called a Lexer.
What is a Lexer?
OK, let’s talks about the English language for a second. Take the following phrase:
How are you?
Here, “How” is an adverb, “are” is a verb, and “you” is a pronoun. We also have a question mark (“?”) at the end. We can divide any sentence or phrase like this into many grammatical components in JavaScript. Another way we can distinguish these parts is to divide them into small tokens. The program that divides the text into tokens is our Lexer.
Since our language is very tiny, it only has two types of tokens, each with a value:
keyword
string
We could’ve used a regular expression to extract tokes from the codes string but the performance will be very slow. A better approach is to loop through each character of the code string and grab tokens. So, let’s create a tokenize method in our Magenta class — which will be our Lexer.
Full code
class Magenta {
  constructor(codes) {
    this.codes = codes
  }
  tokenize() {
    const length = this.codes.length
    // pos keeps track of current position/index
    let pos = 0
    let tokens = []
    const BUILT_IN_KEYWORDS = ["print"]
    // allowed characters for variable/keyword
    const varChars = 'abcdefghijklmnopqrstuvwxyzABCDEFGHIJKLMNOPQRSTUVWXYZ_'
    while (pos < length) {
      let currentChar = this.codes[pos]
      // if current char is space or newline,  continue
      if (currentChar === " " || currentChar === "n") {
        pos++
        continue
      } else if (currentChar === '"') {
        // if current char is " then we have a string
        let res = ""
        pos++
        // while next char is not " or n and we are not at the end of the code
        while (this.codes[pos] !== '"' && this.codes[pos] !== 'n' && pos < length) {
          // adding the char to the string
          res += this.codes[pos]
          pos++
        }
        // if the loop ended because of the end of the code and we didn't find the closing "
        if (this.codes[pos] !== '"') {
          return {
            error: `Unterminated string`
          }
        }
        pos++
        // adding the string to the tokens
        tokens.push({
          type: "string",
          value: res
        })
      } else if (varChars.includes(currentChar)) { arater
        let res = currentChar
        pos++
        // while the next char is a valid variable/keyword charater
        while (varChars.includes(this.codes[pos]) && pos < length) {
          // adding the char to the string
          res += this.codes[pos]
          pos++
        }
        // if the keyword is not a built in keyword
        if (!BUILT_IN_KEYWORDS.includes(res)) {
          return {
            error: `Unexpected token ${res}`
          }
        }
        // adding the keyword to the tokens
        tokens.push({
          type: "keyword",
          value: res
        })
      } else { // we have a invalid character in our code
        return {
          error: `Unexpected character ${this.codes[pos]}`
        }
      }
    }
    // returning the tokens
    return {
      error: false,
      tokens
    }
  }
  run() {
    const {
      tokens,
      error
    } = this.tokenize()
    if (error) {
      console.log(error)
      return
    }
    console.log(tokens)
  }
}
If we run this in a terminal with node index.js, we should see a list of tokens printed in the console.
Great stuff!
Defining rules and syntaxes
We want to see if the order of our codes matches some sort of rule or syntax. But first we need to define what those rules and syntaxes are. Since our language is so tiny, it only has one simple syntax which is a print keyword followed by a string.
keyword:print string
So let’s create a parse method that loops through our tokens and see if we have a valid syntax formed. If so, it will take necessary actions.
class Magenta {
  constructor(codes) {
    this.codes = codes
  }
  tokenize(){
    /* previous codes for tokenizer */
  }
  parse(tokens){
    const len = tokens.length
    let pos = 0
    while(pos < len) {
      const token = tokens[pos]
      // if token is a print keyword
      if(token.type === "keyword" && token.value === "print") {
        // if the next token doesn't exist
        if(!tokens[pos + 1]) {
          return console.log("Unexpected end of line, expected string")
        }
        // check if the next token is a string
        let isString = tokens[pos + 1].type === "string"
        // if the next token is not a string
        if(!isString) {
          return console.log(`Unexpected token ${tokens[pos + 1].type}, expected string`)
        }
        // if we reach this point, we have valid syntax
        // so we can print the string
        console.log('x1b[35m%sx1b[0m', tokens[pos + 1].value)
        // we add 2 because we also check the token after print keyword
        pos += 2
      } else{ // if we didn't match any rules
        return console.log(`Unexpected token ${token.type}`)
      }
    }
  }
  run(){
    const {tokens, error} = this.tokenize()
    if(error){
      console.log(error)
      return
    }
    this.parse(tokens)
  }
}
And would you look at that — we already have a working language!
Okay but having codes in a string variable is not that fun. So lets put our Magenta codes in a file called code.m. That way we can keep our magenta codes separate from the compiler logic. We are using .m as file extension to indicate that this file contains code for our language.
Let’s read the code from that file:
// importing file system module
const fs = require('fs')
//importing path module for convenient path joining
const path = require('path')
class Magenta{
  constructor(codes){
    this.codes = codes
  }
  tokenize(){
    /* previous codes for tokenizer */
 }
  parse(tokens){
    /* previous codes for parse method */
 }
  run(){
    /* previous codes for run method */
  }
}

// Reading code.m file
// Some text editors use rn for new line instead of n, so we are removing r
const codes = fs.readFileSync(path.join(__dirname, 'code.m'), 'utf8').toString().replace(/r/g, "")
const magenta = new Magenta(codes)
magenta.run()
Go create a programming language!
And with that, we have successfully created a tiny Programming Language from scratch. See, a programming language can be as simple as something that accomplishes one specific thing. Sure, it’s unlikely that a language like Magenta here will ever be useful enough to be part of a popular framework or anything, but now you see what it takes to make one.
The sky is really the limit. If you want dive in a little deeper, try following along with this video I made going over a more advanced example. This is video I have also shown hoe you can add variables to your language also.
Without any of your inventory moving out for sale, you will see no money coming in from your current stocks. Beyond this concern, it is also important to track your inventory levels and make sure you have enough to sell to your customers. Striking a good balance between the supply and demand of your inventory is extremely crucial if you want to stay in business for the long term.
However, taking control of hundreds of inventory and equipment across various locations is no easy feat. Without a proper inventory management system in place, it’s almost impossible to keep track of all your warehouse and supply chain operations in real-time. Monitoring the number of raw materials that you have, as well as the unfinished goods and ready-to-sell items, becomes twice as challenging if you do not have the right tools for the job.
Poor inventory management leads to many inefficiencies that can cripple the performance of your business. Whether you have too little or too much inventory, improper inventory management can cost you time and money, negatively affecting your bottom line and business growth. For every hour that your business experiences a downtime, you may lose around $140,000 to $5 million.
So if you think your inventory practices are no longer efficient and unable to keep up with demand, implementing an inventory management software system is a great way to turn things around.
What Is an Inventory Management Software?
An inventory management software is a piece of technology that helps you monitor inventory levels, orders, sales, and deliveries. It is a helpful tool that automates many aspects of inventory and warehouse management, such as tracking inventory, managing reorders and keeping your accounting data updated. With an inventory management system, you can manage and organize your inventory across multiple warehouses with ease.
Inventory control is one of the most important features you’ll find in an inventory management system. This allows you to categorize products by type, SKU (or serial number), and location. In turn, you can easily search, filter, and view products to ensure you have enough stocks and can reorder supplies as necessary. Inventory management systems also help you audit data and generate reports in real-time.
Most inventory management systems today are cloud-based, which means your data is stored in the cloud and is constantly updated. This allows you to track your inventory as they come in and out of your storefronts and storage facilities. Mobile-optimized solutions also allow you to access your warehouse activities from your mobile devices, enabling you to remotely manage and organize your inventory. As a matter of fact, 67% of warehouses now plan to take advantage of mobile devices to accelerate inventory and warehousing operations.
Knowing how much inventory you have is critical for every aspect of your business. Aside from keeping track of your inventory levels, there are more ways by which inventory management software can benefit your business. Here are some examples:
Automated Inventory Management
One of the biggest benefits of inventory management software is the automation of your inventory control processes. Instead of manually entering data and recording every action that takes place in your inventory, inventory management solutions do all these things for you. These systems provide you with more accurate, efficient, and insightful inventory data, allowing you to save more time and optimize your processes.
Given the benefits of automation to inventory and warehouse operations, it comes as no surprise that the warehouse automation market is estimated to reach $37.6 billion by 2030, according to a report by BusinessWire. This data reflects the demand for inventory automation systems, which is driven by a need for more rapid deployment and greater efficiency of inventory practices. At this rate, the inventory automation systems are likely to capture a significant market share compared to the traditional methods. Moreover, USPs such as AI incorporations and efficiency will drive considerable market shares.
By automating your inventory processes, you can avoid the risk of human error from manual data entry, saving you the time and money that you can potentially lose as a result of any mistake in your inventory operations. An inventory management solution allows you to automate everything, from dropshipping to backorders, stock replenishment, partial fulfillment, and inventory counts to customer tagging and order invoicing.
Prevent Stockouts and Overselling
For growing businesses, stockouts and overselling are major challenges. Based on a report by RetailDive, retailers lose over $1 trillion every year from stockouts alone. Shoppers often encounter out-of-stock items after three shopping trips from the same brand, resulting in profit losses for many retailers.
Implementing inventory management software can help you prevent this scenario. The app lets you take control of your inventory count, enabling you to see which products are still in stock and which ones need replenishment. It also ensures that you have just the right amount of supplies to avoid overstocking. In this way, you can easily meet consumer demands while at the same time delivering financial elasticity to your business.
Aside from those, proper inventory control gives you better visibility of the complete lifecycle of your inventory items, from purchases, reorders, and shipping to warehousing, storage, turnover, and loss prevention. An inventory management system helps you manage the flow of raw materials, goods, and services up to the point your customers receive the items they ordered and consume the goods.
Systematic Inventory Tracking
An inventory management software also helps you to categorize and track your products by SKU, type, or location. This allows you to group similar inventories together and keep them in an organized location, making it easier for you to locate products. By systematically arranging your inventories, you can easily determine which products require reordering and generate sales data for every item that gets sold.
Furthermore, inventory management systems improve your inventory tracking operations. These tools allow you to monitor every single one of your inventory throughout its entire lifecycle—from the moment it enters your warehouse to the time, it gets sold to your customers. This means having access to each product’s location in your storeroom, relevant sales, and purchase orders, as well as the total number of all available stocks for the same product.
Batch tracking is also a powerful functionality of any good inventory management solution. This system allows you to the group and keeps track of all items that share similar properties. Moreover, batch tracking helps you track defective items back to the batch where they belonged. From here, you can inspect other items from the same batch if they have similar defects, allowing you to ensure the quality of your products before they get delivered to your customers.
Improves Inventory Planning and Forecasting
Inventory management software products have the capability to use past data, trends, and known upcoming events, such as holidays and peak seasons, to help you predict the estimated amount of inventory levels needed for a future period. This ensures that you have enough products to fulfill customer orders without running the risk of stockouts or overstocking unnecessary inventory ahead of time.
Through accurate inventory forecasting, you can easily identify trends and patterns in consumer behavior, allowing you to adapt to dynamic conditions and meet the demands of your customers. On top of that, inventory management systems provide you with replenishment of data, such as the timing, availability, and delivery speed of your inventories. This helps you meet the right amount of inventory levels based on inventory goals, supply, and demand for a certain period.
Harness the Power of Inventory Management Software
With all the benefits outlined above, it’s clear that inventory management systems have the power to transform your business and maximize its potential to generate more sales. Implementing the right software product can help you manage and track inventory within your facility and overall supply chain, leading to higher productivity and better profitability for your business. As such, inventory management software can bring all aspects of your inventory operations into one cohesive system.
According to Statista, over two billion people bought products or services online in 2020, and e-retail sales grew past $4.2 trillion worldwide.
Luckily, this is an opportunity to increase your eCommerce sales and profits.
How can you turn these shoppers into your customers?
By first converting your website visitors to qualified leads.
If you execute this step effectively, it becomes easier to nurture your leads and convert them to customers. But, first things first, how can you capture more leads for your eCommerce store this year?
In this post, I’ll show you 7 eCommerce lead generation tactics that work well in 2022.
Why Does Lead Generation Matter in eCommerce?
Before we go into the tactics, why does lead generation even matter for your eCommerce store? What are the potential benefits you stand to gain?
Here are 5 of them:
You have access to buyer’s information
When you acquire leads, you’ve obtained details such as:
Name
Email address
Phone number
Address
Gender
Product preferences
With the stiff competition among eCommerce stores today, having information about your potential customer can provide an edge to convert an individual into a customer.
These pieces of information will help you create relevant offers that can convince your prospects.
Again, buyer information can help you determine the right time to send offers to them.
Acquire more feedback
When you capture a lead, one of your aims is to understand that lead.
And to achieve this, you need to acquire as much information as possible from them.
Through interactions with your leads, you’ll obtain information about their favorite products, their pain points, budget, and more. This feedback gives you the ability to improve your service and capture even more leads in future marketing campaigns.
It becomes easier to track marketing results
In some cases, shoppers browse through your store and buy products without leaving their information. This can make it difficult to know how effective your marketing campaigns are.
By generating leads, you’ll have an objective number of your audience size.
While running marketing campaigns, you can easily track results based on the number of leads you have and how they progress through the sales funnel.
Increases your chances of boosting sales
Since you have leads in your marketing system, you can create personalized marketing sequences to convert those leads into customers.
Through your interactions, you’ll understand a lead’s preferred marketing channel and connect with them on those channels.
Furthermore, the knowledge you have about leads over time helps you recommend the right products to each prospect.
As a result, you’re likely to improve sales compared to sending your whole product catalog to a lead.
Increases website traffic
During your interactions with prospects, you’ll often share website links for them to check some pages. Whether you’re trying to educate your audience or promote an offer, directing them to your website pages will provide all the information they need at different stages of the sales funnel.
Due to these campaigns, you can get more valuable traffic to your website.
Effective eCommerce lead generation tactics
Now that you know why lead generation is a must for your eCommerce store, you probably want to generate more leads.
Nevertheless, you have to engage in this activity and do it successfully. So, what are lead generation tactics you should consider using in your marketing campaigns?
1. Use a lead magnet
Think about it, your inbox is crowded. Likewise, your website visitors’ inboxes are crowded.
This makes people reluctant before giving out their personal information. Of course, you intend to provide value to your subscribers after they sign up.
To most visitors, however, that’s insufficient. You have to provide value right now.
That’s why using a lead magnet can increase the number of eCommerce leads you generate.
Here’s a popup from Old Navy promising a 20% discount for its visitors:
Beyond that, the clothing and accessories company also promised information about new arrivals and exclusive sales. These are lead magnets that can convince a visitor to enter their email address.
While using a lead magnet, you have to observe some best practices. First, the lead magnet has to be relevant to your audience.
For instance, a discount offer is more attractive to a shopper than telling them to subscribe to your latest blog posts.
Therefore, a discount will be more effective as a lead magnet than promising to send newsletters.
Another point to keep in mind is that the lead magnet should be helpful within a short time. If potential leads don’t need your lead magnet until 3 weeks, then it will have a weaker pull.
2. Use exit-intent popups
Since shoppers now have so many choices, they might compare offers on 4 or 5 websites before deciding where to buy.
Apart from that, shoppers may have other reasons to abandon your website.
And sometimes, when they leave, they never come back.
Whatever reason they have to leave your site, you can use a popup maker to create exit-intent popups to bring them back.
And if they’re on your checkout page, you can turn the leaving shopper into a customer.
Even if they end up leaving your website, exit-intent popups allow you to acquire their details for future contact.
Here’s an exit-intent popup example from Minimum, an eCommerce store:
A lot of times, shoppers begin their buying process through a Google search.
If your website content shows up among the results, you have a chance of attracting visitors and converting them to leads. Otherwise, you’re losing potential leads.
Now, the first step to content creation is by optimizing your pages for keywords you want to rank for.
What keywords are your potential customers using on search engines?
You can discover keywords and group them based on different search intents.
These include:
Navigational keywords: these are keywords used to find specific brand pages e.g. Shopify login page.
Informational keywords: these are keywords used to find information about a topic, product, or service, e.g. how to identify original calf leather.
Commercial keywords: these are keywords from searchers who will likely buy in the future but have not settled on a product e.g. best TV set.
Transactional keywords: these are keywords searchers use when they’ve decided on a product to buy e.g. buy brogue shoes in Boston.
These keyword groups allow you to target potential leads at different stages of the sales funnel.
That said, you can’t perform adequate keyword research without the right tool.
Some popular keyword research tools today are SEMrush, Ahrefs, Ubersuggest, keywordtool.io, or any of these alternatives to SimilarWeb.
Once you discover the keywords potential customers use, you can optimize your page for those keywords.
Optimization includes tasks such as:
Adding target keywords to parts of your pages such as URL, title, subheadings, and more
Ensuring your page content meets the search intent of the searcher
Increasing your website speed
Making your website mobile-friendly
Having a simple website structure
Apart from optimizing your pages, you should also perform off-page SEO tasks such as building backlinks to your pages and guest blogging.
4. Optimize your landing pages for optimum conversions
Landing pages are one of the most potent tools for generating leads. In most cases, you can create landing pages specifically for marketing campaigns.
Whether you’ve created a social media or search ad, you’ll direct clicks from them to your landing pages.
On this page, you have to present an offer that is convincing enough for visitors to submit their details.
Furthermore, you can use psychological concepts such as social proof, fear of missing out (FOMO), scarcity, and more.
Some elements you need to optimize on your landing page include your offer, page copy, background image, CTA text, CTA button color, and more.
Beyond that, your landing page should be congruent with your ad.
That is, your ad design and eCommerce offer should be similar to that on your landing page for continuity.
Another vital part of optimizing your landing pages is performing A/B tests.
With A/B tests, you can compare two variations or more of your landing page to see the one with the highest conversion.
However, to run effective A/B tests, you should only test a single element of your page. This way, you’ll easily identify the change responsible for your increase in conversions.
Some A/B testing tools you can use to track user behavior and perform A/B tests on your landing pages are VWO, Optimizely, and Crazy Egg.
UK Tool Centre, an eCommerce store, removed filters from its woodcare product page.
For your eCommerce store, there are many product categories your customers want to browse.
When you create PPC ads, the sitelink extension allows you to add page links below your ad.
For instance, if you’re running PPC ads for a keyword such as “men’s shoes,” you can link to a landing page that contains a selection of men’s shoes.
But below the result, you can add sitelinks to different types of shoes.
In this situation, the searcher may see a category that interests them. Consequently, you increase the chances of a searcher clicking through to your website.
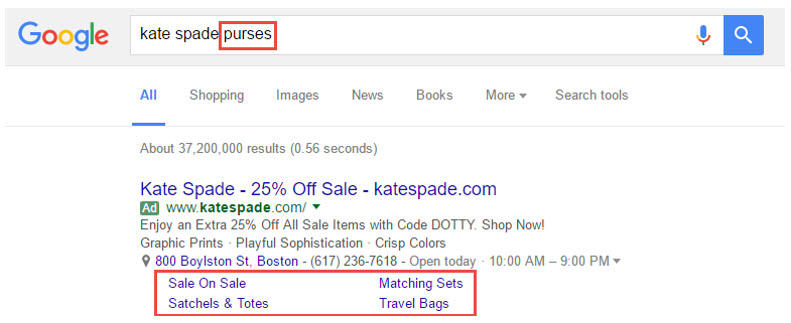
Here’s an example from Kate Spade:
Source: Wordstream
You can see that even the ad sitelinks are relevant to the search query.
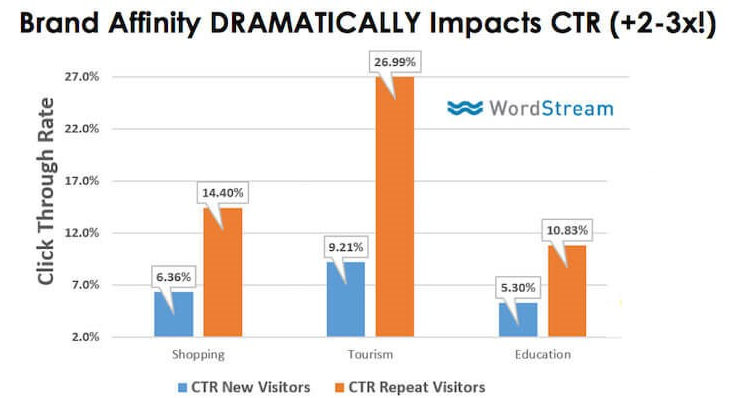
According to Google, adding sitelinks to your ads can increase the average CTR for that ad by 10-20%. And for queries where the searcher is searching for a branded term, the CTR can increase by 20-50%.
Once you get searchers using valuable keywords to visit your landing page, it becomes easier to convert them to qualified leads.
6. Host social media giveaways
Most people love gifts. Especially, if the gift is a product they admire.
Think about it, if you have social media followers, these are people who are already interested in your brand. Therefore, a giveaway will only improve the interaction and trust they have in you.
Apart from improving interactions, there are other benefits of running a giveaway depending on your campaign goals.
For example, some possible benefits include:
Increasing social media followers
Improving brand awareness
Increasing website traffic
Generating leads
Increasing sales
Talking about generating leads, how do you achieve that during your social media giveaways? One effective way is to use your entry criteria.
Some of your entry criteria may include participants entering their email addresses or following you on social media. Even though it’s challenging to account for social media leads, they can become customers in the future through your social media campaigns.
Here’s an example of a giveaway on Instagram by Goodnight Macaroon, an eCommerce store for casual women’s clothing:
By using a giveaway tool, you can create a giveaway landing page on your website. Consequently, visitors can enter giveaways and submit their contact details.
7. Run ad remarketing campaigns
No matter how great your website or effective your campaign is, some visitors will leave without converting.
Are these people lost forever?
With ad remarketing, you have the opportunity to bring back visitors who have left your website. One advantage ad remarketing has over traditional ads is that recipients already know your brand. After all, this is not an ad from an unknown brand promoting products they have no interest in.
Therefore, remarketing ads usually get more clicks than traditional ads.
If you want to run a remarketing ad right now, some popular platforms you can explore are Google, Facebook, and Instagram.
To create effective remarketing ads, you can create ads according to the pages an individual visits. This way, the ads will be even more relevant to the recipient.
For instance, a WordStream study revealed that remarketing audiences get 2 – 3X better click-through and conversion rates than new visitors.
However, the landing page for your remarketing ad shouldn’t be the original page they bounced from. If the page failed to convert them the first time, what’s the chance it will convert them the second time?
So, you should modify the original page to increase the chances of conversions. When some of them come back to your website, they can submit their contact details or, better still, buy a product.
In a remarketing ad case study, Sierra Trading Post sent ads to visitors who viewed their products. This led to a 5X increase in conversions for the eCommerce store.
While this campaign has increased sales, you can run similar campaigns for lead generation.
Conclusion
Generating consistent leads is a must for your eCommerce store if you want your business to survive and thrive. In this post, I’ve provided 7 tactics that still work effectively in 2022.
Of course, there are probably tens of tactics you can exploit. However, you can start with these tactics to capture more leads and generate sales.
Which of these tactics is your favorite? Is there a tactic that has worked wonders for you but is absent here? Let’s hear in the comments!