Archive

Archive for April, 2023

Leveraging Cloud Observability for Better Application Performance Management

April 25th, 2023 No comments

Have you ever wondered what it would be like to be able to observe your entire application infrastructure?

This concept is referred to as observability.

Various companies utilize application performance management or APM tools to optimize their applications after observing them.

This is because these tools benefit teams to gain insights into application deployment environments to guarantee performance levels will never fall below certain thresholds.

Cloud Observability- An Overview

Cloud observability is a new technology that has taken the world of application performance monitoring and management by storm.

It’s an artificial intelligence-based approach to understanding your applications’ performance in the cloud.

The goal is to enable you to not only see what is going on but also understand why it’s happening, so you can take action and improve the performance of your applications.

AI Observability requires a unified view of all the components that an application has, such as the following:

  • Underlying hardware and software components (such as virtual machines),
  • Middleware (such as databases)
  • End-user applications

Importance Of Cloud Observability for Application Performance Management

Source

Organizations can use cloud observability tools to gain insight into their cloud infrastructures by collecting data from multiple sources across diverse environments such as:

  • Physical servers
  • Virtual machines
  • Containers
  • Databases
  • Networks
  • User experience management systems (UXMs)
  • Hypervisors/virtualization platforms
  • Storage arrays
  • Operating systems
  • Applications 

This data can be analyzed using data visualization tools that help users understand trends in their cloud infrastructure over time.

Cloud observability tools typically focus on three main areas:

  • Performance management
  • Application audit trails
  • Event data correlation

Performance management helps you track down slowdowns or errors by providing metrics about how well your apps perform over time.

Audit trails provide detailed information about changes made to your infrastructure over time so you can see which actions caused problems or helped fix them later.

Understanding Application Performance Management 

Source

Application performance management (APM) tools are crucial to any DevOps toolchain.

They collect and analyze metrics from across your entire application infrastructure, giving you the visibility to identify and diagnose performance issues early.

APM tools help identify many different types of problems, including:

  • Performance bottlenecks in your code or infrastructure
  • Slow or unresponsive web pages
  • Errors or exceptions that occur during processing
  • Slow database queries that cause long-running processes
  • Service outages or other unexpected behavior

Benefits of Application Performance Management

APM has become more than just a tool for monitoring application performance.

It’s also critical to ensure that the cloud infrastructure is performing optimally.

Cloud Observability for APM can be improved by adding new capabilities such as:

  • Monitoring application infrastructure
  • Tracing service dependencies
  • Collecting telemetry from user devices

With cloud APM, you can:

  • Get real-time insights into application performance, availability, and user experience
  • Proactively identify performance bottlenecks before users are impacted
  • Identify the root cause of issues faster with rich analytics capabilities, including automated root cause analysis
  • Automate response actions so you can fix problems before they impact customers 

How  Can Cloud Observability Enhance APM?

Source

Cloud observability enables application performance monitoring because it provides visibility into application performance from end-to-end, that is, from the user requesting an application to its delivery by the underlying cloud infrastructure.

Cloud observability also helps you understand how your application behaves as it scales and responds to load changes.

Cloud observability enhances APM in several ways:

  • Provides deeper visibility into application performance across multiple environments, including physical servers, virtual machines (VMs), containers, and more
  • Integrates with other types of monitoring tools such as logs, tracing, and metrics so you can see how they all work together to understand what’s happening in your application environment
  • Helps you manage performance for hybrid applications that combine traditional on-premise applications with cloud-based software components such as databases or message queues

Leveraging Cloud Observability for Better APM

Source

Cloud Observability provides a real-time view of your application’s cloud infrastructure and end-user experience. It also offers advanced analytics capabilities that give you greater visibility into the health of your application.

This helps you identify and troubleshoot problems faster to resolve them before they cause any user impact.

Steps to leverage cloud observability for better APM:

Setting Up Cloud Observability Tools

Cloud observability tools offer deep visibility into cloud-based applications, enabling you to monitor critical metrics like:

  • Latency
  • Error rates
  • Throughput to detect potential problems early on

To set up these tools, you need a monitoring agent installed in your application or infrastructure stack that sends data back to a collector in the cloud.

The collector stores all the information that is then analyzed by the tool’s analytics engine to give you insights into your application’s overall health status.

Monitoring Application Performance Metrics

Once the tool is set up, you can monitor your application’s performance metrics and log real-time events.

You can use these metrics to measure various aspects of your application’s behavior, including:

  • Throughput (number of requests per second)
  • Latency (time taken for a request)
  • Error rate (percentage of failed requests)

Analyzing And Troubleshooting Performance Issues

Cloud observability tools provide insight into how applications are performing in production environments.

These tools can identify bottlenecks and performance issues and determine where resources are utilized or wasted.

The first function is executed by gathering and analyzing metrics from various sources, such as:

  • Logs
  • Traces
  • Network traffic

The second function involves troubleshooting these metrics, which can be done manually or automatically with the help of machine learning algorithms.

Using Data Insights for Continuous Improvement

The good news is that there are plenty of ways to use data insights for constant improvement in your APM strategy.

By leveraging cloud observability features like log monitoring and metrics, you can ensure that all your apps perform at their peak potential. You can reduce IT costs and downtime by optimizing resource utilization.

Examples of How Cloud Observability Can Improve APM

Source

It can help you better monitor, detect and troubleshoot issues that affect application performance.

For example, you can:

  • Correlate events across multiple infrastructure layers, including application logs, network data, and server metrics. This helps you quickly identify the root cause of an issue and then take action to remediate it
  • Monitor metrics from other systems that aren’t natively available via APM tools, such as security alarms or storage metrics
  • Analyze historical data for proactive problem detection and troubleshooting instead of waiting for incidents to occur before investigating them

Here are some more examples of how cloud observability can improve APM:

Monitoring

Cloud observability provides insight into application performance from every possible angle, including:

  • Network
  • Server
  • Database
  • User experience

Alerts

Cloud observability alerts can be set up for specific events or activities so you can proactively identify and resolve issues before they impact users or your business.

Debugging

With cloud observability, you don’t have to wait until something goes wrong before investigating an issue. With this level of insight into your applications’ behavior, you’ll know exactly where problems exist before they affect end users or business operations.

Wrapping Up

The operational insights available via monitoring in a cloud environment are thus invaluable to the operations teams of today and tomorrow.

And as more organizations move their workloads to and from the cloud, they’ll need a new way to think about APM.

As we noted above, it may not be enough anymore to monitor an application’s latency as organizations will also need a way to accurately monitor cloud latency to attribute issues to underlying infrastructure problems.

With this additional visibility into cloud environments, such as performance and cost metrics, hybrid and multi-cloud infrastructures can address issues before they impact applications.

Featured image by Danist Soh on Unsplash

The post Leveraging Cloud Observability for Better Application Performance Management appeared first on noupe.

Categories: Others Tags:

10 Best AI Tools for Web Designers (2023)

April 24th, 2023 No comments

It’s time to stop worrying if AI is going to take your job and instead start using AI to expand the services you can offer to clients and the skills you can add to your résumé.

There are thousands of AI-powered apps out there that can take over your grunt work, and fill in the gaps where your own experience is weak. Take a glance through this list, you’re sure to find something that will make your workday easier, more enjoyable, and more profitable.

GitHub Copilot

Remember that argument that designers should know how to code, or at least understand how code works? Not anymore. You don’t need to fall back on templates or frameworks, GitHub Copilot will write bespoke code for you.

Copilot is frighteningly powerful. Simply type the code you want into your favorite code editor as comments, and Copilot will write the code you need. It works best when deployed on short snippets like functions. And it works with HTML, CSS, JavaScript, and practically anything else.

Khroma

Cranking out branding day in and day out can kill anyone’s creativity. There are only so many times you can try and sell a client on pink, only to have them choose the blue again.

If your portfolio is starting to look a little samey thanks to its color choices then you should look into Khroma, an awesome little tool that applied machine learning directly to you, to discover the colors you like best. You’ll still have to sell them to your clients, but at least you’ll have plenty of options.

Khroma

Writesonic

If you’re one of those designers who creates an advert, only for the client to ask you to “throw in some copy”, then you need a tool like Writesonic.

Writesonic is a GPT-4 powered writing app that is powerful, and flexible. It works great for short passages of marketing text. It even takes a pretty good stab at website copy, so you can stop nagging your client for content, generate something for them, and get on with the design work.

Writesonic

Debuild

Sometimes what you really need is a proof-of-concept or a functioning prototype to take to testers. Building one can be challenging, and hiring a dev team too early can be ruinously expensive.

Debuild is an amazing AI tool that can build web apps in minutes by using AI to generate SQL and React components. It’s a superb way to get going with a functional app that just needs its UI designed.

Debuild

Fontjoy

At this point, we’re all sick of designing with Open Sans and Lato. But finding a good font pairing that works just as well can be tough unless you’re a typography expert.

Fontjoy is a handy tool that generates font pairings using AI. All you need to do is tell it whether you want more or less contrast, then hit the “generate” button.

Fontjoy

Vance

Ever ask a client for a product shot, only to receive a quick snap they took on their cellphone? Clients rarely have professional-grade images available and assume designers can just fix up images in Photoshop.

You don’t need to bother booting up PS thanks to Vance, an excellent AI-powered app that polishes photos for you. It can sharpen, denoise, upscale, enhance, and retouch images in any way you need. It’s especially handy for upscaling images.

Vance

VisualEyes

One of the most time-consuming parts of the design process is testing. It’s not enough to ask your friends, and full-on UX studies are beyond the budget of most projects.

VisualEyes is a game-changer for UI designers. Using AI it analyses eye-tracking to study your designs and lets you know what’s good enough, and what needs more work.

VisualEyes

Jasper

Designers that need to generate longer text, for blogs, or social media posts, should check out Jasper. It’s an advanced AI writing tool that does a good job of generating content.

Jasper delivers one of the most human-like writing services, which is to say it’s less robotic than most of its rivals. You’re still going to need to spend time editing the text to make it sound less cold and less formal. But if you have the time to polish, Jasper will give you a head start on content.

Jasper

Postcards

Designing emails must be one of the most tedious jobs a designer is tasked with. Not only do you have to engage readers quickly, but you have to do it in a medium that is 15 years behind technology on the web.

Postcards is an excellent solution that uses AI to turbocharge your email-building process. There are mobile-friendly templates, drag-and-drop editing, plus integration with most major marketing platforms, all backed with AI intelligence.

Postcards

Midjourney

Illustration is one of the most time-consuming side jobs designers are asked to do. Happily, there are lots of AI-powered apps that will tackle this most onerous of jobs for you.

Perhaps the most promising illustration tool is Midjourney, which is still in beta but still manages to deliver exceptional results — especially if you need a realistic portrait of an elfin woman in a floaty dress. (Don’t blame the tool, blame the prompts!)

Midjourney
Categories: Designing, Others Tags:

The Potentially Dangerous Non-Accessibility Of Cookie Notices

April 24th, 2023 No comments

No matter what your stance is on them, no matter what your perspective is on data protection, web advertisement, setting cookies, EU’s General Data Protection Regulation (GDPR), and privacy preferences, cookie consent widgets (or “cookie banners”) are a reality on the web today.

For this reason, it is worth looking into how accessible and usable these banners are or can be. They have become, for better or worse, a component of the majority of today’s websites. Even more, cookie banners are often the first thing a user encounters. And, of course, they are part of every site of a webpage once they are implemented.

Sometimes, cookie banners are a technical necessity because of the page’s feature set or because of advertisements on the page. Even more often, cookie banners are not built by the front-end team but are a ready-made solution, like UserCentrics or others.

Before I explain why the cookie banner deserves special attention regarding its accessibility, let’s quickly explain how the current gold standard of web accessibility, Web Content Accessibility Guidelines (WCAG) Version 2.1, works.

WCAG consists of principles, guidelines, and success criteria. The latter are testable steps to check against a webpage. For example:

  • “Is the main language of the document set?”
  • “Does this non-text content have a suitable text alternative?”
  • “Is it perceivable where my focus is when I’m using the web presence with the keyboard (or another tech that emulates keyboard presses)?”

You may have noticed that these are “yes or no” questions. Accordingly, this means that the final verdict of any given success criterion is either “pass” or “fail.”

Additionally, conformance to WCAG, as defined by the W3C (the governing body of the Web), means that none of its success criteria is allowed to “fail” when the whole document needs to be conformant:

“Conformance to a standard means that you meet or satisfy the ‘requirements’ of the standard. In WCAG 2.0, the ‘requirements’ are the Success Criteria. To conform to WCAG 2.0, you need to satisfy the Success Criteria, that is, there is no content which violates the Success Criteria.”

W3C Working Group Note

No nuance here. Going back to our cookie consent interface, this means that the banner (or any other component) alone has the potential to negatively affect the WCAG conformance of an entire web project.

WCAG conformance could be a big legal deal for many websites, whether part of the public sector in the European Union or the United States, as it is considered to fall under non-discrimination or market access laws or overall human rights to access to information. Webpages frequently must adhere to directives and regulations that directly or indirectly refer to WCAG, often its newest version, and conformance to its level AA standards. Therefore, all the following WCAG criteria are viewed through this lens, being fully aware that they are only a mere starting point when it comes to true web accessibility. On top of that, cookie consent interfaces are implemented on every subpage of a website, consequently harming accessibility and conformance throughout an entire website.

So, in order to not let a faulty cookie banner interface drag down your page’s conformance with accessibility laws and, more importantly, not exclude users from accessing and exercising their rights, let’s list what to look for, what to configure, and what to build properly in the first place.

Contrast Errors

This is especially relevant when it comes to important controls such as the setting of cookies or the overall acceptance of the recommended cookie set. It is crucial that form controls and text can be sufficiently perceived. Unsurprisingly, a solid contrast is also important for WCAG in general. Namely, in success criteria 1.4.3 and 1.4.11, both define contrast boundaries.

What To Do

When you are using a ready-made cookie management solution, try to influence the colors (if possible, potentially in your cookie vendor’s settings) and make sure interactive controls have sufficient color contrast.

Additionally, if your website relies on a dedicated contrast mode for WCAG conformance, check whether it extends to (or influences) the cookie management interface. I have seen cases in my accessibility auditor practice where this was not considered, and an inaccessible (often branded) color combination was used in the cookie interface, thinking the contrast mode takes care of every color-related violation. But the contrast setting of the website did not affect the third-party cookie banner due to it being, well, third-party and loaded from external sources or after the contrast mode had done its work, resulting in a “Fail” on WCAG’s contrast-related success criteria.

Pseudo Buttons

Another cookie banner issue can be one thing that is, unfortunately, an error pattern that you can find outside of cookie management: divs or spans with click events posing as links or buttons. These controls may be styled like buttons but lack the semantic information of a button.

On top of that, these controls usually aren’t keyboard focusable. Hence, many serious barriers and WCAG violations are occurring all at once. If we were about to imagine the most “pseudo” button, e.g., a div with a click handler, this would at least violate success criteria 2.1.1 (Keyboard), because it is neither reachable nor “activatable,” and 4.1.2 (Name, Role, Value) because it doesn’t “introduce” itself as a button and lacks a programmatic label.

What To Do

The easiest thing to do, assuming you have built the cookie management interface yourself, is to replace those above-mentioned pseudo buttons with real

Categories: Others Tags:

Exploring The Potential Of Web Workers For Multithreading On The Web

April 21st, 2023 No comments

Web Workers are a powerful feature of modern web development and were introduced as part of the HTML5 specification in 2009. They were designed to provide a way to execute JavaScript code in the background, separate from the main execution thread of a web page, in order to improve performance and responsiveness.

The main thread is the single execution context that is responsible for rendering the UI, executing JavaScript code, and handling user interactions. In other words, JavaScript is “single-threaded”. This means that any time-consuming task, such as complex calculations or data processing that is executed, would block the main thread and cause the UI to freeze and become unresponsive.

This is where Web Workers come in.

Web Workers were implemented as a way to address this problem by allowing time-consuming tasks to be executed in a separate thread, called a worker thread. This enabled JavaScript code to be executed in the background without blocking the main thread and causing the page to become unresponsive.

Creating a web worker in JavaScript is not much of a complicated task. The following steps provide a starting point for integrating a web worker into your application:

  1. Create a new JavaScript file that contains the code you want to run in the worker thread. This file should not contain any references to the DOM, as it will not have access to it.
  2. In your main JavaScript file, create a new worker object using the Worker constructor. This constructor takes a single argument, which is the URL of the JavaScript file you created in step 1.
    const worker = new Worker('worker.js');
    
  3. Add event listeners to the worker object to handle messages sent between the main thread and the worker thread. The onmessage event handler is used to handle messages sent from the worker thread, while the postMessage method is used to send messages to the worker thread.
    worker.onmessage = function(event) {
      console.log('Worker said: ' + event.data);
    };
    worker.postMessage('Hello, worker!');
    
  4. In your worker JavaScript file, add an event listener to handle messages sent from the main thread using the onmessage property of the self object. You can access the data sent with the message using the event.data property.
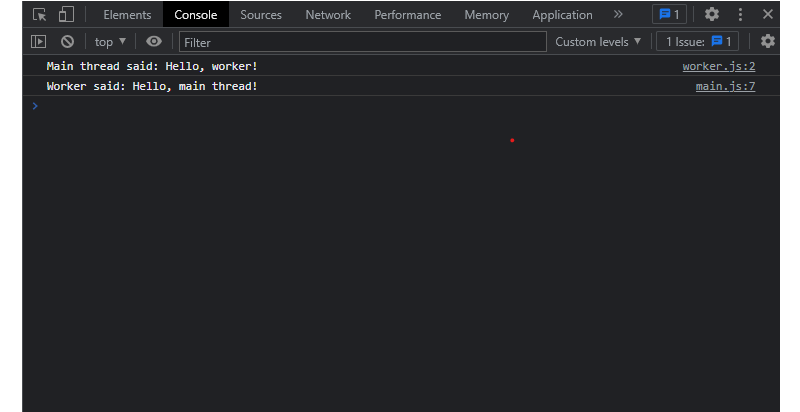
    self.onmessage = function(event) {
      console.log('Main thread said: ' + event.data);
      self.postMessage('Hello, main thread!');
    };
    

Now let’s run the web application and test the worker. We should see messages printed to the console indicating that messages were sent and received between the main thread and the worker thread.

One key difference between Web Workers and the main thread is that Web Workers have no access to the DOM or the UI. This means that they cannot directly manipulate the HTML elements on the page or interact with the user.

Web Workers are designed to perform tasks that do not require direct access to the UI, such as data processing, image manipulation, or calculations.

Another important difference is that Web Workers are designed to run in a sandboxed environment, separate from the main thread, which means that they have limited access to system resources and cannot access certain APIs, such as the localStorage or sessionStorage APIs. However, they can communicate with the main thread through a messaging system, allowing data to be exchanged between the two threads.

Importance And Benefits Of Web Workers For Multithreading On The Web

Web Workers provide a way for web developers to achieve multithreading on the web, which is crucial for building high-performance web applications. By enabling time-consuming tasks to be executed in the background, separate from the main thread, Web Workers improve the overall responsiveness of web pages and allow for a more seamless user experience. The following are some of the importance and benefits of Web Workers for multithreading on the Web.

Improved Resource Utilization

By allowing time-consuming tasks to be executed in the background, Web Workers make more efficient use of system resources, enabling faster and more efficient processing of data and improving overall performance. This is especially important for web applications that involve large amounts of data processing or image manipulation, as Web Workers can perform these tasks without impacting the user interface.

Increased Stability And Reliability

By isolating time-consuming tasks in separate worker threads, Web Workers help to prevent crashes and errors that can occur when executing large amounts of code on the main thread. This makes it easier for developers to write stable and reliable web applications, reducing the likelihood of user frustration or loss of data.

Enhanced Security

Web Workers run in a sandboxed environment that is separate from the main thread, which helps to enhance the security of web applications. This isolation prevents malicious code from accessing or modifying data in the main thread or other Web Workers, reducing the risk of data breaches or other security vulnerabilities.

Better Resource Utilization

Web Workers can help to improve resource utilization by freeing up the main thread to handle user input and other tasks while the Web Workers handle time-consuming computations in the background. This can help to improve overall system performance and reduce the likelihood of crashes or errors. Additionally, by leveraging multiple CPU cores, Web Workers can make more efficient use of system resources, enabling faster and more efficient processing of data.

Web Workers also enable better load balancing and scaling of web applications. By allowing tasks to be executed in parallel across multiple worker threads, Web Workers can help distribute the workload evenly across multiple cores or processors, enabling faster and more efficient processing of data. This is particularly important for web applications that experience high traffic or demand, as Web Workers can help to ensure that the application can handle an increased load without impacting performance.

Practical Applications Of Web Workers

Let us explore some of the most common and useful applications of Web Workers. Whether you’re building a complex web application or a simple website, understanding how to leverage Web Workers can help you improve performance and provide a better user experience.

Offloading CPU-Intensive Work

Suppose we have a web application that needs to perform a large, CPU-intensive computation. If we perform this computation in the main thread, the user interface will become unresponsive, and the user experience will suffer. To avoid this, we can use a Web Worker to perform the computation in the background.

// Create a new Web Worker.
const worker = new Worker('worker.js');

// Define a function to handle messages from the worker.
worker.onmessage = function(event) {
  const result = event.data;
  console.log(result);
};

// Send a message to the worker to start the computation.
worker.postMessage({ num: 1000000 });

// In worker.js:

// Define a function to perform the computation.
function compute(num) {
  let sum = 0;
  for (let i = 0; i < num; i++) {
    sum += i;
  }
  return sum;
}

// Define a function to handle messages from the main thread.
onmessage = function(event) {
  const num = event.data.num;
  const result = compute(num);
  postMessage(result);
};

In this example, we create a new Web Worker and define a function to handle messages from the worker. We then send a message to the worker with a parameter (num) that specifies the number of iterations to perform in the computation. The worker receives this message and performs the computation in the background. When the computation is complete, the worker sends a message back to the main thread with the result. The main thread receives this message and logs the result to the console.

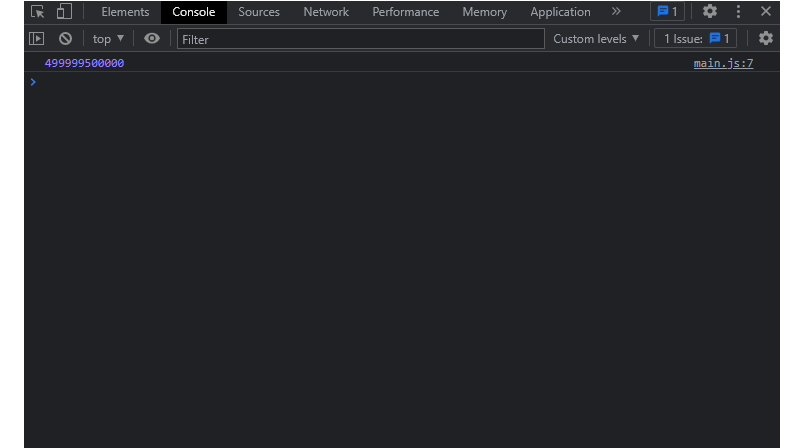
This task involves adding up all the numbers from 0 to a given number. While this task is relatively simple and straightforward for small numbers, it can become computationally intensive for very large numbers.

In the example code we used above, we passed the number 1000000 to the compute() function in the Web Worker. This means that the compute function will need to add up all the numbers from 0 to one million. This involves a large number of additional operations and can take a significant amount of time to complete, especially if the code is running on a slower computer or in a browser tab that is already busy with other tasks.

By offloading this task to a Web Worker, the main thread of the application can continue to run smoothly without being blocked by the computationally intensive task. This allows the user interface to remain responsive and ensures that other tasks, such as user input or animations, can be handled without delay.

Handling Network Requests

Let us consider a scenario where a web application needs to initiate a significant number of network requests. Performing these requests within the main thread could cause the user interface to become unresponsive and result in a poor user experience. In order to prevent this issue, we can utilize Web Workers to handle these requests in the background. By doing so, the main thread remains free to execute other tasks while the Web Worker handles the network requests simultaneously, resulting in improved performance and a better user experience.

// Create a new Web Worker.
const worker = new Worker('worker.js');

// Define a function to handle messages from the worker.
worker.onmessage = function(event) {
  const response = event.data;
  console.log(response);
};

// Send a message to the worker to start the requests.
worker.postMessage({ urls: ['https://api.example.com/foo', 'https://api.example.com/bar'] });

// In worker.js:

// Define a function to handle network requests.
function request(url) {
  return fetch(url).then(response => response.json());
}

// Define a function to handle messages from the main thread.
onmessage = async function(event) {
  const urls = event.data.urls;
  const results = await Promise.all(urls.map(request));
  postMessage(results);
};

In this example, we create a new Web Worker and define a function to handle messages from the worker. We then send a message to the worker with an array of URLs to request. The worker receives this message and performs the requests in the background using the fetch API. When all requests are complete, the worker sends a message back to the main thread with the results. The main thread receives this message and logs the results to the console.

Parallel Processing

Suppose we have a web application that needs to perform a large number of independent computations. If we perform these computations in sequence in the main thread, the user interface will become unresponsive, and the user experience will suffer. To avoid this, we can use a Web Worker to perform the computations in parallel.

// Create a new Web Worker.
const worker = new Worker('worker.js');

// Define a function to handle messages from the worker.
worker.onmessage = function(event) {
  const result = event.data;
  console.log(result);
};

// Send a message to the worker to start the computations.
worker.postMessage({ nums: [1000000, 2000000, 3000000] });

// In worker.js:

// Define a function to perform a single computation.
function compute(num) {
  let sum = 0;
  for (let i = 0; i < num; i++) {
    sum += i;
}
  return sum;
}

// Define a function to handle messages from the main thread.
onmessage = function(event) {
  const nums = event.data.nums;
  const results = nums.map(compute);
  postMessage(results);
};

In this example, we create a new Web Worker and define a function to handle messages from the worker. We then send a message to the worker with an array of numbers to compute. The worker receives this message and performs the computations in parallel using the map method. When all computations are complete, the worker sends a message back to the main thread with the results. The main thread receives this message and logs the results to the console.

Limitations And Considerations

Web workers are a powerful tool for improving the performance and responsiveness of web applications, but they also have some limitations and considerations that you should keep in mind when using them. Here are some of the most important ones:

Browser Support

Web workers are supported in all major browsers, including Chrome, Firefox, Safari, and Edge. However, there are still some other browsers that do not support web workers or may have limited support.

For a more extensive look at browser support, see Can I Use.

It is important that you check out the browser support for any feature before using them in production code and test your application thoroughly to ensure compatibility.

Limited Access To The DOM

Web workers run in a separate thread and do not have access to the DOM or other global objects in the main thread. This means you cannot directly manipulate the DOM from a web worker or access global objects like windows or documents.

To work around this limitation, you can use the postMessage method to communicate with the main thread and update the DOM or access global objects indirectly. For example, you can send data to the main thread using postMessage and then update the DOM or global objects in response to the message.

Alternatively, there are some libraries that help solve this issue. For example, the WorkerDOM library enables you to run the DOM in a web worker, allowing for faster page rendering and improved performance.

Communication Overhead

Web workers communicate with the main thread using the postMessage method, and as a result, could introduce communication overhead, which refers to the amount of time and resources required to establish and maintain communication between two or more computing systems, such as between a Web Worker and the main thread in a web application. This could result in a delay in processing messages and potentially slow down the application. To minimize this overhead, you should only send essential data between threads and avoid sending large amounts of data or frequent messages.

Limited Debugging Tools

Debugging Web Workers can be more challenging than debugging code in the main thread, as there are fewer debugging tools available. To make debugging easier, you can use the console API to log messages from the worker thread and use browser developer tools to inspect messages sent between threads.

Code Complexity

Using Web Workers can increase the complexity of your code, as you need to manage communication between threads and ensure that data is passed correctly. This can make it more difficult to write, debug, and maintain your code, so you should carefully consider whether using web workers is necessary for your application.

Strategies For Mitigating Potential Issues With Web Workers

Web Workers are a powerful tool for improving the performance and responsiveness of web applications. However, when using Web Workers, there are several potential issues that can arise. Here are some strategies for mitigating these issues:

Minimize Communication Overhead With Message Batching

Message batching involves grouping multiple messages into a single batch message, which can be more efficient than sending individual messages separately. This approach reduces the number of round-trips between the main thread and Web Workers. It can help to minimize communication overhead and improve the overall performance of your web application.

To implement message batching, you can use a queue to accumulate messages and send them together as a batch when the queue reaches a certain threshold or after a set period of time. Here’s an example of how you can implement message batching in your Web Worker:

// Create a message queue to accumulate messages.
const messageQueue = [];

// Create a function to add messages to the queue.
function addToQueue(message) {
  messageQueue.push(message);

  // Check if the queue has reached the threshold size.
  if (messageQueue.length >= 10) {
    // If so, send the batched messages to the main thread.
    postMessage(messageQueue);

    // Clear the message queue.
    messageQueue.length = 0;
  }
}

// Add a message to the queue.
addToQueue({type: 'log', message: 'Hello, world!'});

// Add another message to the queue.
addToQueue({type: 'error', message: 'An error occurred.'});

In this example, we create a message queue to accumulate messages that need to be sent to the main thread. Whenever a message is added to the queue using the addToQueue function, we check if the queue has reached the threshold size (in this case, ten messages). If so, we send the batched messages to the main thread using the postMessage method. Finally, we clear the message queue to prepare it for the next batch.

By batching messages in this way, we can reduce the overall number of messages sent between the main thread and Web Workers,

Avoid Synchronous Methods

These are JavaScript functions or operations that block the execution of other code until they are complete. Synchronous methods can block the main thread and cause your application to become unresponsive. To avoid this, you should avoid using synchronous methods in your Web Worker code. Instead, use asynchronous methods such as setTimeout() or etInterval() to perform long-running computations.

Here is a little demonstration:

// In the worker
self.addEventListener('message', (event) => {
  if (event.data.action === 'start') {
    // Use a setTimeout to perform some computation asynchronously.
    setTimeout(() => {
      const result = doSomeComputation(event.data.data);

      // Send the result back to the main thread.
      self.postMessage({ action: 'result', data: result });
    }, 0);
  }
});

Be Mindful Of Memory Usage

Web Workers have their own memory space, which can be limited depending on the user’s device and browser settings. To avoid memory issues, you should be mindful of the amount of memory your Web Worker code is using and avoid creating large objects unnecessarily. For example:

// In the worker
self.addEventListener('message', (event) => {
  if (event.data.action === 'start') {
    // Use a for loop to process an array of data.
    const data = event.data.data;
    const result = [];

    for (let i = 0; i < data.length; i++) {
      // Process each item in the array and add the result to the result array.
      const itemResult = processItem(data[i]);
      result.push(itemResult);
    }

    // Send the result back to the main thread.
    self.postMessage({ action: 'result', data: result });
  }
});

In this code, the Web Worker processes an array of data and returns the result to the main thread using the postMessage method. However, the for loop used to process the data may be time-consuming.

The reason for this is that the code is processing an entire array of data at once, meaning that all the data must be loaded into memory at the same time. If the data set is very large, this can cause the Web Worker to consume a significant amount of memory, potentially exceeding the memory limit allocated to the Web Worker by the browser.

To mitigate this issue, you can consider using built-in JavaScript methods like forEach or reduce, which can process data one item at a time and avoid the need to load the entire array into memory at once.

Browser Compatibility

Web Workers are supported in most modern browsers, but some older browsers may not support them. To ensure compatibility with a wide range of browsers, you should test your Web Worker code in different browsers and versions. You can also use feature detection to check if Web Workers are supported before using them in your code, like this:

if (typeof Worker !== 'undefined') {
  // Web Workers are supported.
  const worker = new Worker('worker.js');
} else {
  // Web Workers are not supported.
  console.log('Web Workers are not supported in this browser.');
}

This code checks if Web Workers are supported in the current browser and creates a new Web Worker if they are supported. If Web Workers are not supported, the code logs a message to the console indicating that Web Workers are not supported in the browser.

By following these strategies, you can ensure that your Web Worker code is efficient, responsive, and compatible with a wide range of browsers.

Conclusion

As web applications become increasingly complex and demanding, the importance of efficient multithreading techniques — such as Web Workers — is likely to increase. Web Workers are an essential feature of modern web development that allows developers to offload CPU-intensive tasks to separate threads, improving application performance and responsiveness. However, there are significant limitations and considerations to keep in mind when working with Web Workers, such as the lack of access to the DOM and limitations on the types of data that can be passed between threads.

To mitigate these potential issues, developers can follow strategies as mentioned earlier, such as using asynchronous methods and being mindful of the complexity of the task being offloaded.

Multithreading with Web Workers is likely to remain an important technique for improving web application performance and responsiveness in the future. While there are other techniques for achieving multithreading in JavaScript, such as using WebSockets or SharedArrayBuffer, Web Workers have several advantages that make them a powerful tool for developers.

Adopting more recent technology such as WebAssembly may open up new opportunities for using Web Workers to offload even more complex and computationally-intensive tasks. Overall, Web Workers are likely to continue to evolve and improve in the coming years, helping developers create more efficient and responsive web applications.

Additionally, many libraries and tools exist to help developers work with Web Workers. For example, Comlink and Workerize provide a simplified API for communicating with Web Workers. These libraries abstract away some of the complexity of managing Web Workers, making it easier to leverage their benefits.

Hopefully, this article has given you a good understanding of the potential of web workers for multithreading and how to use them in your own code.

Categories: Others Tags:

Color Mechanics In UI Kits

April 19th, 2023 No comments

I am currently working on research linked to a project on creating a complete guide to developing a UI kit as a technical system. In the first stage, I collected technical decisions, requirements, and possible solutions by analyzing open-source and proprietary UI kits. My initial plan was to to dive deep into every detail after collecting the main decisions that were made in dozens of such UI kits.

At my main workplace, an open-source UI kit is used under the hood. I soon noticed that it was difficult to understand its API when it came to anything related to colors.

I had many questions:

  • Which tasks does the kit’s API solve?
  • Which concepts does its API implement?
  • How is the API implemented?
  • What should I know before starting to implement such mechanics in a UI kit from scratch?
  • What are the best practices?

I decided to temporarily interrupt my data collection and dive deep into this topic. In this article, I want to share some things that I’ve learned. I suppose that I’m not the only one who has such questions, and this article’s goal is to answer these questions to save you time. It will also help me not to burn out and to continue my research work.

How to deal with colors is one of many technical decisions. It incorporates many subdecisions and relates to other decisions, such as:

  • How to implement theme switching — according to user action or the OS setting?
  • How to provide theme configuration for different system levels?
  • How to automatically make a color palette?
  • How to implement color-contrast checking?
  • How to support different contrast models? (Windows has high-contrast mode, whereas macOS has inverted colors.)

In the article, I’ll cover two parts. First, we’ll look at base operations, which include the definition and use of colors and known issues and practices related to color. Secondly, we’ll look into an approach to solving tasks by analyzing existing solutions and understanding the connections between them.

Some code examples will contain Sass and TypeScript, but these aren’t the focus of this article. You will hopefully come to understand a model that you can implement with the tools of your choice.

Also, I’d like to warn you against trying to create your own UI kit. The subdecisions that I mentioned aren’t done consciously. You will see that even implementing a small part of a kit, such as the definition and use of colors, is not as easy as it seems at first glance. Can you imagine the complexity of developing an entire system?

As reference examples, we will use Material UI and Fluent UI React Northstar.

Why them?

As for Material UI:

  • It contains a lot of best practices (I have compared it with others).
  • It’s one of the most popular UI kits in open-source software (at least according to the GitHub stars).
  • I have a lot of experience in using and customizing it.

As for Fluent UI React Northstar:

  • It contains a lot of best practices (I’ve also compared it with others);
  • It’s used in large-scale enterprise projects.
  • It contains new concepts that simplify the public API and implementation based on previous experience developing UI kits (see the Fluent UI Web readme).

As a bonus, you will understand how to use the APIs of these UI kits.

To achieve the article’s goals, we will follow a few steps:

  1. Consider which tasks are required to be solved.
  2. Define the terms and their meaning. Without a common language, it would be hard for us to understand each other.

    “A project faces serious problems when its language is fractured. Domain experts use their jargon, while technical team members have their own language tuned for discussing the domain in terms of design.

    The terminology of day-to-day discussions is disconnected from the terminology embedded in the code (ultimately the most important product of a software project). And even the same person uses different language in speech and in writing so that the most incisive expressions of the domain often emerge in a transient form that is never captured in the code or even in writing.

    Translation blunts communication and makes knowledge crunching anemic.

    Domain-Driven Design Tackling Complexity in the Heart of Software, Eric Evans, Addison-Wesley, 2004

  3. Consider problems we might encounter and how to solve them.
  4. Illustrate solutions by considering the implementation of reference UI kits.
  5. Follow the example of the best reference.

Let’s dive in!

Colors Mechanics Model

Terminology

Let’s say that our ultimate goal is to provide the ability to switch themes. In this case, the following concepts come into play:

  • Color, hue
    This refers to the type of color (red, blue, and so on). The term we’ll use in this article is “color”.
  • Color shade, color gradient, color variant, color tone
    Color may be determined by hue, brightness, and saturation. The term we’ll use in this article is “color variant”.

“One important detail about Munsell’s color system is that he divided the color space into three new dimensions: The hue determined the type of color (red, blue, and so on), the value determined the brightness of the color (light or dark), and the chroma determined the saturation of the color (the purity of the color). These dimensions are still used to this day in some representations of the RGB color model.”

— “A Short History of Color Theory”, from Programming Design Systems

  • Color palette
    This is a set of variants of color. We’ll refer to it in this article as “color palette”.
  • Design tokens
    These are general component property names from a design point of view. The term we’ll use in this article is “visual properties”. For example:

    • border,
    • text,
    • background.
  • Color scheme, theme, color theme
    A color scheme is created to impose some constraints. The term we’ll use in this article is “color scheme” because “theme” is more general than “color scheme” (encompassing font size and so on). For example, a color scheme might:

    • contain only variants of the color pink,
    • be tailored to light or dark illumination of the space around the device,
    • be tailored to people with vision impairment,
    • be tailored to specific device constraints.

Producing Operations With Color

We’ll consider basic operations such as defining and using color.

Color is defined according to various color model notations (RGB, HSL, etc.).

In the case of development of a digital user interface, a color scheme is created to color UI components. Each UI component might have a different color for its various properties in each scheme. For example, the background color of a call-to-action button might be red or blue depending on the current theme.

So, how can colors be represented?

How to Name Variables?

If you just name variables according to their color, you will get into a situation where a variable named redColor should have a blue color value in another scheme.

Also, the components that show an error state should still be able to use the red color from the redColor variable. So, another layer of abstraction needs to be introduced to solve the problem.

This additional layer organizes colors by their function (for example, error state) or visual property name (for example, background). It acts as a color scheme.

It’s interesting that organization by function was already introduced to CSS properties.

Each value in the layer’s structure would be mapped to the color palette value by color name and color variant.

How To Remember Use Cases?

After adding colors to the layer, you might encounter a minor problem — how to remember their use cases:

I remember the very first time I tried Sass on a project. The first thing I wanted to do was variablize my colors. From my naming-things-in-HTML skillz, I knew to avoid classes like .header-blue-left-bottom because the color and position of that element might change. It’s better for them to reflect what it is than what it looks like.

So, I tried to make my colors semantic, in a sense — what they represent, not what they literally are:

$mainBrandColor: #F060D6;
$secondaryFocus: #4C9FEB;
$fadedHighlight: #F1F3F4;

But I found that I absolutely never remembered them and had to constantly refer to where I defined them in order to use them. Later, in a ‘screw it’ moment, I named colors more like…

$orange: #F060D6;
$red: #BB532E;
$blue: #4C9FEB;

$gray-1: #eee;
$gray-2: #ccc;
$gray-3: #555;

I found that to be much more intuitive, with little, if any, negative side effects. After all, this isn’t crossing the HTML-CSS boundary here; this is all within CSS and developer-only-facing, which puts more of a narrow scope on the problem.”

— Chris Coyier, “What do you name color variables?

In the initial stage of the project, writing comments next to the variables might help. And creating a dictionary might help to communicate with a design team in subsequent stages.

“The use of dictionaries as a means to establish a common understanding of terms has already proved its benefits in various software-related fields. Literature on software project management recommends the usage of a project glossary or dictionary that contains a description of all terms used in a project. This glossary serves as a reference for project participants over the entire project life cycle.”

Concise and Consistent Naming, Florian Deissenboeck, Markus Pizka, 2006, Software Qual J

Now we understand why just using color names wouldn’t work. But it points to the solution for another minor problem: defining names for variants of a particular color.

How To Define Names For Color Variants?

The solution is simple. Just add numbers as suffixes to the names. The advantage of this approach is that adding a new color will be easy, and the suffix will tell you that the color is a variant of another color. But this is still hard to remember.

$gray-1: #eee;
$gray-2: #ccc;
$gray-3: #555;

Another approach is to give a unique name to each color. This approach is the least convenient because names wouldn’t have any useful information, and you would have to remember them. You would need to define the names or use a name generator, which is an unnecessary dependency.

A better solution is suggested by Zain Adeel in his article “My Struggle With Colors”:

Using a scale from 10–100 with a tone at each ten is by far the simplest. A purple-10 will understandably be the lighter tone in comparison to a purple-50. The familiarity of such an approach allows the system to grow predictably.

The approach provides maximum useful information by name. Also, it can cover more cases if a prefix is added. For example, the prefix “A” can denote an accent color. As explained in the Material UI documentation:

A single color within the palette is made up of a hue, such as “red”, and shade, such as “500”. “red 50” is the lightest shade of red (pink!), while “red 900” is the darkest. In addition, most hues come with “accent” shades, prefixed with an A.

A disadvantage is that the cascade will change if you ever have to add an intermediate color with a brightness variant. For example, if you have to add a color between gray-10 and gray-20, then you might replace gray-20 and then have to adjust the following color values (gray-30, gray-40, and so on).

Also, any solution comes with potential maintenance issues. For example, we would have to ensure that all color definitions have all possible variants in order to avoid a scenario where we have gray-20 but not red-20.

One approach to solving problems is Material Design’s color system. One of the values of this guide is that it doesn’t contain details of technical implementation, but rather focuses on concepts containing only important information.

Illustrating Solutions

Let’s look at an implementation from top to bottom.

Fluent UI React Northstar (@fluentui/react-northstar@0.63.1)

Color Scheme

Let’s consider the “Teams” theme.

Fluent UI React Northstar has a two-dimensional color scheme model.

“Brand” is the color scheme. “Light theme,” “HC theme,” and “Dark theme” will also be color schemes in this article.

Grouping Approach

Color scheme object keys are visual properties combined with states.

export const colorScheme: ColorSchemeMapping<ColorScheme, TeamsColorNames> = {
  amethyst: createColorScheme({
    background: colors.amethyst[600],
    backgroundHover: colors.amethyst[700],
    backgroundHover1: colors.amethyst[500],
    backgroundActive: colors.amethyst[700],
  }),
};

Note: Check out the source code.

In the siteVariables key of the theme configuration, the colors palette is located in the colors key, and the color scheme is in the colorScheme key. They are explicitly separated.

Color Palette

A color palette is an object. Interestingly, some color values are defined with transparency, and the palette contains colors named according to their function.

export const colors: ColorPalette<TeamsTransparentColors> = {
  ...contextualAndNaturalColors,
  ...primitiveColors,
  ...transparentColors,
};

Note: Check out the source code.

“Colors in Teams color palette have the following categorization.

Primitive colors

This part of the palette contains colors that, semantically, cannot have any tints. This group is represented by two colors, black and white — as there is nothing blacker than black and nothing whiter than white.

[…]

Natural colors

This part of the palette includes colors from those that are the most commonly used among popular frameworks (blue, green, gray, orange, pink, purple, teal, red, yellow). Each color includes at least ten gradients; this allows us to satisfy the most common needs.

This decision is experienced from Material UI and allows us to define more variants than by using semantical naming (lightest, lighter, etc.). However, there is no requirement for a client to define all the gradient values for each color — it is just enough to define those that are actually used in the app.

[…]

Contextual colors

This part of the palette may include brand color as well as danger, success, info colors, and so on.”

— “Colors”, Fluent UI documentation

The value in the object’s key by color name may be an object containing keys such as a color variant or just a color string literal of a specific color model.

export const naturalColors: TeamsNaturalColors = {
  orange: {
    50: '#F9ECEA', // darkOrange[50]
    100: '#EFDBD3', // app orange14
    200: '#EDC2A7', // old message highlight border
    300: '#E97548', // orange[900]
    400: '#CC4A31', // app orange04 darkOrange[400]
    500: '#BD432C', // app orange03
    600: '#A33D2A', // app orange02
    700: '#833122', // app orange01 darkOrange[900]
    800: '#664134', // app orange14 dark
    900: '#51332C', // app orange16 dark
  },
}

Note: Check out the source code.

export const primitiveColors: PrimitiveColors = {
  black: ‘#000’,
  white: ‘#fff’,
};

Note: Check out the source code.

Material UI (@mui/material@5.10.4)

Color Scheme

Material UI provides only dark and light color schemes as default schemes.

Grouping Approach

The palette key of the theme configuration contains the color scheme used in this article.

Keys linked to the colors of the color scheme have been chosen according to the following groups:

  1. The functional purpose of the color:

    • primary
    • primaryDark
    • text
    • gray
    • error
    • success
    • warning
    • secondary
    • info
    • action
    • divider

    As the value in these object keys, they may be the following keys:

    • light
    • main
    • dark
    • contrastText
  2. Visual property name
    For example, background.
  3. Colors grouped in a category:

    {
      common: {
        black: "#1D1D1D"
        white: "#fff"
      }
    }
    

At the same time, the values in theme.palette contain other stuff:

  • The current color scheme mode:
    {
      mode: 'dark',
    }
  • Utilities such as getContrastText,
  • …and more.

Color Palette

Each color is an object. Keys are a color variant. The prefix A denotes the accent color.

const blue = {
  50: '#e3f2fd',
  100: '#bbdefb',
  200: '#90caf9',
  300: '#64b5f6',
  400: '#42a5f5',
  500: '#2196f3',
  600: '#1e88e5',
  700: '#1976d2',
  800: '#1565c0',
  900: '#0d47a1',
  A100: '#82b1ff',
  A200: '#448aff',
  A400: '#2979ff',
  A700: '#2962ff',
};

export default blue;

Note: Check out the source code.

Comparison

We will choose the best reference example according to the following factors:

  • an API that corresponds with the given terminology agreed on by client;
  • implementation that corresponds with the given terminology;
  • following best practices for the designated tasks.

Correspondence With Given Terminology

Fluent UI React Northstar

Pros:

  • The color palette and color scheme are explicitly separated.

Cons:

  • The color palette contains not only common color names (red, green, and so on).

Material UI

Pros:

  • The color scheme (the “palette” key in the theme configuration) contains not only colors.
  • The “palette” key name is confusing because if you want to use a color palette, you would import the “colors” object from the @mui/material package.
  • Misunderstanding is compounded by incomplete compliance with the Material UI guide:

Used Practices

From the point of view of this factor, let’s consider only the differences.

Fluent UI React Northstar

Adding a postfix denoting the brightness of color was chosen as the approach to name variables. The color palette contains colors named by their function and common color names (red, green, and so on). The color scheme groups color by visual properties combined with states.

Material UI

Adding a suffix denoting the brightness of the color and a prefix denoting the accent color was decided on as the approach to naming variables. The color palette contains colors named by their common color names (red, green, and so on). The color scheme groups color by visual properties and function.

I would use the Fluent UI React Northstar as the reference for implementation because it accords with the given terminology. If the topics that were mentioned in the introduction as not being considered were to be considered, then the choice might have been different.

Conclusion

Let’s summarize the key points:

  1. If you want to implement something, examine the best references in order to avoid reinventing the wheel, and focus instead on finding solutions to unresolved problems.
  2. During the examination process, you will encounter solved tasks and terms. Make a summary of them.
  3. Choose the best solutions according to your task’s requirements and limitations.
  4. Choose the best reference that corresponds with the solutions that you chose.
  5. Implement by following the best reference.

If you want to dig into color theory, I strongly recommend the book Programming Design Systems, written by Rune Skjoldborg Madsen.

I would like to thank Andrey Antropov, Daniyal Gabitov, and Oleksandr Fediashov for their suggestions for improvement and valuable additions. I would also like to thank the editors of Smashing Magazine for their assistance.

Categories: Others Tags:

10 Best Marketing Agency Websites (Examples, Inspo, and Templates!)

April 19th, 2023 No comments

Marketers are skilled in developing strategies, producing visual assets, writing text with high impact, and optimizing everything for engagement and conversion on websites, social media, and everywhere else in between. However, a marketing plan is only as successful as the website you use to get leads from.

Because of this, your marketing agency requires a website that completely impresses visitors.

Continue reading for a list of 10 best marketing agency websites, which you can use as inspiration for your own site’s design or as a quick and simple guide to creating a new one.

We’ll also show you how BeTheme might be useful if you’re seeking suggestions on a WordPress theme or page builder to speed up the process.

10 top websites for marketing agencies in 2023

Having an excellent portfolio is not enough for your marketing agency website.

It must have a similar aesthetic to the websites you will create for customers. The copy should be attractive so customers should regret not discovering you sooner. Additionally, it must include built-in conversion-boosting features.

Do you want to see how that comes along?

Find motivation here:

1. Porter Novelli

Porter Novelli has developed marketing campaigns for many of the world’s top brands. With as impressive a portfolio as this agency has, their website design and copy are clean, simple, and to the point. Rather than bog down prospective clients with too many details, they give their visuals ample room to speak on behalf of the agency. If you want to create a similarly simple, yet powerful visual effect, start with the BeMedia 2 pre-built site.

2. BeMarketing 2

While it’s typical to see websites for marketing agencies chock full of images and videos showcasing their work, BeMarketing 2 adopts a different strategy.

Most of the websites your leads will visit don’t appear like the 3D/flat illustration design does. Additionally, it’s designed to showcase both your work and the digital goods you offer in a way that is incredibly engaging.

BeMarketing

3. Lilo Social

The website for Lilo Social is a great example of how to successfully ditch the predictable symmetry and grid layouts that so many marketing agency websites use. With a lightweight design, hand-drawn and illustrated geometric elements, and a well-balanced (albeit asymmetric) layout, Lilo Social’s site carves a unique path and does it well. If you’re looking to create a similar effect, consider using the BeAgency 6 site.

Lilo Social

4. BeBusiness 6

Having your marketing agency’s human aspect visible to potential clients is one of the finest methods to establish trust. The prebuilt BeBusiness 6 website does this.

You may give your agency an accessible, sympathetic vibe while also highlighting your successes by presenting the individuals who work for it as well as the clients you’ve served throughout time.

BeBusiness 6

5. BeCreative 4

There are additional techniques to look more personable to the clientele you wish to work with for your firm. Everything hinges on who they are. An excellent alternative for focusing on medium-sized corporations and organizations would be the prior agency site. On the other side, BeCreative 4’s young style, which has spinning emblems, funky fonts, and emoji, is quite successful in luring customers from smaller businesses, particularly those led by members of Generation Z.

BeCreative 4

6. BeAgency 8

Want to persuade people that your company is the best at understanding engagement? Design the hero section of your website using a different strategy from BeAgency 8’s prebuilt website. You may get visitors to interact with your website right away by using the fold to provide a sneak peek of your content.

BeAgency 8

7. BeAgency 5

A wonderful example of how basic design will always be fashionable is seen in BeAgency 5. In this age of distraction, it’s important to incorporate unexpected shocks into your basic design to keep people interested. To entice visitors into the agency’s content, this site, for instance, combines hand-drawn features, eye-catching trust marks, and hover-triggered action alternatives.

BeAgency 5

8. BeAgency 7

More than just attracting and generating leads is possible with a marketing agency website. Consider BeAgency 7 as an example. The purpose of this prebuilt website is to sell marketing services. Visitors are immediately made aware of this via the Pricing page and the ecommerce components incorporated into the header. Put your website to work for you like this one does if you’re searching for a solution to streamline your sales process.

BeAgency 7

9. BeBusiness 4

If you’re starting a new marketing firm, visitors to your website need to be greatly impressed. A striking design will be beneficial. The same is true for trust indicators like number counters, FAQs, and well-known partnerships. All of these features and more are available on the BeBusiness 4 website.

BeBusiness 4

10. BeLanding 4

Websites for various kinds of businesses and purposes can also be a terrific source of inspiration, in addition to those for marketing agencies. For example, BeLanding 4 is a fantastic illustration of how to pack a ton of details about your portfolio, client endorsements, pricing, and more onto a single web page. To help users navigate the page’s extensive information, mascots have been put to prominent places of the page.

BeLanding 4

Generate better results with a strong marketing agency website

You’ll be able to generate leads and get new clients thanks to your substantial body of online work. But in order to showcase your very finest and most successful work, you need a website where you can put it all together. Additionally, it must turn interested leads into paying customers.

The 10 best marketing agency websites that you saw provide several methods for accomplishing this.

You want a WordPress theme and page builder that makes it simple for you to establish a website for your agency without limiting what you can design. It’s also a good idea to seek a solution that can be used to create websites for your own clientele.

Your theme should include white labeling features that allow you to customize the WordPress backend in addition to being a WordPress design powerhouse. Make the login screen your own. Replace the theme’s branding with your own (or the logo of your client). Even block access to the visibility of dashboard sections that your customer doesn’t require.

You’ve been searching for an all-inclusive solution, and BeTheme is it.

Everything you need to develop your website as well as the websites of your clients is included, including 650+ pre-built sites (some of which are represented in the list above), a strong and user-friendly website builder, and white labeling.

Categories: Designing, Others Tags:

How to Develop a Winning B2B Brand Strategy In Simple Steps

April 18th, 2023 No comments

If you own a B2B business and are working under the impression that brand identity is essential only for B2C companies, you are in for a surprise.

With more saturation in the digital marketplace, 77% of B2B leaders believe that branding is vital for their company’s growth. To break through the noise, you must develop a brand identity that humanizes your business, engages your target audience, fosters customer loyalty, and ultimately scales your organization.

The secret ingredient to that is a powerful B2B brand strategy.  

Dissecting the term: Brand Strategy

A brand strategy is a holistic approach that defines who you are, who you serve, what you do, and what you value. It encompasses different brand elements such as brand identity, voice, narrative, vision, mission statements, and business goals and objectives.

Every B2B business that strives to build a successful company needs to prioritize strong B2B brand-building strategies.

After setting key goals, business owners can take steps toward their achievement and track their progress. A B2B brand awareness strategy further ensures every team in the company is working in the right direction and supports consistent branding. It is important to note that a consistent brand image is essential to establish credibility, build trust, and boost brand awareness.

Step-by-Step Guide to Developing a B2B Brand Strategy

Let’s see what it takes to build a brand:

Spell Out Your Goals and Purpose 

Every brand has a set of basic principles and beliefs it carries through its existence in the market to deliver a cohesive and consistent experience. It ensures further that your brand is easily and swiftly recognizable across all marketing channels.

Taking this into account, you can’t establish a B2B brand awareness strategy without clarifying what your brand is aiming to achieve and why your brand exists. Your goals can be qualitative such as establishing a reputation as a prominent advertising agency, or quantitative, like driving $5Million in revenue.

Your purpose, on the other side, is your distinct reason for being. What kind of impact does your brand wish to create in the world?

In today’s time, according to a study by Ipsos, consumers of B2B or B2C industries are looking for a brand that is driven by purpose and more precisely, is aligned with their values. 

Define the Persona of the Ideal Audience 

Defining the ideal audience persona is one of the essential steps in B2B brand-building strategies. This makes it easier for you to tailor brand content, messaging, and even product development, as well as marketing campaigns, to meet the specific behaviors, concerns, and needs of the members of your target audience.

In B2B, the ideal persona will be the stakeholder who is authorized to make purchase decisions in the organization or institution you wish to do business with.

Since there is always more than one stakeholder involved in the buying committee of B2B businesses, including the CEO, financial advisor, and director, your focus must be understanding each profile. It is important to uncover detailed and relevant information about each decision-maker, including their role in the buying committee, needs, wants, and concerns.

Build a Brand Personality your Audience will Connect With 

Great brands, whether B2C or B2B, have a distinct personality that injects humanity into your business and fosters deeper customer relationships.

Simply put, your brand personality is the human characteristics associated with your business.

A great starting point to establish a strong personality is to ask yourself how your brand would be defined as a person. Will they be serious and sincere, or are they adventurous and bold?

As such, consider the audience persona when defining brand personality. Think about the kind of brand your audience will be excited to engage with. Will they be attracted to a classy and sophisticated brand or something on the playful side?

B2B brand personality is defined by the visual appearance of your brand, comprising logo, colors, fonts, and photography in conjunction with the voice and tone used in marketing communications.

Create a Compelling Brand Narrative 

A brand narrative is a critical building block for creating a powerful and endearing brand image. It is a concise, lucid, and streamlined story that serves as groundwork for a B2B company’s marketing and communications.

Don’t consider it to be some kind of script that needs to be played on a loop with every communication effort, but rather a messaging framework that your marketing team interprets and communicates, as required.

Most significantly, the story must be framed keeping in mind your target audience: helping them to visualize themselves in the narrative. This will build affinity in your target audience and cultivate a memorable brand image.

Look at Mailchimp, which has a huge section committed to reflecting customer stories in articles, podcasts, and films that are further reinforced with the founder’s story. Collectively, they exhibit that the company is passionate about small businesses and has developed a tool that aids them in competition against the big names in the market.

Strategically Position Your Brand in the Market 

B2B brand positioning is the process of positioning your business in the mind of the consumers. 

Interestingly, many brands have a positioning summary that outlines what their company does and what values it brings to the market or customers. 

When positioning your brand, part of the process also includes differentiating your business from the direct competition. This helps your audience to think of you as the better option than other businesses in your niche.

Some ways to position your brand in the market are

  • Quality of Service: Highlight the quality of your service, especially if it is priced high, to inform clients that it’s justified by the high level of care you offer in return.
  • Convenience: With this B2B brand positioning, you can demonstrate why your business is more convenient than others, whether it is because of the product’s design, ease of use, or any other features.
  • Problem and Solution: Does your product solve a specific problem? In that case, position your B2B brand as a powerful solution provider so that your image immediately appears in the audience’s mind regarding that particular problem.

Wrapping it Up

A great brand identity lays the groundwork for successful branding and marketing. It ensures every aspect involved in your business development and growth is working towards common goals and setting success for the long term. The rewards of a well-defined B2B brand strategy, on the other hand, are many, and if executed right, will build a positive brand image and lasting relationships that withstand the test of time!

Featured image by Leeloo Thefirst

The post How to Develop a Winning B2B Brand Strategy In Simple Steps appeared first on noupe.

Categories: Others Tags:

How Business Tech Can Help Build an Effective Localized Marketing Campaign

April 18th, 2023 No comments

No matter what industry you operate in, you’re likely to face significant competition. While competition can be healthy, it can also be a hurdle to getting customers to engage with your unique and positive attributes. A healthy solution, therefore, is creating an effective marketing campaign to help you stand against the competition and stay successful. 

It’s important to remember that your efforts shouldn’t just be directed toward national or global demographics. The consumers in your local area can be great contributors to your company’s growth. Not to mention that you can forge meaningful supportive relationships with them that will be invaluable in the future. Local marketing campaigns should be a part of your wider strategy.

Your localized campaigns don’t need to be driven by the expertise of your marketing team alone, though. Let’s explore some business tech that can help you implement a more effective approach.  

Consumer Research Elements

Marketing campaigns tend to be most successful when backed by solid customer data. You’ll find data is especially important for localized campaigns. This is because the preferences and needs of your nearby customers may not always be the same as the national or international trending elements. Therefore, it’s important to adopt business tech that helps you to gather and analyze local customer research to drive your marketing efforts.

When used effectively, business tech helps you both obtain consumer insights and improve the diversity of your research base. Effective strategies here include utilizing social media posts to encourage comments and other forms of engagement related to the types of services locals of different generations want to interact with. Your online surveys should also be geared toward accessibility. Provide options for those with mobility challenges to screenshot their product preferences. Offer surveys in different languages to accommodate locals from different geographical and cultural backgrounds.

Another piece of business tech that can be an invaluable part of your consumer research is your customer relationship management (CRM) software. This tool essentially centralizes all the information gathered about consumer interactions and preferences from a range of different sources. In most instances, you can connect your website, loyalty program, consumer survey results, and customer purchase histories to these platforms. You can then filter data analytics results by geographic location, which provides your marketing team with insights into the behavior of local consumers.

Inventory Control Tools

Word of mouth is always an important part of localized marketing. Your reputation for being able to provide the community with reliable services and products when customers need them is key to your success. This has been particularly important to consumers following the product shortages during the COVID-19 pandemic. Therefore, you should consider utilizing business technology tools related to effective inventory management.

This should include a reliable software system that keeps track of the movement of products in the warehouse, the storage area of your local stores, and the storefront itself. Devices that utilize sensors on items to assess the number of products on the premises can interact with the management software. This keeps your inventory visible to staff and the platforms can usually automatically reorder when necessary. Wherever possible, choose platforms that are compatible with those of your supply chain partners, which tends to result in more efficient interactions.

Alongside the software, it’s also vital to have infrastructure that maintains the efficacy of inventory management tools. 5G networks can help minimize potential supply chain disruptions by ensuring your software and hardware inventory tools remain reliably connected. Networks with high bandwidth and low latency will ultimately ensure that large volumes of essential data can be quickly and reliably passed between systems. Particularly if you and your supply chain partners are using sensors in the Internet of Things (IoT) to track inventory items, 5G tends to result in more accurate and consistent real-time data transfers.

This control over your inventory doesn’t just mean you can boost your reputation for reliability among customers and draw more local foot traffic. From a marketing perspective, it also allows you to adjust your stock in an agile way in line with the engagement you’re seeing from your localized campaigns. In this way, your business tech and advertising feed off one another for mutual benefit.

Social Media Management Platforms 

There’s a tendency for small businesses to see social media marketing as a tool to reach primarily national and global audiences. However, it’s important to recognize that consumers in your nearby area will also be keen to engage with businesses on social media. It’s important, then, to ensure there is content and communication specifically directed toward your community. A business tool that can help with this is a reliable social media management platform.

These software services are particularly effective in reducing the amount of repetitive and time-consuming work involved with managing accounts. In most cases, they allow you to post across all your company accounts from a single hub. You’re also able to upload your content in advance and schedule when and where these are posted. Not only do these tools save time and energy, but they’re also essential in producing posts specifically directed to your local customers.

Social media management platforms are also useful to your localized marketing campaigns for the practical components of posting content. They also allow you or your social media managers to quickly respond to local consumers’ comments without having to switch between different accounts. This can be a vital form of additional customer service. 

It’s worth noting, too, that social media management platforms provide users with engagement data. This empowers you to easily ascertain what content your local consumers are particularly responsive to. Your marketing team can then lean into these topics or content styles, adapting in real time for a more agile localized campaign.

Conclusion

Business tech can play a key role in localized marketing campaigns. Online consumer research tools and CRM systems can provide your team with data to make your campaigns more relevant to locals. Inventory management platforms can boost your reputation for reliability and also be effectively influenced by local marketing engagement. Remember that social media management platforms can lighten the load of content creation, allowing you to create posts specifically focused on your community. This tech, along with some careful planning, can ensure you make effective local connections that help the growth of your business. 

Photo by Kindel Media on Pexels

The post How Business Tech Can Help Build an Effective Localized Marketing Campaign appeared first on noupe.

Categories: Others Tags:

What Is Design Thinking?

April 17th, 2023 No comments

In a world of fast-paced action and reactions, quality results are something that we all aim for. But how can you make something better? Whether it is a product, a service, or perhaps a process, we aim to make things better. It leaves us to wonder how we are going to design a world that is long and equitable to attain a degree of excellence.

When we are talking about making “things better,” we cannot deny the role of the Kanban system in implementing TQM (Total Quality Management) for Toyota. If TQM did that for manufacturing, design thinking has the potential to bring human-centric solutions for innovations.

Design thinking takes the human-centric approach in order to understand how to deal with the problem before we jump into all possible solutions. We could see its use in various places. The buzz is everywhere, from the social sector to policy making, health care to business. So what is design thinking?

The Meaning Of Design Thinking

Design thinking fosters tackling complex problems in a creative way that prioritizes human needs with a huge emphasis on finding creative solutions with what is technically feasible.

Though it’d be hard to put the definition of “design thinking” in a few words, I’d rather look at design thinking as a philosophy or a mindset to solve complex problems that are too tough to be solved with the conventional and standard practices of problem-solving. Design thinking takes the route to give solutions that are: feasible, viable, and desirable.

Generally, solutions to problems are sometimes overlooked with the conventional approach to solving them, while some approaches are highly rational and analytical while others are emotional. Design thinking might just be the third way that augments the rational, emotional, and functional needs of human problems. Design thinking is not restricted to only building products; any new initiatives that foster innovations can leverage the design thinking principles of problem-solving.

The Origin

While there are no solid indications of the origin of design thinking, design thinking as a mindset could be traced back to John E. Arnold, a professor of Mechanical engineering who pioneered the study of “Creative Engineering” at Stanford University. He was one of the first few people to write about design thinking and considered the seed for design thinking as a movement. His lectures motivate being more imaginative and innovative. His theory of problem-solving focuses on human needs by relating personal, scientific, and practical aspects of the problem.

He emphasizes the importance of approaching the problem like an artist and having humans as the cornerstone for the solutions you want to build. “Creative problems” do not have one right answer.

“The engineer can take on some aspects of the artist and try to improve or increase the salability of a product or machine by beautifying or bettering its appearance, or by having a keener sensitivity for the market and for the kinds of things people want or don’t want.”

— John E. Arnold

The Design Thinking Process

In an effort to contextualize and apply design thinking, it is often identified with a process that guides the values to hold sway on how you approach the problem. This process may not necessarily be linear or sequential but rather a loop that makes sense for the particular problem or use-case one undertakes.

Empathize

Designing for humans could be tricky. Sometimes the needs or desires are left uncovered and may not be fully reflective of the real problem. While traditional market research processes go by facts, design thinking approaches to address the problem through empathy. Empathy attempts to understand latent needs and translate the current realities of the environment. This helps solution designers understand the people, their behavior, and the context that can explain the problem to build better solutions.

So, the first step to getting inspired by the problem is to understand the people you design for and what motivates them to search for a solution. This is especially very useful for businesses to understand the opportunity space available. Just the way Apple did. While MP3 players were already a thing, iPods changed the way people consumed music. When Sony ruled the consumer electronics market with their Walkman and CDs, Apple revolutionized the world of music with IPods. Apple empathized with people’s problem of carrying around cassette tapes, and iPods changed the game!

In order to identify and understand the pulse of the problem and to contextualize this step, gathering information is key. This is where you talk to people in the problem space to understand what they care about and how they currently deal with the problem. User interviews and their feedback help you get into their shoes.

Define

This is one of the most important steps where the problem gets shaped.

In design thinking, ill-conceived problem statements pave the way to building solutions to “a problem,” not “the problem.”

Let me explain.

For example, you talk to someone about a problem. You record the observation and pitch in a plausible solution to that problem. The user gets excited that your solution might solve that problem. But what really happens here is that you and the person have been discussing just one of the problems among their many other problems. Therefore, their decision to adopt your solution depends on the importance the person gives to the problem that you promise to solve.

Here is where defining the pulse of the problem becomes very crucial. Often, in hindsight, the spotlight falls on the problem you are trying to solve rather than the many other problems the person might actually have.

Hence defining the problem goes a long way to give you leads on how to go about building human-centric solutions.

Ideate

This is the phase where your observations find a home to be synthesized to create an opportunity for change. You brainstorm to define and redefine the potential solution to create competing ideas to solve the problem. This step ideally helps you to get to the core of the problem.

As said earlier, this is not going to be a linear process, and you might often find yourself going back to previous steps as you work together to challenge the idea or perhaps the problem itself. Thereby you cull out good ideas to implement.

Prototype

The next phase is the prototype, where you validate your ideas by creating a mockup of your final solution. Your solution takes a tangible form to show evidence in this implementation phase of the prototype. It also shows you the limits and limitations of your idea that are left unaccounted for during the ideation phase.

One of the classic companies which nailed building a great prototype is Uber. Uber focused on solving the core problem of “finding taxis ” in its initial release. The first beta version of the product was a very minimalist app where all the orders were managed manually, where the CEO contacted drivers to book the ride. And it did not have features to pay. The goal was to test and validate the problem of hailing a cab, which is the core benefit of the app. Eventually, when they understood the target market and pain point, they rolled out to improve other features.

Test

The final prototype is then tested with your target group and is reiterated to accommodate the learning that comes your way. The validation takes the final form here and may again require you to revisit some of the previous steps to implement the plan at scale.

Design Thinking In Action: Case Studies

Design Thinking In Social Sector

Malaria, one of the nerving problems in Africa, was one of the top 5 causes of death for children under the age of five. This is a social problem highly complex in nature, and the design thinking approach to distributing mosquito nets helped to combat the disease effectively. The World Health Organization reported a 50%-60% decline in death in countries like Ethiopia and Rwanda and a 34% decline in Ghana.

It was found that the design of nets was unappealing to some people in Ghana. A group of researchers identified a potential solution to address the problem of getting people to use the net. They came up with a human-centered design of nets that paved the way to provide a long-lasting solution to this social problem.

Airbnb

Design thinking has also played a huge role in transforming an almost failing company- Airbnb. Their business was crippling down, and when they got into the problem, they saw a pattern in their ads with the pictures which weren’t working great. The pictures on display were taken on low-quality phones. When looking at the photos on the site, the people who wanted to rent felt that they did not get to see what they were actually paying for. As soon as the founders realized this, they rented a camera to take good pictures of the customer’s property. Gebbia, one of the founders, went on to explain how the design school experience helped them reinvent themselves to serve customers better.

Netflix

Another household name, Netflix, has come a long way, and design thinking has had a huge part in the decisions that they make. Netflix came up with a DVD rental service delivered straight to the doorstep while other rivals had people drive through the stores to pick movies.

Later when cable started to give on-demand movies, Netflix understood the pain points of the customers and began online streaming services on a monthly basis without having to pay for every single DVD. They built an online directory with a subscription model and delighted customers with the convenience of watching their favorite movies from the comforts of the home.

When picking something to watch took a long time than actually watching, Netflix came up with “previews” that helped people to choose what to watch. As simple as it may sound, the thought behind Netflix’s recommendation system helps to cut down the time people spend deciding what to watch. While change is inevitable, Netflix keeps reinventing itself with a design-thinking approach to uncover innovative solutions focused on the end user in mind.

From renting DVDs to online streaming, Netflix has continuously aimed to understand the end user to design solutions in a human-centric way.

And not just this. The list goes on and on.

Final Thoughts

Design thinking has been evolving itself. People have been contributing to making it more useful to contextualize its use in various fields. Applying the design thinking framework and getting into creating a human-centric solution comes with different shapes, depending on the size and complexity of the problem.

Given its flexibility, design thinking helps you get familiar and comfortable with ambiguity. The approach lets you play around dynamically at various scales, making it a valuable pursuit.

Try it by starting with any problem you want to solve, and let me know how it worked for you in the comments below. I’d love to hear and help if you wish.

Related Resources

Categories: Others Tags:

How to Write a Personal Brand Statement

April 17th, 2023 No comments

Building a strong personal brand is one of the best ways to get ahead in your career. However, a lot goes into developing a solid personal brand. And one of the most crucial aspects of a personal brand is a brand statement. 

In the same way, companies have a statement describing them and their values, you need a powerful personal brand statement to show everyone who you are and the value you offer. It’ll help you network, gain trust with clients in your industry, and stand out from the competition.

This guide will show you how to create an effective personal brand statement and give examples of excellent brand statements to get your creative juices flowing. 

But first, let’s define what a personal brand statement is.

What is a Personal Brand Statement?

A personal brand statement is a sentence or two that describes what you do and what makes you unique in your profession. It summarizes your skills, experience, and passion so that your target audience can quickly understand who you are and the value you offer.

In other words, it’s a catchphrase or slogan about your expertise and what makes you different from competitors. 

Your brand statement should be catchy and short and have enough compelling details to show your personality and value.

After creating your personal brand statement, you can publish it on your:

  • Online portfolio to serve as an excellent tagline;
  • Social media profiles as a bio;
  • Resume showcasing your strengths to hiring managers.

Why is a Personal Brand Statement Important?

A personal brand statement can enable you to showcase your expertise and value in a way that makes others want to know more about you. As a result, it can be a ?valuable tool when networking with potential employers or customers.

How To Write a Personal Brand Statement

Here are four steps to write your own personal brand statement:

  1. Find your unique selling proposition. List down your skills and qualities that help you work effectively. Then, choose the top three qualities from your list.
  1. Identify your target audience, then address their pain points and how you can help them.
  1. Inject your personality into your choice of tone and words to create the uniqueness that helps you stand out.
  1. Avoid industry jargon and use simple language to make your brand statement memorable. Also, balance creativity and clarity to ensure you get your message across.

Now, let’s look at examples to understand how to create compelling personal brand statements.

7 Personal Brand Statement Examples You Can Use As Templates

Here are seven examples of personal brand statements you can use as templates for inspiration. You can tweak them to suit your own skills and professional experience.

  • I help entrepreneurs organize their marketing strategies so they can organize their businesses.
  • I will help you grow your business through innovative, exciting online email marketing campaigns.
  • Hey there, I’m an entrepreneur, writer, and philanthropist committed to helping you create a brand that matches your needs and voice.
  • Helping you create and manage your email marketing campaigns.
  • I help B2B companies reach their goals by creating killer websites that boost traffic by at least 20%.
  • I will show you how to use social media platforms to boost your brand’s revenue and reach.
  • I streamline processes and protocols to help you scale your business.

5 Real-Life Examples of Personal Brand Statements

Here are five personal brand statements to help you get inspiration to create your own brand statement.

1. Ann Handley — Empowering Ridiculously Good Marketing

Source: Ann Handley

Ann Handley is a digital marketing pioneer and a Wall Street Journal best-selling author. She’s also a speaker and a writer who helps other marketers grow their businesses and get exceptional results. 

Her simple catchphrase, “empowering ridiculously good marketing,” is short and to the point, and she delivers it in a casual tone, which makes it stand out. 

2. Neil Patel — Do You Want More Traffic?

Source: Neil Patel

Neil Patel is a world-renowned online marketer known for his SEO and traffic generation expertise. His great personal brand statement, “Do you want more traffic?” is effective since he has the proof and reputation for supporting his claim that he can get more traffic for your business. 

Using a question as his personal statement is also a way to spark curiosity since it appeals to his audience’s desire to solve problems and understand and improve their businesses.

3. Carol Tice — Practical Help for Freelance Writers

Source: Make a Living Writing

Carol Tice is the founder of Make a Living Writing, which offers various tips for freelance writers to grow their online businesses. Her slogan, “Practical Help for Freelance Writers,” is simple and straight to the point.

The strong personal brand statement also specifically targets freelance writers, indicating who will benefit from the “practical help” she provides.

4. Dave Nelson — I Believe in You… Now You Must Believe in Yourself

Source: Dave Nelson Fit

Dave Nelson is a certified personal trainer who previously struggled with obesity. His personal branding statement isn’t about himself but about his audience’s lack of self-esteem. 

Dave tells his audience that he believes in them and encourages them to start believing in themselves so they can achieve their fitness goals. The effective personal brand statement is simple but compelling and perfectly aligns with his brand’s goals.

5. Sujan Patel — I Build and Grow SaaS Companies

Source: Sujan Patel

Sujan Patel is a well-known digital marketer who boldly states that he “builds and grows SaaS companies.” 

His powerful personal brand statement is solid since he’s not simply stating that he helps SaaS businesses grow. He claims that he’s solely responsible for the growth of these companies. As a result, the catchphrase immediately catches the reader’s eye and intrigues them.

Conclusion

There you have it. The personal brand statement examples shared above should inspire you to design your own.

All the examples clearly state who the person is and what they do. So as you create your own personal brand statement, ensure it’s catchy, clear, and infused with your personality.

Featured image by Christina Morillo on Pexels

The post How to Write a Personal Brand Statement appeared first on noupe.

Categories: Others Tags: