Archive

Archive for May, 2023

10+ Best Tools & Resources for Web Designers and Agencies (2023 updated)

May 16th, 2023 No comments

Having the ability to envision a tastefully designed website (i.e., the role creativity plays) is important. But being able to actually build it more often than not depends upon the tools available, including recent developments and improvements in web design tools and resources for designers and agencies alike.

Categories: Designing, Others Tags:

Design Patterns Are A Better Way To Collaborate On Your Design System

May 16th, 2023 No comments

True collaboration to create or maintain a design system is really important to making superb product design, but working with other humans is always tricky. The collaborative nature of a design system can have a lot of pitfalls. In its best form, it is the product of close alignment between developers and designers, but it doesn’t always happen that way.

Some painful memories:

  • A brilliant designer I worked with made a gorgeous new set of elements and examples for the company to use, but the other designers in the company ran into many situations where it was more expedient to just copy and remake (i.e., detach) the component. The design system was used less and less since contributing to it was always a lower priority than working on a product opportunity.
  • A developer I worked with built the design system components such that the padding in every text input, button, and so on always had to be the same in every layout, leading to awkward results when (for example) a button included double-byte characters, only icons, or just longer labels.
  • I did a lot of work on variations of nested components (button bar, toggle buttons, segmented controls) that were designed to use the same style properties as base components (like a button), but the developers I was working with made brand new components for each that didn’t. So, I had to document and specify the many, many identical sets of style values for many, many sets of slightly different components.

The list goes on. I’m sure you have your own examples.

Getting Aligned

I’ve worked in many kinds of teams, in large companies and start-ups, where these collaboration issues kept getting in the way, even (or especially) with very talented and smart individual contributors. Getting aligned with my teammates doesn’t happen automatically or just because we go to lots of meetings. In fact, it’s very easy to start a project together and get pretty far into it before finding out we all had very different ideas about what we were doing. When it comes to complex questions of re-using an existing component vs. making something new or how to stay on the same page without blocking each other, alignment takes practice for any team.

The method for making design systems I’ll talk about probably works best in environments where you are a sole designer (or among a small number of designers) on a cross-functional team, including front-end or full-stack developers, led by a product owner. You might collaborate with other designers in other teams, but this is your “first team.” In this context, you have a lot of freedom but also a lot of responsibility.

You need an idea for nurturing the design system that doesn’t depend on organizational mandates or a specific “process” and one you can apply yourself. After all, a design system is a product with users, and we know how to balance the user’s needs with product opportunities, right? (Yes!)

The approach described below is not common or widely used, but in my experience, it has solved many team collaboration problems, including:

  • Eliminating the “hand-off” step: a truly perverse mini-waterfall built into many relationships between designers and developers.
  • Ensuring that all designers and developers contribute to the design system as a part of regular product work.
  • Connecting design systems to product impact: measurably speeding things up by making more reusable elements and modules in design and development.

A New Use For An Old Idea

What has worked for me in these kinds of teams is a twist on an old idea: design patterns. Elsewhere, design patterns are described as “a toolkit of solutions to common problems” (Refactoring.Guru) or “description or template for how to solve a problem that can be used in many different situations” (SourceMaking). My favorite definition of the concept is from The Timeless Way of Building:

“Even the most complicated, sophisticated things are defined by a small number of composable patterns.”

— Christopher Alexander

You probably don’t think of your own design activities as a “pattern-making” practice, but the idea has a lot of very useful overlap with the practice of making a design system. The trick is to collaborate with your team to find the design patterns in your own product design, the parts that repeat in different variations that you can reuse. Once you find them, they are a powerful tool for making design systems work with a team.

Design Patterns For Design Systems

To see how, first, let’s get specific about the definition of “design pattern” in our product design context. Let’s call a “design element” a small isolated component like a “button,” “chip,” or “card,” and let’s describe a design pattern as a reusable combination of elements for a purpose, a larger module that can do some product experience work on its own.

The elements are the focus of the design systems in most companies I have worked at, and creating them is important and a lot of work. I am sorry to say, however,

Having a good set of elements doesn’t help you get the value out of a design system, save you much time, or by itself ensure designers and engineers are aligned.

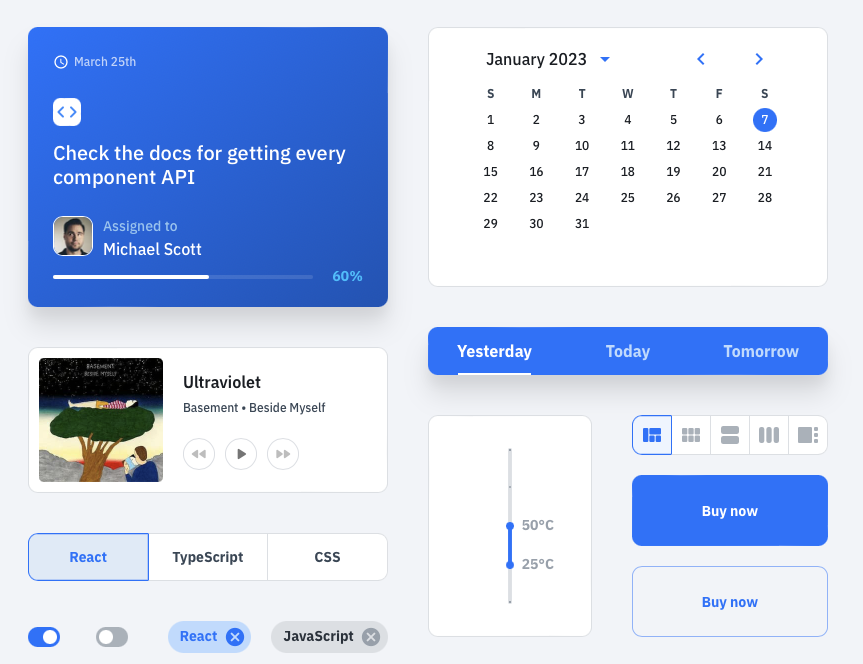
For this reason (and the availability of great existing elements from Tailwind, Bulma, Skeleton, or of course, MUI) I have de-emphasized them in my own work, often just restyling elements created by others. The elements are important, and you do need a set that everyone uses, but they don’t do the work of implementing a feature or valuable experience.

You might be thinking that many of these systems do come with combinations of elements, like the “pre-built components” that MUI ships with for a “Data Grid” or the “blueprints” in the Salesforce Lightning Web system for a “List Builder.” Are these the patterns that can help us?

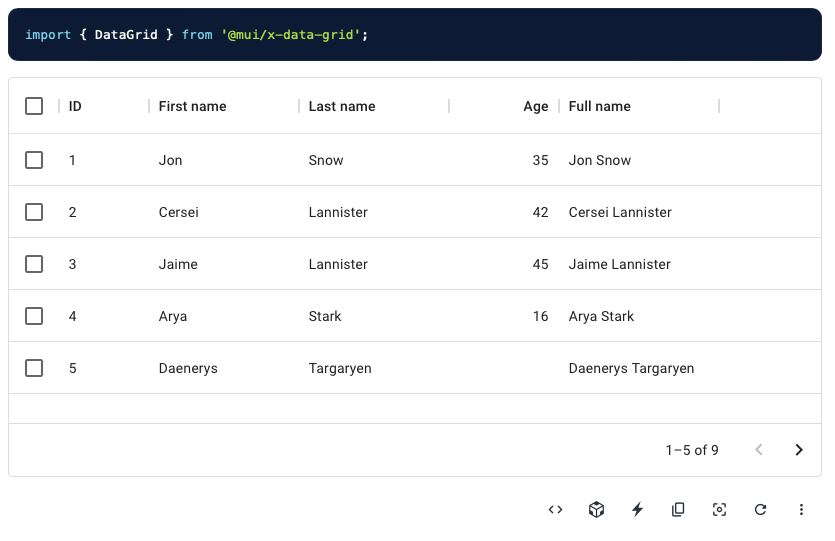
Unfortunately, they are not. These are patterns for sure, but they probably aren’t useful as-is for you. Your product has its own needs. You can use them as a starting point, but in my experience, it takes longer to rework them into something that solves the problem.

To be useful for you, a design pattern has to come out of and express some reusable part of your particular product experience — those parts of the design you find yourself making again and again.

Here are some examples of these useful, product-specific design patterns in products:

  • A tile in a TV app, which people use to browse things to watch in lists. This is sort of a “card” pattern, but not really! Every streaming service has its own particular kind of tile and includes different content and controls that suit that product best.

  • A dashboard meter in a data-visualization app like Google Analytics. Again, this is sort of a “panel” pattern, but not really! Each part of the dashboard might have different kinds of meters, with titles, category labels, “big numbers,” charts, text snippets, or filtering controls, and the number of elements in a meter varies by app.
  • A tree view in a social genealogy app that lets users see relationships between people in a way that adapts for display on small devices. Some products focus on researching your family, others on visualizing relationships.

In each of these cases, designers and developers made their own product-specific patterns. Those patterns are valuable because once a team has defined them, the next project that the team does gets easier. They develop and grow a kit of parts that save them time (and that they can polish and refine). The patterns, not the elements, are the heart of this (better) kind of design system.

Taking this a step further, I would say that a lesson from these patterns is that

All designers and developers can make their design system better and more effective by focusing on patterns first (instead of the elements), making sure that each is completely reusable and polished for any context in their product.

Pattern work can be a fully integrated part of both getting some immediate work done and maintaining a design system.

Design Patterns For Collaboration

This kind of design pattern activity can be a direct path for designers and developers to collaborate, to align the way things are designed with the way they are built, and vice-versa. For that purpose, a pattern does not have to be a polished design. It can be a rough outline or wireframe that designers and developers make together. It needs no special skills and can be started and iterated on by all. And collaborating on this form of a design pattern makes it possible for designers and developers to work in parallel.

That’s all pretty abstract. It’s easier just to try an example.

A Design Pattern Story

Let’s say that we’re on a team together, working on an app called “WeTrip.”

The product opportunity comes from the reality we have all probably dealt with: when a group of people or a family travels together, they usually have a lot of trouble deciding what to do or where to eat.

This app makes group travel easier by giving people an easy way to propose and vote on the plan for each day. Instead of having to have long conversations that feature such sentences as “I dunno, what do you want to do?” travelers have a tool so people can have less trouble with the logistics of a vacation or a trip.

The app has some seed funding, but in order to survive needs some “minimum viable” version of itself to prove that it’s something needed and valuable. Everyone on the team wants to get going! Nobody wants to be waiting for a design.

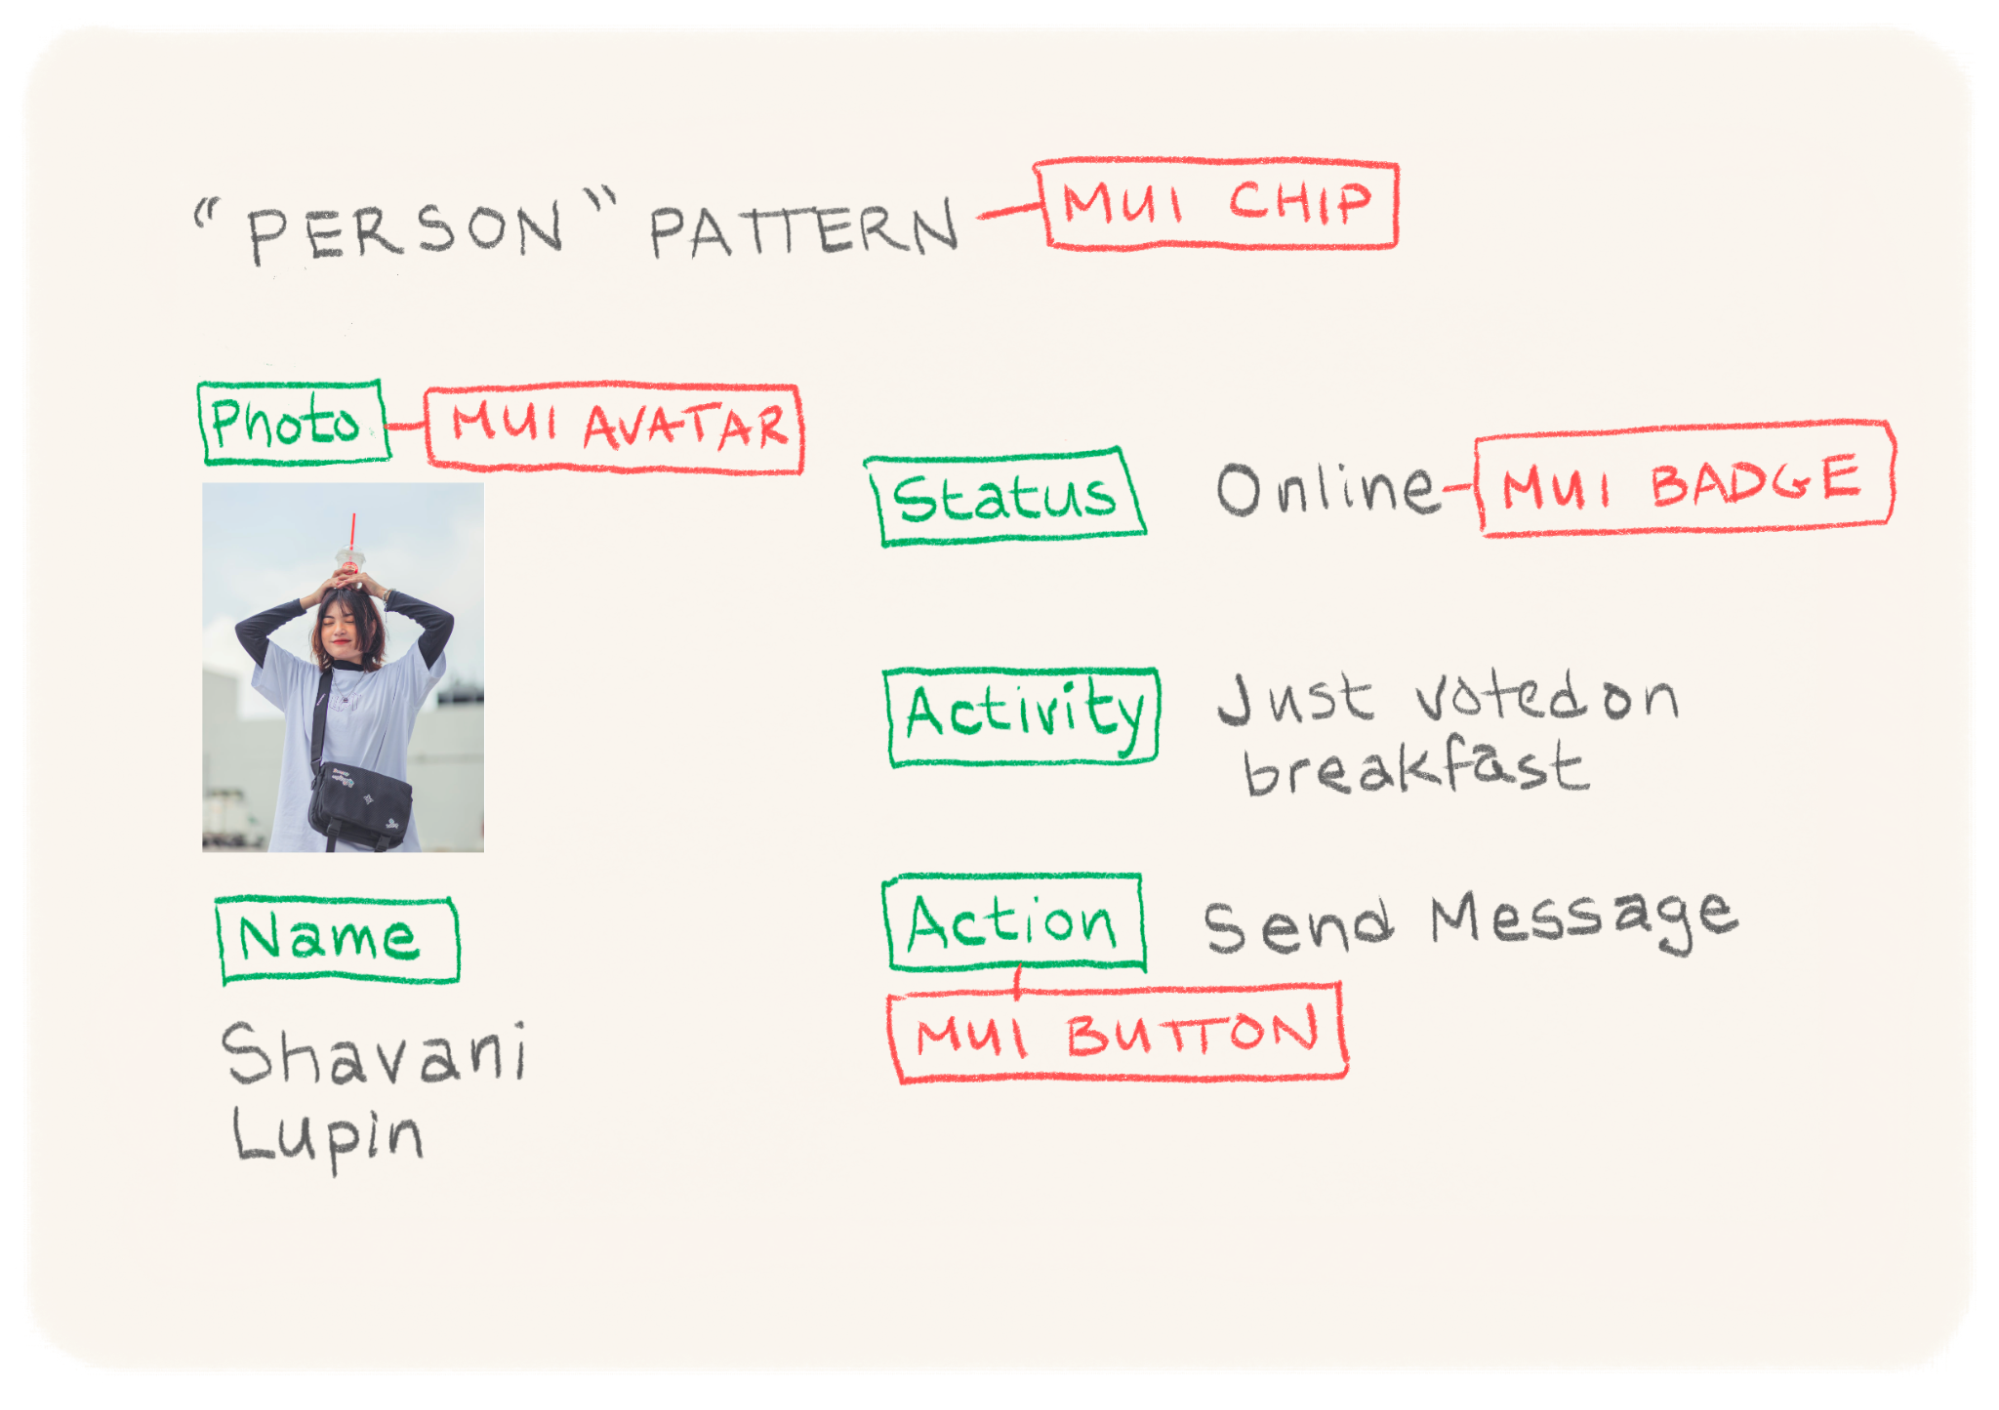
The designers, engineers, and product people all meet and pick the names of some basic objects and their properties. They start with a “Person,” someone on the trip who votes on places to go together for a meal or sightseeing. They sketch things out on a whiteboard.

This is their first pattern.

They move on, describing things like a “Place,” a location someone wants to visit.

And an “Occasion” pattern, a time the group will do things together like eat, and so on.

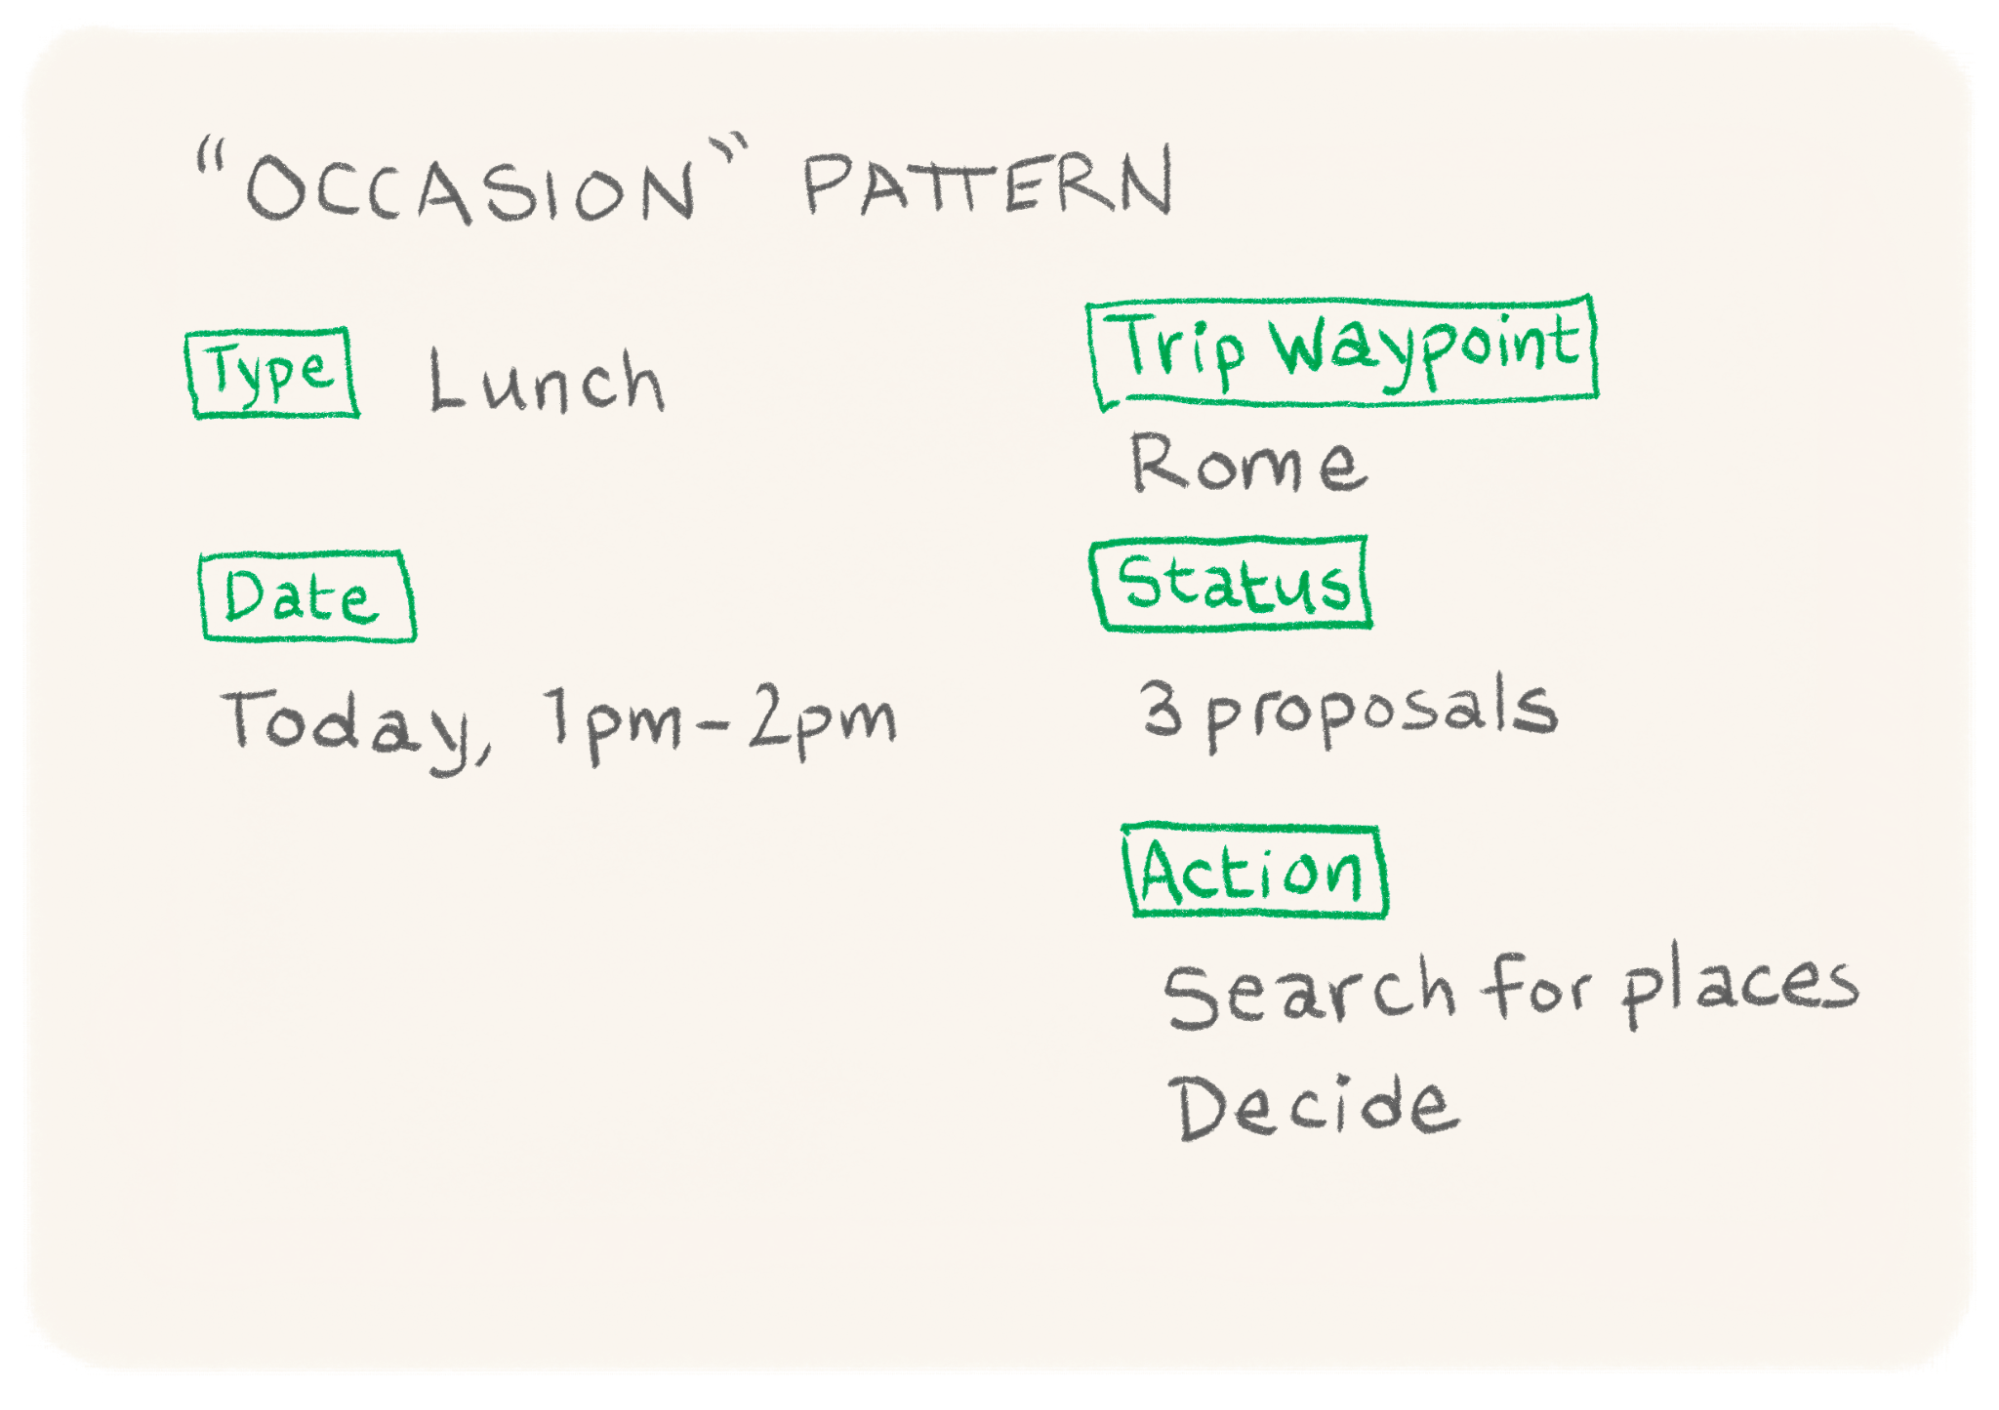
The process can work with a physical whiteboard, shared document, collaboration app, or whatever. All that is important is that everyone participates so they are aligned and get the details they need to start work.

With this rough outline, they can see that some of the parts of these patterns are elements they can pull from existing design systems.

They decided to use some restyled MUI elements. Those have defined properties (named attributes of a component, like “color” or “content”) already and will be a nice shortcut. They pull them into Figma (their design tool of choice) and development (a React web app with the MUI library as a dependency). They add some of these MUI elements and their standard properties to each pattern.

For each pattern, they create a page in a shared Notion document that everyone can edit and update. They start by adding properties from the MUI elements they’ve chosen.

The team combines the properties from the MUI elements with others they’ve sketched out and flattens the properties a bit. They group the properties so that it’s clear what is most important and secondary.

The Figma component will have a different variant for each important property (like activity or actionsAvalable). And each of the element properties will become part of the component in development, of course. In this way, the design and development are aligned — not necessarily completely the same in every detail, but in the ways that matter, moving in the same direction.

The team talks about more ideas for each pattern. Adding properties doesn’t mean they will appear in the final design, just that an idea could be part of the experience, so it’s a low-stakes conversation where final decisions don’t need to be made.

After going through the same process for the “Place” and “Occasion” patterns, the designers and developers have a lot of what they need to make progress. They have agreed on the names of things and what the important properties are. The patterns are defined in a form that the whole team can see and edit, and they start work.

An engineer might stub out a “Person” component like the one below while a designer is sketching it out in Figma with no bottlenecks.

Of course, the engineers figure out that there are some properties they need that they missed at first, like a presence property for a user (after all, in order to know how to show a user notification, it helps to know if that user is using the app right now or a notification would be better). They add that to the document and message the rest of the team.

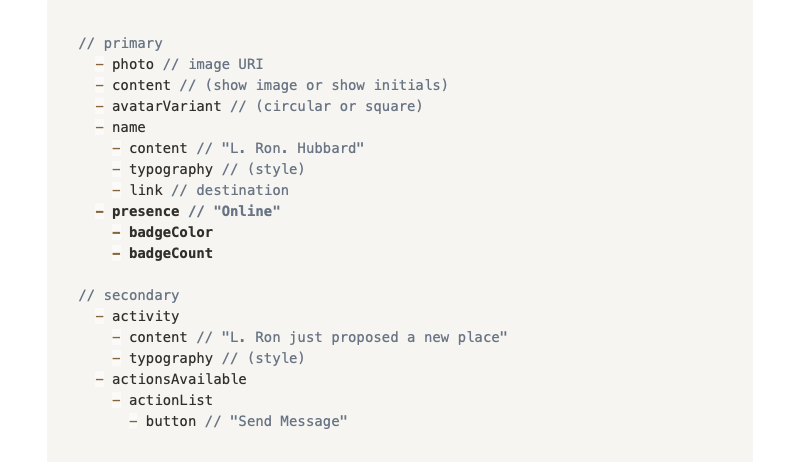
At the same time, the designers are fleshing out the patterns, using the MUI Figma library where possible, and adding new components where needed. When the team sees the addition of a presence property to the Person pattern, they decide to make a presence indicator and group it with the primary elements. As long as they are keeping the simple pattern document up to date, there is no handoff or waiting around.

Sometimes there are big questions to resolve about the experience. But that is the occasion for the next meeting about what the primary views in the app should be.

The team meets again and comes up with a “People” view (a list of people on the trip, with their status), a “Schedule” view (with a list of occasions and the plan for each day), and a “Proposals” view (to see and propose places to go) — more design patterns. For this pattern documentation, one of the product owners wants to use a wireframing tool instead of an outline (as in the previous example). That’s fine. Pretty much anything works to describe patterns as long as it shows elements and groups (and it’s what a team likes using).

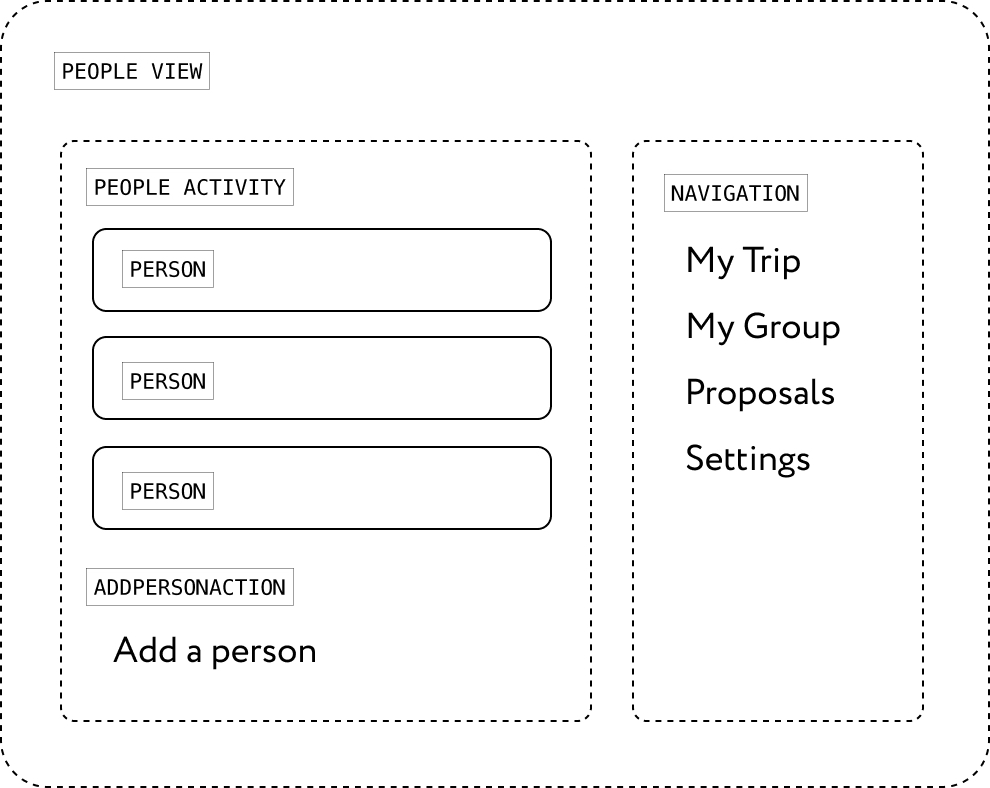
In these patterns, lists of Person, Occasion, and Place patterns are nested inside of each view. It becomes clear that there will have to be two versions of a Person pattern in the app, so the property is added to that pattern.

As they work, if an engineer gets a little ahead of whatever design work exists, they can either use standard MUI components or add a proposal to the patterns document. And designers can add new components if the design starts to need them. All parties are able to make changes without blocking each other.

Organizational Needs

Now, I should pause here to note that there are plenty of teams where this kind of pattern definition is not the primary product definition activity and where other stakeholders (engineering managers and so on) have a say in how the design system is built. Not all teams are small and have as much ownership. Even in larger companies, however, I believe design patterns can be very useful and help make a case for development work (since they show how the design system is helping teams get things done). But in those contexts, design patterns may be small parts of other organizational processes and not as important overall.

In this small team, the struggle to justify time on a design system is for a different reason: there’s a great temptation to put it off because everyone wants very badly to ship something sooner, and it feels “extra.” But every member of the team also knows that the minute they want to iterate on their product, that work will be easier if they have created a design system, and so they keep their good practice going.

Putting It All Together

Once the patterns are established as a way for the entire team to collaborate, final designs and views come together more quickly (because the entire team was able to start together and finish together). The visual design happens at the end rather than being a bottleneck before people can start work.

Integrating Patterns In Product Planning

As working with patterns becomes more established and mature, patterns can be broken out into separate repositories and polished on their own, either as a separate library in Figma or a set of modules in development. If a team gets larger, there might even be an official owner for each pattern who handles bugs or polishes details.

Each pattern properties list can be turned into an API once a module is trustworthy to use in new design and development. In the WeTrip example, the scrolling list of places for today is reused in a search results view when it’s added later.

Since patterns are by their nature only the reusable parts that save designers and developers time, patterns can make working on the design system something with a hard-core product improvement impact. Re-use can be captured as a key metric and a factor in prioritization. The amount of reusable work being generated can be tracked automatically in design and development tools (much like test coverage).

If the reuse of patterns becomes common enough that it needs careful management, patterns can become part of a federated module build process (like what is built into WebPack 5). In short: patterns lend themselves very well to being part of the toolchain of many modern development processes.

Your Turn

I imagine that there are many teams that already practice some of these concepts in the collaboration between design and development, and I am very eager to hear about that! It has been a happy improvement as a method for myself and the people I have worked with, and I would love to hear your stories.

For others, I hope this has been a good introduction to a vision for you and your team of an alternate reality where you can seamlessly collaborate on design systems without as many pitfalls. I wish the best to you and your team as you find your way to such harmony and a happy design outcome!

Categories: Others Tags:

20 Best New Websites, May 2023

May 15th, 2023 No comments
20 Best New Websites, May 2023

Every month we gather together a selection of the most exciting websites from the preceding four weeks.

Categories: Designing, Others Tags:

The Role of Social Media in Building Brand Awareness

May 12th, 2023 No comments

Bob: Hey, Rob! What do you do?

Rob: I have a brand of my own. 

Bob: Oh, what’s the name?

Rob: It’s called “X”. 

Bob: Okay, where can I find it?

Rob: Here, at this address. 

Bob: Umm, I meant which social platform…

Moral of the story: If your brand is not on social media, your brand practically doesn’t exist to your audience. 

Besides, Data Reportal said that 75% of web surfers use social media to research brands. 

So, if you are reading this thinking about how to get more inbound sales for your brand – maybe, it’s time to tell your audience that you have a brand.

Whether you’re a seasoned marketer or just starting out, it’s crucial to understand how social media can help you build brand awareness and grow your business.

Wondering how you can do that? 

Well, then, you’re at the right place. We will not only tell you why you should use social media for brand awareness, but you will get a perfect roadmap to do that. 

Let’s dive in!

Why Should You Use Social Media for Brand Awareness?

Brings your brand to the spotlight

There are almost 300,000 new brands issued every year – what are the chances of your brand surviving now? 

Almost, none if it’s out of your audience’s sight. 

But, social media, if implemented with the right strategy, can bring your brand to the spotlight of its ideal audience. 

From vertical videos to scroll-worthy carousels and even some longer text posts and trending hashtags – you get the chance to express your brand voice & reach out to potential customers by just hitting the “Post now” button.

The easiest part? You don’t even have to sit and post each content every day. There are a number of social media automation tools available out there where you can schedule all your months in one go! 

Lets You Connect with a Wider Audience

Remember the heart of Iron Man’s suit (without which he couldn’t function)? 

The scenario is pretty much the same when it comes to your brand. It cannot function without its heart, i.e. its ideal audience.

And when your goal is to build brand awareness – this is even more evident.

On social media, you get to have a real-time conversation with your audience, reply to their comments, and even slide into their DMs (in a non-creepy way, of course!).

When you evolve as a responsive & interactive brand on social media – you can foster trustworthy relationships with your audience, build a community around your brand’s presence & even establish yourself as an authority. 

Builds Your Brand’s Personality

Without a unique personality, your brand is just a name out in the cloud. However, with social media, you can establish a unique brand identity, get creative and even play a little humor. 

It is your brand’s personality that can help you stand out from the crowd and leave a long-lasting impression on your audience’s mind – which will keep them coming back!

Have you seen how Sephora does it?

Source: Instagram

Even though Sephora’s business model is all about beauty and wellness products worldwide – they go steps further in their socials and features tutorials to influencer collaborations and more. 

And guess what? That’s what differentiates Sephora from other brands in the same niché! 

If you still haven’t figured out a personality for your brand or are confused about it – try out social listening tools like Hootsuite to know how your competitors are doing it.

If you’re just starting out and do not want to invest in a premium tool right away, there are many Hootsuite alternatives you can go for – that get the job done without the pocket pinch. 

Reduces revenue investment 

Compared to other paid channels of brand promotions, social media is quite cheaper – and that too, without compromising on the benefits you can reap. 

In fact, there are a number of brands that have built such a great social media presence that they don’t spend a single penny on paid ads or promotions. And are still successfully generating leads!

Not only will you save on your investment budget, but your sales cycle will also be comparatively shorter – because you have already educated & nurtured your audience on your socials. 

Boosts Your Brand Credibility

Okay, you have a brand. So, does the 3 million other founders – how will your audience know if it’s credible?

Well, there are ample harder ways to get it done – let’s talk about the easier one then; which is – promoting user-generated content on your social channel. 

When the mass audience sees your customers giving positive feedback about your brand,- there won’t be any room for second thoughts. The feedback can come in many formats – from vertical shorts to written reviews, and even static before and after images. This is called customer retention marketing which prevents any sort of customer churn.

Your Roadmap to Using Social Media for Building Brand Awareness

Go for Value Over Anything Else

Social media works much like Newton’s third law of motion – “To every action, there is an equal and opposite reaction“

You give your audience crap, you get crap back. 

You give value to your audience, you get rewarded with engagement/sales. 

So, create content that doesn’t only resonate with your audience’s pain points – but also ensures they are reaping value from it.

Because your audience will only remember your brand when they get something of value from you.

If you still aren’t sure whether your audience is finding your content engaging enough, try using the best social media analytics tools to track your social media curve. 

Say It With A Compelling Story

Who doesn’t love a good story? So, why not leverage the same for your brand! 

It’s your chance to develop a compelling brand narrative that’s clear, concise & resonates with your ideal audience. 

What’s best – if your brand really has a solid story to tell, like ‘rags to riches’ or something similar. Make sure your audience sees it and knows about it! 

Engage, Engage, Engage

Source: Twitter

It will be an amateur move to consider that your ideal audience is seeing or interacting with your content. 

No matter how great the hashtags are or how aligned the content is, almost half of your audience is not even aware of it. 

So, how do you reach out to all your audience?

Well, that’s where engagement comes in. 

Make a list of your ideal lead profiles and start engaging with them every day – or at least twice every day. 

You can comment on their posts, reply to their stories or slide into their DMs (but not in a creepy way!) – all these will ensure that you always stay at the top of your audience’s mind.

Collaborate with Influencers

If you thought influencer marketing was just for B2C – we are sorry to break your bubble – because B2Bs have a similar share in it. 

And partnering with influencers is a great way to boost your brand’s visibility on social media. 

Go ahead, and find influencers in your industry who have a moderate to huge following and an engaging audience – and collaborate with them to create content that resonates with your audience & promotes your brand.

Takeaway

Now, you get it? 

While other channels like blogs and podcasts still work great for building brand awareness – social media brings you faster in front of your audience. 

And, for your brand to survive the hustle & bustle online and still bring in revenue – there’s no alternative to building brand awareness on social media.

Featured image by Loc Dang

The post The Role of Social Media in Building Brand Awareness appeared first on noupe.

Categories: Others Tags:

5 Best CRO Tips for B2B SaaS Websites

May 12th, 2023 No comments

Conversion rate optimization (CRO) denotes strategies to persuade website visitors to become clients. What influences customers’ shopping behavior? In the world of B2B SaaS, you need to present a product that serves the following primary purposes:

  • enhancing business performance;
  • solving common pain points;
  • increasing sales;
  • reducing costs;
  • providing a team with the needed capabilities that are easy to comprehend.

But even having the best and most useful product doesn’t guarantee conversions. You need to succeed in the challenging CRO process, improving the user experience on the website and removing any barriers on the purchase journey. For example, online store owners follow eCommerce UX design best practices to achieve it. What can a B2B SaaS company do?

A great customer experience begins with understanding the path a potential buyer follows when interacting with a brand. It involves all of the company’s points of contact with a prospect. Ideally, these paths should be well thought through from many perspectives: UXUI, sales, and marketing, to name a few.

By investing time in conversion rate optimization, a company can pave the optimal way for a potential client to buy more. In this article, you’ll find out what software as a service (SaaS) companies can do to increase their website’s conversions.

1. Analyze Your Landing Pages

B2B clients need more time to convert compared to direct consumers. They avoid impulsive purchases, so having a good landing page with essential information about the product is a must for a B2B SaaS company. These are pages intended to trigger a particular action:

  • subscribing to an email newsletter;
  • signing up for a demo version of the software;
  • opting in for a trial period;
  • buying the tool.

So they should be powerful in marketing terms. Here are some pointers for designing a landing page:

  • Let people sign in with a single click.
  • Use a strong copy, with headlines and subheadings defining your unique value proposition (UVP).
  • Include engaging elements, such as videos, to tell about your product more.
  • Highlight the benefits for a potential business client (not only the features of the product/service).
  • Reduce doubts and increase trust with social proof (testimonials, achievements, awards, partners, etc.).
  • Personalize communication with pronouns and tailored content.
  • Remove the website’s navigation from a landing page to double the conversion rate.

FreshBooks increases the number of conversions by stating the ability to cancel subscriptions and not to insert credit card data. It also displays product ratings and reviews. At the bottom of the page, there is a Frequently Asked Questions section and product benefits for businesses, helping prospects decide.

Screenshot taken on the official FreshBooks website

2. Give an Idea About Your Product with a Short Free Trial

Gaining awareness of your product and stimulating interest in it typically constitutes the first step in lead generation. That’s where the opportunity to test the software becomes of the utmost importance. If you neglect this step, most consumers will skip your product and turn to your competitors. As most SaaS companies provide an opportunity to run the product for free, you need to follow their suit.

In light of this, work on improving visitor-to-free trial/freemium conversions. It includes offering a complete product for a brief period (a trial) or providing a minimal, non-time-limited version of your product (freemium). So customers will need to either pay for the service after a certain period or complete access to all features without any limitations or watermarks.

A case in point is MailChimp, a marketing platform for small businesses. You can utilize the tool for free, but it’s limited to 2,500 monthly emails sent, one user, and some advanced features.

Screenshot taken on the official MailChimp website

People need to understand the tool fast. Ensure a smooth onboarding process. Let consumers complete their tasks and get to grips with the software to encourage them to purchase it for a longer time. The bottom line is that the product should solve customer problems before the end of the trial. That’s where the following tips may help:

  • display the value of the products with the help of metrics and reports;
  • instill a sense of urgency when the trial is coming to an end;
  • follow up with those who don’t subscribe to discover reasons for abandoning the service.

3. Use Clear Calls-to-Action

Suppose you’ve convinced visitors to subscribe or buy. Where should they click to get the desired solution? To encourage visitors to stay on a website and submit a contact form with an inquiry or download a whitepaper, include the CTA to catch their attention immediately. While it may seem obvious, organizing the CTA is a critical step on the CRO list. Take this information into consideration when improving CTAs:

  • These can be links or buttons, leading people to other sales funnel stages. 
  • They may differ in prominence, with the most important being highlighted.
  • As clicking the button denotes conversion, you need to place them front and center on your pages.
  • The wording should be understandable and give clear directions.
  • Generate FOMO by advertising innovative features or limited-time deals.
  • CTAs should be concise, stating the product value in several words.

Look at how DocuSign emphasizes CTAs by increasing their size or spacing them out. This strategy is especially successful as there are minimum elements in the above-the-fold area.

Screenshot taken on the official DocuSign website

4. Cut Down on Your Lead Form Fields

Analyze your website forms. Is all information necessary to initiate the first contact with your company? Stick to the minimal number of fields. Allow users to complete them in a couple of seconds. Ask for the essential information only and make it up to clients whether to insert some details. For example, asterisks above specific fields will denote their importance. You may either hide the rest in accordions, remove them, or leave them without any marks.

Zoho enables prospects to sign up by inserting an email address, password, and country. But there is a quicker path. You can use a Google or Microsoft account to access Zoho CRM.

Screenshot taken on the official Zoho website

The fewer fields you show, the higher your chances of converting people into customers. If it’s necessary to collect such information, try separating forms across several pages. According to statistics, choosing multi-page over single-page forms can increase conversions from 4.53% to 13.85%.

In most cases, successful conversion in B2B SaaS will involve starting a conversation with your sales team, not purchasing. Keeping that in mind, you need to reduce the effort of making an appointment.

5. Practice A/B Testing

What should you pay the most attention to in terms of marketing? Your messages. AB testing gives a great hand at determining which elements, phrases, and layouts bring back a higher response. As such, using tools such as Visual Website Optimizer and similar, you can test the components on your landing pages to get an insight into customer behavior. These include calls to action, color schemes, texts, and visuals.

Such variation test campaigns allow for splitting your audience and showing them different options. For instance, you can build a hypothesis on the wording used for sign-up forms or even the subject lines of your newsletter send-outs.

As the business grows, you may conduct polls and surveys or analyze heatmaps to gather user feedback on your business. Implement the results on your touchpoints, including the website, app, social media, email, etc. It can involve making minor adjustments like changing the look of your landing pages or adding CTAs that are simpler, clearer, and more effective at boosting conversion rates.

You may find out what works best by comparing the results of gathered data like the number of clicks, downloads, filled-out forms, etc. You can also discover the bottlenecks that need fixing and underperforming solutions to replace. This way, your marketing efforts will bring back a more effective resonance.

By analyzing data of this kind, you can optimize the customer journey map and build stronger relationships with your clients. Not to mention that such an approach saves marketing resources and gets a better return on investment.

Major Takeaways

B2B SaaS companies should start optimizing their websites and solutions for conversions by analyzing customer psychology. What do people seek when inserting specific keywords in search and landing on your page? Leverage website analytics and tools to determine their interests and pain points.

We’ve described several ways to enhance conversion rates and sales, such as:

  • organizing landing pages;
  • adding a free version of the software to evaluate it before buying;
  • improving CTAs, their position, color, wording, and so on;
  • simplifying the registration process;
  • finding the best variant with the help of A/B testing, website analysis, and heat mapping.

Generate high-quality content and ensure website usability. Attract the target audience and solve people’s problems. If you follow these pieces of advice in addition to the CRO best practices, you will get more qualified leads for your B2B SaaS business.

Featured image by Stephen Phillips – Hostreviews.co.uk on Unsplash

The post 5 Best CRO Tips for B2B SaaS Websites appeared first on noupe.

Categories: Others Tags:

20 Key Influencer Marketing Statistics to Help You Shape Your Strategy in 2023

May 12th, 2023 No comments

For many marketers, an influencer marketing strategy is a no-brainer. The others are still deciding on the worth of influencer marketing. 

Both are perfectly right in their own way: After all, the importance of influencer marketing “depends” on the type of industry you’re in and the kind of work you do. 

However, if you’ve never dipped your toe in the world of influencer marketing but are eager to learn more, we’ve got some jaw-dropping statistics that’ll help you shape your strategy in 2023.  

Please note: We’ve only noted the statistics acquired from studies conducted between 2021–2023 to ensure relevancy.

Let’s dive in.  

Key statistics to shape up your influencer strategy 

1. When asked to share a budget, 23% of marketers planned to spend 40% of their marketing budget on influencer marketing, whereas the average majority (25%), planned to dedicate 10–20% of their budget. (Source)

Some marketers leverage AI to cut down costs. There are tools that help to find potential candidates in a short period of time, plus writing tools can help develop guidelines and brand books to make the partnership seamless. 

Tools like Klear, Chat GPT, and specialized writing tools for marketing and sales content, for instance, are some valuable resources marketing teams can leverage to save time and money. However, it is crucial to check for features and specifications in advance to choose the right toolset. For those looking in for tools in the content space, online reviews like this one on Jasper.ai vs. Copy.ai are helpful. 

2. 43% of brands spend less than $10k/year (US Dollars) on influencer marketing. However, there are a few who spend more than $500k. (Source)

Image Source

3. Instagram is the most popular channel for influencer marketing, with 87% of marketers and 90% of creators planning to increase their presence there. (Source)

4. According to a 2022 survey (whose respondents were mainly brands and PR and marketing agencies), 54% of the organizations said they worked with up to 10 influencers, and 3% said they worked with 1000+ influencers. (Source)

5. In 2023, brands plan to decrease their spending on the following platforms: Snapchat (73%), Twitter (58%), Pinterest (43%), etc. (Source)

Image Source

6. Zara, Shein, and Instagram are the most talked-about brands on Instagram. (Source

This indicates the audiences there place importance on fashion, which means if you’re in the fashion business and you sell products like leather jackets and linen suits, partnerships with creators on Instagram may be an exceptionally good strategy for you. You can get a lot of valuable data for earned media and social media mentions and utilize this data for your HubSpot lead scoring, which will help you get more conversions in the end. 

7. In 2022, brands placed importance on the following metrics when partnering with influencers: engagement rates (32%), social media traffic (19%), and brand mentions (11%). (Source

However, in 2023, the following metrics have the highest level of importance: views, reach, and impressions (49.6%), engagement (25.5%), and conversions/sales (24.9%). (Source)

Image Source

8. 61% of brands prefer to work with the same influencers, whereas the remaining 39% prefer working with new influencers. (Source)

9. An average majority (77%) of influencers are female, and 23% of them are male. (Source) You’ll find a breakdown of this statistic by each platform below. 

Image Source

10. In 2021 and 2022

  • Mega-influencers charged at least $1,200 (US dollars) per Instagram post, whereas macro-influencers charged anywhere between $185-$2500. (Source)
  • On TikTok, mega-influencers charged an average minimum of $1,034, and macro-influencers charged anywhere between $151-$793. (Source)
  • On YouTube, the former (mega-influencers) charged an average minimum of $2,500, and the latter (macro-influencers) charged between $1105-$16,234, thus making YouTube the platform that requires the highest amount of investment for influencer partnerships. (Source)

If your budget doesn’t allow you to partner with mega or macro influencers, you can try getting your foot in the door with organic posts instead of paid ones. 

For example, if you’re in the pet industry and want to work with a cat influencer, you can offer them free products, such as toys, food, accessories, furniture, and even cat insurance. That might get you noticed (and if your luck has it, you might get a free post out of it too). 

This barter strategy worked so well for Awful Cloth, it got them noticed by influencers Jason Derulo, Bryce Hall, and Charli D’Amelio. 

Image Source

If you get a free post or promotion, make sure to highlight it in you social media and website to use it as social proof. Create eye-catching captions to boost sales by leveraging AI writing tools, photo editors and upscale API to ensure high-quality.

11. A 2021 survey said that 53% of respondents believe influencers are the most skilled at promoting beauty products, and 45% of them said they are the most skilled at promoting clothing/accessories. (Source

12. More than 61% of the brands plan to use artificial intelligence or machine learning to identify which influencers to work with. (Source). 

Image Source

13. 39% of brands prefer to work with nano-influencers, whereas 30% of them prefer to work with micro-influencers. (Source

14. An influencer collaboration takes approximately 16 days to complete its full lifecycle. (Source)

15. Price per post for any influencer partnership is usually determined by the following formula, “Average engagement x Engagement Rate Price.” 

The average engagement rate cost on YouTube is $0.04, on TikTok is $0.21, on Instagram is $0.56, on Facebook is $2.63, on Pinterest is $5.51, and on Twitter is $37.82. (Source)

Side note: Prices are in US dollars. 

16. Lifestyle, fitness, entertainment, etc., are some of the most profitable niches for influencers. (Source

When you take an average of how much 500,000 influencers charge across various niches on a variety of platforms, these are the figures you’ll get:

Image Source

17. In 2022, these were the accounted engagement rates of influencers: Nano-influencers (2.53%), micro-influencers (1.06%), mid-tier influencers (0.91%), macro-influencers (0.86%), and mega-influencers (0.92%). (Source)

18. Between 2022 and 2023, 70% of influencers have increased their rates, 2% have decreased them, and around 28% are keeping them just the same. (Source

19. Men prefer to follow influencers who operate in the gaming, fitness, and food niches. While women prefer to follow influencers who operate in the skincare, fashion, and food niches. (Source)

20. A study that focused on Gen Z and millennials said that these audiences prefer to follow someone who’s authentic, funny, or knowledgeable, as opposed to someone with a large following. (Source)

Learn more about influencer marketing 

Since we’ve only seen the rise of influencer marketing in the past few years, there’s still a lot to learn about the industry’s future and how effective it could be in the long run. 

To keep up with all the trends in influencer marketing, you can regularly follow places like Influencer Marketing Hub, Adweek, and Noupe (as we regularly post advice on improving your brand presence and marketing strategies).

So are you ready to take the leap and invest in influencer marketing? Join the thousands of brands already tapping into this lucrative marketing strategy. You won’t regret it and neither will your bottom line. 

Happy influencing! 

Featured Image by rawpixel.com on Freepik

The post 20 Key Influencer Marketing Statistics to Help You Shape Your Strategy in 2023 appeared first on noupe.

Categories: Others Tags:

How to Cut Costs and Make More Profit in a Small Manufacturing Business

May 11th, 2023 No comments

Small-scale manufacturing is often the most fraught place to be from a cash flow perspective. You might have achieved some success, but be faced with the prospect of struggling to invest to expand your operations because your profit margins are tight, to put it lightly.

With that in mind, there are a few ways to overcome this conundrum, keeping your outgoings to a minimum, boosting your profitability, and still keeping customers happy. Here’s how.

Identifying Areas of Potential Savings

Since every penny counts, you must first take the time to identify areas of potential savings and pinpoint where changes can be implemented without compromising quality or customer service.

As part of this, consider reviewing overhead costs such as rent, utilities, and payroll expenses. Each area offers an opportunity for savings if managed carefully and strategically. Perhaps you’ll find that it’s possible to renegotiate rates with your commercial landlord, switch to a better deal with a new energy supplier, or streamline your staffing. If handled on a case-by-case basis, you’ll surely find a more cost-efficient way forward.

Additionally, look into ways to reduce energy consumption, perhaps by investing in efficient lighting solutions or updating older equipment that’s less power-hungry, and will lead to long-term savings. You can even claw back some cash when replacing outgoing hardware if you’re savvy, as you can easily sell used plastic machinery and other manufacturing equipment through online marketplaces.

Streamlining Operations to Increase Efficiency

One of the best ways for a small manufacturing business to cut costs and make more profit is by streamlining operations. This involves analyzing current processes, identifying weaknesses or areas that could be improved upon, establishing clear goals, and developing strategies toward achieving them. It’s an approach that can be applied to any organization, of course, but has manufacturing-specific elements to keep in mind.

For instance, it’s a good idea to invest in software solutions or automation tools that can help you reduce manual labor with tasks such as inventory tracking or order processing. These are often time-consuming to deal with by hand but can be easily accelerated with the right platforms.

Also, look into opportunities to outsource elements of your operations. This could include complex yet necessary aspects like warehousing, which a third party might be able to handle far more affordably than you could manage in-house.

You can even outsource things like accounting, payroll management, workforce management, marketing, and whatever else you need to. The leaner your small manufacturing firm is, the more adaptable, agile, and profitable it will be.

Making Smart Purchasing Decisions With Suppliers

In order to remain competitive and profitable, your purchasing decisions have to be on point. This means taking the time to research suppliers, compare prices, and weigh up the terms and conditions of sales contracts. This will help you identify the best possible deals for materials or products that your business needs.

Taking advantage of bulk ordering discounts also makes sense for businesses involved in mass production on any scale, as this can save money on essentials over time, while also preparing you to accommodate spikes in demand without being overwhelmed.

Finally, take into account quality considerations before making any final decision. It’s better to prioritize value for money over pure price because the cheapest option is a false economy if the goods you’re getting aren’t up to your usual standards. There’s no point saving a small amount if it only ends up creating consternation among your customers.

Implementing a Culture of Continuous Improvement

For any small manufacturing business that seeks to make more profit, establishing and maintaining a culture of continuous improvement is key. This involves creating an environment where employees are encouraged to think outside the box and suggest new strategies for reducing costs, while still delivering on the overarching mission statement of your firm.

This won’t just happen organically, as you need to be active in developing this culture, and giving your team members the tools and the motivation to live up to its promise. For instance, providing training programs for your staff on how best to identify potential savings opportunities will help build their skillset, as well as catalyze collaboration between departments.

It also makes sense to reward ideas or initiatives that have been successful in cutting costs, as this will motivate everyone involved while reinforcing positive behaviors.

Final Thoughts

Profitability is within reach for any manufacturer, and it doesn’t have to be achieved by cutting corners. Hopefully, you’ve now got a basic framework for finding cost-cutting measures that won’t jeopardize your position in the market.

Featured image by cottonbro studio

The post How to Cut Costs and Make More Profit in a Small Manufacturing Business appeared first on noupe.

Categories: Others Tags:

How To Boost Your Design Workflow With Setapp

May 11th, 2023 No comments

This article is a sponsored by MacPaw Inc.

As someone who wears multiple hats, it is challenging to balance a full-time job, freelance projects, and all sorts of creative endeavors.

This is how I started off: By day, I’m a full-time product designer. By night, I juggle all sorts of freelance work and creative projects.

I am currently self-employed. However, there are challenges that come with being my own boss: Working with clients, sales and negotiation, invoicing, building a personal brand, crafting a content strategy, time tracking, project management… The list goes on.

Trying to keep up with everything used to be tough. No matter how hard I tried, my to-do list always seemed never-ending. I was constantly feeling overwhelmed.

I thought to myself, “There’s got to be a better way.”

After analyzing my workflow, I realized that many tasks could be simplified or automated so that I could save time, focus on high-value tasks, and work fewer hours.

After years of trial and error, I discovered a range of tools and strategies that helped me save time and stay organized to focus on what really matters.

The apps mentioned in this guide are available on Setapp. Whether you’re a Mac user or not, these hacks will help you get more done in less time and improve your quality of life. I hope you find value in this guide.

Streamline Your Workflow With the Best Apps

You can use Setapp to access 240+ apps on your Mac and iPhone under a single monthly subscription.

Personally, I use Setapp to do three things:

  1. Try out apps that could help save time. Some of these apps cost more than Setapp’s subscription, so it’s a relief that I do not need to pay for each one individually.
  2. For apps that I only need to use occasionally, I can quickly install and uninstall them as needed, with no extra cost. This saves me precious space on my Mac and ensures that I’m not cluttering up my system with unnecessary apps.
  3. Since Setapp’s library is updated regularly, I always get to try out new apps to further enhance my workflow.

Track Time & Eliminate Distractions

As a freelance designer, I need to track how much time I spend on each project to calculate my billable hours. I used to manually create events on my calendar and calculate the hours spent on each project. It’s a waste of time, and sadly, it is inaccurate.

To solve this problem, you can use Timemator to track your time accurately and minimize distractions.

With Timemator, you can set up auto time-tracking rules for specific apps, files, or websites. For example, you can set rules so that the timer starts tracking when you work on a specific project on Figma or Adobe Photoshop.

The timer runs quietly in the background so that you can stay focused without any interruptions. You no longer need to manually start or pause the timer.

Pro tip: Use it to reduce distractions! Set up auto-tracking to track how much time you spend on meetings, talking to teammates or clients on Slack, or watching Netflix.

To help you identify where you’ve spent your time, Timemator gives detailed reports and analytics so you can reduce or eliminate time-wasting activities and get more done in less time.

The Only Font Manager You Need

As designers, we all know that font selection can make or break a creative project.

I was frustrated with Font Book (the default font manager on MacOS). It wasn’t user-friendly. Searching and comparing fonts was a chore.

I found Typeface to be useful — especially when you need to quickly browse through your font collection, customize the preview text and size in real-time, and compare to see how different fonts look side-by-side.

Over the years, I have saved up a huge font library. Typeface is able to load all my fonts quickly and remove duplicate fonts that bloat up my computer. It supports variable fonts and OpenType font features and has robust features for the busy designer.

For fonts you don’t use often, you can choose to activate them only when necessary. This way, your computer stays clean and fast.

As a bonus, you can also easily organize fonts into custom collections or tags.

Fastest Way To Create Device Mockups

When designing, we often need to create high-quality, professional-looking phone, tablet, and computer mockups to showcase our designs.

I used to spend hours searching for device mockup templates and launch Adobe Photoshop in order to use those templates. The whole process was time-consuming, so I switched to a tool called Mockuuups Studio.

All you need to do is drag and drop a screenshot of your website or app into it, pick a scene, and it will generate thousands of mockups. It’s pretty neat.

You can filter through scenes, models, and devices to find the perfect mockup for your digital product. Then, add hands, overlays, realistic shadows, or backgrounds to your device mockups. In the example above, I have filtered ‘iPhone’ mockups only.

Since it’s cloud-based, you can access it anywhere and collaborate with your teammates in real time too.

To further speed up your workflow, you can use their Figma, Sketch, or Adobe XD plugin. This is their Figma plugin:

Create Screenshots & Screen Recordings, Fast

When presenting designs (especially when working remotely), I take screenshots and screen recordings for my clients every day.

But instead of using the default Mac screenshot tool, CleanShot X is a better solution. This is an essential tool for every Mac user.

To quickly take a screenshot, use this shortcut key on your Mac: Command + Shift + 4.

This tool gives you the convenience to record MP4 or GIF with your desktop icons hidden, capture scrollable content, and annotate, highlight, or blur screenshots to hide sensitive personal information.

An example of how I annotate my screenshots:

I’ve used this tool for years with zero complaints. This tool will make your life easier when sharing screenshots with clients or on social media.

A cool feature you’ll also love: You can capture and copy any text, so you’ll never have to manually retype it again!

Your workflow will become much more streamlined and efficient since you no longer get bogged down in the technical details.

Never Waste Time Searching For Meeting Links Again

It’s challenging to keep track of various meetings, their details, and attendees, especially when switching between Google Meet, Zoom, your email inbox, and calendars.

To solve this problem, you can use Meeter to schedule or join meetings with one click right from the menu bar on your Mac.

It supports Google Meet, Zoom, and Microsoft Teams. When you want to join a meeting, you no longer have to waste time searching for meeting links, then copy and paste the link into the browser. Instead, you can now focus on being present in every meeting.

The tool allows you to directly call your FaceTime contacts and phone numbers and jump into recurring calls from the menu bar too. Pretty simple!

Save Time With Spotlight On Mac

When working with multiple files and apps on your Mac, you need to be able to quickly find and access them instead of navigating through different folders.

With Spotlight, you can do these things quickly. While this is not an app, it’s one of the most powerful features on Mac that can save you plenty of time.

To open Spotlight, simply hit Command + Spacebar on your keyboard and start typing.

Then, try these on Spotlight:

  • Perform quick calculations.
    No need to open a calculator app. Simply type in your calculation in Spotlight and hit enter. It’s that easy.
  • Search for apps.
    Quickly find any app on your Mac.
  • Search the internet.
    Type your search term, and it will launch your default browser with the search results. You’ve just saved a few clicks.
  • Find files or folders.
    Type in the name of the file or folder, and you have it.

  • Check the weather.
    Type “weather” followed by your location, and it will give you up-to-date information on the current weather conditions and forecast.

Cool, right? Learning how to use Spotlight effectively is a game-changer. Give it a try, and see how much time you can save.

Design Accessible Interfaces

As a product designer who also builds websites for clients, it’s a challenge to find and create the perfect color palettes while working on multiple projects at once. In the past, I’ve had to rely on a combination of tools like swatch libraries and notes to keep track of my palettes.

If you’re a designer or a developer, you’ll love Sip — a powerful color picker that can help you design beautiful and accessible interfaces easily.

With Sip, you can quickly grab colors right from the Mac menu bar and drop them into any design or development tool, including Adobe Photoshop, Figma, and Sketch. This makes it easy to create custom color palettes that match the client’s brand.

You can create and save custom color palettes, and the quick access menu that floats on the side of your desktop gives you quick access to your color palettes.

Currently, it supports 24 of the most popular color formats in the industry, like Android XML, CSS hex, RGB, and CMYK.

Now, my favorite feature is Sip’s Contrast Checker. In the example below, you can use the color picker to check the contrast between the gray text and white background, ensuring that it meets accessibility standards and is legible for all users.

Tip: Always make sure the contrast between the text and background is greater than or equal to 4.5:1 for small text and 3:1 for large text. If the color contrast fails, click on the ‘FIX’ button to improve it!

Declutter Your Mac’s Menu Bar

If you have a bunch of apps running on your Mac, your menu bar may be cluttered with all sorts of icons and notifications.

Just like physical clutter, digital clutter takes up mental space and affects your focus, too! To solve this problem, you can use Bartender.

Bartender allows you to organize your menu bar icons into neat and tidy groups or hide them completely — as simple as that. You can collapse your menu bar icons into a customizable dropdown menu so it remains clutter-free.

In the above example, most of my menu icons are hidden, except Figma and the battery level indicator.

After using it for over a month, I am able to focus better. It’s one of those subtle quality-of-life improvements that can have a big impact on your productivity and mindset.

Wrapping Up

I wish I had discovered these tools sooner!

The apps I’ve shared above are available on Setapp. With a single monthly subscription, you get access to 240+ Mac and iPhone apps. They offer a free 7-day trial, so you can try it out and decide if it’s right for you.

These tools have completely transformed my workflow and helped me become more productive and less stressed. I hope that these tools will do the same for you so you can make the most of your time. After all, time is a limited resource, and it’s up to us to use it wisely.

Thank you for reading. Have a productive day!

Further Reading On SmashingMag

Categories: Others Tags:

How to Find the Right White Label Website Builder for Your Agency

May 10th, 2023 No comments
How to Find the Right White Label Website Builder for Your Agency
Categories: Designing, Others Tags:

A Guide To Redux Toolkit With TypeScript

May 10th, 2023 No comments

If you are a React developer working on a complex application, you will need to use global state management for your app at some point. React Redux is one of the most popular libraries for state management used by many developers. However, React Redux has a complex setup process that I’ve found inefficient, not to mention it requires a lot of boilerplate code. The official developer of Redux developed the Redux Toolkit to simplify the process.

This article is for those with enough knowledge of React and TypeScript to work with Redux.

About Redux

Redux is the global state management library for React applications. If you have used useState() hooks for managing your app state, you will find it hard to access the state when you need it in the other parts of the application. With useState() hooks, the state can be passed from the parent component to the child, and you will be stuck with the problem of prop drilling if you need to pass it to multiple children. That’s where Redux comes in to manage the application state.

Introducing Redux Toolkit

Redux Toolkit is a set of opinionated and standardised tools that simplify application development using the Redux state management library.

The primary benefit of using Redux Toolkit is that it removes the overhead of writing a lot of boilerplates like you’d have to do with plain Redux.

It eliminates the need to write standard Redux setup code, such as defining actions, reducers, and store configuration, which can be a significant amount of code to write and maintain.

Jerry Navi has a great tutorial that shows the full Redux setup process.

Why I Prefer Redux Toolkit Over Redux

The Redux Toolkit has several key features which make me use this library over plain Redux:

  1. Defining reducers
    With Redux Toolkit, you can specify a slice with a few lines of code to define a reducer instead of defining actions and reducers separately, like Redux.
  2. Immutability helpers
    Redux Toolkit includes a set of utility functions that make it easy to update objects and arrays in an immutable way. This makes writing code that follows the Redux principles of immutability simpler.
  3. Built-in middleware
    Redux Toolkit includes built-in middleware that can handle asynchronous request tasks.
  4. DevTools integration
    Redux Toolkit includes integration with the Redux DevTools browser extension, which makes it easier to debug and analyse Redux code.

Using Redux Toolkit To Build A Project Issue Tracker

I think the best way to explain the value and benefits of using Redux Toolkit is simply to show them to you in a real-world context. So, let’s develop an app with it that is designed to create and track GitHub issues.

You can follow along with the code examples as we go and reference the full code anytime by grabbing it from GitHub. There is also a live deployment of this example that you can check out.

Start creating a new React app with the following command:

yarn create react-app project_issue_tracker --template typescript

This generates a folder for our project with the basic files we need for development. The –template typescript part of the command is used to add TypeScript to the stack.

Now, let’s install the dependencies packages required for our project and build the primary UI for the application before we implement Redux Toolkit. First, navigate to the project_issue_tracker project folder we just created:

cd project_issue_tracker

Then run the following command to install Material UI and Emotion, where the former is a design library we can use to style components, and the latter enables writing CSS in JavaScript files.

yarn add @mui/material @emotion/react @emotion/styled

Now we can install Redix Toolkit and Redux itself:

yarn add @reduxjs/toolkit react-redux

We have everything we need to start developing! We can start by building the user interface.

Developing The User Interface

In this section, we will be developing the UI of the app. Open the main project folder and create a new components subfolder directly in the root. Inside this new folder, create a new file called ProjectCard.tsx. This is where we will write the code for a ProjectCard component that contains information about an open issue in the project issue tracker.

Let’s import some design elements from the Material UI package we installed to the new /components/ProjectCard.tsx file to get us started:

import React from "react";
import { Typography, Grid, Stack, Paper} from "@mui/material";
interface IProps {
    issueTitle: string
}
const ProjectCard : React.FC<IProps> = ({ issueTitle }) => {
    return(
        <div className="project_card">
            <Paper elevation={1} sx={{p: '10px', m:'1rem'}}>
                <Grid container spacing={2}>
                    <Grid item xs={12} md={6}>
                        <Stack spacing={2}>
                            <Typography variant="h6" sx={{fontWeight: 'bold'}}>
                                Issue Title: {issueTitle}
                            </Typography>
                            <Stack direction='row' spacing={2}>
                                <Typography variant="body1">
                                    Opened: yesterday
                                </Typography>
                                <Typography variant="body1">
                                    Priority: medium
                                </Typography>
                            </Stack>
                        </Stack>
                    </Grid>
                </Grid>
            </Paper>
        </div>
    )
}
export default ProjectCard;

This creates the project card that displays an issue title, issue priority level, and the time the issue was “opened.” Notice that we are using an issueTitle prop that will be passed to the ProjectCard component to render the issue with a provided title.

Now, let’s create the component for the app’s HomePage to display all the issues. We’ll add a small form to the page for submitting new issues that contain a text field for entering the issue name and a button to submit the form. We can do that by opening up the src/HomePage.tsx file in the project folder and importing React’s useState hook, a few more styled elements from Material UI, and the ProjectCard component we set up earlier:

import React, { useState } from "react";
import { Box, Typography, TextField, Stack, Button } from "@mui/material";
import ProjectCard from "./components/ProjectCard";
const HomePage = () => {
    const [textInput, setTextInput] = useState('');
    const handleTextInputChange = (e:any) => {
        setTextInput(e.target.value);
    };
    return(
        <div className="home_page">
            <Box sx={{ml: '5rem', mr: '5rem'}}>
                <Typography variant="h4" sx={{textAlign: 'center'}}>
                    Project Issue Tracker
                </Typography>
                <Box sx={{display: 'flex'}}>
                    <Stack spacing={2}>
                        <Typography variant="h5">
                            Add new issue
                        </Typography>
                        <TextField 
                        id="outlined-basic" 
                        label="Title" 
                        variant="outlined" 
                        onChange={handleTextInputChange}
                        value={textInput}
                        />
                        <Button variant="contained">Submit</Button>
                    </Stack>
                </Box>
                <Box sx={{ml: '1rem', mt: '3rem'}}>
                    <Typography variant="h5" >
                        Opened issue
                    </Typography>
                        <ProjectCard issueTitle="Bug: Issue 1" />
                        <ProjectCard issueTitle="Bug: Issue 2" />
                </Box>
            </Box>
        </div>
    )
}
export default HomePage;

This results in a new HomePage component that a user can interact with to add new issues by entering an issue name in a form text input. When the issue is submitted, a new ProjectCard component is added to the HomePage, which acts as an index for viewing all open issues.

The only thing left for the interface is to render the HomePage, which we can do by adding it to the App.tsx file. The full code is available here on GitHub.

Using Redux Toolkit

Now that our UI is finalised, we can move on to implementing Redux Toolkit to manage the state of this app. We will use Redux Toolkit to manage the state of the ProjectCard list by storing all the issues in a store that can be accessed from anywhere in the application.

Before we move to the actual implementation, let’s understand a few Redux Toolkit concepts to help understand what we’re implementing:

  1. createSlice
    This function makes it easy to define the reducer, actions, and the initialState under one object. Unlike the plain redux, you don’t need to use a switch for actions and need to define the actions separately. This function accepts an object as a name (i.e., the name of the slice) and the initial state of the store and the reducer, where you define all the reducers along with their action types.
  2. configureStore
    This function is an abstraction for the Redux createStore() function. It removes the dependency of defining reducers separately and creating a store again. This way, the store is configured automatically and can be passed to the Provider.
  3. createAsyncThunk
    This function simplifies making asynchronous calls. It automatically dispatches many different actions for managing the state of the calls and provides a standardised way to handle errors.

Let’s implement all of this! We will create the issueReducer with an addIssue() action that adds any new submitted issue to the projectIssues store. This can be done by creating a new file in src/redux/ called IssueReducer.ts with this code:

// Part 1
import { createSlice, PayloadAction } from "@reduxjs/toolkit"

// Part 2
export interface IssueInitialState {
    projectIssues: string[]
}
const initialState: IssueInitialState = {
    projectIssues: []
}

// Part 3
export const issueSlice = createSlice({
    name: 'issue',
    initialState,
    reducers: {
        addIssue: (state, action: PayloadAction<string>) => {
            state.projectIssues = [...state.projectIssues, action.payload]
        }
    }
})

// Part 4
export const { addIssue } = issueSlice.actions
export default issueSlice.reducer

Let’s understand each part of the code. First, we are importing the necessary functions from the Redux @reduxjs/toolkit package.

Then, we create the type definition of our initial state and initialise the initialState for the issueReducer. The initialState has a projectIssues[] list that will be used to store all the submitted issues. We can have as many properties defined in the initialState as we need for the application.

Thirdly, we are defining the issueSlice using Redux Toolkit’s createSlice function, which has the logic of the issueReducer as well as the different actions associated with it. createSlice accepts an object with a few properties, including:

  • name: the name of the slice,
  • initialState: the initial state of the reducer function,
  • reducers: an object that accepts different actions we want to define for our reducer.

The slice name for the issueReducer is issueSlice. The initalState of it is defined, and a single adIssue action is associated with it. The addIssue action is dispatched whenever a new issue is submitted. We can have other actions defined, too, if the app requires it, but this is all we need for this example.

Finally, in the last part of the code, we export the actions associated with our reducer and the issueSlice reducer. We have fully implemented our issueReducer, which stores all the submitted issues by dispatching the addIssue action.

Now let’s configure the issueReducer in our store so we can use it in the app. Create a new file in src/redux/ called index.ts, and add the following code:

import { configureStore } from "@reduxjs/toolkit";
import IssueReducer from "./IssueReducer";
export const store = configureStore({
    reducer: {
        issue: IssueReducer
    }
})
export type RootState = ReturnType<typeof store.getState>
export type AppDispatch = typeof store.dispatch

This code configures and creates the store using the configureStore() function that accepts a reducer where we can pass all of the different reducers.

We are done adding the reducer and configuring the store with Redux Toolkit. Let’s do the final step of passing the store to our app. Start by updating the App.tsx file to pass the store using the Provider:

import React from 'react';
import { Provider } from "react-redux"
import { store } from './redux';
import HomePage from './HomePage';
function App() {
    return (
        <div className="App">
            <Provider store={store}>
                <HomePage />
            </Provider>
        </div>
     );
}
export default App;

Here, you can see that we are importing the store and directly passing through the Provider. We don’t need to write anything extra to create a store or configure DevTools like we would using plain Redux. This is definitely one of the ways Redux Toolkit streamlines things.

OK, we have successfully set up a store and a reducer for our app with Redux Toolkit. Let’s use our app now and see if it works. To quickly sum things up, the dispatch() function is used to dispatch any actions to the store, and useSelector() is used for accessing any state properties.

We will dispatch the addIssue action when the form button is clicked:

const handleClick = () => {
    dispatch(addIssue(textInput))
}

To access the projectIssue list stored in our reducer store, we can make use of useSelector() like this:

const issueList = useSelector((state: RootState) => state.issue.projectIssues)

Finally, we can render all the issues by map()-ping the issueList to the ProjectCard component:

{
    issueList.map((issue) => {
        return(
            <ProjectCard issueTitle={issue} />
        )
    })
}

The final code for HomePage.tsx looks like this:

import React, { useState } from "react";
import { useDispatch, useSelector } from "react-redux";
import { RootState } from "./redux/index"
import { Box, Typography, TextField, Stack, Button } from "@mui/material";
import ProjectCard from "./components/ProjectCard";
import { addIssue } from "./redux/IssueReducer";
const HomePage = () => {
    const dispatch = useDispatch();
    const issueList = useSelector((state: RootState) => state.issue.projectIssues)
    const [textInput, setTextInput] = useState('');
    const handleTextInputChange = (e:any) => {
        setTextInput(e.target.value);
    };
    const handleClick = () => {
        dispatch(addIssue(textInput))
    }
    return(
        <div className="home_page">
            <Box sx={{ml: '5rem', mr: '5rem'}}>
                <Typography variant="h4" sx={{textAlign: 'center'}}>
                    Project Issue Tracker
                </Typography>
                <Box sx={{display: 'flex'}}>
                    <Stack spacing={2}>
                        <Typography variant="h5">
                            Add new issue
                        </Typography>
                        <TextField 
                        id="outlined-basic" 
                        label="Title" 
                        variant="outlined" 
                        onChange={handleTextInputChange}
                        value={textInput}
                        />
                        <Button variant="contained" onClick={handleClick}>Submit</Button>
                    </Stack>
                </Box>
                <Box sx={{ml: '1rem', mt: '3rem'}}>
                    <Typography variant="h5" >
                        Opened issue
                    </Typography>
                    {
                        issueList.map((issue) => {
                            return(
                                <ProjectCard issueTitle={issue} />
                            )
                        })
                    }
                </Box>
            </Box>
        </div>
    )
}
export default HomePage;

Now, when we add and submit an issue using the form, that issue will be rendered on the homepage.

This section covered how to define any reducer and how they’re used in the app. The following section will cover how Redux Toolkit makes asynchronous calls a relatively simple task.

Making Asynchronous Calls With Redux Toolkit

We implemented our store to save and render any newly added issue to our app. What if we want to call GitHub API for any repository and list all the issues of it in our app? In this section, we will see how to use the createAsyncThunk() API with the slice to get data and render all the repository issues using an API call.

I always prefer to use the createAsyncThunk() API of the redux toolkit because it standardises the way different states are handled, such as loading, error, and fulfilled. Another reason is that we don’t need to add extra configurations for the middleware.

Let’s add the code for creating a GithubIssue reducer first before we break it down to understand what’s happening. Add a new GithubIssueReducer.ts file in the /redux folder and add this code:

import { createAsyncThunk, createSlice } from '@reduxjs/toolkit';
export const fetchIssues = createAsyncThunk<string[], void, { rejectValue: string }>(
  "githubIssue/fetchIssues",
  async (_, thunkAPI) => {
    try {
      const response = await fetch("https://api.github.com/repos/github/hub/issues");
      const data = await response.json();
      const issues = data.map((issue: { title: string }) => issue.title);
      return issues;
    } catch (error) {
      return thunkAPI.rejectWithValue("Failed to fetch issues.");
    }
  }
);
interface IssuesState {
  issues: string[];
  loading: boolean;
  error: string | null;
}
const initialState: IssuesState = {
  issues: [],
  loading: false,
  error: null,
};
export const issuesSliceGithub = createSlice({
  name: 'github_issues',
  initialState,
  reducers: {},
  extraReducers: (builder) => {
    builder
      .addCase(fetchIssues.pending, (state) => {
        state.loading = true;
        state.error = null;
      })
      .addCase(fetchIssues.fulfilled, (state, action) => {
        state.loading = false;
        state.issues = action.payload;
      })
      .addCase(fetchIssues.rejected, (state, action) => {
        state.loading = false;
        state.error = action.error.message || 'Something went wrong';
      });
  },
});
export default issuesSliceGithub.reducer;

Let’s understand the fetchIssues part first:

  1. We are using the createAsyncThunk() API provided by the Redux Toolkit. It helps create asynchronous actions and handles the app’s loading and error states.
  2. The action type name is the first argument passed to createAsyncThunk(). The specific action type name we have defined is githubIssue/fetchIssues.
  3. The second argument is a function that returns a Promise, which resolves to the value that dispatches the action. This is when the asynchronous function fetches data from a GitHub API endpoint and maps the response data to a list of issue titles.
  4. The third argument is an object that contains configuration options for the async thunk. In this case, we have specified that the async thunk will not be dispatched with any arguments (hence the void type) and that if the Promise returned by the async function is rejected, the async thunk will return an action with a rejected status along with a rejectValue property that contains the string “Failed to fetch issues.”

When this action is dispatched, the API calls will be made, and the githubIssuesList data will be stored. We can follow this exact same sequence of steps to make any API calls we need.

The second section of the code is similar to what we used when we created the issueSlice, but with three differences:

  1. extraReducers
    This object contains the reducers logic for the reducers not defined in the createSlice reducers object. It takes a builder object where different cases can be added using addCase for specific action types.
  2. addCase
    This method on the builder object creates a new case for the reducer function.
  3. API call states
    The callback function passed to the addCase method is dispatched by createAsyncThunk(), which updates the different store objects based on the API call states (pending, fulfilled, and error).

We can now use the GithubIssue reducer actions and the store in our app. Let’s add the GithubIssueReducer to our store first. Update the /redux/index.ts file with this code:


import { configureStore } from "@reduxjs/toolkit";
import { useDispatch } from "react-redux";
import IssueReducer from "./IssueReducer";
import GithubIssueReducer from "./GithubIssueReducer";
export const store = configureStore({
    reducer: {
        issue: IssueReducer,
        githubIssue: GithubIssueReducer
    }
})
export type RootState = ReturnType<typeof store.getState>
export type AppDispatch = typeof store.dispatch
export const useAppDispatch = () => useDispatch<AppDispatch>()

We just added the GithubIssueReducer to our store with the name mapped to githubIssue. We can now use this reducer in our HomePage component to dispatch the fetchIssues() and populate our page with all the issues received from the GitHub API repo.

import React, { useState, useEffect } from "react";
import { useSelector } from "react-redux";
import { useAppDispatch, RootState, AppDispatch } from "./redux/index";
import { Box, Typography, TextField, Stack, Button } from "@mui/material";
import ProjectCard from "./components/ProjectCard";
import { addIssue } from "./redux/IssueReducer";
import { fetchIssues } from "./redux/GithubIssueReducer";
const HomePage = () => {
    const dispatch: AppDispatch = useAppDispatch();
    const [textInput, setTextInput] = useState('');
    const githubIssueList = useSelector((state: RootState) => state.githubIssue.issues)
    const loading = useSelector((state: RootState) => state.githubIssue.loading);
    const error = useSelector((state: RootState) => state.githubIssue.error);
    useEffect(() => {
        dispatch(fetchIssues())
      }, [dispatch]);

    if (loading) {
      return <div>Loading...</div>;
    }

    if (error) {
      return <div>Error: {error}</div>;
    }
    const handleTextInputChange = (e:any) => {
        setTextInput(e.target.value);
    };
    const handleClick = () => {
        console.log(textInput)
        dispatch(addIssue(textInput))
    }
    return(
        <div className="home_page">
            <Box sx={{ml: '5rem', mr: '5rem'}}>
                <Typography variant="h4" sx={{textAlign: 'center'}}>
                    Project Issue Tracker
                </Typography>
                <Box sx={{display: 'flex'}}>
                    <Stack spacing={2}>
                        <Typography variant="h5">
                            Add new issue
                        </Typography>
                        <TextField 
                        id="outlined-basic" 
                        label="Title" 
                        variant="outlined" 
                        onChange={handleTextInputChange}
                        value={textInput}
                        />
                        <Button variant="contained" onClick={handleClick}>Submit</Button>
                    </Stack>
                </Box>
                <Box sx={{ml: '1rem', mt: '3rem'}}>
                    <Typography variant="h5" >
                        Opened issue
                    </Typography>
                    {
                        githubIssueList?.map((issue : string) => {
                            return(
                                <ProjectCard issueTitle={issue} />
                            )
                        })
                    }
                </Box>
            </Box>
        </div>
    )
}
export default HomePage;

This updates the code in HomePage.tsx with two minor changes:

  1. We dispatch fetchIssue and use the createAsync() action to make the API calls under the useEffect hook.
  2. We use the loading and error states when the component renders.

Now, when loading the app, you will first see the “Loading” text rendered, and once the API call is fulfilled, the issuesList will be populated with all the titles of GitHub issues fetched from the repo.

Once again, the complete code for this project can be found on GitHub. You can also check out a live deployment of the app, which displays all the issues fetched from GitHub.

Conclusion

There we have it! We used Redux Toolkit in a React TypeScript application to build a fully functional project issue tracker that syncs with GitHub and allows us to create new issues directly from the app.

We learned many of the foundational concepts of Redux Toolkit, such as defining reducers, immutability helpers, built-in middleware, and DevTools integration. I hope you feel powered to use Redux Toolkit effectively in your projects. With Redux Toolkit, you can improve the performance and scalability of your React applications by effectively managing the global state.

Further Reading on Smashing Magazine

Categories: Others Tags: