Google resembles an iceberg: there’s the part above the water we can see and use everyday; there’s also the part beneath the water, that we don’t see and know little about.
While many of us are concerned about the aspects of Google we don’t see — the parts that threaten our privacy, or monopolize the web — there’s no denying that Google offers some amazing products and tools, many of them free, all from the convenience of a single login.
Today we’re going to take a look at 12 tools from Google that really do bring something positive to the table.
1. Polymer
Polymer is an open-source JavaScript library from Google for building web applications using Web Components. The platform comes with a ton of libraries and tools to help designers and developers unlock the web’s potential by taking advantage of features like HTTP/2, Web Components, and Service Workers.
The main feature of Polymer is Web Components. With Web Components, you can share custom elements to any site, work seamlessly with any browser’s built-in elements, and effectively use frameworks of all kinds. Products like LitElement (a simple base class for creating fast, lightweight web components) and PWA Starter Kit make Polymer easy to use. If you like, you can build your app entirely out of Web Components.
2. Lighthouse
Google Lighthouse is an open-source, automated tool for improving the quality of web pages. The software allows you to audit web pages for performance, SEO, accessibility, and more. You can run Lighthouse using ChromeDevTools, directly from the command line, or as a Node module.
To use Lighthouse in Google Chrome, just go to the URL you want to audit (you can audit any URL on the web), open ChromeDevTools, and click the Audits tab. After you have run the audit, Lighthouse will give you an in-depth report on the web page.
With these reports, you will see which parts of your web page you need to optimize. Each report has a reference doc that explains why that audit is important and also shows you the steps you can take to fix it.
You can also use Lighthouse CL to prevent regression on your sites. Using Lighthouse Viewer, you can view and share reports online. You can also share reports as JSON or GitHub Gists.
Lighthouse also comes with a feature called Stack Packs that allows Lighthouse to detect what platform a site is built on. It also displays specific stack-based recommendations.
3. Google Analytics
Google Analytics is the gold standard of analytics services. Google analytics can be installed on your site for free with a small amount of JavaScript and allows you to see all kinds of details about your site visitors, like what browser they’re using, and where they’re from.
By using Google Analytics you can make decisions about your site based on science, and therefore be somewhat confident that the decisions you make will result in the outcome you are expecting.
4. Flutter
Flutter is Google’s UI toolkit for building natively compiled applications for mobile, web, and desktop from a single codebase. The toolkit is open source and free to use. The best part of Flutter is that it works with existing code.
The toolkit has a layered architecture that allows for full customization, which results in fast rendering and flexible designs. It also comes with fully-customizable widgets that allow you to build native interfaces in minutes. With these widgets, you will be able to add platform features such as scrolling, navigation, icons, and fonts to provide a full native performance on both iOS and Android.
Flutter also has a feature called hot reload that allows you to easily build UIs, add new features, and fix bugs faster. You can also compile Flutter code to native ARM machine code using Dart native compilers.
5. Google API Explorer
Google has a huge library of APIs that are available to developers but finding these APIs can be difficult. Google API Explorer makes it easy for developers to locate any API. On the Google API Explorer web page, you will see a complete list of the entire API library. You can easily scroll through the list or use the search box to filter through the API list.
The best part of Google API Explorer is that each link to a reference page comes with more details on how to use the API. API Explorer is an excellent way to try out methods in the Monitoring API without having to write any code.
6. Puppeteer
Puppeteer is a project from the Google Chrome team. The platform enables web developers to control a Chrome (or any other Chrome DevTools Protocol based browser) and execute common actions, much like in a real browser. Puppeteer is also a Node library and it provides a high-level API for working with headless Chrome. It is also a useful tool for scraping, testing, and automating web pages.
Here are some things you can do with Puppeteer: generate screenshots and PDFs of pages, UI testing, test Chrome Extensions, automate form submission, generate pre-rendered content, and crawl Single-Page Applications.
7. Codelabs
Google Developer Codelabs is a handy tool for beginner developers and even advanced developers who want to improve their knowledge. Codelabs provide a guided, tutorial, hands-on coding experience. Codelabs’ site is broken down into several tutorial sessions on different topics.
With the tutorials on Codelabs, you can learn how to build applications from scratch. Some of the tutorial categories include Augmented reality, TensorFlow, Analytics, Virtual Analytics, G Suite, Search, Google Compute Engine, and Google APIs on iOS.
8. Color Tool
Color Tool makes it easy for web designers to create, share, and apply colors to their UI. It also measures the accessibility level for any color combination before exporting to the palette. The tool comes with 6 user interfaces and offers over 250 colors to choose from.
The tool is also very easy to use. All you need to do is pick a color and apply it to the primary color scheme; switch to the secondary color scheme, and pick another color. You can also switch to Custom to pick your own colors. After you have selected all your colors, use the Accessibility feature to check if all is good before exporting it to your palette.
9. Workbox
Workbox is a set of JavaScript libraries and Node modules. The JavaScript libraries make it easy to add offline support to web apps. The Node modules make it easy to cache assets and offer other features to help users build Progressive Web Apps. Some of these features include pre-caching, runtime caching, request routing, background sync, debugging, and greater flexibility than sw-precache and sw-toolbox.
With Workbox, you can add a quick rule that enables you to cache Google fonts, images, JavaScript, and CSS files. Caching these files will make your web page to run faster and also consume less storage. You can also pre-cache your files in your web app using their CLI, Node module, or webpack plugin.
10. PageSpeed Insights
PageSpeed Insights is a handy tool from Google Developers that analyzes the content of a web page, then generates suggestions on how to make the page faster. It gives reports on the performance of a web page on both desktop and mobile devices. At the top of the report, PageSpeed Insights provides a score that summarizes the page’s performance.
11. AMP on Google
AMP pages load faster and also look better than standard HTML pages on mobile devices. AMP on Google allows you to enhance your AMP pages across Google. It is a web component framework that allows you to create user-first websites, ads, emails, and stories. One benefit of AMP is that it allows your web pages to load almost instantly across all devices and platforms hence improving the user’s experience.
12. Window Resizer
When creating websites, it is important that developers test them for responsive design – this is where Google’s Window Resizer comes in. Window Resizer is a Chrome extension that resizes the browser window so that you can test your responsive design on different screen resolutions. The common screen sizes offered are desktop, laptop, and mobile, but you can also add custom screen sizes.
Django is a high-level Python Web framework that encourages rapid development and clean, pragmatic design. Built by experienced developers, it takes care of much of the hassle of Web development, so you can focus on writing your app without needing to reinvent the wheel. It’s free and open source.
It is one of Python’s popular framework for building web applications and is most preferred for its scalability in creating a boilerplate with laid down configurations and files. This wraps up the whole goal of Django for developers;
“…building a great application in little time and less worry over basic settings.”
There are basic configurations, files and styling that cuts across all web application, no matter what you’re building. When using Django, these are generated for you automatically when you run certain commands at different points in the development cycle of your application. With this, you’ll have enough time to focus on the core aspect of your developing your application while Django handles the others for you.
It means that there are a lot of things happening underneath the hood. For someone who does not have a full grasp of the moving parts, this can be overwhelming. In this article we’re going to be learning about the following:
We’ll learn how these all fit together and the role they play. It’s important to know that it will not be possible to take a look at everything happening inside of Django. For cases outside the scope of this tutorial, there will be links to point you to resources that will help with that.
For learning purpose, we will be building an e-commerce platform. This is not a full-blown e-commerce site, our application will have only two basic features; creating products and making orders from the admin’s view.
This article will guide you through understanding Django’s pre-built commands, files and basics. It is targeted at developers who have used Django or intend to use it and want to know what happens under the hood. While it is not compulsory that you must have used Django, having experience with the basics of Django before continuing with this article will give you an advantage. You need to have a working knowledge of Python to fully grasp what will be covered in this piece.
Installing Django
If you do not have Django installed already, here are the steps to do that.
First, create a virtual environment, named djangodev. You need this to isolate your Django workspace and its dependent packages.
python3 -m venv ~/.virtualenvs/djangodev
Now to get into your virtual environment, you need to get it activated;
source ~/.virtualenvs/djangodev/bin/activate
If you get any error running with source you can make use of this alternative command,
Note: You need to activate the virtual environment anytime you want to use Django.
Now that you’re in your virtual env, install Django:
python -m pip install Django
To check if Django was properly installed, run;
python -m django --version
Shakaboom! Now you’re set for some magic, get your wands ready!
The method of creating files and folders at the go might be simple and straightforward. However, it is not ideal when you have to create a medium or large project and a deadline to beat. We always have a deadline to beat, even for personal projects.
Following this method when creating a new large project, you’ll have to create multiple files and folders and make multiple settings, which could lead to the creation of avoidable bugs and a lot of wasted time. startproject and startapp commands available to us through Django aim to solve this problem. These two commands create files, folders and carry out lots of configuration for you.
Let’s get started by generating a new application using the startproject command.
Scaffolding An Application
We’ll generate our application and take a look at the files that are generated, as well as few commands we’ll use. Run this command in your terminal to get started;
django-admin startproject ecommerce_site
When installing Django, django-admin is added to your path to give it access to perform its actions. It’s Django’s command-line utility for administrative responsibilities. Learn more django-admin uses here; it is a little beyond the scope of this article.
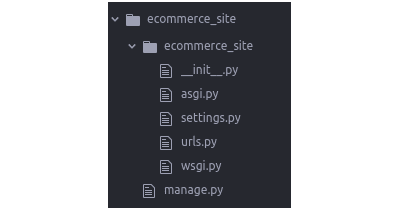
startproject is a Django command that helps generate the project. Here we pass to it the name of our project ecommerce_site. It then goes on to create the project in a directory called ecommerce_site. The directory should look like this,
Showing folder after running startproject. (Large preview)
We’ll need to navigate into the newly created directory and run the command to generate the app.
cd ecommerce_site
python manage.py startapp trading
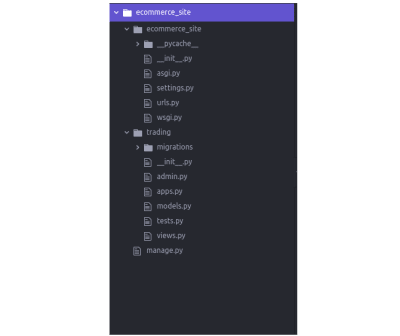
startapp is a command executed by manage.py in the project directory, it creates multiple files, and a folder named using the name specified in the command, in this case, what’s specified is trading. The app folder consists of simple files that should be needed for creating features of an application. Now your directory should be looking like this:
Showing folder after running startapp. (Large preview)
If you’re wondering the difference between a project and an app. A project is a Django web application, it can consist of one or more apps. It’s the folder holding manage.py and the other module that includes the settings.py and other files. An app is a python package that does a certain feature, includes files like models.py, the migration directory and more. You can check out this answer on Stack Overflow for more.
The startproject will create the main project directory, while the startapp will create the app directory. Both are also been passed a name to be used in generation. The startproject is the first command run when creating a new project, while the startapp is run inside the new project directory.
The current layout is a great mapping you can use for whatever application you are building. It’s scalable and consists of files you will be needing. There is a chance to create, rename, edit and move files within the project.
Django’s Configuration
Django provides different settings and configurations for you, after running the two commands in different files, let’s run through the generated files to learn what each does.
settings.py
Most web applications need configurations like; authentication to verify users, permissions to allow certain users with certain abilities and set security standards. All these are needed to give your users the best experience needed. It will take a long time for you as a developer to begin to roll each of these on your own, for every application you work on.
Django provides you with these needed configurations and more — such that you can opt for the ones you want and plug them in. These are done in settings.py, there are already laid settings created to provide basic functionalities for you.
When Django tries to run a project, there are certain variables it looks for. The settings.py is the file holding those variables that lead to other files or information. Django is directed to this file from the manage.py file and takes information or loads other files it is led to from here.
These configurations include:
DEBUG
The DEBUG functionality is set to True to enable reading of errors and debugging code in development, it should be set to False during production (i.e when you are deploying). This setting allows you to be able to debug your code better with the help of Django when it tries running your code.
INSTALLED_APPS
This is a list of all apps performing a certain feature in Django. It comes with some defaults apps like the 'django.contrib.auth' which is used for user authentication, django.contrib.admin' for admin functionality, and 'django.contrib.messages' needed in sending notification or info to users. Any other app you create using the startapp command will have to be in here before it can be run by Django.
MIDDLEWARE is a lightweight framework for processing inputs and outputs going through Django requests and responses. Each middleware does a specific function with an app, like the 'django.contrib.auth.middleware.AuthenticationMiddleware' works with the 'django.contrib.sessions' to associate users with requests. You should check out further features of each middleware on the docs.
ROOT_URLCONF is a variable to a path where Django looks for your urlpatterns when a request is passed to your Django application. Whenever a request is made in a Django application, Django searches this variable and loads the leading file and loops though the urlpatterns list in search for the matching path.
TEMPLATES is a setting to allow rendering of HTML files to represent a view. It communicates with the request, auth and messages apps. The 'BACKEND' value and the 'APP_DIRS' set to True enables Django to search for HTML files within /templates folder. The 'context_processors' in the OPTIONS are callables, that take in the request as an argument and merge it with the context when a template is been rendered, these callables work to help with debugging, authentication, and handling of requests generally.
WSGI_APPLICATION is a path leading to the application variable in wsgi.py file.
DATABASE is a dictionary that holds access to an external database(or internal like in the case of the default sqlite) like PostgresSQL, MySQL and MongoDB. Here is an example of a Postgres database I will be using for our example:
You can decide to use the default sqlite database, this doesn’t work great for production. You can set up a Postgres database like above, you will have to create the database first and pass the user, password with write permission to the database.
Note: For the purpose of this tutorial you can use the default sqlite database set already. The above is a demonstration on how you can set SQL and NO-SQL database connection in Django.
AUTH_PASSWORD_VALIDATORS these are functions that are called for password validations. They are called when creating users (and admins too) records, resetting and changing passwords. You can learn more about them from the official documentation.
Most web projects need an entry point where commands start from. An entry point acting as a gateway into the application. In every Django project, it is usually the manage.py file.
This file is needed as a starting point in your application. From here, all commands are run and everything starts up here.
manage.py does the same function as django-admin. It also tells Django the location for the configurations you have in your application. This is set by default and does not need to be changed.
It uses def main() function to handle the default settings module to our settings.py file. It tries to import the execute function, and if it runs into error it throws the ImportError. Otherwise, it takes in whatever argument is passed by the sys.argv from the command line and executes.
sys.argv is a list that takes in the command passed in via the terminal. When we run python manage.py runserver in the command line, sys.argv gets set to ["manage.py", "runserver"] and this is passed to the execute() function.
Arguments like python manage.py startapp trading or python manage.py makemigrations are set to [ "manage.py", "startapp", "trading"] and ["manage.py", "makemigrations"] respectively for execution.
The if statement is set to run if the command given set to manage.py.
Aside from running django-admin functions, you will be using it in running server, handle migrations, and other commands your project will be using. You will also need it when deploying, testing and debugging your projects.
Model Layout
Django provides a simple modelling layout for you. You configure your models in the models.py file in the trading directory. Your classes (or models) are layouts your database tables will follow.
You define your classes based on the data types you want to get from the user(or the admin) for each table. Our models create a migration file that works with the DATABASE variable in the settings.py.
Let’s create two models we’ll need, for products and orders:
from django.db import models

class Product(models.Model):
    name = models.CharField(max_length=50)
    image = models.ImageField(upload_to='products', default='python.png')
    price = models.IntegerField()
    description = models.TextField()

    def __str__(self):
        return self.name

class Order(models.Model):
    product =  models.ForeignKey(Product, on_delete=models.CASCADE)
    quantity = models.IntegerField()
    date = models.DateField(auto_now_add=True)
    user = models.CharField(max_length=50)

    def __str__(self):
        return self.user
The product model has a name, price, description and an image (which when saved will be uploaded to a products folder. This gets created if it folder doesn’t exist) columns. The order has a product (linked to the products table), the quantity, date and user columns.
With this information, Django creates a database schema for the app. Also, creates a Python database-access API for accessing Product and Order objects. Django has a built migration tool so you don’t have to use external packages for migrations.
Next step is to run the migration command and migrate to the database. But before we do that, we have to register trading as an app in our project directory.
First off, we have to configure the trading directory as an app in Django. Django has that done for you in the app.py file. This file registers trading as an app and will be further used in the settings.py file.
Now, in settings.py add trading in INSTALLED_APP. It should look like this:
Note: Your virtual environment must be activated and you should be inside the project directory.
python manage.py makemigrations trading takes note of changes made in the trading module and creates a file in the migration folder of changes in models.py and python manage.py migrate then updates the changes.
You can find the generated migration file from the python manage.py makemigrations trading command in the migration directory named 0001_initial.py. You can see the classes and columns as commands for creation inside the file. As more changes in models.py are made, more files will be generated here.
Admin Features
In our current application, we’ll need admin features to manage the products and orders that will be created in the application. Django provides us with an in-built admin functionality already at our disposal. The admin app(feature) has also been registered in our INSTALLED_APP list; 'django.contrib.admin'.
Also, the URL for the admin has also been registered in the urlpatterns list our URL configuration file urls.py; path('admin/', admin.site.urls),. The admin.py file makes it possible for you to register models and the CRUD actions that are to be performed on the models.
To set up the admin, run this on the terminal:
$ python manage.py createsuperuser
You’ll be prompted to enter a username, email and password. After that, you’ve successfully created an admin. To get started with the admin functionality, run the server:
$ python manage.py runserver
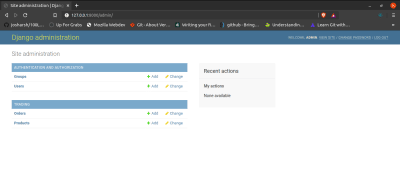
Visiting http://127.0.0.1:8000/admin/ will lead to a login session, when you log in (with username and password you created) you are directed to admin dashboard:
The groups and users are default configurations that allow admin to access user management and permission. Now let’s register our models.
In the admin.py, add the following lines:
from django.contrib import admin

# Register your models here.
from .models import Product, Order

admin.site.register(Product)
admin.site.register(Order)
from django.contrib import admin imports the admin functionality from Django, and then we imported the two classes from our models.py and registered them so an admin can perform CRUD actions on products and order from the dashboard.
After registering the models, your dashboard should look like this:
Product and Order model on Admin Dashboard. (Large preview)
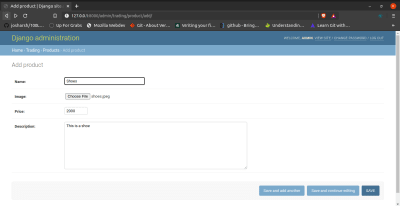
Adding products:
Admin adding a product(shoe) to site. (Large preview)
Every site needs route or URLs leading to specific pages with certain information for the end-user. Collections of similar information or application are accessed in a particular route. There is a need for grouping routes together for accessibility and communication within files. Django has that done for you in the urls.py file.
The urls.py is a file leading from the ROOT_CONF variable in the settings.py. This is where our main URL configuration is done. When we create views in different files or folders, or even in the urls.py file, they have to be configured in the urlpatterns list.
Django expects a list named urlpatterns in the file. You can change the file in the ROOT_CONF variable to any other file which you placed the urlpatterns list.
The list consists of objects that are instances of path or re-path. Each instance has two compulsory parameters, the pattern 'admin/', and a view or URL file, admin.site.urls.
The instances could also be leading to another file with more URL configurations. This is done for readability.
views.py
An important need for a backend application is the views which each route maps to. In Django, you write your function or class based views for an app in the views.py file. A view is a class or function that processes a request and sends back a response to your user.
Edit your views.py file to this:
from django.http import HttpResponse
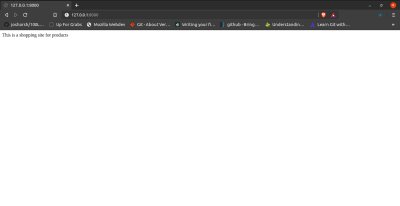
def home(request):
return HttpResponse("This is a shopping site for products")
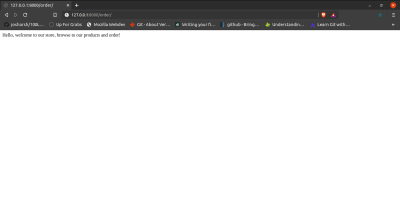
def order(request):
return HttpResponse("Hello, welcome to our store, browse to our products and order!")
Here we imported HTTPResponse to use it in defining two views (function views) to return sentence when called on. def home should be called when you visit the primary address and def order when you access the order URL.
After creating our views we need to assign it to different routes(or urlpatterns). That can be done in several ways, we can create a urlpatterns list in the same file, or we could import trading.views into ecommerce_site.urls file and create the path.
The preferred way to do so is creating a sub URL configuration file (inside trading), and including it in ecommerce_site.urls. Create a urls.py file in the trading directory. Your directory should look like:
from django.urls import path

from . import views

urlpatterns = [
    path('', views.home, name='home'),
    path('order/', views.order, name='order'),
]
Let’s register the trading URL configuration file(urls.py) in the project URLs configuration file,
from django.contrib import admin
from django.urls import include, path

urlpatterns = [
    path('admin/', admin.site.urls),
    path('', include('trading.urls'))
]
To be able to access the urlpatterns we will use the include class from django.urls in line 2. Then chose a pattern and attached the urls.py file in the trading directory.
What we did here was to import the path class from django, and the views.py file. Then our list consists of two path instances for each view. So def home is called on http://127.0.0.1:8000/.
Note: The process of running startproject and startapp is not compulsory but highly encouraged by Django. And you can create/move files and folders after running each command to your working convenience.
Dependency Tree
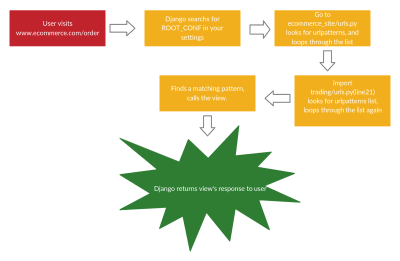
Here is the process in which Django processes requests from URLs coming:
Django searches for the root location (path) for your URLs in the ROOT_CONF variable.
Django loads the python file given in the path provided. And locates the urlpatterns variable, this is a list containing all instances of django.urls.path() and/or django.urls.re_path().
In the list, Django goes in order and looks for a matching URL.
Python, imports and calls the view (either function-based or class-based view). Which is furthered passed with the HTTP request.
The view processes the request and information passed and either returns a message/template or redirects to another view.
If no URL pattern matches, or if an exception is raised during any point in this process, Django invokes an appropriate error-handling view.
We have learnt of the possibility of creating files for Django without the command line. Also we have learnt the advantages and the building block of a Django Project. Django is an amazing tool in building backend projects with the goal to create simplicity.
You can check out the code for this tutorial on GitHub.
Shawn Wang thinks there are deeper, perhaps more uncomfortable, places to go with developer experience (DX) beyond the surface-level stuff that we recently covered. Sure, sure, documentation, CLIs, good demos. But there are much harder questions to answer that are part of the real DX. Shawn lists eight really good ones. I’ll share this one:
No product launches feature complete. Nobody expects you to. The true test is whether you address it up front or hide it like a dirty secret. As developers explore your offering, they will find things they want, that you don’t have, and will tell you about it. How long do you make developers dig to find known holes in your product? Do developers have confidence you will ship or reject these features promptly, or are they for a “v2” that will never come?
The best way to learn is to build. Let’s learn about this hot new buzzword, Jamstack, by building a site with React, Netlify (Serverless) Functions, and Airtable. One of the ingredients of Jamstack is static hosting, but that doesn’t mean everything on the site has to be static. In fact, we’re going to build an app with full-on CRUD capability, just like a tutorial for any web technology with more traditional server-side access might.
Why these technologies, you ask?
You might already know this, but the “JAM” in Jamstack stands for JavaScript, APIs, and Markup. These technologies individually are not new, so the Jamstack is really just a new and creative way to combine them. You can read more about it over at the Jamstack site.
One of the most important benefits of Jamstack is ease of deployment and hosting, which heavily influence the technologies we are using. By incorporating Netlify Functions (for backend CRUD operations with Airtable), we will be able to deploy our full-stack application to Netlify. The simplicity of this process is the beauty of the Jamstack.
As far as the database, I chose Airtable because I wanted something that was easy to get started with. I also didn’t want to get bogged down in technical database details, so Airtable fits perfectly. Here’s a few of the benefits of Airtable:
You don’t have to deploy or host a database yourself
It comes with an Excel-like GUI for viewing and editing data
There’s a nice JavaScript SDK
What we’re building
For context going forward, we are going to build an app where you can use to track online courses that you want to take. Personally, I take lots of online courses, and sometimes it’s hard to keep up with the ones in my backlog. This app will let track those courses, similar to a Netflix queue.
One of the reasons I take lots of online courses is because I make courses. In fact, I have a new one available where you can learn how to build secure and production-ready Jamstack applications using React and Netlify (Serverless) Functions. We’ll cover authentication, data storage in Airtable, Styled Components, Continuous Integration with Netlify, and more! Check it out ?
Airtable setup
Let me start by clarifying that Airtable calls their databases “bases.” So, to get started with Airtable, we’ll need to do a couple of things.
Next, let’s create a new database. We’ll log into Airtable, click on “Add a Base” and choose the “Start From Scratch” option. I named my new base “JAMstack Demos” so that I can use it for different projects in the future.
Next, let’s click on the base to open it.
You’ll notice that this looks very similar to an Excel or Google Sheets document. This is really nice for being able tower with data right inside of the dashboard. There are few columns already created, but we add our own. Here are the columns we need and their types:
name (single line text)
link (single line text)
tags (multiple select)
purchased (checkbox)
We should add a few tags to the tags column while we’re at it. I added “node,” “react,” “jamstack,” and “javascript” as a start. Feel free to add any tags that make sense for the types of classes you might be interested in.
I also added a few rows of data in the name column based on my favorite online courses:
The last thing to do is rename the table itself. It’s called “Table 1” by default. I renamed it to “courses” instead.
Locating Airtable credentials
Before we get into writing code, there are a couple of pieces of information we need to get from Airtable. The first is your API Key. The easiest way to get this is to go your account page and look in the “Overview” section.
Next, we need the ID of the base we just created. I would recommend heading to the Airtable API page because you’ll see a list of your bases. Click on the base you just created, and you should see the base ID listed. The documentation for the Airtable API is really handy and has more detailed instructions for find the ID of a base.
Lastly, we need the table’s name. Again, I named mine “courses” but use whatever you named yours if it’s different.
Project setup
To help speed things along, I’ve created a starter project for us in the main repository. You’ll need to do a few things to follow along from here:
Check out the starter branch with git checkout starter
There are lots of files already there. The majority of the files come from a standard create-react-app application with a few exceptions. There is also a functions directory which will host all of our serverless functions. Lastly, there’s a netlify.toml configuration file that tells Netlify where our serverless functions live. Also in this config is a redirect that simplifies the path we use to call our functions. More on this soon.
The last piece of the setup is to incorporate environment variables that we can use in our serverless functions. To do this install the dotenv package.
npm install dotenv
Then, create a .env file in the root of the repository with the following. Make sure to use your own API key, base ID, and table name that you found earlier.
To create serverless functions with Netlify, we need to create a JavaScript file inside of our /functions directory. There are already some files included in this starter directory. Let’s look in the courses.js file first.
The core part of a serverless function is the exports.handler function. This is where we handle the incoming request and respond to it. In this case, we are accepting an event parameter which we will use in just a moment.
We are returning a call inside the handler to the formattedReturn function, which makes it a bit simpler to return a status and body data. Here’s what that function looks like for reference.
Notice also that we are importing several helper functions to handle the interaction with Airtable. We can decide which one of these to call based on the HTTP method of the incoming request.
HTTP GET ? getCourses
HTTP POST ? createCourse
HTTP PUT ? updateCourse
HTTP DELETE ? deleteCourse
Let’s update this function to call the appropriate helper function based on the HTTP method in the event parameter. If the request doesn’t match one of the methods we are expecting, we can return a 405 status code (method not allowed).
Since we are going to be interacting with Airtable in each of the different helper files, let’s configure it once and reuse it. Open the airtable.js file.
In this file, we want to get a reference to the courses table we created earlier. To do that, we create a reference to our Airtable base using the API key and the base ID. Then, we use the base to get a reference to the table and export it.
require('dotenv').config();
var Airtable = require('airtable');
var base = new Airtable({ apiKey: process.env.AIRTABLE_API_KEY }).base(
  process.env.AIRTABLE_BASE_ID
);
const table = base(process.env.AIRTABLE_TABLE_NAME);
module.exports = { table };
Getting courses
With the Airtable config in place, we can now open up the getCourses.js file and retrieve courses from our table by calling table.select().firstPage(). The Airtable API uses pagination so, in this case, we are specifying that we want the first page of records (which is 20 records by default).
Airtable returns back a lot of extra information in its records. I prefer to simplify these records with only the record ID and the values for each of the table columns we created above. These values are found in the fields property. To do this, I used the an Array map to format the data the way I want.
How do we test this out? Well, the netlify-cli provides us a netlify dev command to run our serverless functions (and our front-end) locally. First, install the CLI:
npm install -g netlify-cli
Then, run the netlify dev command inside of the directory.
This beautiful command does a few things for us:
Runs the serverless functions
Runs a web server for your site
Creates a proxy for front end and serverless functions to talk to each other on Port 8888.
Let’s open up the following URL to see if this works:
We are able to use /api/* for our API because of the redirect configuration in the netlify.toml file.
If successful, we should see our data displayed in the browser.
Creating courses
Let’s add the functionality to create a course by opening up the createCourse.js file. We need to grab the properties from the incoming POST body and use them to create a new record by calling table.create().
The incoming event.body comes in a regular string which means we need to parse it to get a JavaScript object.
const fields = JSON.parse(event.body);
Then, we use those fields to create a new course. Notice that the create() function accepts an array which allows us to create multiple records at once.
Since we can’t perform a POST, PUT, or DELETE directly in the browser web address (like we did for the GET), we need to use a separate tool for testing our endpoints from now on. I prefer Postman, but I’ve heard good things about Insomnia as well.
Inside of Postman, I need the following configuration.
url: localhost:8888/api/courses
method: POST
body: JSON object with name, link, and tags
After running the request, we should see the new course record is returned.
We can also check the Airtable GUI to see the new record.
Tip: Copy and paste the ID from the new record to use in the next two functions.
Updating courses
Now, let’s turn to updating an existing course. From the incoming request body, we need the id of the record as well as the other field values.
We can specifically grab the id value using object destructuring, like so:
const {id} = JSON.parse(event.body);
Then, we can use the spread operator to grab the rest of the values and assign it to a variable called fields:
const {id, ...fields} = JSON.parse(event.body);
From there, we call the update() function which takes an array of objects (each with an id and fields property) to be updated:
To test this out, we’ll turn back to Postman for the PUT request:
url: localhost:8888/api/courses
method: PUT
body: JSON object with id (the id from the course we just created) and the fields we want to update (name, link, and tags)
I decided to append “Updated!!!” to the name of a course once it’s been updated.
We can also see the change in the Airtable GUI.
Deleting courses
Lastly, we need to add delete functionality. Open the deleteCourse.js file. We will need to get the id from the request body and use it to call the destroy() function.
Here’s the configuration for the Delete request in Postman.
url: localhost:8888/api/courses
method: PUT
body: JSON object with an id (the same id from the course we just updated)
And, of course, we can double-check that the record was removed by looking at the Airtable GUI.
Displaying a list of courses in React
Whew, we have built our entire back end! Now, let’s move on to the front end. The majority of the code is already written. We just need to write the parts that interact with our serverless functions. Let’s start by displaying a list of courses.
Open the App.js file and find the loadCourses function. Inside, we need to make a call to our serverless function to retrieve the list of courses. For this app, we are going to make an HTTP request using fetch, which is built right in.
Thanks to the netlify dev command, we can make our request using a relative path to the endpoint. The beautiful thing is that this means we don’t need to make any changes after deploying our application!
const res = await fetch('/api/courses');
const courses = await res.json();
Then, store the list of courses in the courses state variable.
Open up localhost:8888 in the browser and we should our list of courses.
Adding courses in React
Now that we have the ability to view our courses, we need the functionality to create new courses. Open up the CourseForm.js file and look for the submitCourse function. Here, we’ll need to make a POST request to the API and send the inputs from the form in the body.
The JavaScript Fetch API makes GET requests by default, so to send a POST, we need to pass a configuration object with the request. This options object will have these two properties.
Test this out in the browser. Fill in the form and submit it.
After submitting the form, the form should be reset, and the list of courses should update with the newly added course.
Updating purchased courses in React
The list of courses is split into two different sections: one with courses that have been purchased and one with courses that haven’t been purchased. We can add the functionality to mark a course “purchased” so it appears in the right section. To do this, we’ll send a PUT request to the API.
Open the Course.js file and look for the markCoursePurchased function. In here, we’ll make the PUT request and include both the id of the course as well as the properties of the course with the purchased property set to true. We can do this by passing in all of the properties of the course with the spread operator and then overriding the purchased property to be true.
To test this out, click the button to mark one of the courses as purchased and the list of courses should update to display the course in the purchased section.
Deleting courses in React
And, following with our CRUD model, we will add the ability to delete courses. To do this, locate the deleteCourse function in the Course.js file we just edited. We will need to make a DELETE request to the API and pass along the id of the course we want to delete.
To test this out, click the “Delete” button next to the course and the course should disappear from the list. We can also verify it is gone completely by checking the Airtable dashboard.
Deploying to Netlify
Now, that we have all of the CRUD functionality we need on the front and back end, it’s time to deploy this thing to Netlify. Hopefully, you’re as excited as I am about now easy this is. Just make sure everything is pushed up to GitHub before we move into deployment.
If you don’t have a Netlify, account, you’ll need to create one (like Airtable, it’s free). Then, in the dashboard, click the “New site from Git” option. Select GitHub, authenticate it, then select the project repo.
Next, we need to tell Netlify which branch to deploy from. We have two options here.
Use the starter branch that we’ve been working in
Choose the master branch with the final version of the code
For now, I would choose the starter branch to ensure that the code works. Then, we need to choose a command that builds the app and the publish directory that serves it.
Build command: npm run build
Publish directory: build
Netlify recently shipped an update that treats React warnings as errors during the build proces. which may cause the build to fail. I have updated the build command to CI = npm run build to account for this.
Lastly, click on the “Show Advanced” button, and add the environment variables. These should be exactly as they were in the local .env that we created.
The site should automatically start building.
We can click on the “Deploys” tab in Netlify tab and track the build progress, although it does go pretty fast. When it is complete, our shiny new app is deployed for the world can see!
Welcome to the Jamstack!
The Jamstack is a fun new place to be. I love it because it makes building and hosting fully-functional, full-stack applications like this pretty trivial. I love that Jamstack makes us mighty, all-powerful front-end developers!
I hope you see the same power and ease with the combination of technology we used here. Again, Jamstack doesn’t require that we use Airtable, React or Netlify, but we can, and they’re all freely available and easy to set up. Check out Chris’ serverless site for a whole slew of other services, resources, and ideas for working in the Jamstack. And feel free to drop questions and feedback in the comments here!
As a web developer, there is an interesting bit of back and forth that always comes along with setting up a new application. Even using a full stack web framework like Ruby on Rails can be non-trivial to set up and deploy, especially if it’s your first time doing so in a while.
Personally I have always enjoyed being able to dig in and write the actual bit of application logic more so than setting up the apps themselves. Lately I have become a big fan of React applications together with a GraphQL API and storing state with the Apollo library.
Setting up a React application has become very easy in the past few years, but setting up a backend with a GraphQL API? Not so much. So when I was working on a project recently, I decided to look for an easier way to integrate a GraphQL API and was delighted to find FaunaDB.
FaunaDB is a NoSQL database as a service that makes provisioning a GraphQL API an incredibly simple process, and even comes with a free tier. Frankly I was surprised and really impressed with how quickly I was able to go from zero to a working API.
The service also touts its production readiness, with a focus on making scalability much easier than if you were managing your own backend. Although I haven’t explored its more advanced features yet, if it’s anything like my first impression then the prospects and implications of using FaunaDB are quite exciting. For now, I can confirm that for many of my projects, it provides an excellent solution for managing state together with a React application.
While working on my project, I did run into a few configuration issues when making all of the frameworks work together which I think could’ve been addressed with a guide that focuses on walking through standing up an application in its entirety. So in this article, I’m going to do a thorough walkthrough of setting up a small to-do React application on Heroku, then persisting data to that application with FaunaDB using the Apollo library. You can find the full source code here.
Our Application
For this walkthrough, we’re building a to-do list where a user can take the following actions:
Add a new item
Mark an item as complete
Remove an item
From a technical perspective, we’re going to accomplish this by doing the following:
Creating a React application
Deploying the application to Heroku
Provisioning a new FaunaDB database
Declaring a GraphQL API schema
Provisioning a new database key
Configuring Apollo in our React application to interact with our API
Writing application logic and consume our API to persist information
Here’s a preview of what the final result will look like:
Creating the React Application
First we’ll create a boilerplate React application and make sure it runs. Assuming you have create-react-app installed, the commands to create a new application are:
create-react-app fauna-todo
cd fauna-todo
yarn start
After which you should be able to head to http://localhost:3000 and see the generated homepage for the application.
Deploying to Heroku
As I mentioned above, deploying React applications has become awesomely easy over the last few years. I’m using Heroku here since it’s been my go-to platform as a service for a while now, but you could just as easily use another service like Netlify (though of course the configuration will be slightly different). Assuming you have a Heroku account and the Heroku CLI installed, then this article shows that you only need a few lines of code to create and deploy a React application.
Now that we have a React app up and running, let’s add persistence to the application using FaunaDB. Head to fauna.com to create a free account. After you have an account, click “New Database” on the dashboard, and enter in a name of your choosing:
Creating an API via GraphQL Schema in FaunaDB
In this example, we’re going to declare a GraphQL schema then use that file to automatically generate our API within FaunaDB. As a first stab at the schema for our to-do application, let’s suppose that there is simply a collection of “Items” with “name” as its sole field. Since I plan to build upon this schema later and like being able to see the schema itself at a glance, I’m going to create a schema.graphql file and add it to the top level of my React application. Here is the content for this file:
type Item {
 name: String
}
type Query {
 allItems: [Item!]
}
If you’re unfamiliar with the concept of defining a GraphQL schema, think of it as a manifest for declaring what kinds of objects and queries are available within your API. In this case, we’re saying that there is going to be an Item type with a name string field and that we are going to have an explicit query allItems to look up all item records. You can read more about schemas in this Apollo article and types in this graphql.org article. FaunaDB also provides a reference document for declaring and importing a schema file.
We can now upload this schema.graphql file and use it to generate a GraphQL API. Head to the FaunaDB dashboard again and click on “GraphQL” then upload your newly created schema file here:
Congratulations! You have created a fully functional GraphQL API. This page turns into a “GraphQL Playground” which lets you interact with your API. Click on the “Docs” tab in the sidebar to see the available queries and mutations.
Note that in addition to our allItems query, FaunaDB has generated the following queries/mutations automatically on our behalf:
findItemByID
createItem
updateItem
deleteItem
All of these were derived by declaring the Item type in our schema file. Pretty cool right? Let’s give these queries and mutations a spin to familiarize ourselves with them. We can execute queries and mutations directly in the “GraphQL Playground.” Let’s first run a query for items. Enter this query into the left pane of the playground:
query MyItemQuery {
 allItems {
   data {
    name
   }
 }
}
Then click on the play button to run it:
The result is listed on the right pane, and unsurprisingly returns no results since we haven’t created any items yet. Fortunately createItem was one of the mutations that was automatically generated from the schema and we can use that to populate a sample item. Let’s run this mutation:
mutation MyItemCreation {
 createItem(data: { name: "My first todo item" }) {
   name
 }
}
You can see the result of the mutation in the right pane. It seems like our item was created successfully, but just to double check we can re-run our first query and see the result:
You can see that if we add our first query back to the left pane in the playground that the play button gives you a choice as to which operation you’d like to perform. Finally, note in step 3 of the screenshot above that our item was indeed created successfully.
In addition to running the query above, we can also look in the “Collections” tab of FaunaDB to view the collection directly:
Provisioning a New Database Key
Now that we have the database itself configured, we need a way for our React application to access it.
For the sake of simplicity in this application, this will be done with a secret key that we can add as an environment variable to our React application. We aren’t going to have authentication for individual users. Instead we’ll generate an application key which has permission to create, read, update, and delete items.
Authentication and authorization are substantial topics on their own?—?if you would like to learn more on how FaunaDB handles them as a follow up exercise to this guide, you can read all about the topic here.
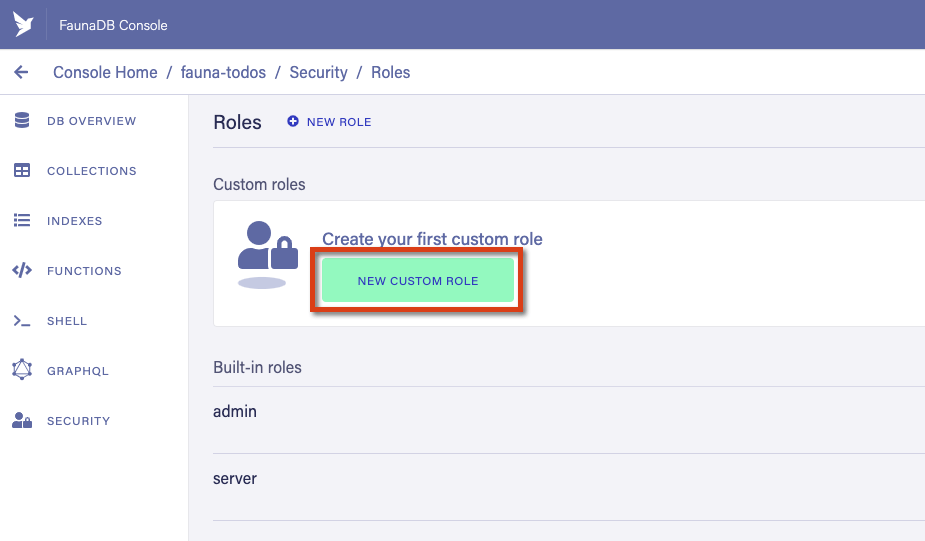
The application key we generate has an associate set of permissions that are grouped together in a “role.” Let’s begin by first defining a role that has permission to perform CRUD operations on items, as well as perform the allItems query. Start by going to the “Security” tab, then clicking on “Manage Roles”:
There are 2 built in roles, admin and server. We could in theory use these roles for our key, but this is a bad idea as those keys would allow whoever has access to this key to perform database level operations such as creating new collections or even destroy the database itself. So instead, let’s create a new role by clicking on “New Custom Role” button:
You can name the role whatever you’d like, here we’re using the name ItemEditor and giving the role permission to read, write, create, and delete items?—?as well as permission to read the allItems index.
Save this role then, head to the “Security” tab and create a new key:
When creating a key, make sure to select “ItemEditor” for the role and whatever name you please:
Next you’ll be presented with your secret key which you’ll need to copy:
In order for React to load the key’s value as an environment variable, create a new file called .env.local which lives at the root level of your React application. In this file, add an entry for the generated key:
Important: Since it’s not good practice to store secrets directly in source control in plain text, make sure that you also have a .gitignore file in your project’s root directory that contains .env.local so that your secrets won’t be added to your git repo and shared with others.
It’s critical that this variable’s name starts with “REACT_APP_” otherwise it won’t be recognized when the application is started. By adding the value to the .env.local file, it will still be loaded for the application when running locally. You’ll have to explicitly stop and restart your application with yarn start in order to see these changes take.
If you’re interested in reading more about how environment variables are loaded in apps created via create-react-app, there is a full explanation here. We’ll cover adding this secret as an environment variable in Heroku later on in this article.
Connecting to FaunaDB in React with Apollo
In order for our React application to interact with our GraphQL API, we need some sort of GraphQL client library. Fortunately for us, the Apollo client provides an elegant interface for making API requests as well as caching and interacting with the results.
To install the relevant Apollo packages we’ll need, run:
Now in your src directory of your application, add a new file named client.js with the following content:
import { ApolloClient, InMemoryCache } from "@apollo/client";
export const client = new ApolloClient({
 uri: "https://graphql.fauna.com/graphql",
 headers: {
   authorization: `Bearer ${process.env.REACT_APP_FAUNA_SECRET}`,
 },
 cache: new InMemoryCache(),
});
What we’re doing here is configuring Apollo to make requests to our FaunaDB database. Specifically, the uri makes the request to Fauna itself, then the authorization header indicates that we’re connecting to the specific database instance for the provided key that we generated earlier.
There are 2 important implications from this snippet of code:
The authorization header contains the key with the “ItemEditor” role, and is currently hard coded to use the same header regardless of which user is looking at our application. If you were to update this application to show a different to-do list for each user, you would need to login for each user and generate a token which could instead be passed in this header. Again, the FaunaDB documentation covers this concept if you care to learn more about it.
As with any time you add a layer of caching to a system (as we are doing here with Apollo), you introduce the potential to have stale data. FaunaDB’s operations are strongly consistent, and you can configure Apollo’s fetchPolicy to minimize the potential for stale data. In order to prevent stale reads to our cache, we’ll use a combination of refetch queries and specifying response fields in our mutations.
Next we’ll replace the contents of the home page’s component. Head to App.js and replace its content with:
import React from "react";
import { ApolloProvider } from "@apollo/client";
import { client } from "./client";
function App() {
 return (
   <ApolloProvider client={client}>
     <div style={{ padding: "5px" }}>
       <h3>My Todo Items</h3>
       <div>items to get loaded here</div>
     </div>
   </ApolloProvider>
 );
}
Note: For this sample application I’m focusing on functionality over presentation, so you’ll see some inline styles. While I certainly wouldn’t recommend this for a production-grade application, I think it does at least demonstrate any added styling in the most straightforward manner within a small demo.
Visit http://localhost:3000 again and you’ll see:
Which contains the hard coded values we’ve set in our jsx above. What we would really like to see however is the to-do item we created in our database. In the src directory, let’s create a component called ItemList which lists out any items in our database:
import React from "react";
import gql from "graphql-tag";
import { useQuery } from "@apollo/react-hooks";
const ITEMS_QUERY = gql`
 {
   allItems {
     data {
       _id
       name
     }
   }
 }
`;
export function ItemList() {
 const { data, loading } = useQuery(ITEMS_QUERY);
if (loading) {
   return "Loading...";
 }
return (
   <ul>
     {data.allItems.data.map((item) => {
       return <li key={item._id}>{item.name}</li>;
     })}
   </ul>
 );
}
Then update App.js to render this new component ?— ?see the full commit in this example’s source code to see this step in its entirety. Previewing your app in again, you’ll see that your to-do item has loaded:
Now is a good time to commit your progress in git. And since we’re using Heroku, deploying is a snap:
git push heroku master
heroku open
When you run heroku open though, you’ll see that the page is blank. If we inspect the network traffic and request to FaunaDB, we’ll see an error about how the database secret is missing:
Which makes sense since we haven’t configured this value in Heroku yet. Let’s set it by going to the Heroku dashboard, selecting your application, then clicking on the “Settings” tab. In there you should add the REACT_APP_FAUNA_SECRET key and value used in the .env.local file earlier. Reusing this key is done for demonstration purposes. In a “real” application, you would probably have a separate database and separate keys for each environment.
If you would prefer to use the command line rather than Heroku’s web interface, you can use the following command and replace the secret with your key instead:
After running this last command, your Heroku-hosted app should appear and load the items from your database.
Adding New To-Do Items
We now have all of the pieces in place for accessing our FaunaDB database both locally and a hosted Heroku environment. Now adding items is as simple as calling the mutation we used in the GraphQL Playground earlier. Here is the code for an AddItem component, which uses a bare bones html form to call the createItem mutation:
After adding a reference to AddItem in our App component, we can verify that adding items works as expected. Again, you can see the full commit in the demo app for a recap of this step.
Deleting New To-Do Items
Similar to how we called the automatically generated AddItem mutation to add new items, we can call the generated DeleteItem mutation to remove items from our list. Here’s what our updated ItemList component looks like after adding this mutation:
Reloading our app and adding another item should result in a page that looks like this:
If you click on the “Remove” button for any item, the DELETE_ITEM mutation is fired and the entire list of items is fired upon completion as specified per the refetchQuery option.
One thing you may have noticed is that in our ITEMS_QUERY, we’re specifying _id as one of the fields we’d like in the result set from our query. This _id field is automatically generated by FaunaDB as a unique identifier for each collection, and should be used when updating or deleting a record.
Marking Items as Complete
This wouldn’t be a fully functional to-do list without the ability to mark items as complete! So let’s add that now. By the time we’re done, we expect the app to look like this:
The first step we need to take is updating our Item schema within FaunaDB since right now the only information we store about an item is its name. Heading to our schema.graphql file, we can add a new field to track the completion state for an item:
type Item {
 name: String
 isComplete: Boolean
}
type Query {
 allItems: [Item!]
}
Now head to the GraphQL tab in the FaunaDB console and click on the “Update Schema” link to upload the newly updated schema file.
Note: there is also an “Override Schema” option, which can be used to rewrite your database’s schema from scratch if you’d like. One consideration to make when choosing to override the schema completely is that the data is deleted from your database. This may be fine for a test environment, but a test or production environment would require a proper database migration instead.
Since the changes we’re making here are additive, there won’t be any conflict with the existing schema so we can keep our existing data.
You can view the mutation itself and its expected schema in the GraphQL Playground in FaunaDB:
This tells us that we can call the deleteItem mutation with a data parameter of type ItemInput. As with our other requests, we could test this mutation in the playground if we wanted. For now, we can add it directly to the application. In ItemList.js, let’s add this mutation with this code as outlined in the example repository.
The references to UPDATE_ITEM are the most relevant changes we’ve made. It’s interesting to note as well that we don’t need the refetchQueries parameter for this mutation. When the update mutation returns, Apollo updates the corresponding item in the cache based on its identifier field (_id in this case) so our React component re-renders appropriately as the cache updates.
We now have all of the functionality for an initial version of a to-do application. As a final step, push your branch one more time to Heroku:
git push heroku master
heroku open
Conclusion
Take a moment to pat yourself on the back! You’ve created a brand-new React application, added persistence at a database level with FaunaDB, and can do deployments available to the entire world with the push of a branch to Heroku.
Now that we’ve covered some of the concepts behind provisioning and interacting with FaunaDB, setting up any similar project in the future is an amazingly fast process. Being able to provision a GraphQL-accessible database in minutes is a dream for me when it comes to spinning up a new project. Not only that, but this is a production grade database that you don’t have to worry about configuring or scaling?—?and instead get to focus on writing the rest of your application instead of playing the role of a database administrator.
No one really knows how long this pandemic will stick around or what the “new normal” will look like after this is all over.
This is particularly challenging for businesses, as they’re reopening in this in-between phase when cases are unfortunately still rising.
Businesses now have to juggle the realities that consumer behavior has radically changed alongside new policies and procedures to keep everyone as safe as possible.
In this post, we’re going to outline some strategies you can use to reopen your business:
Build a reopening playbook
Default to online whenever possible
Prioritize contactless or curbside pickup options for in-person activities
Keep people safe in your establishment
Practice social distancing
Enforce capacity limits
Stock up on personal protective equipment (PPE)
Clean everything
Communicate the changes and policies you put in place with your team, customers, and prospects
Make it easy for people to change or cancel their plans
Update your employee sick leave policies
Minimize your legal and liability risks
Create and/or update liability waivers and consent forms
Screen all employees and guests before they enter your establishment
Enable contact tracing
Build a reopening playbook
You’re going to be making a lot of changes over the coming weeks. Building a playbook can help you keep everything in one place, which helps with creating a consistent customer experience as well as training your team.
Start by mapping out the entire customer journey. What this looks like depends on the type of business you’re running.
Doing this will help you account for all of the touchpoints a customer has with you from landing on your website and stepping inside your venue to buying a product or service and afterward.
After all, you can’t know what you need to change or improve on unless you fully understand what’s been done in the pre-pandemic past.
Now, you can create sections of your playbook based on key customer interactions. For example, you might have one section on website changes and another about your new curbside pickup process.
The safest option is to move anything you can online.
This could be selling items through an e-commerce platform, like Shopify, instead of your brick-and-mortar shop; creating online order forms; delivering food through delivery apps like Instacart, DoorDash, and Uber Eats; or providing helpful service using videoconferencing platforms.
Prioritize contactless or curbside pickup options for in-person activities
When online isn’t possible, the next best alternative is contactless or curbside pickup options.
My local grocery store has had curbside pickup for well over a year. I used to think it was the dumbest thing ever. Why would you drive all the way to the grocery store to sit in your car and wait for someone to bring out your groceries when you can just go inside and get them yourself? Now, in a pandemic, I’ll drive 15 minutes out of my way to go to a grocery store with a better curbside pickup system.
Why am I sharing this story?
Because consumer behavior has shifted radically in the last three months. The more you can adapt to the “new normal” that we’re living in, the better off your business will be.
Curbside pickup requires new systems and processes. However, it’s something that many grocery stores, restaurants, retail establishments, and even bars have adopted. (Curbside pickup at bars is one of the few silver linings from this pandemic. Drive-through margaritas, anyone?)
Not all businesses will require such drastic operational changes. A small tactic like prioritizing contactless payments, such as Google Pay and Apple Pay, or having customers pay in advance from their phone or laptop, can go a long way, since you don’t have to exchange cash or credit cards.
Keep people safe in your establishment
While people are getting creative these days with curbside pickup and drive-through options like movie theaters, birthday parties, and even weddings, let’s face it: There are some shopping excursions and activities that must take place in person.
Practice social distancing
This is where practicing social distancing, limiting crowds, and keeping people at least 6 feet apart, whenever possible, is crucial.
Evaluate the length of time people will be there as well as the risk level to decide which precautions you need to take. After all, there’s a big difference between drunk people singing and dancing in a small bar for four hours vs getting your hair cut vs leading a private zipline tour for a group of people who live in the same household.
Each of these activities carries a different level of risk, and each requires different enforcement protocols for your team.
The drunk people at the bar are engaging in a high-risk activity since they are in groups and can’t wear masks while they’re drinking.
A salon can practice social distancing up to a certain extent, requiring all employees and clients to wear masks. Obviously, a hairdresser can’t cut a client’s hair from 6 feet away. However, you can ensure that all of your clients practice social distancing. Have people wait in their cars when they arrive, add plexiglass barriers between stations and at the front desk, and make sure there are at least 10 feet between all clients.
A zipline tour company that’s holding only private excursions is even lower risk. They have the added benefit of being outside where it’s much easier to practice social distancing. Also, everyone can wear masks.
Enforce capacity limits
Let’s go back to the bar example. While you might not be able to get drunk people to wear masks or stop crowding around tables, you can control how many people you let into the bar.
A good starting point is to calculate the number of people who can safely be in your venue and still maintain a distance of 6 to 10 feet.
Whether you’re a restaurant, a doctor’s office, or a hair salon, there are some supplies you’re going to need for the foreseeable future, including
Disposable face masks
Disposable gloves
Hand sanitizer
At minimum, you should have enough for your team to be able to do their job in a clean environment.
It goes without saying that the type of PPE gear you buy should match the risk level of the activity. For example, you don’t need to stock up on N95 or K95 masks for all of your fast-food workers to do their jobs effectively. However, if you run an urgent care clinic, you absolutely should have K95 or N95 masks in stock for the doctors and nurses who are diagnosing and treating COVID-19 patients.
Now isn’t the time to save money or cut corners on cleaning. While cleaning procedures will vary based on the type of business you run, here are some general best practices:
Wipe down all high-touch surfaces — like counters, door handles, sinks, and toilets — with a disinfectant cleaner multiple times a day.
Set up automatic hand sanitizer dispensers at the entrance, in/near the restrooms, and in common areas.
Install plexiglass barriers between cashiers and other front-of-house workers and customers.
Make sure all customers and employees wear face masks.
If serving food and drinks, use paper products and menus instead of reusable items.
Wash and disinfect any item immediately after it comes in contact with someone who is infected with COVID-19.
Communicate the changes and policies you put in place with your team, customers, and prospects
While we all have different tolerance levels for risk, everyone is experiencing the same threat. Many will understandably be anxious about venturing out. Communicate what you’re doing to keep people safe. This builds trust and confidence.
Two great places to start are changes/cancellations and employee sick leave policies.
Make it easy for people to change or cancel their plans
The last thing you want is someone coming to your venue who is COVID-19 positive or was recently exposed to a positive patient because they don’t want to lose their $50 dinner reservation or $400 plane ticket.
The easier you can make it for someone to change or cancel their plans (ideally all online), the better it is for everyone involved.
In addition, if you’re worried about the potential for large numbers of refunds, you can start by offering store credit or gift cards.
Update your employee sick leave policies
Just like you don’t want customers showing up sick, you really don’t want employees feeling like they have to “tough it out.” The best way to prevent this is to pay them their normal rate for the duration of their quarantine and not penalize them in any way for taking sick leave.
Minimize your legal and liability risks
The hard truth is that you can take all of the precautionary measures in the world, and still, something bad can happen. Because of this, it’s always a good idea to protect yourself and your company from any costly lawsuits or liability risks.
Create and/or update liability waivers and consent forms
Signing waivers is already a best practice for customers and guests who participate in many contact sports and adventure excursions.
Organizations that already have waiver policies in place have a leg up. If you already require customers to sign a waiver, it’s a good idea to add a few lines educating people about the changes you’re making regarding COVID-19 as well as acknowledging the risks in order to limit your business’s liability.
You should also switch to digital waivers and liability forms instead of paper forms. This is not only more efficient and environmentally friendly, but it’s also safer since you’re minimizing germs by not sharing pens, papers, and clipboards.
Note: These templates can save you a boatload of time. However, it’s still a good idea to get a lawyer to read through your waiver just to make sure you’re covered.
Besides removing some legal risks, waivers also allow you to collect valuable customer information, such as names, email addresses, and birthdays. You can sync this information with your CRM and then reengage them in any future marketing initiatives.;
Screen all employees and guests before they enter your establishment
Whether you own a doctor’s office, a hair salon, or a busy restaurant, it’s a good idea to use all of the following: self-screening employee questionnaires, health and safety checklists, and contactless temperature guns.
For example, when employees clock in for work each day, you should take their temperature with a contactless temperature gun and have them fill out a questionnaire to assess any COVID-19 risks. Here’s an example of an employee questionnaire template you can use.
In addition, create detailed protocols for screening all customers, like going through a screening checklist and mandatory temperature checks at the door.
Put in place contingency plans in case an employee or customer tests positive for COVID-19. This includes everything from how you’re going to disinfect the place, trace and isolate anybody who came in close contact with the infected person, and handle customer and team communication, including change and refund requests.
Enable contact tracing
Another way to help keep your team and customers safe, as well as protect yourself, is to keep great records. If you have detailed notes on every single person who enters your establishment, including dates and times, it will make it easier to reach out in the event they might have been exposed to COVID-19.
No one knows how long this pandemic will last or what the “new normal” will be after all of this fades. However, the one thing you can do is put plans in place early on to help keep more people safe.
Last week, we ran our very first SmashingConf Live! event, the first in a series of online events taking us through to the end of 2020. We had an amazing two days and we hope that all of our speakers and attendees did too. In this post, I’ll round up some of the key moments and feedback we’ve had.
A Team Spread Around The World
Here at Smashing, we take remote, distributed working to the extreme, and are very used to dealing with all of our different timezones. However, the conferences are the one time when most of us are together in one place. With all of us in our home locations and timezones, things were very different this time. We shared pictures of our setups in the Slack for the event, and lots of attendees joined in the fun and showed us how they were attending the conference themselves.
Top row (left to right): Amanda, Charis and Jarijn, Rachel. Bottom row (left to right): Phil, Vitaly, Tobi
Trying to coordinate watching @smashingconf and playing with the ?? ?
It takes a lot of people to bring you an online multi-track conference, so the full team taking care of everything and everyone behind the scenes on the day were:
When selecting a conference platform it was important to us to have something that would enable the fun and interactivity of an in-person SmashingConf. We wanted to have sidetracks, games, places to ask questions of our speakers, all along with main stage content. While we use Zoom for workshops, we didn’t feel that asking you all to sit through two days of Zoom meetings would be very Smashing at all.
We’re running our conferences on Hopin, a friendly, inclusive platform, with Smashing branding and plenty of cats. With interactive, live sessions and live captioning. Watch a video preview. (Large preview)
Amanda and the rest of the team looked at a number of options and we ultimately chose to use Hopin. We trialed the platform for our Smashing Meets events, but this was the first time we would be running at such a scale. Everything worked really well, and speakers and attendees seemed to like the setup. As a speaker, I found it felt far more interactive than the usual online conference solutions, and less like I was presenting to my office wall!
With multiple sessions happening at once we had a lot of speakers sharing their knowledge with us. As with our in-person events, everyone created shared Google Docs of takeaways over the two days — Day One, Day Two. MC Phil Hawksworth kept everything on track on the main stage.
Some amazing sketchnotes were created by Ximena which give you a snapshot of the key takeaways from many of the talks and sessions.
I think this may be the last of the #sketchnotes maybe.
GREAT TALK at @smashingconf from dina Amin. Beautiful story and Stop Motion creations with a few other thinkery things ??
We even had our conference DJ Tobi playing some tunes between the mainstage talks — just like at our in-person events.
Badges
We felt that a virtual conference should have badges too. So, for SmashingConf Live we had badges featuring a variety of cats. Attendees tried to find all of the different cats — all 96 of them!
Friendly SmashingConf badges for cat collectors! Every attendee gets their own badge and can trade them when meeting new people. Illustrated by our cherished illustrator, Ricardo Gimenes.
It really did feel like an event, rather than a webinar, and it was great to see so many people — and to meet their cats! That’s something we don’t get to do at our usual events.
These virtual badges for @smashingconf are awesome! ?
If you wish you could have joined us then you have three more chances for some SmashingConf online fun! We’ve taken all of our 2020 events online, which means that between now and the end of the year you have three to choose from.
SmashingConf Freiburg Online (Sep 7–8)
The SmashingConf Freiburg is moving online on the original dates: September 7th–8th. One track, two days and 13 speakers, with all of the actionable insights you expect from SmashingConf. We’ll be running the event tied to the timezone in Germany — making this a great event for Europeans. Check out the schedule, and buy tickets here.
SmashingConf Austin/NY Online (Oct 13–14)
We have combined the programming for New York and Austin as these two events were so close together and similar to each other. We’ll be running this event in Central time, just as if we were all in Austin. Check out the schedule, and buy tickets here. We’d love to see you in October!
SmashingConf SF Online (Nov 10–11)
In PST, join us for a SmashingConf San Francisco on November 10th–11th. The schedule and tickets are online for you to take a look at. We’ll be sure to have a great celebration for our final event of 2020!
The five steps below are professional risk management techniques to apply to your projects, proven to be effective.
Step 1: Identify the risks
Right at the beginning of your project, after planning the activities to be carried out, you and your team must identify as many risks as you can imagine. That’s right, the maximum and not just the risks they consider most important. This is so that any risk that seems harmless (but it is not) is not left out. So, don’t worry if the list of risks gets a little big in this first step, as it will be shortened in the next step.
Do not identify the risks of a project alone, trusting your experience, as people have different experiences and perspectives on the same risk. Thus, while a member of your team may feel that a particular risk has no relevance and should not be registered, another member may view the same risk differently, giving reasons for treating it as an extremely critical risk and one that can lead the project to failure.
Step 2: Classify the risks
After you have identified the risks, they must be assessed and classified. To this end, the probability and impact of each risk on your project must be estimated. Probability is the “chance” of this risk to occur and Impact is “how much” it will affect the project.
Step 3: Plan for risk responses
Having defined the most important risks, it is then necessary to plan the response actions that will be taken to prevent them from happening or at least reduce their impacts. At this time, it is also important to define who is responsible for monitoring each risk, as well as ensuring that the planned response is executed at the right time so that no risk is overlooked or disregarded.
Description of the risk: due to the use of new risk technologies, there may be incompatibilities, low quality, or even much greater difficulty than expected during the construction of the system, causing delays and additional costs to the project.
In many cases, it is also important to determine “contingency actions” for the risks, that is, what will be done if it occurs. This is what is popularly called Plan B. However, given the purpose of this article, we are not going to delve into this subject.
Step 4: Monitor the risks
There is no point in doing the previous 3 steps if afterward you simply file your risk record and don’t look at it anymore. Therefore, monitoring the risks throughout the project is essential, for two main reasons:
You will not always be able to completely eliminate the chances of the risk occurring, so those responsible for each risk need to be vigilant and monitor periodically to ensure that they are ready to execute the planned response at the moment it is necessary.
The risk is alive! That’s right, the likelihood and impact of a risk can change at any time. Remember how the walls of the houses were lower in the past and the risk of theft was almost zero? Nowadays houses have alarms, security guards, dogs, electric fences, and much more.
See that each step and field above is of fundamental importance for you to know the risks you will be dealing with and have a response ready to perform, eliminating the risk or, at the very least, reducing the chances of it occurring as much as possible. This is called anticipation and is the secret to drastically reducing the unforeseen in your projects, the overtime used to “put out fires” and most of the daily stresses due to lack of planning.
Step 5: Record the risk management processes
It is very important to create records of the processes. They are the ones who provide the fundamental information to improve the company’s methods and processes.
Everything that is done through risk management must be traceable. There should be records of all activities planned and carried out to be accessed in future consultations or whenever necessary.
Following these 5 steps will allow your business to easily mitigate risks within your project and your organization. Managing risks is an essential process for any business that wants to succeed and grow.
Web 2.0 celebrated the idea of everyone being able to contribute to the web regardless of their technical skill and knowledge. Its major features include self-publishing platforms, social networking websites, “tagging”, “liking”, and bookmarking.
Many individuals and companies began creating these platforms so that anyone could contribute to the Web, and not just people who had the privilege to learn to code. In fact, to recognize our contributions to the web, “we” were Time magazine’s Person of the Year in 2006.
Nowadays whether you’re consuming or sharing content on the web, it is likely to be via a big website. Twitter, Youtube, or a Facebook-owned service are popular examples. Whilst this gives us the advantage of being able to participate in a larger conversation at almost no monetary cost, there is also the downside of potentially losing all our content if a company closes, as has happened in the past.
In the past few years, I began to notice I was losing control of online life. What follows is a case for why the IndieWeb is a great opportunity for personal development, taking ownership of your content, and learning by building personal websites.
Learning On The “Corporate Web”
After years of seemingly endless growth and acquisitions, we have ended up with a handful of big websites that control our whole online identity, data, and privacy. The main mode of participation on the web, for many people, is through major web corporations that need to own data to sell to advertisers. This has become what many people call the corporate web, where users are the product and engagement is king.
The corporate web allows our family and friends and anyone with lower-tech skills to develop their web presence and have access to the digital world. Anyone can sign up to a handful of social media websites and see and interact with what people are sharing, especially at times of physical distance.
However, nothing online is truly free. Many of these websites rely on advertising revenue for income. Consequently, these websites need to change a lot to keep the engagement up so that the users don’t leave. This is not always in the best interest of the people who use it.
Exploring The Corporate Web
Social media websites allowed me to find and connect with industry peers. When I first started working as a web developer, one of the first things I did was to sign up to popular social media websites and subscribe to updates of people who also worked in the industry. Some of them I personally knew but others were recommended to me by the algorithm itself and throughout the years I would adjust my subscription list.
Regardless if it was shared via an article or a social media post, lots of things I learned were because someone wrote about it and I was able to read it for free. And when I engaged I was potentially building a professional network from my home. All this for free! How cool is that?
However, as time went by I began to lose control of what I wanted to see and when. In order to increase engagement, many social media websites began to use algorithms to dictate what they thought I wanted to see and they also started to show me things I didn’t actually subscribe to. While now I can rationalize this, at the time I was just entering the industry so I thought I was the one who needed to catch up on everything.
Social media doesn’t take breaks, but at some point in my life, I needed a break from it, which made me realize that my personal development was going to suffer. I began to experience strange anxiety of missing out because I also knew that I couldn’t scroll through my whole timeline to see everything that was shared while I was offline. It became really hard to search and find anything I had a glimpse of some weeks ago.
Making Stuff On The Corporate Web
So far I’ve been talking about consuming content, but I also wanted to share. While one may always be keen to continuously improve their craft, I was feeling an intense pressure to follow trends and build things using the latest shiny thing for the sake of being employable and impress people I’ve never met. Even sharing stuff that immediately reaches many people, would come with its own limitations as I would be using a platform not built by me.
Most importantly, it was doing a disservice to a whole group of people who can’t even join certain corporate websites because of the geopolitical restrictions of where they live. There is always the possibility of having your account (and your content) removed at any time if the corporation decides you’re breaking a rule.
Whether it would be accessibility, character limits, moderation, or even the option of not receiving feedback, many times it felt unwelcoming and intimidating. Often I felt like an impostor and as if I was running a never-ending marathon.
I began to ask myself, “who am I doing this for?” Is the “corporate web” bringing to the surface “corporate values” that get in the way of personal development?
What Is The IndieWeb?
Do you ever wonder what would happen if your social identity was stolen or reassigned by the corporation to someone else? Or, as I mentioned before, if these big websites close down, and all the content you created is gone? Corporate websites control who, when, if, and where the content created by its users can be accessed.
I didn’t wonder about these things until 2017. It was in ViewSource that I saw a talk by Jeremy Keith that introduced me to the IndieWeb called “Building blocks of the IndieWeb”. The IndieWeb is a community of individual personal websites connected by principles that lead to an alternative to the corporate web.
IndieWebCamps are an opportunity to work on my personal website blog and to ask for help. Photograph by Julie Anne Noyingurce.
The IndieWeb community is about creating or improving your personal website while also helping others to build theirs, either by documenting or creating tools. To help create an alternative to the corporate web, members of the IndieWeb community have built tools that anyone can use on their personal website that helps create the interaction and community building between personal websites.
One of the principles of the IndieWeb is that you own your content and that principle alone solves one of the main problems I mentioned above. Other tenets include:
Ownership of your identity.
I didn’t realize until this point how much it made sense to have a “one true version” of yourself online instead of multiple accounts spread on many websites;
Using tools you’ve built yourself.
At some point, I thought the worth of the things I built were related to the number of people who can use it. IndieWeb promotes the idea of building something for me and actively using it;
Documenting your journey.
I used to be an active blogger and I had stopped when I began to work as a developer. At the time I was afraid of writing beginner-friendly content and this principle helped me embrace every bit that I wanted to share;
Contributing to open-source.
Before joining the IndieWeb community I felt that I had nothing to contribute anywhere. For the first time in my life, I began to edit wiki pages, create issues in GitHub, organize meetups, and give talks. There are all examples of not only contributing to open source but also contributing to a community;
As I learned more about the IndieWeb, I found support and encouragement, especially as I read about the principles of plurality and using what one makes. That’s when I found a sense of freedom and permission to build something for myself — even if it only serves me and even if it has already been built by someone else too.
Creating A Personal Website And Learning From It
How many times does one have the opportunity to build a website from scratch at work? When you have a job in a really big company it is an unbelievably bureaucratic process to change anything we consider “base code”, especially how to choose a particular flavor of framework. I couldn’t believe I was so excited to write every cool thing inside an tag! I’ve lost count of how many “Hello worlds” I’ve created and binned in my lifetime when I had a real “product” to build: me.
When I began my quest to have an IndieWeb blog I chose to build almost everything from scratch but it isn’t necessarily the only option. If someone wants a full-fledged Indie Website without coding, there are services that support IndieWeb (Micro.blog for example) as well as some known CMS such as WordPress.
At the time, on my daily job, I was mostly writing JavaScript so I felt that this was an opportunity to do something a little bit different. I started to follow a couple of IndieWeb websites that were using static website generators and right now I am using Eleventy. My decision was based on visiting IndieWeb blogs that I liked that were also using this particular static website generator and looking up their code in Github. There isn’t a right or wrong answer here.
Building my personal website and blog from scratch forced me to refresh my HTML, accessibility, and CSS knowledge (with the bonus of no one telling me I wasn’t allowed to use the latest CSS cool things). As I began to IndieWebify myself, I learned so many new things! For example:
Jamstack (a stack that generates static code that doesn’t depend on a web server);
Microformats (extensions to HTML represent commonly published things like people, locations, blog posts and more. They provide an API to the information on your website);
Micropub (which is a standard API for creating content on a website);
Microsub (provides a standardized way for reader apps to interact with feeds);
Webmentions (a standard that allows you to notify another site that you’ve interacted with them);
Web Sign In / IndieAuth (a federated login protocol for Web sign-in that allows you to use your own domain to sign in to other sites and services);
Owning my content made me want to connect to APIs of existing “corporate websites” and also, where possible, automating the process of syndicating to them when I share something (also known as POSSE).
Now, the IndieWeb doesn’t require one to automate this process. You’re already adhering to the idea by publishing on your own domain and sharing the link to the original manually, for example, on Twitter! But the possibility to automate this process exists too and it is a great experiment. Similar to “what should you use to build your own website”, there is no right answer — as long as it works.
There are still many things I want to build and learn. For example, when I was able to bring my content from a corporate website into my server I grew the desire to optimize that output, so I began to make changes on my deployment build. This is something that would likely not happen at work or maybe I wouldn’t find the inspiration or need to build for anything else.
A snapshot of POSSE and IndieWeb posts. The flow begins on a personal website, syndicated to social media where interactions are backfeed to the original blog post. The original blog post can also receive and show interactions from other blogs via Webmentions.
Building my personal website and blog into my playground has been the place where I’ve learned the most. It is where I can experiment, write, build, try, and learn without censorship or limitations.
An unexpected consequence is that I felt more confident in writing on my blog compared to social media. Social media feels like a tiny stage with a massive audience compared to my blog that allows me to have a massive stage production but only perform to those who want to be there. I have control of who can interact with it (by not having comments available) and plenty of room to express myself without having to censor what I do.
So I also began to blog more and after I blog, I share on social media because we can then have the best of both worlds. My content may be buried by an algorithm in social media but that can never happen on my own personal website.
With Webmentions and publisher services, I can see what interactions my blog posts had on some social media websites. In order to receive Webmentions, you must have a Webmention endpoint. Luckily, lots of people have shared ways of how you can build one. While I still haven’t dared to create mine from scratch, I’ve been using a service called Webmentio.io to create and host my endpoint so that I can receive Webmentions. As for sending them, sometimes I do it manually using Telegraph but I’ve recently had a go at automating that process as well using Webmention.app.
Other great services, like Bridgy, send Webmentions for comments/replies, likes, and reposts on some social media websites like Twitter which also helps the process of “backfeeding” the interactions back to the original post. I recommend experimenting with existing services as it may be a bit overwhelming to build everything from scratch.
By slowly creating an alternative to the corporate web, one can have one place to document and share — a fixed place that anyone at any time can go back to whenever they need. All this while keeping the door open for all the good things that corporate web offers with the bonus of a very personalized touch.
My current website is a constant work in progress but I have a lot of joy when I scroll through my archives. I am always excited to improve it and try new things, I can break it and fix it at my own pace and I don’t have a deadline on it. It is my safe space.
Where To Begin
The IndieWeb community is open for everyone. You can start today by buying your domain name and building a homepage. With this single step alone, you will already have one place that anyone in the world can visit to be in touch with you.
Ever since joining the community, I participated and organized events, met great creators, and challenged myself with not only code but also in topics like privacy and ethics. I discovered new and fantastic personal websites and blogs that I probably wouldn’t find via social media and felt less alone in this constant journey of learning in our industry.
If you relate to anything I’ve said above and would like to get started there is a page that goes into more detail. We have an online chat room and weekly community meet-ups where you can connect with other members of the IndieWeb community who are happy to share their experiences and answer questions.
Dive straight into some welcoming guides built by community members (that anyone can contribute to) like IndieWebify.me and the IndieWeb Guides. I also recommend looking out for blog posts with IndieWeb introductions on personal websites as they all have different voices that may match your way of learning.
The wonderful thing about the IndieWeb community is that you’re welcome to do what works for you. It isn’t about following trends and there isn’t only one ‘right way’ to build things — just your way.
I’d say “website” fits better than “mobile app” but I like this framing from Max Lynch:
Every production mobile app ultimately has a set of recurring tasks around integration, testing, deployment, and long term maintenance. These tasks often must be automated across a team of many developers and app projects. Building a process for these tasks can be incredibly time consuming and require specialized infrastructure experience, but is critical for the success of any serious app project.
They are talking about “Continuous Integration and Continuous Deployment,” or CI/CD.
Everybody is trying to get you on their CI/CD tooling, and it’s obvious why: it’s a form of lock-in. This stuff is hard, so if they can help make it easier, that’s great, but they tend to do it in their own special way, which means you can’t just up and leave without causing a bunch of work for yourself. I ain’t throwing shade, it’s just how it is.
So much CI/CD stuff crosses my attention:
Max was writing about AppFlow, which is a new CI/CD thing from Ionic. I haven’t used it, but hey, it looks nice. I also have not used Semaphore but it also looks nice.
Heroku deserves a high five for teaching developers long ago that CI/CD should be Git-based and as simple as git push heroku master.
I’m probably missing at least 20 companies here. Like I say, everybody wants you on their system. They want you storing your secrets there. They want you configuring your permissions there.