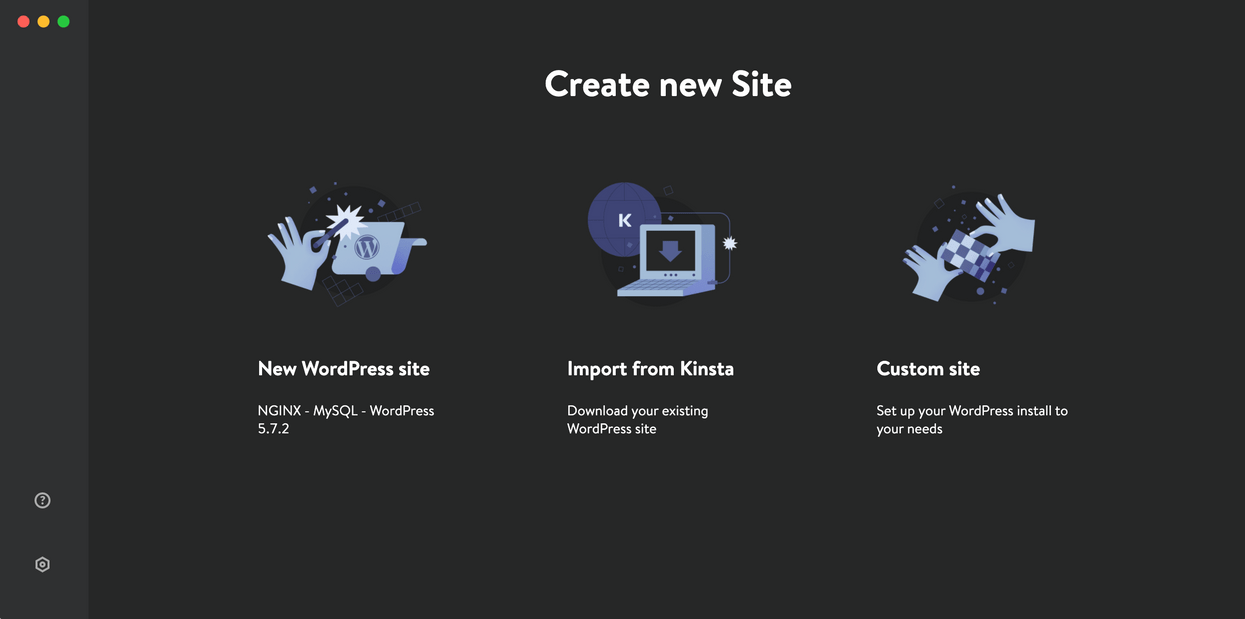
In today’s episode of the Smashing Podcast, we’re talking about image optimization. What steps should we follow for performant images in 2021? I spoke with expert Addy Osmani to find out.
Show Notes
Weekly Update
Transcript
Drew McLellan: He’s an engineering manager working on Google Chrome, where his team focuses on speed, helping to keep the web fast. Devoted to the open source community, his past contributions include Lighthouse, Workbox, Yeoman, Critical, and to do NVC. So we know he knows his way around optimizing for web performance. But did you know he wants won the Oscar for best actress in a supporting role due to a clerical error? My smashing friends, please welcome Addy Osmani. Hi, Addy. How are you?
Addy Osmani: I’m smashing.
Drew McLellan: That’s good to hear. I wanted to talk to you today about images on the web. It’s an area where there’s been a surprising amount of changes and innovation over the last few years, and you’ve just written a very comprehensive book all about image optimization for Smashing. What was the motivation to think at this time, “Now is the time for a book on image optimization?”
Addy Osmani: That’s a great question. I think we know that images have been a pretty key part of the web for decades and that our brains are able to interpret images much faster than they can text. But this overall topic is one that continues to get more and more interesting and more nuanced over time. And I always tell people this is probably, I think, my third or fourth book. I’ve never intentionally set out to write a book.
Addy Osmani: I began this book writing out an article about image optimization, and then over time I found that I’d accidentally written a whole book about it. We were working on this project for about two years now. And even in that time, the industry has been evolving browsers and tooling around images and image formats have been evolving.
Addy Osmani: And so I wrote this book because I found myself finding it hard to stay on top of all of these changes. And I thought, “I’m going to be a good web citizen and try to track everything that I’ve learned in one place so everybody else can take advantage of it.”
Drew McLellan: It is one of those areas, I think, with a lot of performance optimization in the browser, it’s a rapidly shifting landscape, isn’t it? Where a technique that you’ve learned as being current and being best practice, some technology shift happens, and then you find it’s actually an anti-pattern and you shouldn’t be doing it. And trying to keep your knowledge up and make sure that you’re reading the right articles and learning the right things and you’re not reading something from two years ago is quite difficult.
Drew McLellan: So to have it all collected in one well-researched book from an authoritative source is really tremendous.
Addy Osmani: Yeah. Even from an author’s perspective, one of the most interesting things and perhaps one of the most stressful things for our editorial team was I would hand in a chapter and say it was done. And then two weeks later, something would change in a browser, and I’d be like, “Oh, wait. I have to make another last minute change.”
Addy Osmani: But the image landscape has evolved quite a lot, even in the last year. We’ve seen WebP support finally get across the finishing line in most modern browsers. AVIF image support is in Chrome, coming to Firefox, JPEG XL, lazy loading. And across the board, we’ve seen enhancements in how you can use images on the web pretty concretely in browsers. But again, a lot for folks to keep on top of.
Drew McLellan: Some people might view the subject of image optimization as a pretty staid topic. We’ve all, at some point in our careers learn, how to export for web from our graphics software. And some of us that might be in the habit of taking those exported images and running them through something like ImageOptim.
Drew McLellan: So we might know that we should choose a JPEG when it’s a photographic image and a PNG when it’s a graphic based image and think that, “Okay, that’s it. I know image optimization, I’m done.” But really, those things are just table stakes, aren’t they, at this point?
Addy Osmani: Yeah, they are. I think that as our ability to display more detailed, more crisp images and images within even in a different context, depending on whether you care about art direction or not, has evolved over time. I think the need to figure out how you can get those images looking as beautiful as intended to your end users, keeping in mind their environment, their device constraints, their network constraints is a difficult problem and something that I know a lot of people still struggle with.
Addy Osmani: And so when it comes to thinking about images and getting a slightly more refined take on this beyond just, “Hey, let’s use a JPEG,” or “Let’s use a PNG,” I think there’s a few dimensions to this worth keeping in mind. The first is just generally compression. You mentioned ImageOptim, and a lot of us are used to just dragging an image over into a place and getting something smaller off the back of it.
Addy Osmani: Now, when it comes to compression, we’re usually talking about different codecs. And codecs are a compression technology that usually have an encoder component to them for encoding files and a decoder component for decoding them and decompressing them. And when you come to deciding whether you’re using something, you generally need to think about whether the photos or the images that you’re using are okay for you to approach using a lossy compression approach or a loss less approach.
Addy Osmani: Just in case folks are not really as familiar with those concepts, a lossless approach is one where you reproduce the exact same file at the very end upon decompression. So you’re not really losing much in the way of quality. Lossless is a lot more putting your image through a fax machine. You get a facsimile of the original, and it’s not going to be the original file. There might be some different artifacts in place there. It might look subtly different. But in general terms, the more that you compress, the more quality that you typically lose.
Addy Osmani: And so with all of these modern image codecs, they’re trying to see just how much quality you can squeeze out while still maintaining a relatively decent file size, depending on the use case.
Drew McLellan: So really, from a technology point of view, you have a source image and then you have the destination file format. But the process of turning one into the other is open for debate. As long as you have a conforming file, how you do it is down to a codec that can have lots of different implementations, and some will be better than others.
Addy Osmani: Absolutely. Absolutely. And I think that, again, going back to where we started with JPEG and PNG, folks may know the JPEG was created for a lossy compression of photos. You generally get a smaller file off the back of it, and it can sometimes have different banding artifacts. PNG was originally created for a lossless compression, does pretty well on non-photographic images.
Addy Osmani: But since then, things have evolved. Around 2010, we started to get support for WebP, which was supposed to replace JPEG and PNG and beats them in compression by a little bit. But the number of image formats and options on the table has just skyrocketed since then. I think things are headed in generally a good direction, especially with modern formats like AVIF and JPEG XL. But it’s taken a while for us to get here. Even getting WebP support across all browsers took quite some time.
Addy Osmani: And I think ultimately what swayed it is making sure that developers have been asking for it, they’ve had an appetite for being able to get better compression out of these modern formats, and the desire to just have good compatibility across browsers for these things, too.
Drew McLellan: Yeah. WebP seems really interesting to me, because as well as having lossless and lossy compression available within the format, we obviously have a much reduced file size as a result. And there’s good browser support, and we see adoption from big companies like Google and Netflix and various big companies.
Drew McLellan: But my perception in the industry is that we don’t see the same sort of uptake at the grassroots level. Is WebP still waiting for its day to come?
Addy Osmani: I think that I would say that WebP is arriving. A lot of folks have been waiting on Safari and WebKit support to materialize, and we finally have that. But when we think about new image formats, it’s very important that we understand what does support actually mean. There’s browser support for decoding those images. We also need really good tooling support so that whether you’re in a node environment, image CDN, if you’re in a CMS, you have the ability to use those image formats.
Addy Osmani: I can remember many years ago when WebP first came out. Early adopters had this problem of you’d save your WebP file to your desktop, and then suddenly, “Oh, wait. Do I need to drag this into my browser to view it?,” or, “If my users are downloading the WebP, are they going to get stuck and be wondering what’s going on?”
Addy Osmani: And so making sure that there’s pretty holistic support for the image format at both an operating system level as well as in other context is really important, I think, for an image format to take off. It’s also important for people who are serving up images to think about these use cases a little bit so that, if I am saving or downloading a file, you’re trying to put it into a portable format that people can generally share easily. And I think this is where, at least on iOS, iOS has got support for a hike and hyphen. And converting things over to JPEGs when necessary allows people to share them.
Addy Osmani: So thinking through those types of use cases where we can make sure that users aren’t losing out while we’re delivering them better compression is important, I think.
Drew McLellan: I have a slide sharing service that I run that, as you can imagine, deals with hundreds of thousands of images. And when I was looking at WebP, and this was probably maybe three years ago, I was primarily looking at a way to reduce CDN bandwidth costs, because if you’re serving a smaller file, you’re being charged less to serve it. But while I still needed a fullback image, a legacy image format as well, my calculations showed that the cost of storing a whole other image set outweighed the benefits of serving a smaller file. So here we are in 2021. Is that a decision I should be reconsidering at this point?
Addy Osmani: I think that’s a really important consideration. Sometimes, when we talk about how you should be approaching your image strategy, it’s very easy to give people a high-level answer of, “Hey, yeah. Just generate five different formats, and that will just scale infinitely.” And it’s not always the case.
Addy Osmani: I think that when you have to keep storage in mind, sometimes trying to find what is the best, most common denominator to be serving your users is worth keeping in mind. These days, I would actually say that WebP is worth considering as that common denominator. For people who have been used to using the picture tag to conditionally serve different formats down to people, typically you’d use a JPEG as your main fallback. Maybe it’s okay these days to actually be using the WebP as your fallback for most users, unless you’ve got people who are on very, very old browsers. And I think we’re seeing a lot less of that these days. But you definitely have some flexibility there.
Addy Osmani: Now, if you’re trying to be forward facing, I would say go pick one format that you feel works really well. If you can approach storage in a way that scales and is flexible to your needs, what I would say people should do is consider JPEG XL. It’s not technically shipping in a browser just yet. When it does, JPEG XL should be a pretty great option for a lot of photos in lossy or lossless use cases or for non-photo use cases as well. And it’s probably going to be much better than WebP V1. So that’s one place.
Addy Osmani: I think that AVIF is probably going to be better if you need to go to really low bit rates. Maybe you care a lot about bandwidth. Maybe you care a little bit less about image fidelity. And at those bit rates, I could imagine it looking crisper than some of the alternatives. And until we have JPEG XL, I’d try to take a look at your analytics and understand whether it’s possible for you to serve AVIF. Otherwise, I’d focus on that WebP. If you were analytics, I guess most people can be served WebP and you care a little bit less about wide-gamut or text overlays, places where chromosome sampling may not be perfect in WebP. That’s certainly something worth keeping in mind.
Addy Osmani: So I would try to keep in mind that there’s not going to be a one size fits all for everybody. I personally, these days, worry a little bit less about the storage and egress and bandwidth costs, just because I use an image CDN. And I’m happy to say I use Cloudinary personally. We use lots of different image CDNs at where I work. But I found that not having to worry as much about the maintenance costs of dealing with image pipelines, dealing with how I’m going to support like, “Oh, hey, here’s yet another image format or new types of fallbacks or new web APIs,” that has been a nice benefit to investing in something that just takes care of it for me.
Addy Osmani: And then the overall cost for my use cases have been okay. But I can totally imagine that if you’re running a slide service at that scale, that might not necessarily be an option, too.
Drew McLellan: Yeah. So I want to come back to some of these upcoming future formats. But I think that’s worth digging into, because with any sort of performance tools, Lighthouse, or WebPageTests, if any of us run our sites through it, one of the key things that it will suggest is that we use a CDN for images. And that is a very realistic thing to do for very big companies. Is it realistic and within the reach of people building smaller websites and apps, or is that actually as easy to do as it sounds?
Addy Osmani: I think the question people should ask is, “What are you using images for?” If you only have a few images, if you’re building a blog and the images you’re adding in are relatively simple, you don’t have hundreds and hundreds or thousands of thousands of images, you might be okay with just approaching this at build time, in a very static way, where you install a couple of NPM packages. Maybe you’re just using Sharp. And that takes care of you for the most part.
Addy Osmani: There are tools that can help you with generating multiple formats. It does increase your build time a little bit, but that might actually be fine for a lot of folks. And then for folks who do want to be able to leverage multiple-
Addy Osmani: And then for folks who do want to be able to leverage multiple formats, they don’t want to deal with as much of the tooling minutia and want to be able to get a really rich responsive image or story in place, I would say try out an image CDN. I was personally quite reticent about using it for personal projects for the cost concerns initially, and then over time as I took a look at my billing, I actually realized it’s saving me time that I’d otherwise be investing in addressing these problems myself. I don’t know how much you’ve had to write custom scripts for dealing with your images in the past but I realized if I can save myself at least a couple of days of debugging through these different npm packages a month, then the costs kind of take care of the time I’m saving and so it’s okay.
Addy Osmani: But it can be something where if you’re scaling to 100s of 1000s or millions of images and that’s not something that’s necessarily covered by your revenue or not something that you’re prepared to pay for, you do need to think about alternative strategies. And I think we’re lucky that we have enough flexibility with the tools that are available to us today to be able to go in either of those directions, where we do something a little bit more kind of custom, we tackle it ourselves or roll our own image CDN or we invest in something slightly more commercial. And we’re at a place where I’d say that for some use cases, yeah you can use an image CDN and it’s affordable.
Drew McLellan: I guess, one of the sort of guiding principles is always just to be agile and be prepared for change. And you might start off using an image CDN to dynamically convert your images for you as they’re requested, and if that gets to a point where it’s not sustainable cost-wise you can look at another solution and have your code base in a state where it’s going to be easy to substitute one solution for another. I think generally and anywhere you’re relying on a third-party service, that’s a good principle to have isn’t it? So these upcoming image formats, you mentioned JPEG XL. What is JPEG XL? Where’s it come from? And what does it do for us?
Addy Osmani: That’s an excellent question. So JPEG XL is a next generation image format, it’s supposed to be general purpose and it’s a codec from the JPEG committee. It started off with some roots in Google’s pic format and then Cloudinary’s FUIF format. There have been a lot of formats over the years that have kind of been subsumed by this effort, but it’s become a lot more than just the kind of sum of its individual parts and some of the benefits of JPEG XL are it’s great for high fidelity images, really good for lossless, it’s got support for progressive decoding, lossless JPEG transcoding, and it’s also kind of fuss and royalty free, which is definitely a benefit. I think that JPEG XL could potentially be a really strong candidate. We were talking earlier about, if you were to just pick one, what would you use? And I think the JPEG XL has got potential to be that one.
Addy Osmani: I also don’t want to over promise, we’re still very early on with browser support. And so I think that we should really wait and see, experiment and evaluate how well it kind of lines up in practice and meets people’s expectations but I see a lot of potential with JPEG XL for both those lossy and lossless cases. Right now, I belief that Chrome is probably the furthest along in terms of support, but I’ve also seen definitely interest from Mozilla side and other browsers in this so I’m excited about the future with JPEG XL. And if we were to say, what is even shorter term of interest to folks? There’s of course AVIF too.
Drew McLellan: Tell us about AVIF, this is another one that I’m unfamiliar with.
Addy Osmani: Okay. So we mentioned a little bit earlier about AVIF maybe being a better candidate if you need to go to low bit rates and you care about bandwidth more than image fidelity, as a general principle, AVIF really takes the lead in low fidelity high appeal compression. And JPEG XL, it should excel in medium to high fidelity, but they are slightly different formats in their own rights. We’re at a place where AVIF has got increasingly good browser support, but let me take a step back and talk a little bit more about the format. So AVIF itself is based on the AV1 video codec, which has been standardized by the Alliance for Open Media, and it tries to get people significant compression gains over JPEG, over WebP, which we were talking about earlier. And while the exact savings you can get from AVIF will depend on the content and your quality targets, we’ve seen plenty of cases where it can offer over 50% savings compared to JPEG.
Addy Osmani: It’s got lots of good features, it’s able to give you container support for new features like high dynamic range and wide color gamuts, film grain synthesis. And again, similar to talking about being forward facing, one of the nice things about the picture tag is that you could serve users AVIF files right now and it’ll still fall back to your WebP or your JPEG in cases where it’s not necessarily supported. But going back to your example about Photoshop Save For Web, you could take a JPEG that’s 500 kilobytes in size, try to shoot for a similar quality to Photoshop Save For Web and with AVIF I would say that you probably be able to get to a point where that file size is about 90 kilobytes, 100 kilobytes so quite a lot of savings with no real discernible loss in quality.
Addy Osmani: And one of the nice things about that is you’re ideally not going to be seeing as much loss of the texture in any images that have rich detail. So if you’ve got photos of forests or camping or any of those types of the things, they should still look really rich with AVIF. So I’m quite excited about the direction that AVIF has. I do think it needs a little bit more work in terms of tooling support. So I dropped a tweet out about this the other day, we’ve got a number of options for using AVIF right now, for single images we’ve got Squoosh, squoosh.app, which is written by another team in Chrome, so shout out to Surma and Jake for working on Squoosh. Avif.io has got a number of good options for folks who are trying to use AVIF today, regardless of what tech stack they’re focused on, Sharp supports AVIF too.
Addy Osmani: But then generally you think about other places where we deal with images, whether it’s in Figma or in Sketch or in Photoshop or in other places, and I would say that we still need to do a little bit of work in terms of AVIF support there, because it needs to be ubiquitous for developers and users to really feel like it’s landed and come home. And that’s one of the areas of focus for us with the teams working on AVIF in Chrome at the moment, trying to make sure that we can get tooling to a pretty good place.
Drew McLellan: So we’ve got in HTML, the picture element now, which gives us more flexibility over the traditional image tag. Although the image tag’s come a long way as well, hasn’t it? But we saw picture being added, it was around the same time as the native video tag, I think in that sort of original batch of HTML5 changes. And this gives us the ability to specify multiple sources, is that right?
Addy Osmani: Yes, that’s right.
Drew McLellan: So you can list different formats of images and the browser will pick the one it supports, and that enables us to be quite experimental straight away without needing to worry too much about breaking things for people with older browsers.
Addy Osmani: Absolutely. I think that’s one of the nicest benefits of using the picture tag outside of use cases where we’re thinking about our direction, just being able to serve people an image and have the browser go through the list of potential sources and see, okay, well, I will use the first one in that list that I understand otherwise I’ll fall back, that’s a really powerful capability for folks. I think at the same time, I’ve also heard some folks express some concern or some worry that we’re regenerating really huge blobs of markup now when we’re trying to support multiple formats and you factor in different sizes for those formats and suddenly it gets a little bit bulky.
Addy Osmani: So are there other ways that we could approach those problems? I don’t want to sell people too much on image CDNs, I want them to stand on their own. But this is one of those places where an idea called content negotiation can actually offer you an interesting path. So, we’ve talked a little bit about picture tag where you have to generate a bunch of different resources and decide on the order of preference, right, extra HTML. With content negotiation, what it says is let’s do all of that work on the server. So the clients can tell the server what formats it supports up front via list of MIME types via Accept HTTP header. Then the server can do all the heavy work of generating and managing ultimate resources and deciding which ones to send down to clients. And one of the powerful things here is if you’re using an image CDN, you can point to a single resource.
Addy Osmani: So maybe if we’ve got a puppy image like puppy.JPEG, we could give people a URL to puppy.JPEG and if their browser supports WebP or it supports a AVIF the server can get really smart about serving down the right image to those users depending on what their support looks like, but otherwise fall back without you needing to do a ton of extra work yourself. Now, I think that’s a powerful idea. There’s a lot that you can do on the server, we sometimes talk about how not everybody has got access to really strong network quality, your effective connection type can be really different depending on where you are.
Addy Osmani: Even living in Silicon Valley, I could be walking from a coffee shop to a hotel or I could be in the car and the quality of my wifi or my signal may not be that great. So this is where you’ve got access to other APIs, other ideas like the Save-Data client hint for potentially being able to serve people down even smaller sized resources, if the user has opted in to data savings. So there’s a lot of interesting stuff that we could be doing on the server side and I do think we should keep pushing on these ideas of finding a nice balance where people who are comfortable with doing the market path have got all the flexibility to do so and people who want slightly more magical solution have also got a few options.
Drew McLellan: The concept of this sort of data saver approach was something that I learned of first from your book. I mean, let’s go into that a little bit more because that’s quite interesting. So you’re talking about the browser being able to signal a preference for wanting a reduced data experience back because maybe it’s on a metered connection or has low battery or something.
Addy Osmani: Exactly. Exactly. I’ve been traveling in the normal times or the before times back when we would travel a lot more, I’ve experienced plenty of places in the world or situations where my network quality might be really poor or really spotty, and so even opening up a webpage could be a frustrating or difficult experience. I might be looking up a menu and if I can’t see pictures of the beautiful food they’ve got available I might go somewhere where I can, or I might, I don’t know, make myself some food instead. But I think that one of the interesting things about data saver is it gives you a connection back to what the user’s preferences are. So if as a user, I know that I’m having a hard time with my network connection. I can say, “Okay, well, I’m going to opt into data saver mode in my browser.”
Addy Osmani: And then you can use that as a developer as a signal to say, “Okay, well, the user’s at a bit of a constrained, maybe we will surf them down much smaller images or images of a much lower quality.” But they still get to see some images at all, which is better than them waiting a very long time for something much richer to be served down. Other benefits of these types of signals are that you can use them for conditionally serving media. So maybe there are cases where text is the most important thing in that page, maybe you can switch those images off if you discover that users are in kind of a constrained environment. I’ll only spend 30 seconds on this, but you can really push this idea to it’s extremes. Some of the interesting things you can do with Save-Data are maybe even turning off very costly features implemented in JavaScript.
Addy Osmani: If you have certain components that are considered slightly more optional, maybe those don’t necessarily need to be sent down to all users if they only enhance the experience. You can still serve everybody a very core, small, quick experience, and then just layer it on with some nice frosting for people who have a faster connection or device.
Drew McLellan: Potentially, I guess it could factor into pagination and you could return 10 results on a page rather than a 100 and those sorts of things as well. So lots of interesting, interesting capabilities there. I think we’re all sort of familiar with the frustrating process of getting a new site ready, optimizing all your images, handing it over to the client, giving them a CMS to manage the content and find that they’re just replacing everything with poorly optimized images. I mean, again, an image CDN, I guess, would be a really convenient solution to that but are there other solutions, are there things that the CMS could be doing on the server to help with that or is an image CDN just probably the way to go?
Addy Osmani: I think that what we’ve discovered after probably at least six or seven years of trying to get everybody optimizing their images is that it’s a hard problem where some folks involved in the picture might be slightly more technically savvy and maybe comfortable setting up their own tooling or going and running Lighthouse or trying out other tools to let them know whether there are opportunities to improve. I’d love to see people consistently using things like Lighthouse to catch if you’ve got opportunities to optimize further or serve down images of the right size but beyond that, sometimes we run into use cases where the people who are uploading images may not necessarily even understand the cost of the resources that they’re uploading. This is commonly something we run into, and I’ll apologize, I’m not going to call people out too much, but this is something we run into even with the Google blog.
Addy Osmani: Every couple of weeks on the Google blog, we’ll have somebody upload a very large 20 or 30 megabyte animated GIF. And I don’t expect them to know that that’s not a good idea, they’re trying to make the article look cool and very engaging and interactive, but those audiences are not necessarily going to know to go and run tools or to use ImageOptim or to use any of these other tools in place and so documenting for them, that they should check them out, is certainly one option. But being able to automate away the problem, I think is very compelling and helps us consistently get to a place where we’re hopefully balancing the needs of all of our users of CMSs, whether they’re technical or non-technical, as well as the needs of our users.
Addy Osmani: So I think the image CDNs can definitely play a role in helping out here. Ultimately, the thing that’s important is making sure you have a solution in place between people, stakeholders who might be uploading those images, and what gets served down to users. If it’s an image CDN, if it’s something you’ve rolled yourself, if it’s a built step, just needs to be something in place to make sure that you are not serving down something that’s very, very large and inefficient.
Drew McLellan: Talking about animated GIFs, they’re surprisingly popular. They’re fun, we love them, but they’re also huge. And really, it’s a case where a file format that was not designed for video is being used for video. Is there a solution to that with any of these image formats? What can we do?
Addy Osmani: Oh, gosh. The history of GIFs is fascinating. We saw a lot of the formats we know and love or have been around for a while were originated in the late ’80s to early ’90s, and the GIF is one of those. It was created in 1987. I’m about as old as the GIF.
Addy Osmani: As you mentioned, it wasn’t originally created necessarily for use case. I think it was Netscape Navigator which in mid ’90s maybe added support for looping GIFs and giving us this kind of crazy fun way to do memes and the like, but GIFs have got so many weaknesses. They’re kind of limited in many cases to a very finite color palette; 256 colors, in many cases. They’re a bitmapped raster format with pixel value stored in image files.
Addy Osmani: They’re very inefficient, for a number of reasons. And you mentioned that they’re also quite large. I think that we’ve gotten into this place of thinking that if we want a short segment of video or animation that’s going to be looping, the GIF is the thing that we have to use. And that’s just not the case.
Addy Osmani: While we do see that there are modern image formats that have support for animation, I think that the most basic thing you can do these days is make sure you’re serving a video down instead of a GIF. Muted auto-play videos combined with HD64, HD65, whatever video you’re going to use, can be really powerful, and significantly smaller for use cases where you need to be showing a sequence of images.
Addy Osmani: There are options for this. AVIF has got image sequences in there, potentially. Other formats have explored these ideas as well. But I think that one thing you can do is, if you’re using GIFs today, or you have users who are slightly less technical who are using GIFs today, try to see if you can give them tools that will allow them to export a video instead, or if your pipeline can take care of that for them, that’s even better.
Addy Osmani: I have plenty of conversations with CMS providers where you do see people uploading GIFs. They don’t know the difference between a video and a GIF file. But if you can just, whether it’s with an image CDN or via some built process, change the file over to a more efficient format, that would be great.
Drew McLellan: We talked briefly about tools like ImageOptim that manage to strip out information from the files to give us the same quality of result with a smaller file size. I’m presuming that’s because the file formats that we commonly deal with weren’t optimized for delivery over the Web in the first place, so they’re doing that step of removing anything that isn’t useful for serving on the Web. Do these new formats take that into consideration already? Is something like ImageOptim a tool that just won’t be required with these newer formats?
Addy Osmani: I’m anticipating that some of the older formats… Things that have been around for a while, take a while to phase out or to evolve into something else. And so I can see tools like ImageOptim continuing to be useful. Now, what are modern image formats doing that are much better? Well, I would say that they’re taking into account quite a few things.
Addy Osmani: They’re taking into account, are there aspects of the picture that the human eye can’t necessarily make out a difference around? When I’m playing around with different quality settings or different codecs, I’m always looking for that point where if I take the quality down low enough, I’m going to see banding artifacts. I’m going to see lots of weird looking squares around my buildings or the details of my picture.
Addy Osmani: But once those start to disappear, I really need to start zooming in to the image and making comparisons across these different formats. And if users are unlikely to do that, then I think that there are good questions around is that point of quality good enough? I think that modern image formats are pretty good at being able to help you navigate, filtering out some of those details pretty well. Keeping in mind what are the needs of color, because obviously we’ve got white gamut as a thing right now as well.
Addy Osmani: Some people might be okay with an amount of changing your color palette versus not, depending on the type of images that you have available, but definitely I see modern formats trying to be resilient against things like generational loss as well. Generational loss is this idea that… We mentioned memes earlier. A common problem on the Web today is you’ll find a meme, whether it’s on Facebook or Instagram or Reddit or wherever else, you’ll save it, and maybe you’ll share it around with a friend. Maybe they’ll upload it somewhere else. And you suddenly have this terrible kind of copy machine or fax effect of the quality of that image getting worse and worse and worse over time.
Addy Osmani: And so when I see something get reshared that I may have seen three months ago, now it might not be really, really bad quality. You can still make out some of the details, but image formats, being able to keep that in mind and work around those types of problems, I think are really interesting.
Addy Osmani: I know that JPEG XL was trying to keep this idea of generational loss in mind as well. So there’s plenty of things that modern codecs and formats are trying to do to evolve for our needs, even if they’re very meme focused.
Drew McLellan: Let’s say you’ve inherited a project that has all sorts of images on it. What would be the best way to assess the state of that project in terms of image optimization? Are there tools or anything that would help there?
Addy Osmani: I think that it depends on how much time you’ve got to sink into the problem. There are very basic things people can try doing, like obviously batch converting those images over to more modern formats at the recommended default quality and do an eyeball check on how well they’re doing compared to the original.
Addy Osmani: If you’re able to invest a little bit more time, there are plenty of tools and techniques like DSSIM and other ways of being able to compare what the perceptual quality differences are between different types of images that have been converted. And you can use that as a kind of data-driven approach to deciding, if I’m going to batch convert all of my old images to WebP, what is the quality setting that I should be relying on? If I’m going to be doing it for AVIF or JPEG XL, what is the quality setting that I should be relying on?
Addy Osmani: I think that there’s plenty of tools people have available. It really just depends on your time sink that’s possible. Other things that you can do, again, going back to the image CDN aspect, if you don’t have a lot of time and you’re comfortable with the cost of an image CDN, you can just bulk upload all of those images. And there are CDNs that support this idea of automatic quality setting. I think in Cloudinary it’s q_auto, or something like that.
Addy Osmani: But the basic idea there is they will do a scan of the image, try to get a sense of the type of content that’s in there, and automatically decide on the right level of quality that you should be using for the images that are getting served down to users. And so you do have some tooling options that are available here, for sure.
Drew McLellan: I mean, you mentioned batch processing of images. Presumably you’re into the area of that generational loss that you’re talking about, when you do that. When you take an already compressed JPEG and then convert it to a WebP, for example, you risk some loss of quality. Is batch converting a viable strategy or does that generational loss come too much into play if you care about the pristine look of the images?
Addy Osmani: I think it depends on how much you’re factoring in your levels of comfort with lossy versus lossless, and your use case. If my use case is that I’ve inherited a project where the project in question is all of my family’s photos from the last 20 years, I may not be very comfortable with there being too much quality loss in those images, and maybe I’m okay with spending a little bit more money on storage if the quality can remain mostly the same, just using a more modern format.
Addy Osmani: If those are images for a product catalog or any commerce site, I think that you do need to keep in mind what your use case is. Are users going to require being able to see these images with a certain level of detail? And if that’s the case, you need to make those trade-offs in mind when you’re choosing the right format, when you’re choosing the right quality.
Addy Osmani: So I think that batch is still okay. To give you a concrete idea of one way of seeing people approach this at scale, sometimes people will take a smaller sample of the images from that big collection that they’ve inherited, and they’ll try out a more serious set of experiments with just that set. And if they’re able to land on an approach that works well for the sample, they’ll just apply it to the whole batch. And I’ve seen that work to varying degrees of success.
Drew McLellan: So optimizing file size is just sort of one point on the overall image optimization landscape. And I’d like to get on to talking about what we can do in our browsers to optimize the way the images are used, which we’ll do after a quick word from this episode sponsor.
Drew McLellan: So we’ve optimized and compressed our large files, but now we need to think about a strategy for using those in the browser. The good old faithful image tag has gained some new powers in recent times, hasn’t it?
Addy Osmani: Yeah, it has. And maybe it’s useful for folks… I know that a lot of people that ask me about images these days also ask me to frame it in terms of metrics and the Core Web Vitals. Would it be useful for me to talk about what the Core Web Vitals are and maybe frame some of those ideas in those current terms?
Drew McLellan: Absolutely, because Core Web Vitals is a sort of initiative from Google, isn’t it, that we’ve seen more recently? We’re told that it factors into search ranking potentially at some level. What does Core Web Vitals actually mean for us in terms of images?
Addy Osmani: Great question. As you mentioned, Core Web Vitals is an initiative by Google, and it’s all about trying to share unified guidance for quality signals. That can be pretty key to delivering a great user experience on the Web. And it is part of a set of page experience signals Google Search may be evaluating for ranking purposes, but they can impact the Core Web Vitals in a number of ways.
Addy Osmani: Now, before I talk about what those ways are, I should probably say, what are the Core Web Vitals metrics? There’s currently three metrics that are in the Core Web Vitals. There’s largest contentful paint, there’s cumulative layout shift, and there’s first input delay. Now, in a lot of modern Web experiences we find that images tend to be one of the largest visible elements on the page. We see a lot of product pages where we have a big image that’s the main product item image. We see images in carousels, in stories and in banners.
Addy Osmani: Now, largest contentful paint, or LCP, is a Core Web Vitals metric that tries to measure when the largest contentful element, whether it’s an image text or something else, is in a user’s viewport, such that we’re able to tell when that image becomes visible. And that really allows a browser to determine when the main content of the page has really finished rendering.
Addy Osmani: So if I’m trying to go to a recipe site, I might care about how that recipe looks, and so we care about making sure that that big hero image of the recipe is visible to me. Now, the LCP element can change over time. It’s very possible that early on in load, the largest thing may be a heading, but as the page continues to load, it might actually end up being a much larger image or a poster of some sort.
Addy Osmani: And so when you’re trying to optimize largest contentful paint, there’s about four things that you can do. The first thing is making sure that you’re requesting your key hero image as early on as possible. Generally, we have a number of things that are important in the page. We want to make sure that we can render the main page’s content and layout.
Addy Osmani: For layout, typically we’re talking about CSS. So you may be using critical CSS, inline CSS, in your pages, want to avoid things that are render blocking, but then when it comes to your image, ideally you should be requesting that image early. Maybe that involves just making sure that the browser can discover that image as early on in the page as possible, given that a lot of us these days are relying on frameworks.
Addy Osmani: If you’re not necessarily using SSR, server-side rendering, if you are waiting on the browser to discover some of your JavaScript bundles, bundles for your components, whether you have a component for your hero image or product image, if the browser has to wait to fetch, parse, execute, compile and execute all of these different files before it can discover the image, that might mean that your largest contentful image is going to take some time before it can be discovered.
Addy Osmani: Now, if that’s the case, if you find yourself in a place where the image is being requested pretty late, you can take advantage of a browser feature called link rel preload to make sure that the browser can discover that image as early as possible. Now, preload is a really powerful capability. It’s also one that you need to take a lot of care with. These days, it’s very easy to get to a place where maybe you hear that we’re recommending preload for your key-
Addy Osmani: Maybe you hear that we’re recommending preload for your key hero image, as well as your key scripts, as well as your key fonts. And it becomes just this really big, massive trying to make sure that you’re sequencing things in the right order. So the LCP images is definitely one key place worth keeping in mind for this.
Addy Osmani: The other thing, as I mentioned four things, the other thing is make sure you’re using source set and an efficient modern image format. I think that source set is really powerful. I also see sometimes when people are using it, they’ll try to overcompensate and will maybe ship 10 different versions of images in there for each possible resolution. We tend to find, at least in some research, that beyond three by images, users have a really hard time being able to tell what the differences are for image quality and sharpness and detail. So DPR capping, device pixel ratio capping, is certainly an idea worth keeping in mind.
Addy Osmani: And then for modern image formats, we talked about formats earlier, but consider your WebP, your AVIF, your JPEG XL. Avoid wasting pixels. It’s really important to have a good strategy in place for quality. And I think that there are a lot of cases where even the default quality can sometimes be too much. So I would experiment with trying to lower your bit rate, lower your quality settings, and see just how far you can take things for your users while maintaining sharpness.
Addy Osmani: And then when we’re talking about loading, one of the other things that the image tag has kind of evolved to support over the last couple of years is the lazy loading. So with loading equals lazy, you no longer need to necessarily use a JavaScript library to add lazy loading to your images. You just drop that onto your image. And in chromium browsers and Firefox, you’ll be able to lazy load those images without needing to use any third-party dependencies. And that’s quite nice too.
Addy Osmani: So, we’ve got lazy loading in place. We’ve got support for other things like sync decoding, but I’m going to keep things going and talk very quickly about the other two core vitals metrics.
Drew McLellan: Go for it, yep.
Addy Osmani: So, get rid of layout shifts. Nobody likes things jumping around their pages. I feel like, one of my biggest frustrations is I open up a web page. I hover my finger over a button I want to click, and then suddenly a bunch of either ads or images without dimension set or other things pop in. And it causes a really unpleasant experience.
Addy Osmani: So cumulative layout shift tries to measure the instability of content. And a lot of the time, the common things that are pushing your layout shifts are images or other elements on your page that just don’t have dimension set. I think that that’s one of those places where it’s often straightforward for people to set image dimensions. Maybe it’s not something we’ve historically done quite as much of, but certainly something worth spending your time on. In tools like lighthouse will try to help you collect, like what is the list of images on your page that require dimensions? So you can go and you can set them.
Drew McLellan: I was going to say, that’s a really interesting point because when responsive web design became a thing, we all went through our sites and stripped out image dimensions because the tools we had at our disposal to make that work required that we didn’t have height and width attributes on our images. But that’s a bad idea now, is it?
Addy Osmani: What’s old is new again. I would say that it’s definitely worth setting dimensions on your images. Set dimensions on your ads, your eye frames, anything that is dynamic content that could potentially change in size is worth setting dimensions on.
Addy Osmani: And for folks who are building really fun out there experience, out there is the wrong phrase, really fun layout experiences where maybe you need to do kind of more work on responsive cards and the like; I would consider using CSS aspect ratio or aspect ratio boxes to reserve your space. And that can compliment setting dimensions on those images as well for making sure that things are as fixed as possible when you’re trying to avoid your layout shifts.
Addy Osmani: And then, finally last Core Web Vital is first input delay. This is something people don’t necessarily always think about when it comes to images. So it is in fact possible for images to block a user’s bandwidth and CPU on page load. They can get in the way of how other critical resources are loaded in, in particular on really slow connections or on lower end mobile devices that can lead to bandwidth saturation.
Addy Osmani: So first input delay is a Core Web Vital metric that captures, it users first impression of a site’s interactivity and responsiveness. And so by reducing main thread CPU usage, your first input delay can also be kind of minimized. So in general there, just avoid images that might cause network contention. They’re not render blocking. But they can still indirectly impact your rendering performance.
Drew McLellan: Is there anything we can do with images to stop them render blocking? Can we take load off the browser in that initial phase somehow to enable us to be interactive quicker?
Addy Osmani: I think it’s really important increasingly these days to have a good understanding of the right optimal image sequence for displaying something above the fold. I know that above the fold is an overloaded term, but like in the user’s first view port. Very often we can end up trying to request a whole ton of resources, some of them being images, that are not really necessary for what the user is immediately going to see. And those tends to be great candidates for loading later on in the page’s lifecycle, great things to lazy load in place. But if you’re requesting a whole slew of images, like a whole queue of things very early on, those can potentially have an impact.
Drew McLellan: Yeah. So, I mean, you mentioned lazy loading images that we’ve historically required a JavaScript library to do, which has its own setbacks, I think, because of historic ways that browsers optimize loading images, where it’s almost impossible to stop them loading images, unless you just don’t give it a source. And if you don’t give it a source and then try and correct it with JavaScript afterwards, if that JavaScript doesn’t run, you get no images. So lazy loading, native lazy loading is an answer to all that.
Addy Osmani: Yeah, absolutely. And I think that this is a place where we have tried to improve across browsers, the native lazy loading experience over the last year. As you know, this is one of those features where we shipped something early and we’re able to take advantage of conversations with thought leaders in the industry to understand like, “Oh, hey, what are the thresholds you’re actually manually setting if you’re using lazy sizes or you’re using other JavaScript’s lazy loading libraries?” And then we tuned our thresholds to try getting to a slightly closer place to what you’d expect them to be.
Addy Osmani: So in a lot of cases, you can just use native lazy loading. If you need something a lot more refined, if you need a lot more control over being able to set the intersection observer thresholds, the point of when the browser is going to request things, we generally suggest, go and use a library in those cases, just because we’re trying to solve for the 90% use case. But the 10% is still valid. There might be people who still need something a little bit more. And so, for most people, I’m hopeful that native lazy loading will be good enough for the foreseeable future.
Drew McLellan: Most of all, it’s free. A simple attribute to add, and you get all this functionality for free, which is great. If there was one thing that our listener could do, could go away and do to their site to improve their image optimization, what would it be? Where should they start?
Addy Osmani: A good place to start is understand how much of a problem this is for your site. I’d go and check out either lighthouse or pay speed insights. Go and run it on a few of your most popular pages and just see what comes out. If it looks like you’ve only got one or two small things to do, that’s fantastic. Maybe you can put some time in there.
Addy Osmani: If there’s a long list of things for you to do, maybe take a look at the highest opportunities that you have in there, things that say, “Oh, hey, you could save multiple seconds if you were to do this one thing.” And focus your energy there to begin with.
Addy Osmani: As we’ve talked about here, tooling for modern image formats has gotten better over time. Image CDNs can definitely be worth considering. But beyond that, there’s a lot of small steps you can take. Sometimes if it’s a small enough site, even just going and opening up Squoosh, putting a few of your images through there can be a great starting point.
Drew McLellan: That’s solid advice. Now I know it’s a smashing publication, but I really must congratulate you on the book. It’s just so comprehensive and really easy to digest. I think it’s a really valuable read.
Drew McLellan: So I’ve been learning all about image optimization. What have you been learning about lately, Addy?
Addy Osmani: What have I been learning about lately? Actually, on a slightly different topic that still has to do with images, so when I was doing my masters at college, I got really deep into computer vision and trying to understand, how can we detect different parts of an image and do wild and interesting things with them?
Addy Osmani: And a specific problem I’ve been digging into recently is I’ve been looking at pictures of myself when I was a baby or a kid. And back then, a lot of the food is my parents would take were not necessarily on digital cameras. They were Polaroids. They’re often somewhat low resolution images. And I wanted a way to be able to scale those up. And so I started digging into this problem again recently. And it led me to learn a lot more about what I can do in the browser.
Addy Osmani: So I’ve been building out some small tools that let you, using machine learning, using TensorFlow, using existing technologies, take a relatively low resolution image or illustration, and then upscale them to something that is much higher quality. So that it’s better than simply just like stretching the image out. It’s like actually filling in detail.
Addy Osmani: And that’s been kind of fun. I’ve been learning a lot about how stable web assembly is now across browser, how well you can use some of these ideas for desktop application use cases. And that’s been really fun. So I’ve been digging into a lot of web assembly recently. And that’s been cool.
Drew McLellan: It’s funny, isn’t it? When a technology comes along that turns everything you know on its head. We’ve always said that on the web, we can make images smaller. But if we’ve only got a small image, we can’t make it bigger. It’s just impossible. But now we have technology that, under a lot of circumstances, might make that possible. It’s really fascinating.
Drew McLellan: If you, dear listener, would like to hear more from Addie, you can find him on Twitter where he’s @AddieOsmani and find all his projects linked from AddyOsmani.com. The book “Image Optimization” is available both physically and digitally from Smashing right now at smashingmagazine.com. Thanks for joining us today, Addy. Do you have any parting words?
Addy Osmani: Any parting words? I have a little quirk from history that I will share with people. Tim Berners-Lee uploaded the very first image to the internet in 1992. I’m not sure if you can guess what it was, but you’ll probably be surprised. Drew, do you have any guesses?
Drew McLellan: I’m guessing a cat.
Addy Osmani: A cat. It’s a good guess, but no. This was at CERN. And the image was actually of a band called Les Horribles Cernettes, which was a parody pop band formed by a bunch of CERN employees. And the music they would do is like doo-wop music. And they would sing love songs about colliders and quirks and liquid nitrogen and anti-matter wearing sixties outfits, which I found just wonderful and random.