Twitter’s div Soup and Uglyfied CSS, Explained

When I came up in web development (2005-2010 were formative years for me), one of the first lessons I learned was to have a clean foundation of HTML. “What Beautiful HTML Code Looks Like” is actually one of the most popular posts on this very site. The image in that post made its way to popular pages on subreddits every once in a while.
Now, while I still generally write HTML like that by default when working on sites like this one, I also work on projects that don’t have HTML output like that at all. I don’t work on Twitter, but here’s what you might see when opening up DevTools and inspecting the DOM there:
Nobody would accuse that of being “clean” HTML. In fact, it’s not hard to imagine criticism being thrown at it. Why all the divs! divitis!! Is that seriously a
What’s probably closer to the truth is that it doesn’t actually matter that much. It’s not that semantics don’t matter. It’s not that accessibility doesn’t matter. It’s not that performance doesn’t matter. It’s that this output actually does things fairly well, or at least as well as they intend to do them.
Giuseppe Gurgone gets into the details.
React Native for Web provides cross platform primitives that normalize inconsistencies and allow to build web applications that are, among other things, touch friendly.
To the eyes of somebody who’s not familiar with the framework, the HTML produced by React Native for Web might look utterly ugly and full of bad practices.
That DOM actually does produce an accessibility tree that is expected and usable. The
That’s not to say all is the only criticism. You could argue that robotic class names don’t allow for user stylesheets that may assist with accessibility. You could argue the superfluous divs make for an unnecessarily heavy DOM. You could argue that shipping robot barf makes the web less learnable, particularly without sourcemaps.
There are things to talk about, but just seeing a bunch of divs with weird class names doesn’t mean it’s bad code. And it’s not limited to React Native either, loads of frameworks have their own special twists in what they actually ship to browsers, and it’s almost always in service of making the site work better in some fashion, not to serve in teaching or readability.
Direct Link to Article — Permalink
The post Twitter’s div Soup and Uglyfied CSS, Explained appeared first on CSS-Tricks. You can support CSS-Tricks by being an MVP Supporter.
Getting Your `head` Straight: A New CSS Performance Diagnostics Snippet

There are plenty of ways to detect performance bottlenecks and audit CSS. We can look into common performance bottlenecks and the complexity of stylesheets, the way we load assets, and the order in which it happens.
One helpful way to spot common problems easily is to use some sort of a performance diagnostics CSS — a dedicated stylesheet that highlights potential problems and errors.
Today, during his talk at Webexpo Prague 2021, Harry Roberts, a web performance consultant and front-end engineer, introduced a little helper that helps him spot common performance bottlenecks easily. And that is mostly related to the order of how assets are loaded in the .
As Harry says,
“I spend a lot of my time looking through clients’
tags to ensure everything in there is in the best possible shape it can be. There are a lot of complex and often conflicting rules that constitute ‘good’tags, and cross-referencing everything can soon grow unwieldy, so to make my life easier, I developed ct.css — a quick and dirty way of seeing inside of your.”
ct.css is a little diagnostic snippet, named after Computed Tomography (CT) scans, that exposes potential performance issues in your page’s tags, and will disappear as soon as you’ve fixed them.
Harry has put all the insights he’s learned from his performance work to a perfect order, and the tool exposes some of the issues that often result from a suboptimal arrangement of tags.

With the bookmarklet in the browser’s toolbar, browse to a website of your choice, click or activate the bookmarklet, and the tool highlights useful pointers for you to double-check when working around performance bottlenecks. Just a little helper to make your work a bit easier, and find all those hidden issues faster.
If you just want to play with the snippet, you can get it at csswizardry.com/ct. Happy debugging, everyone!
7 Tips for Transforming CX with Live Chat

Not so long ago, customers only had a couple of ways to interact with brands.
If you had an issue with a product or service, you could reach out through the customer service phone number or send an email. Occasionally, sites would introduce dedicated forms on their website that allowed consumers to send support tickets straight to the service desk – but that was it.
The problem with this kind of service was all the waiting.
Send an email or ticket, and you have no idea when the company is going to get back to you. Customers end up refreshing their inbox all day, waiting for a response. Call the company, and 9 times out of 10, you’ll be placed on hold. You can’t exactly do much when you’re stuck listening to hold music, so customers are gradually getting more frustrated as they wait for a response.
Fortunately, the evolving digital age has introduced a new solution: live chat.
Transforming Your CX With Live Chat
Live chat is a quick and convenient way for your customers to contact your business and get a response immediately. The result is happier clients, better customer satisfaction scores, and even opportunities for bigger sales.
More than 41% of customers say they expect to see live chat on a site.
Even if you don’t have an agent on hand to answer a chat message immediately, you can create an automated system that notifies your customer when someone is available. That means they can go and do other things while they’re waiting for a response. Live chat solutions with bots can even allow your customers to fix problems for themselves. That’s pretty convenient!
Widgets equipped with answers to commonly asked questions can automatically deal with customer queries or help them find solutions to their problems before passing them over to an agent. This means that your customer gets a solution faster, and your agents don’t have as much pressure to deal with. It’s a win-win – as long as you get it right.
Unfortunately, a lot of companies don’t know how to implement live chat experiences correctly.
Kayako’s study into 400 customers found that 47% couldn’t remember the last time they’d had a positive experience through a live chat tool.
How to Upgrade Live Chat CX
The evidence shows that customers love the idea of live chat, but the reality of how businesses implement this technology isn’t always ideal.
However, since 86% of customers say they’re willing to spend more on a better customer experience, it’s worth figuring out what separates a good live chat interaction from a bad one.
1. Set Expectations Instantly
Setting the right expectations is crucial if you want to generate better satisfaction for your customers at a later date. When customers know what to expect from your live chat strategy, they can also make more informed decisions about which support channels they’re going to use, and whether they want to hang around for someone to answer their messages.
The first thing you should do is showcase your agent’s availability. In this example from Help Scout, you can see whether the team is active, online, and ready to talk. The company also sets expectations for how quickly you can get an email response if you don’t want to chat.
Other ways to set expectations include:
- Showing your opening hours: List when team members are usually available to answer questions if you’re not currently online.
- Topics: Offer your customers some topics that they can ask about or use the welcome message on your chat tool to direct your customers to an FAQ page.
- Restrictions: If there’s anything you can’t deal with over live chat, like changing a customer’s password, let them know in advance so they don’t waste time.
2. Leverage Pre-Chat Forms
Pre-chat forms are some of the most important parts of the live chat experience. They ask your customer to explain their issue to your chatbot so that they can be directed towards the right agent. Using these forms correctly ensures that your agent has all the information they need to solve a problem fast.
You can even set up automated systems that direct customers to different agents and teams based on their needs. For instance, the live chat app on Outgrow.co gives customers the option to fill out different forms depending on whether they want answers to a question, a demo, or something else.
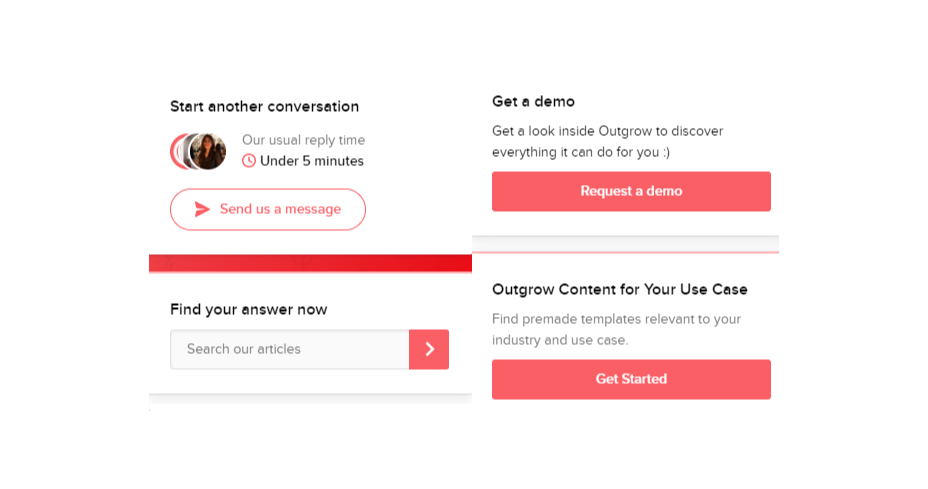
The button you click on dictates which professional you’ll get through to. Although filling out a form can seem like an extra friction point for your customer at first, it helps to streamline the customer journey. After all, if you can direct the customer to the right agent the first time, there are fewer chances that they’ll need to explain their issue to various different people.
Here are a few things you can ask for in the live chat form to make it more effective:
- The customer’s name: This will help to personalize the conversation. It could also be an opportunity to track down any background information you have about an existing customer and the orders that they may want to speak to you about.
- An email address: Having an email address will allow you to bring up a customer’s record on your CRM. It also means that you can send any information that the customer needs to their email inbox at the end of the conversation.
- A brief explanation: Ask your customers to share what they’re reaching out to you about and use keywords in their message to assign the chat to the right agent or professional. You could even add a drop-down menu of topics for them to choose from.
Remember, don’t ask for too much information straight away, or you’ll risk your clients feeling that the service experience is too complicated.
3. Make Sure It Works Everywhere
We’ve reached the point now where every customer expects a brand’s website to be responsive on any device. Most web-building templates automatically work on mobile tablets and smartphones. Additionally, it’s becoming increasingly easy for companies to transform their website and online store experiences into dedicated apps too.
However, while most businesses know that their site needs to be responsive, they often forget about the mobile element when it comes to live chat. If your live chat function is only available on the web browser version of your website, then this is going to end up making your mobile customers pretty unhappy. They don’t want to have to stop browsing on their phone just to connect with you.
Ideally, you’ll want to create a separate component for your mobile app where your customers can easily access the same live chat functions they’d have on your browser-based site.
If you’re just offering live chat through a mobile version of your website, make sure that it’s easy for your customer to click into the chat section and send messages without accidentally ending up on a different tab or page. It might also be worth setting up functions that allow your chat app to send push notifications to your customer’s phone whenever they get a new message.
Being able to put their smartphone down or switch to another app while they wait for a response will provide a much more intuitive experience for your audience.
4. Make Sure You Support All the Right Languages
You’d think that this CX tip for live chat would be obvious, but it’s shocking how many companies fail to offer support for all the languages that their customers might use. If you’re selling your products throughout the world, and you know you have customers in China, then it doesn’t make much sense to only offer live chat in English.
Some of the available live chat apps on the market today come with features that allow you to automatically translate languages when your agents are talking to foreign customers. For instance, LiveChat currently supports 45 languages.
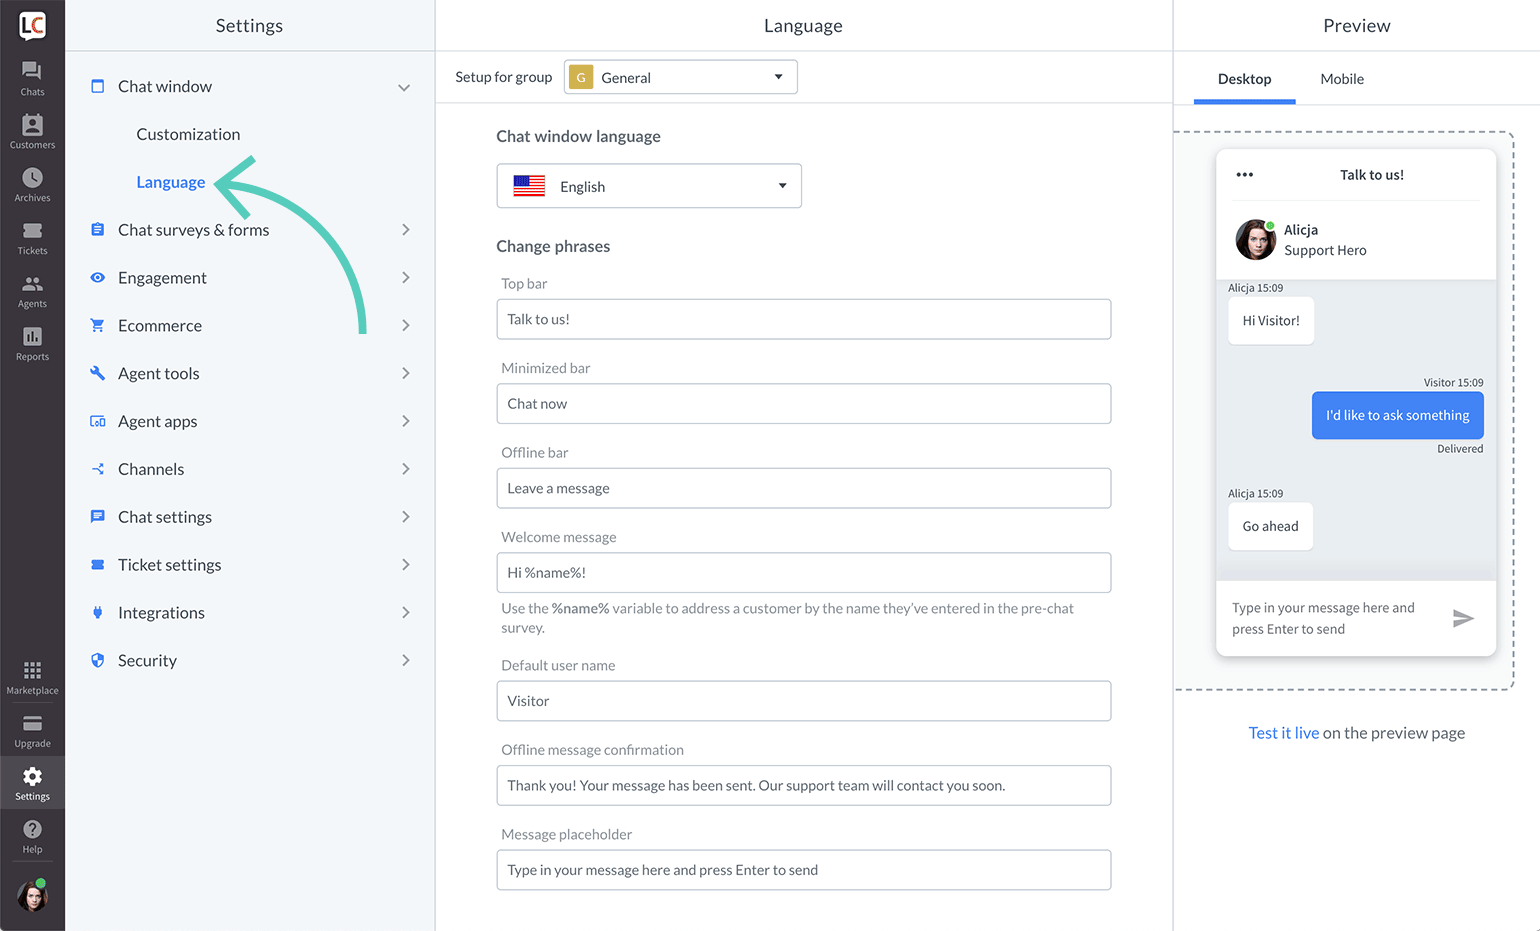
If you’re creating your own chat app from scratch, then you’re going to need to work with your developer or designer to make sure that the right languages are supported. Remember, you don’t have to cover everything, but at least make sure that you can connect with the most common groups of customers in your CRM.
Ensure that if you are using multiple languages, your customers know how to switch to their preferred option too. Usually, the best way to do this is with a drop-down menu. You could also use little flag icons of the countries that you support.
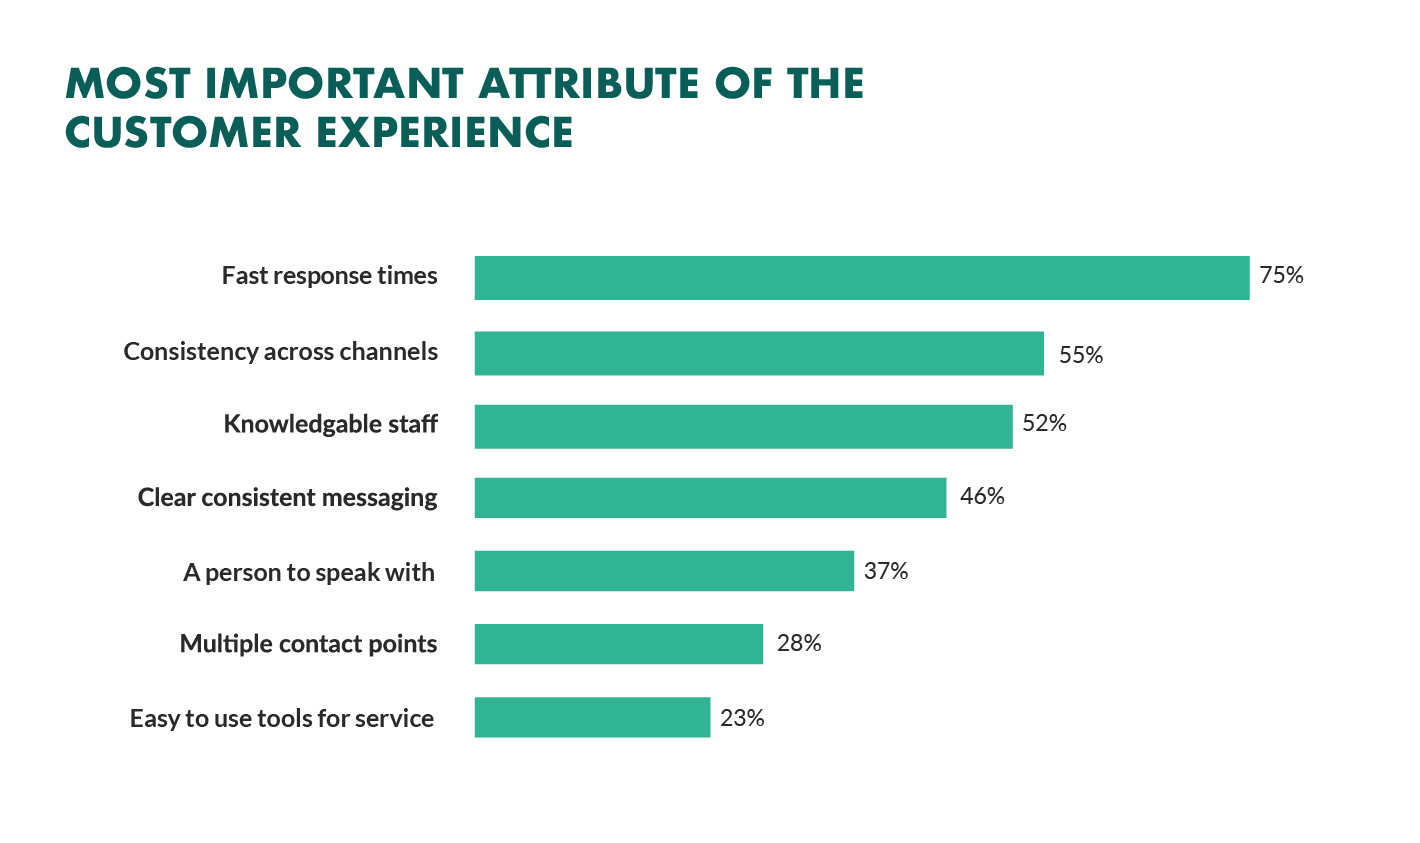
5. Find Ways to Reduce First Response Time
Speed is probably one of the biggest advantages of live chat, and the main reason that customers like it so much. According to the CMO council, fast response time is the number one thing that a customer looks at when measuring satisfaction.
While you might not be able to have someone on-hand to answer your customers 24/7, you can improve the way they perceive your load times in a variety of ways. For instance, start by making it clear when your people are online to talk to your customers. Setting expectations on when you’ll be available to immediately respond should help to avoid frustration.
- Keep all chats in the same place for agents: Having a combined contact center solution on the back-end makes responding to queries much easier for your agents. If they can see all of your brand’s live chat, social, and email conversations in one place, they don’t have to waste time jumping between different platforms and tabs.
- Set routing queues: Use an automated system to send every message you get to the most appropriate agent available. You can intelligently route conversations based on the issues that your customers have or the things they want to discuss. It’s also worth ensuring that your system prioritizes routing conversations to the first agent available.
- Send notifications: Make sure that you set your live chat system up to send push notifications to agents when a new message is waiting. It’s also with notifying your customer when they have a response, just in case they’ve switched to another tab.
The notifications you send to your agents could come with access to a customer’s CRM file, so that your agent can go into a conversation with the context they need. Agents that instantly get context on a conversation don’t have to waste as much time tracking down the right information. Giving your agents context also means that they don’t have to ask repetitive questions, which could annoy your customer.
6. Make the Chat Experience On-Brand
Every company wants to give their customer a slick experience with live chat. The solution you build needs to be easy to use, and responsive across every device. However, it also needs to be something that your customer associates with your brand.
Companies generally have a lot of options for how a live chat window can look. You can adjust the appearance to suit your brand by picking specific colors, tweaking button shapes, and even changing the available fonts.
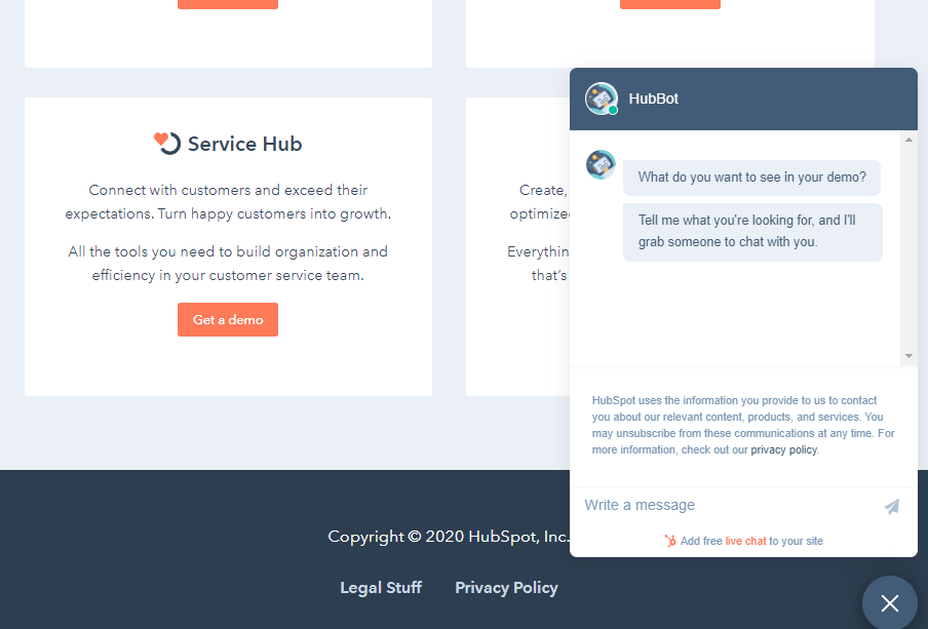
Working the visual elements of your brand into the design of the live chat experience is the best way to make your customers feel comfortable and confident that they’re dealing with your company. For instance, Hubspot uses matching colors, rounded edges on chat bubbles, and even a fun illustration to make their chat experience more “branded.”
Remember, when you’re creating a Live Chat experience that’s “on brand”, it’s also a good idea to think about things like voice and tone. Infusing live chat with the unique personality of your brand will make the experience more memorable.
If you usually stick with informal language and use a lot of slang, then it makes sense to continue that in live chat – even when you’re sending automated messages. To make sure your brand identity really shines through:
- Write scripts for your automated messages in your brand’s tone of voice
- Write guidance scripts for employees that highlight your tone for agents
- Provide training on brand tone of voice for your support team
- Encourage support agents to connect with customers on a personal level
- Remember to set guidelines on how to use things like gifs, slang, and emojis too!
7. Make a Checklist For Security and Tech Issues
One of the most significant things that will affect the experience your customer has with your live chat service, is technical and security issues. Choose the right developer or designer to help with your app, and the risk of problems dwindle. You can also address the issue of having to constantly maintain, check, and update your live chat experience by using a pre-existing solution, like Intercom.
No matter how you choose to approach live chat, these are the things you’ll need to check for most:
- Page load times: Page load times are crucial for user experience and SEO, so you should be taking them seriously already. Check your web chat software isn’t dragging down the performance of your page or causing unnecessary problems.
- Cross-channel conversations: If your website has various subdomains, make sure that moving through these in chat won’t mean you lose the session. Customers don’t want to have to repeat themselves!
- Functionality with browsers: Your chat app needs to work just as well on every browser and operating system – including mobile devices.
- Data management: Under things like GDPR, you need to ensure that you’re controlling user information safely. Ensure you have a DPA in place, and make sure that your web channel doesn’t affect any PCI-DSS compliance systems you have in place. Your chat solution may need to automatically mask credit card information, for instance.
Time to Enhance Your Live Chat Strategy
Ultimately, whether you like it or not, your customers love live chat technology, and they’re not going to stop looking for it on your website. Today’s consumers expect you to serve their interests by delivering customer support on the channels that they choose. Unfortunately, most companies just aren’t living up to expectations.
Following the tips above could help you to transform the way that you interact with your clients and improve your chances of better satisfaction overall.
The post 7 Tips for Transforming CX with Live Chat first appeared on Webdesigner Depot.
How to Implement Logging in a Node.js Application With Pino-logger

Logging, on its own, is a key aspect of any application. Logging helps developers comprehend what it is that their code is doing. It also helps save developers hours of debugging work. This tutorial is about implementing logging in a Node.js application using Pino-logger.
With logging, you can store every bit of information about the flow of the application. With Pino as a dependency for a Node.js application, it becomes effortless to implement logging, and even storing these logs in a separate log file. And its 7.8K stars on GitHub are a testament to that.
In this guide:
- You will study how to configure logging services with different logging levels.
- You will learn how to prettify the logs in your terminal as well as whether or not to include the JSON response in your logs.
- You will see how to save these logs in a separate log file.
When you’re done, you’ll be able to implement logging with coding-best practices in your Node.js application using Pino-logger.
Prerequisites
Before following this tutorial make sure you have:
- Familiarity with using Express for a server.
- Familiarity with setting up a REST API without any authentication.
- An understanding of command-line tools or integrated terminals in code editors.
Downloading and installing a tool like Postman is recommended for testing API endpoints.
Step 1: Setting up the project
In this step, you set up a basic Node.js CRUD application using Express and Mongoose. You do this because it is better to implement logging functionality in a codebase that mimics a real-world application.
Since this article is about implementing the logger, you can follow “How To Perform CRUD Operations with Mongoose and MongoDB Atlas” to create your basic CRUD application in Node.js.
After completing that tutorial, you should be ready with a Node.js application that includes create, read, update, and delete routes.
Also, at this point. You can download nodemon so that each time you save changes in your codebase, the server automatically restarts and you don’t have to manually start it again with node server.js.
So, write this command in your terminal:
npm install -g --force nodemonThe -g flag depicts that the dependency is installed globally and, to perform something globally, you are adding the --force flag in the command.
Step 2: Installing Pino
In this step, you install the latest versions of dependencies required for the logging. These include Pino, Express-Pino-logger, and Pino-pretty. You need the following command in your command-line tool from the project’s root directory.
npm install pino@6.11.3 express-pino-logger@6.0.0 pino-pretty@5.0.2At this point, you are ready to create a logger service with Pino.
Step 3: Creating the logger service
In this step, you create a Pino-logger service with different levels of logs, like warning, error, info, etc.
After that, you configure this logger-service in your app using Node.js middleware. Start by creating a new services directory in the root folder:
mkdir servicesInside of this new directory, create a new loggerService.js file and add the following code:
const pino = require('pino')
module.exports = pino({})
This code defines the most basic logger service that you can create using Pino-logger. The exported pino function takes two optional arguments, options, and destination, and returns a logger instance.
However, you are not passing any options currently because you will configure this logger service in the later steps. But, this can create a little problem with this logger-service: the JSON log that you will see in a minute is not readable. So, to change it into the readable format, you mention the prettyPrint option in the exported pino function and, after that, your loggerService.js file should look something like this:
const pino = require('pino')
module.exports = pino(
  {
    prettyPrint: true,
  },
)
Configuring your loggerService is covered in later steps.
The next step to complete this logger service is to add the following lines of code in your server.js file in the root directory:
const expressPinoLogger = require('express-pino-logger');
const logger = require('./services/loggerService');
In this code, you are importing the logger service that you just made as well as the express-pino-logger npm package that you installed earlier.
The last step is to configure the express-pino-logger with the logger service that you made. Add this piece of code after const app = express(); in the same file:
// ...

const loggerMidlleware = expressPinoLogger({
  logger: logger,
  autoLogging: true,
});

app.use(loggerMidlleware);

// ...
This code establishes a loggerMiddleware creation using the expressPinoLogger. The first option passed in the function is the logger itself that depicts the loggerService that you created earlier. The second option is autoLogging that can take either true or false as value. It specifies whether you want the JSON response in your logs or not. That’s coming up.
Now, finally, to test the loggerService, revisit your foodRoutes.js file. Import the loggerService with this code at the top:
const logger = require('../services/loggerService')Then, in the GET route controller method that you created earlier, put this line of code at the start of the callback function:
// ...

app.get("/food", async (request, response) => {
  logger.info('GET route is accessed')
  // ...
});

// ...
The info method is one of the default levels that comes with Pino-logger. Other methods are: fatal, error, warn, debug, trace or silent.
You can use any of these by passing a message string as the argument in it.
Now, before testing the logging service, here the complete code for the server.js file up to this point:
const express = require("express");
const expressPinoLogger = require('express-pino-logger');
const logger = require('./services/loggerService');
const mongoose = require("mongoose");
const foodRouter = require("./routes/foodRoutes.js");
const app = express();
// ...
const loggerMidleware = expressPinoLogger({
  logger: logger,
  autoLogging: true,
});
app.use(loggerMidleware);
// ...
app.use(express.json());
mongoose.connect(
  "mongodb+srv://madmin:<password>@clustername.mongodb.net/<dbname>?retryWrites=true&w=majority",
  {
    useNewUrlParser: true,
    useFindAndModify: false,
    useUnifiedTopology: true
  }
);
app.use(foodRouter);

app.listen(3000, () => {
  console.log("Server is running...");
});
Also, don’t forget to restart your server:
nodemon server.jsNow, you can see the log in your terminal. Test this API route endpoint in Postman, or something like that to see it. After testing the API, you should see something like this in your terminal:
This provides a lot of information:
- The first piece of the information is the log’s timestamp, which is displayed in the default format, but we can change it into something more readable in later steps.
- Next is the
infowhich is one of the default levels that comes with Pino-logger. - Next is a little message saying that the request has been completed.
- At last, you can see the whole
JSONresponse for that particular request in the very next line.
Step 4: Configuring the logs
In this step, you learn how to configure the Logger service and how to prettify the logs in your terminal using pino-pretty along with built-in options from the pino package you installed earlier.
Custom levels
At this point, you know that the pino-logger comes with default levels of Logging that you can use as methods to display Logs.
You used logger.info in the previous step.
But, pino-logger gives you the option to use custom levels. Start by revisiting the loggerService.js file in your services directory. Add the following lines of code after you have imported the pino package at the top:
// ...
const levels = {
  http: 10,
  debug: 20,
  info: 30,
  warn: 40,
  error: 50,
  fatal: 60,
};
// ...
This code is a plain JavaScript object defining additional logging levels. The keys of this object correspond to the namespace of the log level, and the values should be the numerical value of that level.
Now, to use this, you have to specify all that in the exported Pino function that you defined earlier. Remember that the first argument it takes is an object with some built-in options.
Rewrite that function like this:
module.exports = pino({
  prettyPrint: true,
  customLevels: levels, // our defined levels
  useOnlyCustomLevels: true,
  level: 'http',
})
In the above code:
- The first option,
customLevels: levels, specifies that our custom log levels should be used as additional log methods. - The second option,
useOnlyCustomLevels: true, specifies that you only want to use yourcustomLevelsand omit Pino’s levels.
/explanation To specify second option, useOnlyCustomLevels, Logger’s default level must be changed to a value in customLevels. That is why you specified the third option.
Now, you can again test your loggerService and try using it with one of your customLevels. Try it with something like this in your foodRoutes.js file:
// ...

app.get"/foods", async (request, response) => {
    logger.http('GET route is accessed')
});

// ...
/explanation Don’t forget to make the autoLogging: false in your server.js file because there is no actual need for the irrelevant JSON response that comes with it.
const pino = require('pino')
const levels = {
  http: 10,
  debug: 20,
  info: 30,
  warn: 40,
  error: 50,
  fatal: 60,
};
module.exports = pino(
  {
    prettyPrint: true,
    customLevels: levels, // our defined levels
    useOnlyCustomLevels: true,
    level: 'http',
  },
)
You should get something like this in your terminal:

And, all the unnecessary information should be gone.
Pretty printing the Logs
Now you can move ahead and prettify the logs. In other words, you are adding some style to the terminal output that makes it easier (or “prettier”) to read.
Start by passing another option in the exported pino function. Your pino function should look something like this once that option is added:
module.exports = pino({
  customLevels: levels, // our defined levels
  useOnlyCustomLevels: true,
  level: 'http',
  prettyPrint: {
    colorize: true, // colorizes the log
    levelFirst: true,
    translateTime: 'yyyy-dd-mm, h:MM:ss TT',
  },
})
You have added another option, prettyPrint, which is a JavaScript object that enables pretty-printing. Now, inside this object, there are other properties as well:
colorize: This adds colors to the terminal logs. Different levels of logs are assigned different colors.levelFirst: This displays the log level name before the logged date and time.translateTime: This translates the timestamp into a human-readable date and time format.
Now, try the API endpoint again, but before that, make sure to put more than one logging statement to take a look at different types of logs in your terminal.
// ...

app.get("/foods", async (request, response) => {
  logger.info('GET route is accessed')
  logger.debug('GET route is accessed')
  logger.warn('GET route is accessed')
  logger.fatal('GET route is accessed')

// ...
You should see something like this in your terminal:

At this point, you have configured your logger service enough to be used in a production-grade application.
Step 5: Storing logs in a file
In this last step, you learn how to store these logs in a separate log file. Storing logs in a separate file is pretty easy. All you have to do is make use of the destination option in your exported pino-function.
You can start by editing the pino-function by passing the destination option to it like this:
module.exports = pino(
  {
    customLevels: levels, // the defined levels
    useOnlyCustomLevels: true,
    level: 'http',
    prettyPrint: {
      colorize: true, // colorizes the log
      levelFirst: true,
      translateTime: 'yyyy-dd-mm, h:MM:ss TT',
    },
  },
  pino.destination(`${__dirname}/logger.log`)
)
pino.destination takes the path for the log file as the argument. The __dirname variable points to the current directory, which is the services directory for this file.
/explanation You added the logger.log file in your path even though it doesn’t exist yet. That’s because the file is created automatically when saving this file. If, for some reason, it does not create the file, you can create one manually and add it to the folder.
Here is the complete loggerService.js file:
const pino = require('pino')
const levels = {
  http: 10,
  debug: 20,
  info: 30,
  warn: 40,
  error: 50,
  fatal: 60,
};
module.exports = pino(
  {
    customLevels: levels, // our defined levels
    useOnlyCustomLevels: true,
    level: 'http',
    prettyPrint: {
      colorize: true, // colorizes the log
      levelFirst: true,
      translateTime: 'yyyy-dd-mm, h:MM:ss TT',
    },
  },
  pino.destination(`${__dirname}/logger.log`)
)
Test your API again, and you should see your logs in your log file instead of your terminal.
Conclusion
In this article, you learned how to create a logging service that you can use in production-grade applications. You learned how to configure logs and how you can store those logs in a separate file for your future reference.
You can still experiment with various configuring options by reading the official Pino-logger documentation.
Here are a few best practices you can keep in mind when creating a new logging service:
- Context: A log should always have some context about the data, the application, the time, etc.
- Purpose: Each log should have a specific purpose. For example, if the given log is used for debugging, then you can make sure to delete it before making a commit.
- Format: The format for all the logs should always be easy to read.
The post How to Implement Logging in a Node.js Application With Pino-logger appeared first on CSS-Tricks. You can support CSS-Tricks by being an MVP Supporter.
How to Source Content for Your Website?

Modern businesses just crave traffic. Why? The apparent reasons are higher conversation and greater recognition within the Internet.
In this regard, many consider content marketing as a powerful strategy, especially if they have a pool of loyal readers or visitors. Yet, writing content for websites requires time, effort, and funds. In particular, it applies to quality pieces that fulfill customer’s needs, answer their inquiries, and follow SEO rules.
Many things to consider, right? Thus, websites outsource their efforts and apply effective strategies to find content for blogs on their sites.
Read on, and you will know how to get content for your website via different methods, both paid and free.
Importance of Good Content
Before all, content marketing is important for lead generation, users’ attraction, and communication. If the content is interesting for visitors, the people would remember the brand, its solution, or insights. The same applies to websites and blogs. Content is about adding to the authority and expertise that can be monetized. Considering these facts, it is no surprise that more than 50% of marketers identify this method as their top priority in marketing operations.
At the same time, for any website, it is vital to have quality content, as it makes people stick around. In particular, about 25% of people are convinced that poor content harms the blog’s credibility.
Moreover, high-quality posts are crucial for the SEO game your website is trying to follow. Since Google updates and digitalization of communication, certain content is more suitable for search engines.
It leads to the consideration of quality content as the one that will fulfill user’s inquiries, offer value, and show credibility or expertise. Besides, Google focuses on user experience, meaning quality pieces should be either comprehensive and helpful or detailed and focused. In this regard, SEO experts use free website content articles less and focus on writing content for other blogs for the sake of reputation and backlinks.
Yet, many would ask, “Where to get content for my website if I have a lack of funds and resources”? To begin with, you can become one of those free website content articles, collaborate with the writers, or use platforms. Each strategy would have its pros and cons. Nonetheless, if you want free content for your website, it means you would need to give something in return, in other words, sacrifice something.
How to Get Content For Your Website: Ways to Source It
Digital marketing offers specific opportunities for business people on the Internet. Blogs need content and news to publish; marketing brands posts’ need places to be published. It creates a specific win-win situation for publishers and brands. If the requirements are set right, both are to get dividends. For you, a website manager or owner, it means you can even get free content for your website.
In the digital world, content sourcing has become a technique that allows getting quality content for the website or blog without spending much time on content creation. However, it only sounds simple. Here is the list of the best methods that can help find content for blogs:
Allowing guest posts
The guest post strategy seems to be the most popular for content sourcing among website owners. Why? The website can set strict or flexible requirements for the publications and identify what it needs in terms of topics or publication focus. Such a method also allows you to manage the text, alter the links, and edit the piece. All power is in the hands of your website editors. Sounds great?
Yet, you need to have an excellent reputation, high traffic, and strong domain rating to attract the appropriate authors and get free content for your website. The proper writers work in a similar industry, have an audience, and some quality works. They are likely to produce high-quality content, attractive to your audience, and optimized for SEO.
Still, high requirements do not mean you would be saved from tons of low-quality posts. Thus, don’t forget to check links and plagiarism of the posts if choosing this method.
To start, you would need to make a “guest post page,” set your rules, and wait when authors or outreach specialists start biting.
Collaborating with other authors
If your website is not recognized and you need content to make it more visible, you can collaborate with other authors. How to get unique content for free or via exchange? Check these options:
- Contact the author and share exciting insights or stats so that the writer produces content for you.
- Contact a promising writer and offer them a platform for their publication.
- Contact the business looking for quality backlinks that will provide you a content piece.
These options allow you to exchange your insights, data, or reputation for quality, even unique content. At the same time, these actions require a lot of effort and can be supplementary to your primary content strategy.
However, how to find the interested writers? Imagine you know some authors that have produced the content for similar websites. You may find them by comparing SERP or watching competitors.
Then, analyze their social media or blogs; if the content is excellent, contact them via email or social media. In this regard, you can use email finders or extractors to find business email addresses in bulk on websites or LinkedIn. As writers usually work for several projects or websites, sending emails to their corporate address can be a good idea.
In the next stage, everything depends on your offer and communication. Before starting the conversation, consider the needs of their business and offer value. If it is a promising writer, offer coverage and a series of posts. In the case of insights, you can help with the report design. For a business, you can offer sponsored publication. Try to find a win-win strategy for all to get free content for your website.
Using platforms and working with agencies
Simultaneously, there are other options that can help you get the content. For instance, you can use platforms for cooperation with writers or journalists. In particular, you can resort to freelance platforms like Upwork, find the writers, and pay them for a content piece specifically designed for you. For sure, it will take time to find the right writers and funds to deliver them.
Another thing is platforms for journalists and experts. There, you can have interviews with industry leaders and produce the content. It is likely to save you some time usually spent on the research.
Notably, you can refer to writing agencies that provide ghostwriting services. Writing content for websites is their job, so they are likely to produce high-quality posts. Yet, be ready that such assistance would be expensive enough.
Moreover, the chances are that you would need to check the links that freelancers or other writers put into the text. Some of them use different posts to include the links they were paid to insert in terms of SEO. Why? Subject to uSER’s study on backlinking tactics, 10,4% of respondents use link insertion as the primary technique.
Relying on internal forces
Writing content for websites can start with your audience. For instance, you can create a forum on a subdomain or social media so that your audience would share their thoughts. It can become the place for content generation and social listening. On the one hand, you would source ideas for the posts. On the other hand, you would create a community that will help you.
Also, you can ask the most active people in the community to share their thoughts in the post. That way, you can invite your readers to publish quality posts or start a writing competition with a prize for the best writer. Your job would be just to edit the content pieces.
Lastly, many marketers use digital content software to optimize their work. Such software is to add to the creation of the content. For instance, some apply content generators. Unfortunately, they cannot produce high-quality pieces and require editing. Yet, it can generate a good intro for an article.
Others have constructors for images and infographics that allow creating visual content without designers’ help. These options are not for sourcing the content. However, if used properly, they can significantly help you in editing and content creation.
An Event Apart Full Summit! (Use Coupon AEACSST21)

(This is a sponsored post.)
The web’s premier conference is online this fall, October 11–13, 2021: An Event Apart Full Summit. If you already know how good of a conference this is (i.e. that some of the web’s biggest ideas debut at AEA) then just go buy tickets and please enjoy yourself. You can buy literally any combination of the three days. That coupon code, AEACSST21, is good for $100 off if you buy two or more days.
If you’d like to know more, just have a peek at the speaker list — every name there has changed the game in this industry for the better in their own way, including five speakers hitting the AEA stage for the first time ever. Or, read up on why you should attend.
Spanning the spectrum from climate-conscious development to design beyond the screen, and from advanced CSS to inclusive design and development, An Event Apart Online Together: Fall Summit 2021 will give you deep insights into where we are now, and where things are going next.

Direct Link to Article — Permalink
The post An Event Apart Full Summit! (Use Coupon AEACSST21) appeared first on CSS-Tricks. You can support CSS-Tricks by being an MVP Supporter.
How To Build Your Own Mouseless Development Environment

Once upon a time, in the magical land of Software development, there was a young developer, your humble servant, discovering Linux for the first time. Suddenly, I had access to the Linux shell, a tool offering many ways to automate everything I didn’t want to do again and again.
But Ubuntu wasn’t without drawbacks. I was often the victim of display bugs and crashes, and it was getting slower and slower as time passed.
One day, something terrible happened: I had to update Ubuntu to its next major version. Everything crashed. I couldn’t start my system anymore. I had no idea how I could solve the problems I was facing because I had no idea how Linux was working under the hood. Ubuntu was abstracting all the nitty-gritty for me not to care about it.
I had to reinstall everything manually — Ubuntu and all my tools. The worst part was reconfiguring everything. All and all, it took me days to get back to the system I had before the crash. But I didn’t know any other alternative, so I kept using Ubuntu for years. During this time, I’ve never managed to update it to its next major version without the need to reinstall everything manually, again and again.
My life as a developer changed again when my company hired two great developers. They knew a lot about Linux and the different distributions I could use. They guided me, showed me the tools which solved all the problems I had with Ubuntu. These tools improved my workflow drastically; they showed me how practical it was for a developer to keep the hands on the keyboard as much as possible.
This happened six years ago. I still use the same development environment today. I use the keyboard 92.8% of the time to manage all my tools, using keystrokes that make sense and which are easy to remember. I can reinstall my whole system with a bunch of scripts I’ve written, including all the tools I use and their configurations.
Today, I’d like to share with you these tools so that you too can increase your efficiency and your comfort in your daily job. They work well together — shaping what I call my Mouseless Development Environment. More precisely, we’ll discuss:
- Why using the Linux shell can be very powerful when working with plain text (including code);
- Why using the dreaded Arch Linux;
- The advantage of a tiling window manager;
- How to have a great terminal experience with URxvt, tmux, and tmuxp;
- Why Vim can become your best friend.
Note: The tools I advocate in this article work on Linux-based systems. You can also use them with macOS except for i3. For Windows, the easiest way is to use the Windows Linux Subsystem (WSL) to install and use them.
I would have never discovered this new way of working without trying these tools. That’s why I encourage you to install them, experiment with them, and see by yourself if you fall in love as I did.
Mouseless With The Shell
As a developer, it’s almost impossible to avoid using a shell. This is a powerful tool that can simplify your workflow by automating away all the boring tasks.
The Benefits Of The Shell
Before speaking about the benefits of using the shell and the terminal, let’s explain briefly what’s the difference between these two ideas.
The terminal is a graphical interface that allows you to interact with the shell. On Linux, this shell is often Bash, but it can be another one too, e.h. Zsh. The shell is an interpreter. You can feed it with commands and it will execute them to perform some actions. It will also, sometimes, give you an output back. The terms “command-line” and “shell” are synonyms.
If we would compare the Mouseless Development Environment to the solar system, the shell would be the sun and everything else would turn around it. It’s because the shell is really powerful: it allows you to run many small programs which work very well together. They’re called CLIs (Command-Line Interfaces).
The big advantage of these tools: they are very simple and limited in isolation, but you can chain them for powerful results. For example, you can use altogether the CLIs “history”, “sort”, “uniq” and “head” to display the CLIs you use the most and the frequency of their use.
There are many CLIs available out there. First, because the Linux shell is around for a long time; developers had time to develop many tools and make them reliable. Second, because it’s easier to develop CLIs than GUIs (Graphical User Interfaces). Designing and implementing these graphical interfaces takes a lot more work. CLIs have only textual interfaces, which are easier to develop, to change, and to maintain.
It’s also why CLIs are fast: no need to mess up with the display and other graphical elements. It was one of my main problems with Ubuntu: its desktop environment, Unity, was quite heavy, slow, and buggy. At least in my experience. Using more GUIs on top made things worse.
Another big advantage of the command-line: you can write shell scripts to automate all the boring tasks you repeat day after day. For example, if you need to resize images to the same size very often, you can write a script for that. If you often search in some specific type of files, you can automate that too. The sky’s the limit.
CLIs have drawbacks, too. It’s a bit more daunting to use for beginners, but there are ways to get quickly what you need even if you don’t know how to use a specific CLI.
Finally, if you have some tasks to do on remote servers, you’ll often end up using the shell. They don’t have any graphical interface most of the time, so you won’t have any choice. In these cases, it’s necessary to know your way around the command-line.
A Mouseless Approach
Because the shell has a textual interface, your hands stay on your keyboard when you use it. This is something I never really considered during my first years as a developer, but it’s a big advantage.
In my experience, avoiding the hundreds of hand movements between the keyboard and the mouse saves a lot of cognitive energy. I was shocked to discover how comfortable it was when I really tried to stick to my keyboard. As a bonus, I feel like a hacker using solely my keyboard with my shell, even if I only write my shopping list! How great is that?
I have to admit, I was very skeptical about this “mouseless” idea before trying it. With the tools I describe below, I didn’t have to change all my habits from one day to another: you can use the mouse with them, too. But they really shine when they’re managed with the keyboard.
Even if it was never really proved, I also believe that staying on the keyboard makes us more efficient. As the book The Pragmatic Programmer pointed out:
“Using only keystrokes for common editing operations is more efficient than mouse or menu-driven commands because your hands never leave the keyboard.”
That being said, efficiency is not the main goal here. I love staying on my keyboard and using all these tools because I can entirely focus on the tasks at hand. It motivates me to start working and get my tasks done.
The Bedrock: Arch Linux
At the beginning of my mouseless journey, one of my new friends advised me to use Arch Linux instead of Ubuntu. Again, skepticism was creeping, doubts were invading my poor brain. Arch Linux? This horrible Linux distribution you need to install and configure entirely manually? This unstable system became a joke for many?
Sometimes, stereotypes have nothing to do with reality, and Arch Linux is the perfect example for this idea. I’ve used Windows (from 98 to 7), macOS, and I tried other Linux distributions too. My conclusion, without doubt: Arch Linux is the most stable of all.
That being said, Arch Linux it’s not a requirement for a Mouseless Development Environment. You can use all the other tools described in this article with other Linux distributions, too. You can also use them with macOS (except i3), or Windows if you have the Windows Subsystem for Linux (WSL). But, before you do so, let me tell you why you should seriously consider Arch Linux.
A Rolling Release System
Arch Linux has a rolling release system. It means that you need to update your whole system often, weekly or bi-weekly. To come back to Ubuntu, it has a long-term support system: you only need to update it a couple of times a year, or even less if you want to.
Many developers think that a rolling release system makes your development environment unstable, which explain partly the reputation of Arch Linux. But I never had a problem in six years of daily use, and my friends using it either. On another side, the advantages of a rolling system are great:
- All the applications I use are constantly up-to-date. No need to compile them manually to have the most recent version when needed.
- Updating your system often means that less changes will be introduced at once. As a result, there are less chances for crashes, too.
I told you my experience with Ubuntu and the crashes I had when updating it. I never had any problem with Arch Linux.
Everything You Need
Additionally, the repositories of Arch Linux are huge. It’s very likely that you’ll find every tool you need in there. If you don’t, you can look at the AUR (Arch User Repositories), where there is everything else. The AUR is not an official repository, so there could be some security problems with the applications found there. Again, I never had any problem with them, but it’s possible. As long as you stick to the official repositories and you don’t install everything and anything from the AUR, you won’t have any problem.
A Learning Opportunity
Let’s also mention that Arch Linux is a very minimal distribution. It doesn’t impose many useless applications when you install it. Speaking of which, you need to install the whole distribution manually using the shell. The task can feel daunting but, on the other side, you’ll learn a lot from the experience.
As I mentioned at the beginning of this article, knowing a minimum of how Linux-based systems work under the hood can help you when your system is behaving weirdly, or when it crashes. It’s not as complex as it might seem and, if you’re a developer, I would argue that it’s mandatory. The Web, your phone, or your Raspberry Pie run on Linux nowadays.
Last but not least, the Arch Wiki is the best place you can find for anything Linux-related. It helped me a lot over the years, even when I was using Ubuntu. It’s a great place for troubleshooting your system and finding new tools.
Managing Your Windows With i3
Now that we reviewed why Arch Linux can be a solid bedrock for your Mouseless Development Environment, let’s see what we can add on top.
But first, a bit of theory. Operating systems have often three layers, more or less coupled with each other:
- The kernel, which directly dabbles with the hardware of your computer;
- The shell, an interface for you, or some applications, to interact with the kernel;
- A display layer on top, like a desktop manager or a tiling windows manager.
Gnome or Unity are both desktop managers for Linux-based systems. They manage your windows and many other things, like your status bar or your application launcher. Tiling windows managers are an alternative to desktop managers, and they’re often smaller and more focused on manipulating windows.
The tiling window manager i3 is indeed very light: I’m using it right now on a ten-year-old computer (Lenovo x220) and it doesn’t slow down. It’s also simple to use, the documentation is great, and most importantly, you can manage your windows with your keyboard only (if you want to).
The basics of i3 are simple: you can open windows in different workspaces representing an entire screen. It’s very similar to the virtual desktops many Linux desktop managers have. Then, when you open your favorite applications, the screen will be automatically shared depending on the number of windows on the screen.
For example, if you open Firefox, its window will take 100% of the screen. If you open three instances of Firefox, each of them will take 33% of the screen.
You can also change the layout of the windows. Instead of having all the window visible on the screen, you can stack them on each other and go through them with a simple keystroke. If you need some “normal” floating windows, you can configure them too.
The goal of i3 is to simplify the management of all your windows. Instead of using your mouse to move them and resize them each time you open new ones, you can use keystrokes to do the same operation only when you need to.
Does it look too complicated? I was efficient with i3 two days after trying it. I’m no genius; if I could do it, you can do it, too.
The cherry on the cake: like every tool described in this article, you can customize i3 and its keystrokes as your heart’s content.
The only drawback of i3: it’s not available for macOS. But there are great alternatives, like the tiling windows manager Amethyst or Divvy.
Level Up Your Terminal With URxvt, tmux, And tmuxp
The terminal is the interface giving you access to the shell. Even if the shell is the real deal, we can make it easier to use with a couple of tools.
The Path of Simplicity With URxvt
I like simplicity, and that’s partly why I love the development environment I describe in this article. Speaking of which, URxvt is one of the simplest terminals you can find. It’s also fast and reliable. In six years, I never saw it crashing or even slowing down. It does what it’s supposed to do: allowing you to use the shell. No more, no less.
The Terminal Multiplexer With tmux
Even if I like the simplicity of URxvt, I also like having a good terminal multiplexer I can rely upon, like tmux.
What’s a terminal multiplexer? It lets you open sessions containing multiple shells. These sessions are persisted in the background: even if your terminal crashes or if you close it by accident, your shells won’t disappear. You can recover them in another terminal whenever you want (as if nothing happened).
This is useful on your local computer, but it’s even better on a remote server. You can, for example, connect to a server via SSH, run a script, close your SSH connection and your terminal on your local machine, and go home. Because your shell is still running on your server thanks to tmux, your script will still run, too.
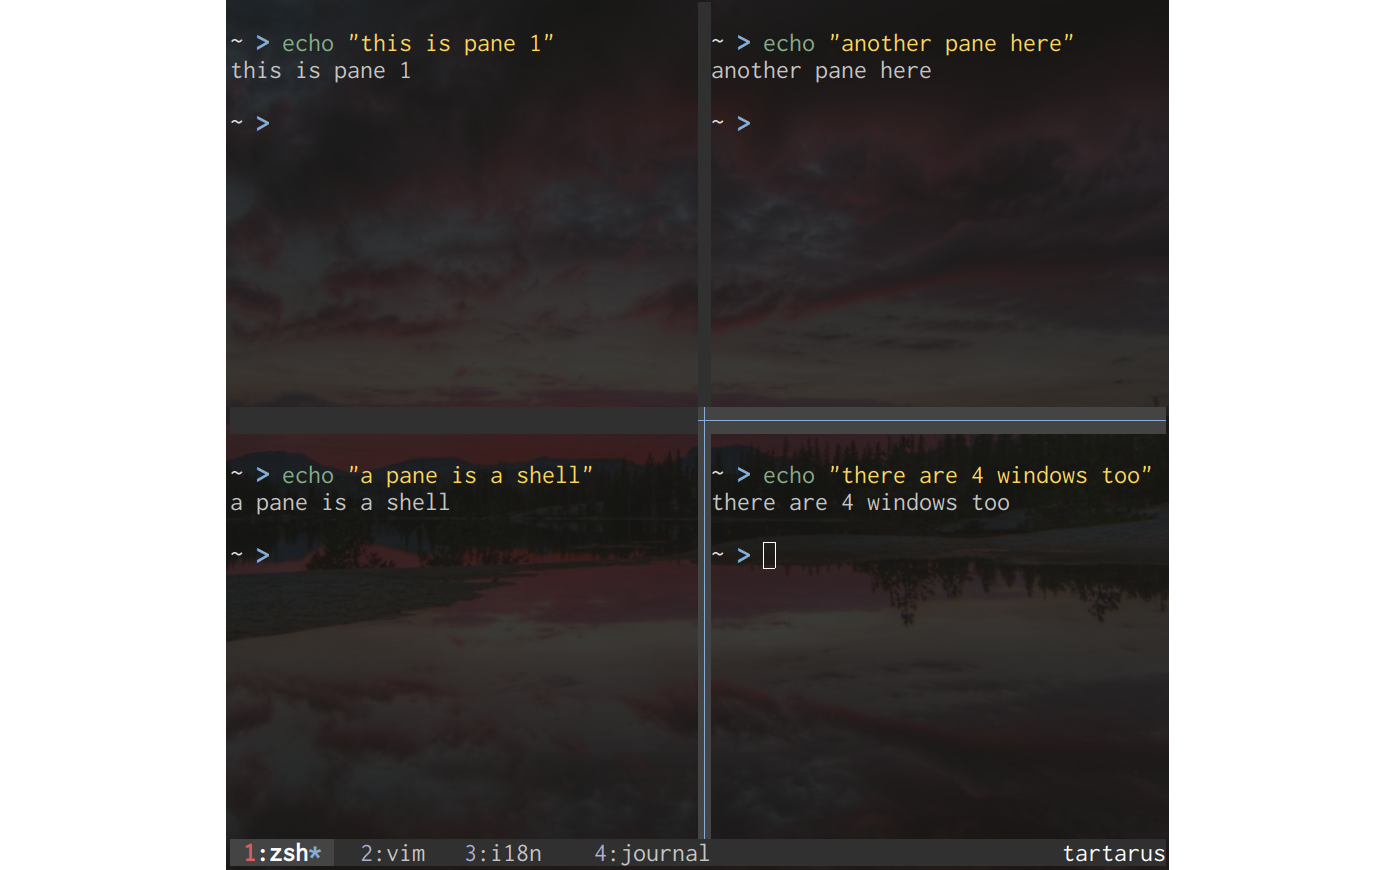
That’s not all: tmux is a bit of a jack-of-all-trades, in a good sense. You can use it to open multiple windows containing multiple panes in one terminal. You can think of a window as the entire terminal, and a pane as a shell taking a percentage of the window.
Does it remind you of i3? It follows the same principles, but it can only create new shells. That’s why many users who are happy with i3 don’t see any point in using tmux. Personally, I like to use both.
As always, you can manipulate tmux’s windows and panes with your keyboard, and you can configure tmux itself following your craziest wishes.
tmuxp
Let’s imagine that you want to use tmux for the disrupting application you’re developing right now. You need first to open a terminal. Then, you need to create as many tmux’s windows as you need and divide these windows with the panes you want.
Remember: A pane represents a shell. In each of these shells, you can then run all the CLIs you need for a specific project: for example, running a docker container, or displaying some logs.
But you can also automate all of that, and it’s where the real power of tmux — in the context of a development environment — really shines. Using another CLI called tmuxp, you can write down in a YAML configuration file what windows, panes, and whatever command you want. Then, you can load this configuration and create automatically your customized tmux session.
I have one of these configuration files for each of my projects. It saves me a lot of time and energy. As I was saying above, this is one of the major benefits of using the shell.
Editor Plus Shell Equals IDE
Since the shell is so powerful, why not have an editor directly running in it? Why not use Vim?
Like Arch Linux, Vim has the reputation to be hard to learn. It’s more subtle: it’s pretty easy to be productive with it, but it takes a long time to master. If you run Linux and you have Vim installed, you can learn the basics in 20 minutes by running vimtutor in your shell.
Vim offers many functionalities which can be extended further with countless plugins. Additionally, you can directly interact with your shell using Vim, using whatever CLI you want directly in your editor. It will transform Vim into a full-blown IDE.
Vim has another big advantage: you can use it to develop in many programming languages. I don’t like to switch between different IDEs each time I need to program in PHP, Golang, or Clojure. The interface is different, I need to configure each of these editors separately, and I can’t really save the configurations somewhere to use it again when I reinstall these tools.
With Vim, I can code in any language I want while staying in the same editor. Like VS Code, you can use LSPs (Language Server Providers) to enable auto-completion, linting, and automatic refactoring for the most common programming languages (and even more esoteric ones).
Vim is also fast. It doesn’t require many resources to run. I often have 6 or 7 instances of the editor open at all times on my old computer — without any problems. In comparison, I used IntelliJ IDEs for years and, when I was opening two of them, my whole system was beginning to slow down. It’s really practical when I work on different projects at the same time, like a bunch of microservices, for example.
Should I add that Vim is highly configurable? Instead of having many functionalities directly in your IDE (including some you’ll never use), you can choose what you exactly need and discard what you don’t.
A Set Of Coherent Keystrokes
If Arch Linux is the bedrock of my Mouseless Development Environment, then i3, Zsh, tmux, and Vim are the workbenches for my creative needs. It gives me a level of comfort I’ve never experienced with any other tools.
But you might wonder why you should use all these new tools and their keystrokes when you can already use the shortcuts for the tools you already know?
Well, the shortcuts of most applications out there are often meaningless. It’s a soup of keys that have no relations with each other. As a result, they are hard to remember, and they can be quite different from one tool to another.
The tools I describe in this article are meant to fit nicely with each other. You can almost use the same keystroke for each of them. Only one key will differ, for the system to know what tool you want to act on. It makes the different keystrokes way easier to remember.
Additionally, Vim was designed to have keystrokes that make sense by creating a simple language that you can rely upon. For example, in order to delete a word, you can hit daw. To delete a paragraph, it’s dap. Since many CLIs are based on Vim’s keystrokes, learning Vim will open the door to many other CLIs.
Installing Automatically Your Mouseless Development Environment
Installing Arch Linux manually is good to learn a lot about Linux-based systems, but it gets old when you need to do it each time you want to install your system on a new computer. That’s why I’ve created my own scripts to install my whole Mouseless Development Environment. They install Arch Linux as well as all of the tools I use with their configurations. When I need to use a new computer, I can simply run these scripts, and voila!
Are You Ready To Be A Mouseless Developer?
Because of the flexibility, I have with my development environment, I can also switch tools easily. For example, if I don’t want to use tmux anymore, I can replace it with another terminal multiplexer. If I don’t like i3’s status bar or my application launcher, I can replace them, too.
As you might have guessed, configuring this kind of system needs some time, motivation and effort. That’s why I wrote a book called “Building Your Mouseless Development Environment”. It describes in detail how to configure all the tools, how to create scripts to install the whole system with one command, and how to customize everything for your personal needs. If you don’t know much about the Linux shell, it lets you build a custom project to get familiar with it.
If you’re interested, you’ll find a sample of the book here as well as its entire table of content.
I think the best way to find out if you’d like this kind of system is simply to try it. I can guarantee you one thing: you’ll learn a lot along the way!
Further Reading on Smashing Magazine
- “I Used The Web For A Day With Just A Keyboard,” Chris Ashton
- “A Complete Guide To Mechanical Keyboards,” Ben Frain
- “Making A Strong Case For Accessibility,” Todd Libby
- “Accessibility In Chrome DevTools,” Umar Hansa
Influencer Marketing for Gen Z: 5 Tips for Success

Young and impactful. Generation Z dictates the future of digital business. This segment of consumers is now under the close attention of all innovative-thinking brands.
Gen Zers make a massive impact not only on modern marketing but also on product conceptualization and customer service. They shape an entirely new culture of online interactions between brands and consumers.
These young people make up the largest purchasing power of the future. They have specific needs, wants, and preferences – all born in the digital age. Gen Z expects brands to approach them differently than Millennials and Baby Boomers. To stay competitive now and over the next decade, companies need to learn how to market to Gen Z. Yes, influencer marketing works for them. However, there are particular “game” rules you must know to earn the trust of this generation.
Who Are Gen Z and What They Stand For
Generation Z was born between 1995 and 2012. They are ambitious, open-minded, and multicultural people that tend to embrace technology and change. The biggest difference between Gen Z and previous generations is that they have been growing along with many technologies, including Netflix, Fortnite, mobile games, and online shopping. Gen Zers are kids of social media. They literally live on these platforms, and most of their communication with friends happens online. For Gen Z, the verge between the virtual and real worlds is fully blurred.
What they like and hate
Communities. Gen Z likes communities. They gather in communities to exchange information and have fun with like-minded people. The brand can address this need by creating its own community where customers can interact with each other and feel engaged. Wherever you start your community, Telegram, Discord, or Instagram, make sure it functions as a perfect environment for communication between all members and with the brand itself.
Transparency and authenticity. Now, let’s talk about what Gen Z hates most. It’s salesy messages and undisclosed ads. This generation of consumers appreciates authentic content that tells a story. No matter where you advertise your brand, make sure you have clearly disclosed that it is sponsored content. Otherwise, they might feel like a target of a sharky advertiser.
Influencers. The power of influencers is real. Today, brands work not only with celebrities but also with micro-influencers, and there are multiple benefits of this approach. First of all, influencers can introduce your company as a friend and help you enter a loyal community. They are often treated as the industry experts and usually try out a product by themselves before promoting it to their audience. That is why people trust influencer advice and endorsements.
5 Influencer Marketing Tips to Help You Earn Gen Zer’s Trust
Embrace emerging social media
If you are wondering what these social platforms are, I would mention Instagram, TikTok, Snapchat, and Discord. Depending on the industry, some brands may also find Twitch relevant to them. It is a gaming and live-streaming platform that is on the rise today.
If your customers are Gen Zers they are surely on one of these platforms or, most likely, on all of them. Although Facebook and Twitter are still having a place in Gen Zer’s social media life, they are not the priority (unlike Instagram and TikTok which are as important to the average Gen Zer as breathing air). Connect to influencers on these platforms. It will help you deliver a brand message to the audience faster and easier.
Stay authentic and honest
One of the biggest reasons to work with influencers is that they can integrate your brand promotion in their authentic content that resonates with your target audience. Authenticity matters a lot to Gen Z. They like raw content from “real” people, so it’s better to move away from flashy professional campaigns. This is why temporary Instagram Stories and Snaps in Snapchat have become so popular among Gen Zers today.
Ensure that your ad is properly disclosed in the influencer’s content. Being transparent to your audience is a winning strategy for long-term loyalty. Followers trust influencers and perceive their product endorsements as the friend’s advice rather than the advertising. Disguising paid posts as genuine endorsements can make Gen Zers feel frustrated.
Choose influencers based on your target groups
The epoch of massive marketing is over. It’s a new age of micro marketing. Choose influencers based on your target tribes gathered around specific interests. It breaks an outdated one-size-fits-all approach and features innovative marketing based on customer-centricity. I would recommend using influencer marketing tools to perform a more precise and efficient influencer search and outreach. You can apply search filters and find influencers by a social media platform, industry, size of their community, and real engagement rate. Moreover, this practice will enable you to automate a lot of routine work and save time.
Practice what you preach
Gen Zers want to see brands practice exactly what they preach. It means that it’s not enough to say that you care about the planet. You must participate in this change. If you have started a social or environmental initiative it’s a great idea to promote it via a partnership with the influencer. It will allow you to connect with the audience emotionally and show that you are in the same tribe and deliver on the same mission.
Provide snackable content
When collaborating with the influencer, co-create highly entertaining and short-format content that takes Gen Zers straight to the point and makes them want to share. Value their time and give all the informational essence in the limited time. Whether you are creating a video ad, social media post, or blog, keep in mind that content consistency and laconism are always welcomed.
Conclusion
What I love most about Generation Z is that they are more conscious from a social and environmental perspective. They tend to do things on purpose and want to bring a change in this world. Companies should support and foster this powerful stream, as it can help us co-create a better future. I hope that these tips based on my real-life experience will help you build tighter connections with your consumers.
Resources aren’t requested by CSS, but by the DOM
This is a good tweet from Harry:
I like it because, as he says, it’s the correct way to think about it. It helps form a mental model of how websites work.
Just to spell it out a bit more…
/*
  Just because I'm in the CSS, doesn't mean I'll load!
  In order for `myfont.woff2` to load, a selector needs to
  set `font-family: 'MyWebFont';` AND something in the DOM
  needs to match that selector for that file to be requested.
*/
@font-face {
  font-family: 'MyWebFont';
  src: url('myfont.woff2') format('woff2');
}

/*
  Just because I'm in the CSS, doesn't mean I'll load!
  In order for `whatever.jpg` to load, the selector
  `.some-element` needs to be in the DOM.
*/
.some-element {
  background-image: url(whatever.jpg);
}
The post Resources aren’t requested by CSS, but by the DOM appeared first on CSS-Tricks. You can support CSS-Tricks by being an MVP Supporter.
Embracing Asymmetrical Design

I’ll never forget one of Karen McGrane’s great lessons to the world: truncation is not a content strategy. The idea is that just clipping off text programmatically is a sledgehammer, and avoids the kind of real thinking and planning that makes for good experiences.
You certainly can trucate text with CSS. A bit of overflow: hidden; will clip anything, and you can class it up with text-overflow: ellipsis; Even multiple line clamping is extremely easy these days. The web is a big place. I’m glad we have these tools.
But a better approach is a combination of actual content strategy (i.e. planning text to be of a certain length and using that human touch to get it right) and embracing asymetric design. On the latter, Ben Nadel had a nice shout to that idea recently:
Unfortunately, data is not symmetrical. Which is why every Apple product demo is mocked for showcasing users that all have four-letter names: Dave, John, Anna, Sara, Bill, Jill, etc.. Apple uses this type of symmetrical data because it fits cleanly into their symmetrical user interface (UI) design.
Once you release a product into “the real world”, however, and users start to enter “real world data” into it, you immediately see that asymmetrical data, shoe-horned into a symmetrical design, can start to look terrible. Well, actually, it may still look good; but, it provides a terrible user experience.
To fix this, we need to lean into an asymmetric reality. We need to embrace the fact that data is asymmetric and we need to design user interfaces that can expand and contract to work with the asymmetry, not against it.
Fortunately, these days, CSS has so many tools to help do that embracing of the asymetric. We’ve got CSS grid, which can do things like overlap areas easily, position image and text such that the text can grow upwards, and align them with siblings, even if they aren’t the same size.
Combine that with things like aspect-ratio and object-fit and we have all the tools we need to embrace asymetry, but not suffer problems like awkward white space and malalignment.
Direct Link to Article — Permalink
The post Embracing Asymmetrical Design appeared first on CSS-Tricks. You can support CSS-Tricks by being an MVP Supporter.
