If you are an hourly employee looking to be a salaried worker or happen to be an organization that has traditionally had hourly employees, but is now considering making them salaried, there are some points that need to be considered before making the transition.
In most cases moving an employee from hourly to salaried comes with a variety of advantages, but this may not be a universal phenomenon. You need to consider your organization’s objectives to see if this would be a right switch. Below are some of the top considerations that need to be addressed while doing the salary vs hourly comparison. The information mentioned below takes into consideration only the processes that are in effect in the United States. The process for transitioning employees in other countries may slightly differ.
Overtime
Traditionally, if you have a salaried employee, they do not qualify for overtime pay, unless they are treated as a non-exempt employee. According to the Fair Labor Standards Act (FLSA), usually hourly employees are non exempt and salaried employees are exempt from overtime pay. There are of course exceptions to this rule, but those are quite rare.
Additional Expenses
For salaried employees, organizations usually provide additional benefits like insurance, retirement plans and paid time off. These can be counted as additional expenses from an organizational perspective. Care needs to be taken to ensure that employees are satisfied with the benefits package before proceeding with the finalization of the list.
Internal promotions
Salaried employees are eligible for promotion and can expect internal growth within the organization. Many professions that are considered supervisory, professional, or managerial all fall under the salaried employee stature and are hence positions with scope for advancement. Moreover, salaried positions are overall considered more stable.
Time tracking
Salaried employees enjoy a fixed pay every month because their monthly payout is not dependent on the number of hours they worked. This means tracking their work hours is also easier because they usually have a fixed schedule that they adhere to.
Once all the above points have been considered and if you are choosing to move an hourly employee to salaried worker, below are the steps that need to be followed.
Step 1 – Analyze job duties
FLSA has a strict set of job responsibilities that fall under exempt duties. So, your employees’ duties need to be analyzed before converting them to a salaried worker. If they are continuing to do job responsibilities that are considered non-exempt, you as an organization will still have to pay them overtime hours, as the employee will be considered a non-exempt salaried employee.
Step 2 – Calculation of salary
Federal as well as Local government rules need to be checked to ensure that you are paying the mandated wages for your salaried employees. Minimum wage comes into the picture if your employee is salaried-non exempt. The federal minimum wage, or state minimum wage, whichever is higher, needs to be paid to your salaried-non exempt employees along with overtime pay not less than 1.5 times their regular pay. Otherwise, the FLSA requires wages of a minimum of $684 per week, and needs to be paid for salaried-exempt employees.
Step 3 – Employee Confirmation
Your converted employee needs to be made aware of the change in their employment type, and all the deductions/ additions that come with the transition. This can be regarding the benefits, overtime pay changes or even work timings. If there are any changes in job responsibilities, those need to be informed as well. Clear communication between the organization and employee are necessary to avoid future payroll issues and complaints. Employee buy-in is mandatory before you make any change to their contracts. Only once the employee has gone through and confirmed the new terms of employment, should you proceed with the transition.
Step 4 – Track Working Hours
For hourly workers, since their pay depends on the number of hours they work, time tracking is highly important to ensure accurate pay. For salaried employees, since their pay does not depend on the number of hours they work, they can be put on fixed schedules and need to be ensured that they are not working longer hours than necessary. Their time can be tracked purely for documentation purposes but is not as critical as it is for hourly workers. Any time tracking methods that were in use can be continued to be used to track work of employees. If you have a time billing setup for your clients, this information can be used for billing purposes. Even though payroll doesn’t need up-to-the minute time information of your salaried employees, this may be critical for your client billing setup.
Step 5 – Updating Payroll and HR Software
Most organizations have a payroll or HR software in place to manage their employee payouts. After you move your hourly employee to salaried worker, this change needs to be updated in your necessary software as well so that accurate payments are made to the employee. The employee contract also needs to be updated accordingly to ensure that the new changes have been agreed upon by both the employee as well as the organization. If you have a time tracking software in use, that also needs to be updated for the employee to take into consideration their new hours. If you are using an external vendor to manage payroll, they need to be informed accordingly to take the employment updates into consideration.
Conclusion
Though the advantages of having salaried employees are many, all the legalities revolving around the government laws need to be strictly followed before making any changes. Organizations that are found to be in violation of these laws will have to pay stiff penalties and fines along with worker compensation for their distress. If you have doubts or need clarification about labor laws and how they affect you, it is always recommended to get a legal consultation done before making any changes and to ensure you are not in violation of any rules. A strong working relationship with your employees can be the foundation for success for your organization.
Customer communication is the foundation of your business’ success and a big part of customer service.
How you treat your customers directly impacts the development of your business. When you think about it, it is logical that when customers are satisfied (and have benefits from your products or services), they will keep coming back. This, in turn, helps you attract more customers and increase your revenue and brand recognition.
Businesses start communicating with their clients from the day they start operating. Back in the day, it was a simple, two-way communication between a provider and a customer.
Nowadays, with the development of technology, things have changed in many ways.
Modern businesses use multiple communication channels – from email to website and social media ads. Unfortunately, so many possibilities come with a great risk. In fact, the cost of poor customer communication for businesses can reach up to several billion per year!
To prevent such a scenario, pay attention to the following in order to create the ultimate customer communication strategy.
Omnichannel communication
Nowadays, 74% of customers use various channels of communication in order to complete a single purchase. With this in mind, it is essential to provide a consistent experience for all of them. For example, if a client contacts you through your website, email, or your company’s social media, they should have the same experience, both in terms of content and quality.
Omnichannel communication is important in delivering a consistent experience for a customer, from pre-sales to post-sales and the process in between. Omnichannel customer communication delivers an improved customer service experience and keeps your business growing.
The important thing is to enable your customers to reach you easily. For example, you can add a call now button to your website – that’s how your clients will be able to reach you immediately. The aim is to use all of the possible channels of communication and to do that purposefully, with customer satisfaction as your primary goal.
The use of chatbots
Waiting time is listed as the main reason for the high customer bounce rate, with around two-thirds of online customers giving up on a purchase due to long waiting times. The frustration that comes with long waiting times can be reduced with the use of chatbots.
Chatbots automate the communication you have with your customers and can help you save a lot of time and resources by answering the recurring questions automatically. This means that your customers will get an immediate reply. And you’ll be able to do that 24/7 since chatbots can always be available on your website.
Most client issues can be solved with the help of a chatbot. Besides the direct effect on customer satisfaction, this is beneficial for your employees as well. With the help of a chatbot, you will provide space for your support and sales teams to use their time more efficiently. By reducing the time your agents spend on repeating simple questions, they will be able to give special care to customers that need it.
First-time customer communication
Customer loyalty is essential, and you are more likely to attract and retain loyal customers by teaching them about your products and services. Statistics are on your side: around a quarter of your customers who have a good first impression will most likely remain loyal for almost two years. Besides that, around 90% of them will spread the word about the good experience they had with their friends and family.
You can start by providing a warm welcome message that you can personalize for each of your clients and demonstrate how to get the most benefits from a service or a product that you are providing.
Many of your first-time visitors are not familiar with your business. Most probably, they have been searching for a solution to their problem and came across your website. In order to retain them, pay attention to cover the essential parts that the first-time customer interaction should have:
Personalized welcome message
Initial setup of product/service
Demonstration of the features of your product/service
Providing easy access to the knowledgebase
Successful onboarding can have a tremendous impact on customer loyalty, so you should craft educational, welcoming content. Don’t forget to personalize it and keep the human touch throughout the whole interaction with your customers.
Measuring customer satisfaction
Customer feedback is a critical input for your business, so you should take it seriously. To make the most of it, ask people for feedback from after each customer service interaction. That is how you will track your customers’ happiness and improve your service to suit their needs.
Many businesses realize the importance of satisfaction with customer service and use a couple of standardized ways to track them. One of the most common ways of measuring them is through surveys. Customers record their feedback by answering different forms of questions and provide you with real-time insights about their satisfaction.
The two most common methods are Net Promoter Score and Customer Satisfaction Score.
Net Promoter Score (NPS)
This score represents the likelihood of your customers recommending you. How to measure it?
Start by preparing a survey with a scale from 1 to 10, where your customers respond with how likely they are to recommend your business to their friends and family.
Mark the customers that respond with a score from 1 to 6 as detractors and the ones that respond with a number above 6 as promoters.
Subtract the percentage of detractors from the percentage of promoters, and you will get an NPS. For example, if 60% of the respondents were promoters and 20% of them detractors, your NPS is 40.
Customer Satisfaction Score (CSAT)
This is a score that you can directly connect with the quality of your customer support. This way, you’ll know how well you’re taking care of your customers which will allow you to explore the potential issues in depth by asking additional questions.
CSAT surveys provide a quantitative metric that shows the level of satisfaction of your customers and more importantly, qualitative feedback that explains the reasons behind it. CSAT is easy to measure:
First of all, create a simple survey and send it to your customers
Collect the responses and sum of all positive ones.
Divide the positive responses by the total responses that you have collected
Multiply the result by 100
Be proactive
Are you only interacting with your customers when they reach out to you? If yes, it’s time to change that. Don’t worry about seeming too pushy. Statistics say that customers actually love proactive customer communication. Brands that have a habit of initiating contact with their customers are rewarded both in terms of customer retention and loyalty
Start by reaching out to your customers and engaging with them. This is one of the best ways to get timely feedback and help them solve the issues before they become serious.
This way, your customers will feel more connected to your business and help you improve.
There are many ways you can achieve that, from asking for feedback to keeping your customers up to date with any changes in your company. The only things left is choosing the communication channel and the ideal frequency of reaching out.
For example, if a visitor of your website adds an item to their basket without completing a purchase, you should take action. Proactively reach out to them, check if they are facing any problems and convince them to complete the purchase.
Note: make sure that your customers agree on this in the first place. You can do this by using a subscribe button.
Practices to avoid
When speaking with your customers, you should aim to maintain a concise and honest attitude and a friendly approach. As it is essential to cover the above-mentioned, there are behaviors that you should avoid while communicating with your customers:
Sounding generic. Make sure that you address your customers by name and add a human touch to all of your interactions. Start with small changes and see how they benefit your business.
Not being true to your word. Delivering on your promises is what sets you apart from the competition and creates the credibility of your business. You must ensure that the company can follow up on the promises made to customers.
Creating delays. If you keep potential customers waiting, they are less likely to convert to consistent, loyal ones. Chatbots and responsive salespeople are effective ways to solve this issue.
Being too pushy. Or absent. You should find a sweet spot in the frequency with which you communicate to your customers. The goal should be to reach out to them consistently but make sure that you have their permission to do so first.
Conclusion
Creating successful customer communication has a lot to do with satisfying your customer’s expectations and making them feel like a part of your business. Simply answering support requests will not help you reach this goal. You need to strategize customer communication practices to improve customer service and provide unique value to your customers.
The development of effective customer communication skills should become one of your company’s primary goals. This is how you’ll create a strong brand image, attract new customers and build a satisfying relationship with the existing ones. And when your customers are happy, your whole business thrives.
Acquiring a new customer is difficult, but retaining an existing one is even more challenging. Yet, statistics show that efforts focused on retention bring way more value.
For instance, according to SmallBizGenius, 82% of companies agree that customer retention is cheaper than acquisition. Apart from that, 65% of a company’s revenue comes from existing clients, and increasing the investment in retention by only 5% already gives you a boost in profits by 25% to 95%. Impressive, right?
So what should you do to reach such results?
One component that impacts brand-client relationships is website design. This article will give you three design tricks that will encourage your customers to come back to your site more and more.
1. Rethink Your Website Structure
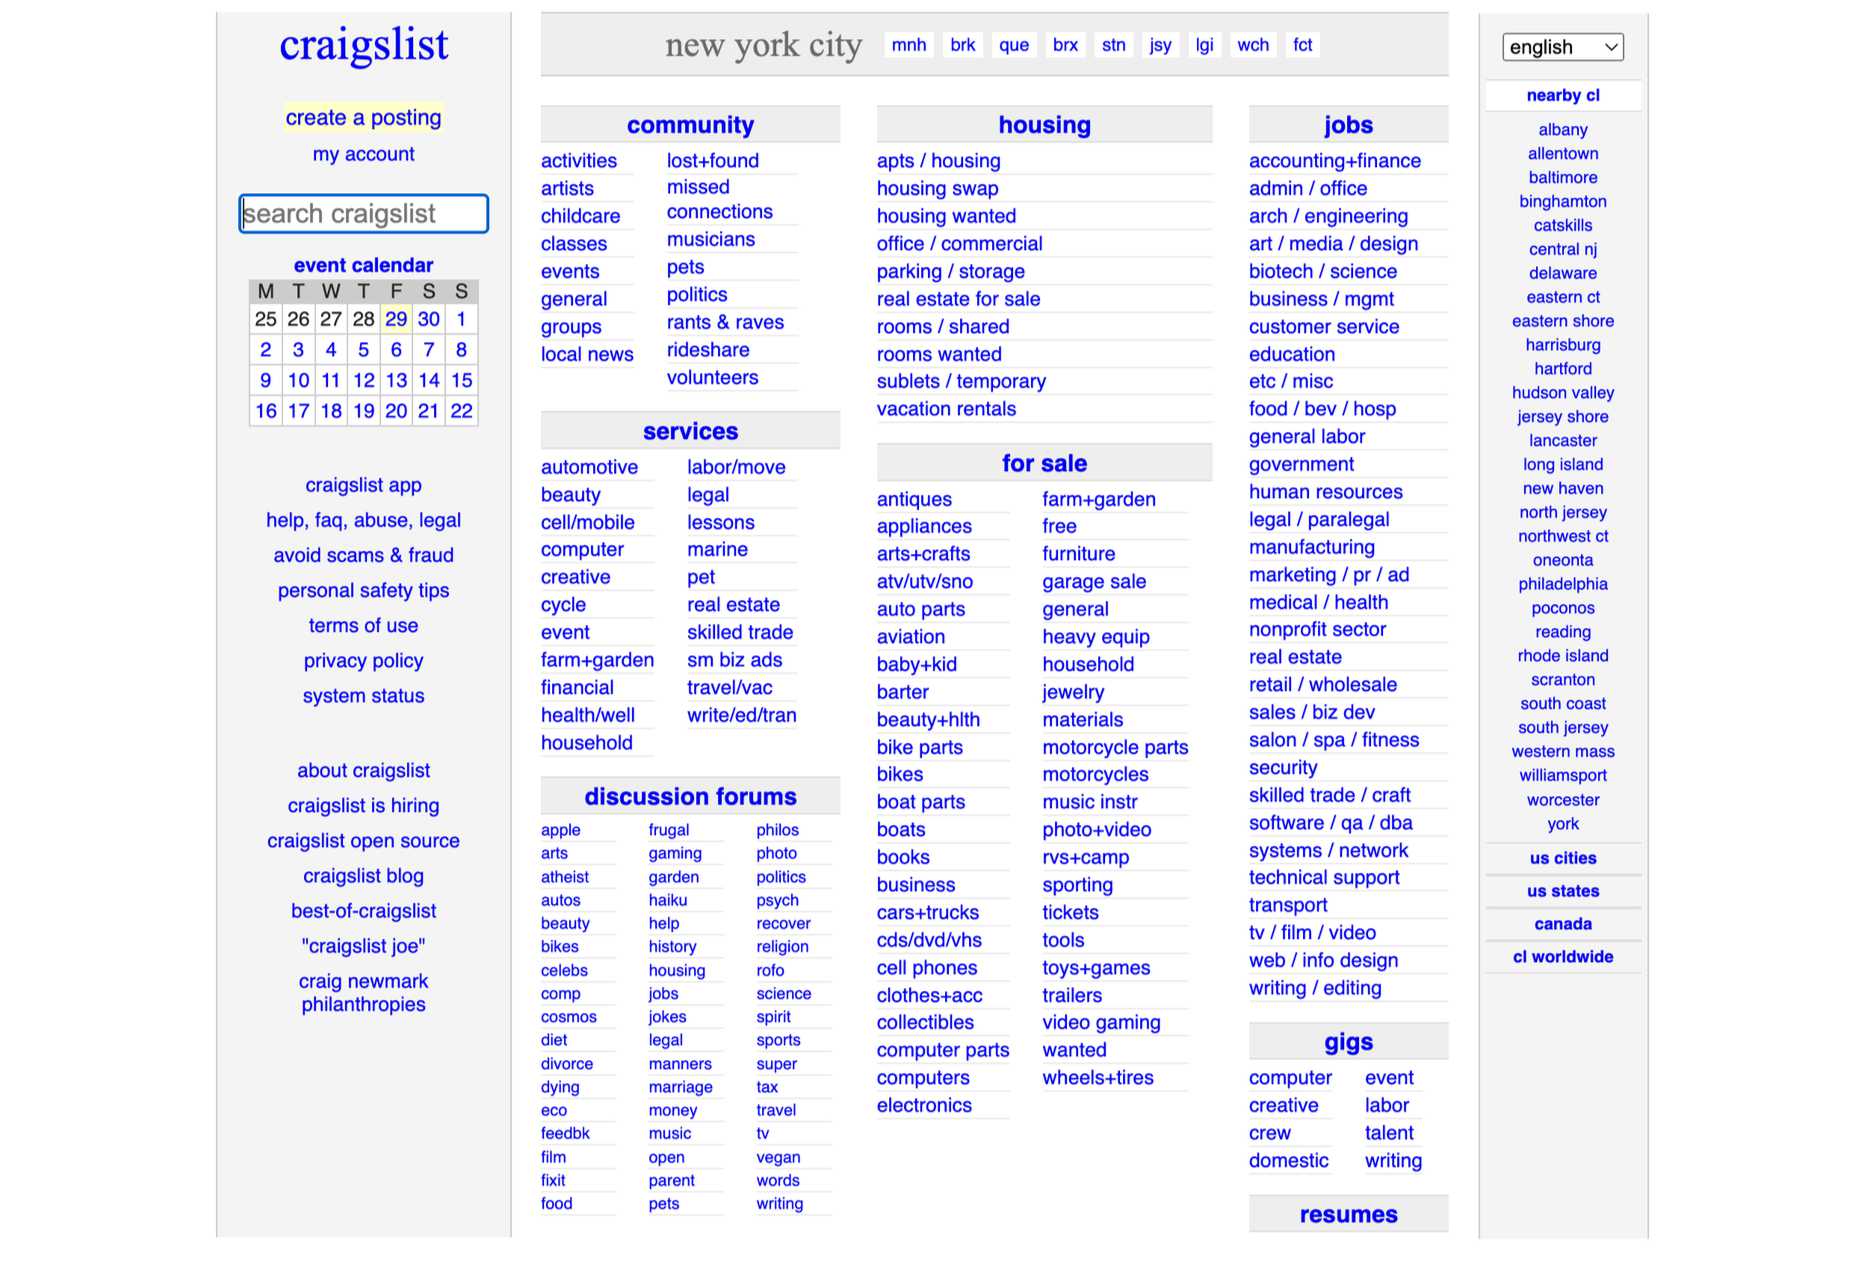
It is hard to imagine a website visitor who would spend more than five minutes (usually it’s way less) trying to figure out the navigation system on your website. If you have a loaded, complex site structure, you will not retain a customer.
Take Craigslist, for instance. Its navigation is not user-friendly, not to mention that it took over 30 seconds to load when the acceptable average load time should be no more than 1.7 seconds:
Here’s what proper website navigation presupposes:
Subordination should not go deeper than three levels.
A website should include eight horizontal categories max.
The structure should be symmetrical.
The menu should not be overstuffed with too many locations.
Since we mentioned Craigslist, let’s take a look at its competitor AdPost, which has a better website structure:
Instead of listing all the product categories on the front page, like Craigslist, AdPost added them to the search menu, thus making the design more user-friendly and making the navigation cleaner.
2. Make Your Site Multilingual
If you have visitors coming to your website from around the world, you should not assume they know English. A survey by Weglot found some interesting results regarding the attitude of buyers to shopping on international websites:
52% of websites are in English, but English reaches only 25% of global users.
56% of visitors say the website information in their language is more important than the price.
73% of customers say they prefer to shop on sites in their own language.
So, there is no doubt that having your website localized to several languages can increase customer retention, especially considering the last stat.
To understand the proper practices of making a website multilingual, look at the examples of the best language learning apps. For instance, Preply has a drop-down menu where you can choose from multiple language options, including Polish, Ukrainian, German, and many more:
Translating your website to different languages will help the visitor understand the value of your product better. However, before you invest in localization, make sure you study the data on customer behaviors to understand which languages your audience speaks.
3. Invest in Custom Illustrations
Some companies don’t bother much with designing their websites, especially when it comes to custom elements, such as visuals. However, research has shown that the focus on branding in website design increases customer commitment and e-loyalty, as a result.
Moreover, in the world of billions of websites, you need something that would help your business stand out. And custom illustrations are among those features that contribute to your site’s uniqueness.
Just take a quick look at the Emiozaki Web site. It includes personalized illustrations and animation created in the form of a tablet that substitutes the navigation menu:
This website reflects the brand’s tone and style, and animation adds emotion to UX. Apart from that, it’s also an excellent example of structuring a website.
Or, if you would like an example of a less loaded design, take a look at this personal portfolio by Victoire Douy. It also includes animations that add interactivity to the design. For instance, you can play with the shadow of the girl’s hand:
So, if you want your website to attract more customers and encourage them to hang out for longer, take the creative approach. Hiring an illustrator is, of course, costly, but it will help your site stand out.
Wrapping Up
As you can see, you’ll have to put in a lot of work to bring forward website design that increases online customer retention. You just have to employ our three best practices. Let’s quickly recap them:
Rethink your website structure; it should make the navigation easier.
Consider making your site multilingual; you’ll retain more international visitors.
Invest in custom illustrations to help consumers differentiate your brand from your competitors.
As a data analyst, you feel most comfortable when you’re alone with all the numbers and data. You’re able to analyze them with confidence and reach the results you were asked to find. But, this is not the end of the road for you. You still need to think about your target audience, that is the people who’ll be reading your report. If they don’t understand the report, then all your effort is in vain. This is why it’s crucial that you learn how to write a good data analysis report.
Your coworkers and clients don’t have nearly as much knowledge about data analysis as you do. So, your report needs to be straightforward and informative. The article below will help you learn how to do it. Let’s take a look at some of the practical tips you can apply to your data analysis report writing and the benefits of doing so.
Benefits of Writing Well-Structured Data Analysis Reports
Before we dig any deeper into the writing tips and tricks, you must understand what are the benefits of writing a comprehensible and professional data analysis report. After knowing how it can help you in different segments of your professional journey, you’ll be more willing to learn how to do it.
Below are the main benefits a data analysis report brings to the table.
Improved Collaboration
When you’re writing a data analysis report, you need to be aware more than one end user is going to use it. Whether it’s your employer, customer, or coworker – you need to make sure they’re all on the same page. And when you write a data analysis report that is easy to understand and learn from, you’re creating a bridge between all these people.
How?
Simply, all of them are given accurate data they can rely on and you’re thus removing the potential misunderstandings that can happen in communication. This improves the overall collaboration level and makes everyone more open and helpful.
Increased Efficiency
People who are reading your data analysis report need the information it contains for some reason. They might use it to do their part of the job, to make decisions, or report further to someone else. Either way, the better your report, the more efficient it’ll be. And, if you rely on those people as well, you’ll benefit from this increased productivity as well.
KPIs
Data tells a story about a business, project, or venture. It’s able to show how well you’ve performed, what turned out to be a great move, and what needs to be reimagined. This means that a data analysis report provides valuable insight and measurable KPIs (key performance indicators) that you’re able to use to grow and develop.
Clear Communication
Information is key regardless of the industry you’re in or the type of business you’re doing. Data analysis finds that information and proves its accuracy and importance. But, if those findings and the information itself aren’t communicated clearly, it’s like you haven’t even found them.
This is why a data analysis report is crucial. It will present the information less technically and bring it closer to the readers.
Data Analysis Report Writing: 7 Steps
After reading about the benefits of writing a data analysis report, you’re hopefully motivated to cut to the chase. The process of writing such a report is far from simple, but you can master it quickly, with the right guidance.
This is why we’ve prepared a step-by-step guide that will cover everything you need to know about this process, as simply as possible.
Let’s get to it.
1. Decide on your Data Report’s Goals
The first thing you need to do before you even start writing your data analysis report is to decide what is the goal behind it. You need to answer the following question:
What do I want to achieve with this report?
There can be all kinds of goals in your mind – from supporting a decision-making process of your coworkers to showing your client why they need to invest more in a certain segment of their business strategy.
Once you have a goal, you have something to focus on. Your goal is the core of our report and you’re building the section around it. This is the only way you’ll be able to communicate it clearly and not lose the reader’s attention too soon.
With a defined goal, you can start planning how you’re going to achieve it.
2. Consider your Readers’ Expertise
You are writing your report for a certain target audience, and you need to keep them in mind while writing. Depending on their level of expertise, you’ll need to adjust your report and ensure it speaks to them. So, before you go any further, ask yourself:
Who will be reading this report? How well do they understand the subject matter?
Let’s say you’re explaining the methodology you used to reach your conclusions and find the data in question. If the reader isn’t familiar with these tools and software, you’ll have to simplify it for them and provide additional explanations.
So, you won’t be writing the same type of report for a coworker who’s been on your team for years or a client who’s seeing data analysis for the first time. Based on this determining factor, you’ll think about:
the language and vocabulary you’re using
abbreviations and level of technicality
the depth you’ll go into to explain something
the type of visuals you’ll add
Your readers’ expertise dictates the tone of your report and you need to consider it before writing even a single word.
3. Include Data Visualization Elements
You have all the data and numbers in your mind and find it easy to understand what the data is saying. But, to a layman or someone less experienced than yourself, it can be quite a puzzle. All the information that your data analysis has found can create a mess in the head of your reader.
So, you should simplify it by using data visualization elements.
Firstly, let’s define what are the most common and useful data visualization elements you can use in your report:
graphs
charts
images
tables
maps
There are subcategories to each of the elements and you should explore them all to decide what will do the best job for your specific case. For instance, you’ll find different types of charts including, pie charts, bar charts, area charts, or spider charts.
Whatever you choose, keep in mind that it needs to help you bring your data to life in the mind of the reader. Find the best combination and remember to keep your data visualization elements neat and simple.
For each data visualization element, add a brief description to tell the readers what information it contains. You can also add a title to each element and create a table of contents for visual elements only.
4. Organize Information
When writing your data analysis report, it’s not enough to just include all the valuable information and use understandable language to do so. It also matters how you organize the information you’re presenting.
If your report isn’t properly organized into meaningful sections, the reader might give up on reading it or just find it extremely hard to understand anything.
Here’s what we suggest you do:
divide the report into sections
make sure each section helps the reader complete a milestone
organize sections using subheadings
make sure you write short paragraphs
use bullet points and lists to present important information
number the pages
add a table of contents at the end
This way, you’re helping the reader decide what sections to read first, how to look for the answers they need, and what information to prioritize. Simply put, you’re helping them create their own journey when reading your report and reach their conclusions on their own terms.
5. Proofread & Edit Before Submission
All the hard work you’ve invested in writing a good data analysis report might go to waste if you don’t edit and proofread. Proofreading and editing will help you eliminate potential mistakes, but also take another objective look at your report.
First, do the editing part. It includes:
reading the whole report objectively, like you’re seeing it for the first time
leaving an open mind for changes
adding or removing information
rearranging sections
finding better words to say something
You should repeat the editing phase a couple of times until you’re completely happy with the result. Once you’re certain the content is all tidied up, you can move on to the proofreading stage. It includes:
finding and removing grammar and spelling mistakes
rethinking vocabulary choices
improving clarity
improving readability
You can use an online proofreading tool to make things faster. If you really want professional help, essaymarks.com is a great choice. Their professional writers can edit and rewrite your entire report, to make sure it’s impeccable before submission.
Whatever you choose to do, proofread yourself or get some help with it, make sure your report is well-organized and completely error-free.
6. Stick to a Template Going Forward
The first time writing a data analysis report will be the hardest one. The lack of experience as well as the pressure to not make any mistakes will make this process a lot more difficult than it actually is.
But, once your first report is finished, you’ll see just how easy it was to write it.
Then you can think about using this first report as a template for all your future reports. That means you’ll keep the:
main sections
formatting settings
design elements
You can also find and use data analysis reports templates online and simply add the data you’re presenting. A template will help you speed this process up but also:
focus on the content instead of the form
build your recognizable writing style
stay focused and make no mistakes
A template will get you the extra couple of hours you need to go over the information you’ve shared and check if your data analysis report is truly as useful and informative as you want it to be.
7. Ask for Second Opinions & Feedback
Finally, your own judgment isn’t going to be enough to ensure the report is ready to be submitted. It would be a great idea to have someone else take a look at it before you send it out.
Here’s why this is the case.
Your brain has been working on this report for quite some time. It knows every word, comma, and figure involved. This is why it will be hard for you to look at the report objectively. You’ll miss out on mistakes that someone else might just spot within seconds.
So, find someone you trust who’s willing to take a look at the report. It could be someone with the same level of expertise as our target audience- to make sure the report is comprehensible. Or, it could be someone more professional and experienced, to verify the quality.
Final Thoughts
As you can see, it takes some skill and a bit more practice to write a good data analysis report. But, all the effort you invest in writing it will be worth it once the results kick in. You’ll improve the communication between you and your clients, employers, or coworkers. People will be able to understand, rely on, and use the analysis you’ve conducted.
So, don’t be afraid and start writing your first data analysis report. Just follow the 7 steps we’ve listed and use a tool such as ProWebScraper to help you with website data analysis. You’ll be surprised when you see the result of your hard work.
Without an established online presence, it can be incredibly challenging to grow your small business. That is exactly why digital branding is so important for your company. It enables you to connect with your consumers easily, stay relevant to your audience, and even stand out from your competition without much effort. But even though it might seem simple at first, establishing your business as a brand online can be a difficult process if you don’t have the right tools and resources at your disposal. To help you reach online success, here are some of the most essential digital branding guidelines you should follow:
Invest in branding
Just like any other branding strategy, your digital campaign should have established branding elements in place as well. This means creating the perfect logo your audience can easily associate with your business, as well as choosing a distinct color palette that helps to build brand identity. Aspects such as fonts and typography, graphics and imagery, taglines and slogans, and the overall tone of voice you use in your writing are also crucial. All of these elements come together in order to create unique and instantly recognizable online branding for your small business.
Focus on messaging
Brand messaging represents what your company says and the way it says it. The messaging should convey the main goals, core values, beliefs, and overall purpose of your business, and it should also speak directly to the desires and needs of your target audience. For that reason, your brand messaging must include mission, vision, and positioning statements, as well as your unique value proposition and the differentiators that set you apart from the competition.
Create buyer personas
In order to target your audience efficiently with your digital marketing efforts, you must first determine exactly who you’d like to reach. Chances are high that potential consumers will learn about your small business and connect with it through your online presence. So, try to create buyer personas by identifying demographics through markers such as age, gender, and location, creating surveys, utilizing social media channels, or even using specific marketing platforms. When you pinpoint your target audience, any digital branding tactic you implement will be that much more effective.
Shift to social media
With billions of people around the globe using social media each day, it’s truly essential for your digital branding. It allows you to reach a wider audience, engage consumers more effectively, and even encourage them to make a purchasing decision. But not all social media platforms are created equal. To ensure success, focus only on those channels that are truly relevant to your target audience and most frequently used by them, whether that’s Facebook, Instagram, Twitter, or TikTok. Then, create a posting strategy based on the platform and the unique interests of your audience.
Build a great website
Websites are crucial for businesses of all types and sizes, representing your digital storefront and an easy way for consumers to find all the necessary information about your company. That is why it should be as clean, simple, and easy to navigate as possible. Along with a memorable or branded domain name, consider using a more personal .me extension as well, as it’s the ideal solution for a small business. When it comes to web design, focus on branding throughout and maintain consistency, while brief and concise pages might be the best solution for the overall efficiency of your website.
Prioritize SEO
If you want to ensure your target audience can find your website easily when performing a Google search, you will have to invest in search engine optimization (SEO). This means posting interesting and high-quality content on your website regularly, using relevant keywords, filling your content with useful backlinks and internal links, increasing the loading speed of your website, optimizing it for mobile and voice search, etc. The more you focus on great SEO tactics, the higher you will be able to position your website on search engine results pages, and the more potential customers you will be able to reach.
Consider advertising
Using the power of the internet in an effort to promote your business, online advertising is another great way to enhance your digital branding efforts. If you create a social media marketing campaign, social media ads will likely be an important part of your strategy. Apart from that solution, there are a number of other online advertising options you could go for, including search engine ads, mobile, and desktop feed ads, display ads, and retargeted ads. Choose a solution that suits your marketing tactics the most, as well as one that is most relevant to your target audience.
Try email marketing
Email marketing is a tried-and-true branding tactic that can enable you to effortlessly reach your target consumers, especially those demographics that don’t use social media. If you want to implement this strategy, begin by building a list of leads that are most likely to convert into subscribers or website visitors, and then focus on creating branded marketing emails for promotions, raising brand awareness, or simply conveying information. Keep in mind that the most efficient email marketing campaigns are always carefully scheduled, simple to read and understand, and have a clear end goal in mind.
Analyze competitors
There are likely a number of companies that offer similar products and services to yours, and it can often be challenging to differentiate your brand from the rest. That is why doing a thorough competitor analysis could be of great help. Set some time aside to research the market and review the tactics that are currently working well for your competitors. Based on their strategies, you can identify what will be efficient for your business as well, see which aspects you can change and improve, and even pinpoint exactly how to stand out from the crowd, thus accelerating success.
In terms of digital branding, growing a loyal and dedicated consumer base that buys frequently and believes in your company is absolutely essential. Do some research and utilize the tips above to find the best strategies that will bring growth and success to your small business online.
In my last article, we went over how to set up a web app that serves chunks and bundles of CSS and JavaScript from CloudFront. We integrated it into Vite so that when the app runs in a browser, the assets requested from the app’s root HTML file would pull from CloudFront as the CDN.
While CloudFront’s edge caching does offer benefits, serving your app’s resources from these multiple locations is not without a cost of its own. Let’s take a look at a WebPageTest trace of my own web app, running with the configuration from the last blog post.
Notice the large connection times for lines 2-4. Line 1 is our HTML entry point. That HTML is parsed, the browser sees script and link tags for the JavaScript and CSS assets that reside on the CDN, and requests them. This causes a new connection to be set up which, as you can see, takes time.
This post will show you how to get around this. We’ll walk through how to host the entire web app on CloudFront and have CloudFront forward — or “proxy” — non-cacheable requests for data, auth, etc., onto our underlying web server.
Note that this is substantially more work than what we saw in the last article, and the instructions are likely to be different for you based on the exact needs of your web app, so your mileage may vary. We’ll be changing DNS records and, depending on your web app, you may have to add some cache headers in order to prevent certain assets from ever being cached. We’ll get into all of this!
You may be wondering whether the setup we covered in the last article even offers any benefits because of what we’re doing here in this article. Given the long connection time, would we have been better off forgoing the CDN, and instead serve all our assets from the web server to avoid that longer wait? I measured this with my own web app, and the CDN version, above, was indeed faster, but not by a lot. The initial LCP page load was about 200-300ms faster. And remember, that’s just for the initial load. Once this connection has been set up, edge caching should add much more value for all your subsequent, asynchronously loaded chunks.
Setting up our DNS
Our end goal is to serve our entire web app from CloudFront. That means when we hit our domain, we want the results to come from CloudFront instead of whatever web server it’s currently linked to. That means we’ll have to modify our DNS settings. We’ll use AWS Route 53 for this.
I’m using mydemo.technology as an example, which is a domain I own. I’ll show you all the steps here. But by the time you read this, I’ll have removed this domain from my web app. So, later when I start showing you actual CNAME records, and similar, those will no longer exist.
Go to the Route 53 homepage, and click on hosted zones:
Click Create hosted zone and enter the app’s domain:
Now, take note of the name servers listed in the next screen. They should look something like this.
We haven’t really accomplished anything yet. We told AWS we want it to manage this domain for us, and AWS gave us the name servers it’ll route our traffic through. To put this into effect, we need to go to wherever our domain is registered. There should be a place for you to enter in your own custom name servers.
Note that my domain is registered with GoDaddy and that is reflected in the screenshots throughout this article. The UI, settings, and options may differ from what you see in your registrar.
Warning: I recommend writing down the original name servers as well as any and all DNS records before making changes. That way, should something fail, you have everything you need to roll back to how things were before you started. And even if everything works fine, you’ll still want to re-add any other records into Route 53, ie MX records, etc.
Setting up a CloudFront distribution
Let’s make a CloudFront distribution to host our web app. We covered the basics in the last post, so we’ll get right to it. One big change from last time is what we enter for the origin domain. Do not put the top-level domain, e.g. your-app.net. What you need is the underlying domain where your app is hosted. If that’s Heroku, then enter the URL Heroku provides you.
Next, be sure to change the default protocol if you plan to use this site over a secure HTTPS connection:
This part is crucial. If your web app is running authentication, hosting data, or anything else, be sure to enable other verbs besides GET. If you skip this part, then any POST requests for authentication, mutating data, etc., will be rejected and fail. If your web app is doing nothing but serving assets and all those things are handled by external services, then outstanding! You have a great setup, and you can skip this step.
We have to make quite a few changes to the cache key and origin requests settings compared to last time:
We need to create a cache policy with a minimum TTL of 0, so non-caching headers we send back will are properly respected. You may also want to enable all query strings. I was seeing weird behavior when multiple GraphQL requests went out together with different query strings, which were ignored, causing all these requests to appear identical from CloudFront’s perspective.
My policy wound up looking like this:
For an origin request policy, if needed, we should make sure to send query strings and cookies for things like authentication and data queries to work. To be clear, this determines whether cookies and query strings will be sent from CloudFront down to your web server (e.g. Heroku, or similar).
Mine looks like this:
Lastly, for response headers policy, we can select “CORS With Preflight” from the list. In the end, your first two will have different names depending on how you set them up. But mine looks like this:
Let’s connect our domain, whatever it is, to this CloudFront distribution. Unfortunately, this is more work than you might expect. We need to prove to AWS that we actually own the domain because, for all Amazon knows, we don’t. We created a hosted zone in Route 53. And we took the nameservers it gave us and registered them with GoDaddy (or whoever your domain is registered with). But Amazon doesn’t know this yet. We need to demonstrate to Amazon that we do, in fact, control the DNS for this domain.
First, we’ll request an SSL certificate.
Next, let’s request the certificate link:
Now, we’ll select the option to request a public certificate option:
We need to provide the domain:
And, in my case, the certificate is pending:
So, I’m going to click it:
This proves that we own and control this domain. In a separate tab, go back to Route 53, and open our hosted zone:
Now we need to create the CNAME record. Copy the first part for the Record name. For example, if the CNAME is _xhyqtrajdkrr.mydemo.technology, then put the _xhyqtrajdkrr part. For the Record value, copy the entire value.
Assuming you registered the AWS name servers with your domain host, GoDaddy or whomever, AWS will soon be able to ping the DNS entry it just asked you to create, see the response it expects, and validate your certificate.
It can take time for the name servers you set at the beginning to propagate. In theory, it can take up to 72 hours, but it usually updates within an hour for me.
You’ll see success on the domain:
…as well as the certificate:
Whew! Almost done. Now let’s connect all of this to our CloudFront distribution. We can head back to the CloudFront settings screen. Now, under custom SSL certificate, we should see what we created (and any others you’ve created in the past):
Then, let’s add the app’s top-level domain:
All that’s left is to tell Route 53 to route our domain to this CloudFront distribution. So, let’s go back to Route 53 and create another DNS record.
We need to enter an A record for IPv4, and an AAAA record for IPv6. For both, leave the record name empty since we’re only registering our top-level domain and nothing else.
Select the A record type. Next, specify the record as an alias, then map the alias to the CloudFront distribution. That should open up an option to choose your CloudFront distribution, and since we previously registered the domain with CloudFront, you should see that distribution, and only that distribution when making a selection.
We repeat the exact same steps for the AAAA record type we need for IPv6 support.
Run your web app, and make sure it actually, you know, works. It should!
Things to test and verify
OK, while we’re technically done here, chances are there are still a few things left to do to meet the exact needs of your web app. Different apps have different needs and what I’ve demonstrated so far has walked us through the common steps to route things through CloudFront for better performance. Chances are there are things unique to your app that require more love. So, for that, let me cover a few possible additional items you might encounter during setup.
First off, make sure any POSTs you have are correctly sent to your origin. Assuming CloudFront is correctly configured to forward cookies to your origin, this should already work but there’s no harm in checking.
The bigger concern are all other GET requests that are sent to your web app. By default, any GET requests CloudFront receives, if cached, are served to your web app with the cached response. This can be disastrous. Any data requests to any REST or GraphQL endpoints sent with GET are cached by the CDN. And if you’re shipping a service worker, that will be cached too, instead of the normal behavior, where the current version is sent down in the background and updated if there are changes.
In order to tell CloudFront not to cache certain things, be sure to set the "Cache-Control" header to "no-cache" . If you’re using a framework, like Express, you can set middleware for your data access with something like this:
And so on. Test everything thoroughly because there’s so much that can go wrong. And after each change you make, be sure to run a full invalidation in CloudFront and clear the cache before re-running your web app to test that things are correctly excluded from cache. You can do this from the Invalidations tab in CloudFront. Open that up and put /* in for the value, to clear everything.
A working CloudFront implementation
Now that we have everything running, let’s re-run our trace in WebPageTest:
And just like that, we no longer have setup connections like we saw before for our assets. For my own web app, I was seeing a substantial improvement of 500ms in LCP. That’s a solid win!
Hosting an entire web app on a CDN can offer the best of all worlds. We get edge caching for static resources, but without the connection costs. Unfortunately, this improvement doesn’t come for free. Getting all of the necessary proxying correctly set up isn’t entirely intuitive, and then there’s still the need to set up cache headers in order to avoid non-cacheable requests from winding up in the CDN’s cache.
Emojis can be a fun and creative way to communicate emotions without using words.
While some research shows that using emojis in email marketing can increase the open rate by over 50%, professional emails remain largely devoid of emojis. This is probably because adding emojis in an email makes a brand seem warm but incompetent.
Although some marketers believe success is mostly based on which email marketing company they use, emojis also play a role worth discussing. The problem is that they denote a playful tone. Thus, their excessive use in corporate messages can appear unprofessional and informal – making them detrimental to your brand image.
Join us as we explore the disadvantages of using emojis in email communication for brands that want to remain serious and professional.
1. Emojis Look Unprofessional
While 33% of marketers add emojis to email correspondence, 60% believe that using emojis in work-related emails is simply not professional. This is why leading companies and brands avoid using them for business correspondence and other formal exchanges, especially in the B2B environment.
For instance, if your goal is to create a proposal email, it is important to keep it short and get to the point right away. Adding emojis to the message can, in some cases, communicate the wrong idea to the recipient and affect the communication negatively.
There is no denying that emojis add a touch of fun and humor to the conversation, but that is often considered unsuitable for a corporate discussion.
2. Emojis Can Cause Miscommunication
Every emoji has an underlying meaning. The problem is that some emojis have multiple.
For example, the fire emoji can either mean “great job” or denote that something is on fire. It is not hard to see how that can lead to miscommunication, especially in international communications where things like hand signs (which are denoted as emojis) can have different connotations – creating a possibility for damaging relationships with prospective clients.
Send an ‘OK’ emoji to a Brazilian client and then wonder why they stopped talking to you.
3. Emojis May Put Off Older Recipients
Using emojis in business emails is still a relatively new concept. If you want to increase sales with email marketing but your target demographic is an older clientele, using text-based emails would be more effective. This is supported by the Office Teams survey which states that 39% of senior managers consider using emojis in official communications very unprofessional.
In fact, only 37% of people over the age of 65, prefer communicating using gifs and emojis. Older generations are unfamiliar with the emoji language, and they cannot grasp the accurate meaning of each character/emoticon. This often puts them in difficult situations and broadens the communication gap.
4. Emojis Don’t Work In Certain Industries
Healthcare, law, and government institutions are the most apparent industries where employees encounter serious situations daily. These are the scenarios where using emojis to clarify the tone or lighten the mood is wildly inappropriate or unnecessary.
Emojis convey an informal tone. Therefore, keeping your email messages textual and concise is best if your business targets financial, healthcare, or corporate sectors.
5. Using Emojis In Marketing Can Be a Daunting Task
Adding emojis to an email campaign may sound like a fun thing to try out, but it may not be as fruitful as you think. If you want to convert your email subscribers, make sure you use the appropriate language. In some cases, that means staying far away from emojis.
Below are additional facts you should consider:
Adding Emojis Is Time Consuming
There are over 3,633 emojis in the Unicode standard. Therefore, choosing the right emoji or the number of emojis per email can be difficult. It requires continuous and thorough research to ensure you are using the correct and appropriate ones.
Emojis Decrease Email Visibility and Deliverability
Emojis in emails are known to trigger spam filters, which can harm your deliverability. Adding to many of them – and especially in the subject lines – can land your emails in the spam folder, which will have an adverse effect on your open and click-through rates.
If the emails that your company sends out are important notices or essential information for your partners or clients, emojis can not only take away the professionalism from your email copy but can hurt your deliverability as well.
If the reader is not familiar with your brand/business, your emails can come across as a standard/mass marketing campaign.
Emojis May Harm Your Brand Image
As emojis are considered unprofessional, your brand can suffer a backlash from using them. Every brand has a distinct image in the customers’ minds, and emojis don’t go well with a brand that has a serious depiction. If forced, they may look improper and harm your brand image.
Also, emojis may look different on different devices or may not even open correctly because of rendering problems. This irks customers and hurts the brand image.
Therefore, emojis aren’t suitable for every brand. Use them only if you have a younger audience, and it suits the overall perception of your brand.
Wrapping Up
Emojis can make you appear unprofessional and less competent when used in business communication, ruining your brand reputation as a qualified professional. Even if the emoticons might be apt at the moment, they don’t consistently deliver the message as intended.
If your email marketing campaign targets other businesses and professionals, or you are communicating with a business for the first time, avoid using emojis altogether.
Crafting text-based emails will make sure you appear qualified in front of clients and colleagues.
A career as a web designer can be extremely lucrative. The average web designer in the US makes around $50-55,000 per year, equating to an hourly rate of around $25. Of course, not every designer will automatically get a full-time, high-paying job as soon as they earn their web design credentials.
Sometimes, you might need to generate a little extra cash, perhaps to supplement your part-time income or keep the lights on while you’re taking some new courses. You can even use your web design skills to earn some extra money on the side while working a standard 9-to-5.
Today, we will be looking at some of the most effective ways to make extra cash on your web design skills.
1. Freelance
Starting with the simplest option, working as a freelancer is one of the best ways to start making cash with your design skills. There are dozens of websites out there to help freelancers find clients these days. Some of the best options include:
Toptal: For web developers, designers, and software experts;
As a freelancer, you’ll be able to choose which hours you want to work, and which projects to work on. You can make money from all kinds of design skills this way, from making pages for a website to designing widgets and applications.
However, you’ll also be responsible for tracking down potential leads, building your portfolio, and managing your own taxes, so keep this in mind.
2. Sell Design Assets
As a web design professional, you’ll end up with a lot of assets over the years. Whether you’re working freelance or full-time, not every asset you create is going to be picked up by your customers. Sometimes, you’ll end up with unused content sitting on your computer.
Fortunately, you can leverage these assets for some extra cash. You can sell things like icons, backgrounds, UI assets, and more. You can even sell themes on sites like ThemeForest if you’ve built something your clients weren’t happy with.
There’s a market out there for just about every asset, from icons and PSD templates to documents, fonts, UI assets, backgrounds, and brushes. You might even build your own website where you can sell assets in the future.
3. Design and Sell NFTs
Feel like getting in on the cutting-edge of a new marketplace? NFTs are probably one of the hottest topics in the digital world today. As concepts like Web 3.0 and the metaverse gain traction, NFTs will only become more valuable.
Countless companies and innovators are looking for people to design their NFTs for them these days. If you don’t mind dedicating some of your free time to creating digital graphics, you’re in for a significant amount of earning potential.
If you learn enough about the NFT landscape and blockchain, you could even create your own NFTs. However, this would probably require a lot of time and research. You can learn more about the NFT design and art landscape here.
4. Become a Consultant
Don’t have time to build endless new websites right now? No problem, just help other people build their sites instead. Consultants are people in any industry with expertise and insights they can share to support other people. As a web design consultant, you can offer your expertise to other upcoming freelance designers or business leaders.
You’ll need to invest some time into building your personal brand as a consultant. This means developing your social media pages (like LinkedIn) and creating a portfolio. It also helps to have an air of thought leadership. This usually means you’ll need to share at least some content online.
Consulting can be an excellent way to share your skills with other people without having to do all the work of building a design course.
5. Teach Web Design
On the other hand, if you like the idea of being a teacher, you can make money almost passively with web design courses and webinars these days. While you do have the option of selling one-on-one education to students, this will usually take up a lot of your time.
If your focus right now is on a side hustle to increase your earnings, it’s often much easier to use a site like Udemy or Skillshare. The great thing about teaching web design these days, it’s much easier than you might expect. The majority of solutions on the web allow you to drip content to your clients automatically. This means you only have to create the content once.
You can create a handful of videos, quizzes, and downloadable assets, and make money off your educational resources while you sleep.
6. Create a Web Design Blog
Blogging is still a surprisingly lucrative way to make money. If you have a creative streak and you know how to write about web design in a way other people can understand, you can turn this into an excellent side hustle.
Start by building your own website using your design skills, then start publishing regular blogs with the content you know your customers would be interested in. It’s a good idea to cover a range of topics, from Photoshop, to how to design widgets and more. You can even share reviews of various web design tools and add affiliate links to earn money that way.
Make sure you use SEO strategies to improve your chances of customers actually seeing your blog and promote your content as often as you can across social media. Once you have your blog, you can make money from it by:
Working as an affiliate and promoting design products;
Showing banner ads or sponsored posts on your website;
Selling digital products through your blog (like themes).
If you don’t have time to launch your own website and build a following for your blog, you can still make money from writing in other ways. Becoming a freelance web design writer means you can sell your blogs and content to other leading publications.
Many popular websites are constantly looking for new content to add to their blog. If you develop a strong relationship with some of these site owners, you could get yourself a regular gig.
Contributing to other sites as a writer helps you to develop your thought leadership. Many companies will even allow you to link back to your social media pages or profile.
A lot of web designers today rely on other themes and templates created for WordPress to help them build their websites. Access to themes and templates can make building a new website a much easier, straightforward process.
If you’ve got some excellent coding prowess, you can develop and sell a host of website themes and templates, and sell them wherever you choose. As mentioned above, there are a number of websites available for selling web design assets. Alternatively, you can sell your own packages and templates on your website, depending on your needs.
If you create a particularly valuable theme, you can actually earn a full-time passive income over time. Placing your themes and templates on marketplace sites will also get you a lot of attention from potential clients in the future.
9. Flip Websites
If you’ve ever seen one of those shows where someone buys a house, makes it look great, and then sells it for a higher price, you’ll understand the basic premise of flipping websites. The idea is to purchase an existing website for a low price (preferably with a good domain name), then fix it up to sell on a website selling directory.
If you want to earn a decent amount of money for your website, you’ll need to dedicate a decent amount of time to building traffic, improving the appearance of the site, and so on. However, it can be fun to take on these projects in your free time if you’re looking for a way to hone your skills.
You might learn some important lessons about how to make websites more profitable while you’re flipping your various sites, which could make you more appealing to customers in the long term.
10. Write a Book
Similar to flipping websites or producing an income from a high-traffic blog, writing a book isn’t something that’s going to give you a lot of extra income overnight. However, it can be an excellent source of passive income in time if you know how to use this strategy correctly.
If you have a specialist skill in web design, or you serve a specific niche, you can generate a lot of attention for an eBook or physical book sharing plenty of accurate and specific information. Remember, writing about web design, in general, will usually make it harder to earn money because there’s already a lot of competition out there.
Writing a book is a fantastic way to create a possible extra source of income as a side hustle, and it can also make you more credible if you decide to go full-time with your web design skills in the future. It’s definitely more impressive to present yourself to clients as a published author.
Remember to advertise your book whenever you can to improve your chances of additional sales.
Find Your Side Hustle
Web design skills are highly sought after in various parts of the digital world. If you’re willing to devote a little time and creativity to exploring the various avenues above, they can all deliver an excellent source of income to you and your potential business. All you need to do is figure out which side hustle makes the most sense for you.
Remember, there’s no one-size-fits-all. In some cases, you might even be able to run multiple side hustles at the same time, particularly if you’re using strategies for passive income, like writing your own book or selling your own course.
A while ago, Geoff wrote an article about a cool hover effect. The effect relies on a combination of CSS pseudo-elements, transforms, and transitions. A lot of comments have shown that the same effect can be done using background properties. Geoff mentioned that was his initial thought and that’s what I was thinking as well. I am not saying the pseudo-element he landed on is bad, but knowing different methods to achieve the same effect can only be a good thing.
In this post, we will re-work that hover effect, but also expand it into other types of hover effects that only use CSS background properties.
CodePen Embed Fallback
You can see the background properties at work in that demo, as well as how we can use custom properties and the calc() function to do even more. We are going to learn how to combine all of these so we are left with nicely optimized code!
Hover effect #1
CodePen Embed Fallback
Let’s start with the first effect which is the reproduction of the one detailed by Geoff in his article. The code used to achieve that effect is the following:
If we omit the color transition (which is optional), we only need three CSS declarations to achieve the effect. You are probably surprised how small the code is, but you will see how we got there.
First, let’s start with a simple background-size transition:
CodePen Embed Fallback
We are animating the size of a linear gradient from 0 100% to 100% 100%. That means the width is going from 0 to 100% while the background itself remains at full height. Nothing complex so far.
Let’s start our optimizations. We first transform our gradient to use the color only once:
background-image: linear-gradient(#1095c1 0 0);
The syntax might look a bit strange, but we are telling the browser that one color is applied to two color stops, and that’s enough to define a gradient in CSS. Both color stops are 0, so the browser automatically makes the last one 100% and fills our gradient with the same color. Shortcuts, FTW!
With background-size, we can omit the height because gradients are full height by default. We can do a transition from background-size: 0 to background-size: 100%.
We are not defining --p initially, so the fallback value (0% in our case) will be used. On hover, we define a value that replaces the fallback one ( 100%).
Now, let’s combine all the background properties using the shorthand version to get:
We are getting closer! Note that I have introduced a left value (for the background-position) which is mandatory when defining the size in the background shorthand. Plus, we need it anyway to achieve our hover effect.
We need to also update the position on hover. We can do that in two steps:
Increase the size from the right on mouse hover.
Decrease the size from the left on mouse out.
To do this, we need to update the background-position on hover as well:
CodePen Embed Fallback
We added two things to our code:
A background-position value of right on hover
A transition-duration of 0s on the background-position
This means that, on hover, we instantly change the background-position from left (see, we needed that value!) to right so the background’s size will increase from the right side. Then, when the mouse cursor leaves the link, the transition plays in reverse, from right to left, making it appear that we are decreasing the background’s size from the left side. Our hover effect is done!
But you said we only needed three declarations and there are four.
That’s true, nice catch. The left and right values can be changed to 0 0 and 100% 0, respectively; and since our gradient is already full height by default, we can get by using 0 and 100%.
The custom property --p is defining both the background position and size. On hover, It will update both of them as well. This is a perfect use case showing how custom properties can help us reduce redundant code and avoid writing properties more than once. We define our setting using custom properties and we only update the latter on hover.
But the effect Geoff described is doing the opposite, starting from left and ending at right. How do we do that when it seems we cannot rely on the same variable?
We can still use one variable and update our code slightly to achieve the opposite effect. What we want is to go from 100% to 0% instead of 0% to 100%. We have a difference of 100% that we can express using calc(), like this:
--p will change from 0% to 100%, but the background’s position will change from 100% to 0%, thanks to calc().
We still have three declarations and one custom property, but a different effect.
CodePen Embed Fallback
Before we move to the next hover effect, I want to highlight something important that you have probably noticed. When dealing with custom properties, I am using 0% (with a unit) instead of a unit-less 0. The unit-less zero may work when the custom property is alone, but will fail inside calc() where we need to explicitly define the unit. I may need another article to explain this quirk but always remember to add the unit when dealing with custom properties. I have two answers on StackOverflow (here and here) that go into more detail.
Hover effect #2
CodePen Embed Fallback
We need a more complex transition for this effect. Let’s take a look at a step-by-step illustration to understand what is happening.
Initially, a fixed-height, full-width gradient is outside of view. Then we move the gradient to the right to cover the bottom side. Finally, we increase the size of the gradient from the fixed height to 100% to cover the whole element.
We first have a background-position transition followed by a background-size one. Let’s translate this into code:
Note the use of two transition values. On hover, we need to first change the position and later the size, which is why we are adding a delay to the size. On mouse out, we do the opposite.
The question now is: what values do we use for background-position? We left those blank above. The background-size values are trivial, but the ones for background-position are not. And if we keep the actual configuration we’re unable to move our gradient.
Our gradient has a width equal to 100%, so we cannot use percentage values on background-position to move it.
Percentage values used with background-position are always a pain especially when you use them for the first time. Their behavior is non-intuitive but well defined and easy to understand if we get the logic behind it. I think it would take another article for a full explanation why it works this way, but here’s another “long” explanation I posted over at Stack Overflow. I recommend taking a few minutes to read that answer and you will thank me later!
The trick is to change the width to something different than 100%. Let’s use 200%. We’re not worried about the background exceeding the element because the overflow is hidden anyway.
It’s time to optimize our code. If we take the ideas we learned from the first hover effect, we can use shorthand properties and write fewer declarations to make this work:
We add all the background properties together using the shorthand version then we use --p to express our values. The sizes change from .08em to 100% and the position from 200% to 100%
I am also using another variable --t , to optimize the transition property. On mouse hover we have it set to a .3s value, which gives us this:
transition: .3s .3s, background-position .3s 0s;
On mouse out, --t is undefined, so the fallback value will be used:
transition: .3s 0s, background-position .3s .3s;
Shouldn’t we have background-size in the transition?
That is indeed another optimization we can make. If we don’t specify any property it means “all” the properties, so the transition is defined for “all” the properties (including background-size and background-position). Then it’s defined again for background-position which is similar to defining it for background-size, then background-position.
“Similar” is different than saying something is the “same.” You will see a difference if you change more properties on hover, so the last optimization might be unsuitable in some cases.
Can we still optimize the code and use only one custom property?
Yes, we can! Ana Tudor shared a great article explaining how to create DRY switching where one custom property can update multiple properties. I won’t go into the details here, but our code can be revised like this:
The --i custom property is initially undefined, so the fallback value, 0, is used. On hover though, we replace 0 with 1. You can do the math for both cases and get the values for each one. You can see that variable as a “switch” that update all our values at once on hover.
Again, we’re back to only three declarations for a pretty cool hover effect!
CodePen Embed Fallback
Hover effect #3
We are going to use two gradients instead of one for this effect. We will see that combining multiple gradients is another way to create fancy hover effects.
Here’s a diagram of what we’re doing:
We initially have two gradients that overflow the element so that they are out of view. Each one has a fixed height and toes up half of the element’s width. Then we slide them into view to make them visible. The first gradient is placed at the bottom-left and the second one at the top-right. Finally, we increase the height to cover the whole element.
The code is almost the same as the other hover effects we’ve covered. The only difference is that we have two gradients with two different positions. The position values may look strange but, again, that’s related to how percentages work with the background-position property in CSS, so I highly recommend reading my Stack Overflow answer if you want to get into the gritty details.
Now let’s optimize! You get the idea by now — we’re using shorthand properties, custom properties, and calc() to tidy things up.
I have added an extra custom property, --c, that defines the gradient since the same gradient is used in both places.
CodePen Embed Fallback
I am using 50.1% in that demo instead of 50% for the background size because it prevents a gap from showing between the gradients. I also added 1% to the positions for similar reasons.
Let’s do the second optimization by using the switch variable:
Are you started to see the patterns here? It’s not so much that the effects we’re making are difficult. It’s more the “final step” of code optimization. We start by writing verbose code with a lot of properties, then reduce it following simple rules (e.g. using shorthand, removing default values, avoiding redundant values, etc) to simplify things down as much as possible.
Hover effect #4
CodePen Embed Fallback
I will raise the difficulty level for this last effect, but you know enough from the other examples that I doubt you’ll have any issues with this one.
This hover effect relies on two conic gradients and more calculations.
Initially, we have both gradients with zero dimensions in Step 1. We increase the size of each one in Step 2. We keep increasing their widths until they fully cover the element, as shown in Step 3. After that, we slide them to the bottom to update their position. This is the “magic” part of the hover effect. Since both gradients will use the same coloration, changing their position in Step 4 will make no visual difference — but we will see a difference once we reduce the size on mouse out during Step 5.
If you compare Step 2 and Step 5, you can see that we have a different inclination. Let’s translate that into code:
The positions are pretty clear. One gradient starts at top left (0 0) and ends at bottom left (0 100%) while the other starts at top right (100% 0) and ends at bottom right (100% 100%).
We’re using a transition on the background positions and sizes to reveal them. We only need a transition value for the background-size. And like before, background-position needs to change instantly, so we’re assigning a 0s value for the transition’s duration.
For the sizes, both gradient need to have 0 width and twice the element height (0% 200%). We will see later how their sizes change on hover. Let’s first define the gradient configuration.
The diagram below illustrates the configuration of each gradient:
Note that for the second gradient (indicated in green), we need to know the height to use it inside the conic-gradient we’re creating. For this reason, I am going to add a line-height that sets the element’s height and then try that same value for the conic gradient values we left out.
The last thing we have left is to figure out the background’s size. Intuitively, we may think that each gradient needs to take up half of the element’s width but that’s actually not enough.
We’re left with a large gap if we use 50% as the background-size value for both gradients.
We get a gap equal to the height, so we actually need to do is increase the size of each gradient by half the height on hover for them to cover the whole element.
What about the version with only one custom property?
I will leave that for you! After looking at four similar hover effects, you should be able to get the final optimization down to a single custom property. Share your work in the comment section! There’s no prize, but we may end up with different implementations and ideas that benefit everyone!
Before we end, let me share a version of that last hover effect that Ana Tudor cooked up. It’s an improvement! But note that it lacks Firefox supports due to a known bug. Still, it’s a great idea that shows how to combine gradients with blend modes to create even cooler hover effects.
CodePen Embed Fallback
Wrapping up
We made four super cool hover effects! And even though they are different effects, they all take the same approach of using CSS background properties, custom properties, and calc(). Different combinations allowed us to make different versions, all using the same techniques that leave us with clean, maintainable code.
If you want to get some ideas, I made a collection of 500 (yes, 500!) hover effects, 400 of which are done without pseudo-elements. The four we covered in this article are just the tip of the iceberg!