Archive

Archive for October, 2022

Relationships 101: Tips for Maximizing Social Media Channels to Increase Brand Awareness

October 13th, 2022 No comments

Maximizing social media channels has become a buzzing topic across all industries. From B2B SaaS to DTC retail to local mom-and-pop shops, everyone wants a slice of the social media market pie.

And we can see why.

In 2021, over 4.26 billion people used social media around the globe — a number projected to increase to nearly six billion by 2027.

In other words, there’s a limitless supply of marketing and relationship-building opportunities on social media.

If you’ve decided the time to make the most of your channels is now, then you’ve come to the right spot. In today’s article, we’re sharing some of our best tips for maximizing social media channels to increase brand awareness. 

Grab a notepad and a pen, and let’s get started.

1. Use a multichannel approach 

Nearly 91% of retail brands use two or more social media platforms to connect with their target audience. 

But here’s the deal — if you’re going to spread your eggs across multiple baskets, make sure you choose the right ones for your business. 

In other words, stick to only building a presence on channels that your audience uses most. 

For instance, if you sell one-of-a-kind virtual fashion pieces, you’ll likely focus on channels that target the younger demographic, such as Snapchat, TikTok, and Instagram. If your company sells space in a colocation data center, you’ll likely focus on channels that thrive in the B2B sector, like LinkedIn, Twitter, and Facebook. 

Whatever the case may be, be sure to find out:

  • What channels your audience uses and why
  • How often they frequent said channels — bonus points if you can dig up specific days and times
  • What kind of content they devour on social media 
  • What messaging and style preferences they have

Once you’ve chosen your dedicated social media platforms, strategize ways to integrate them with other marketing activities, such as blogging, email marketing, and guest posting.

For instance:

  • Add a call to action (CTA) at the end of blog posts inviting readers to follow you on social media 
  • Set up an email sequence that highlights user-generated content and customer stories you’ve collected from your social channels 
  • Invite email recipients to follow you on social media in your email signature line 
  • Use thought leadership insights you’ve shared on social media as screenshots and examples in your guest posts

2. Befriend data 

Whether you’re getting ready to sell your company or you’re just interested in improving your lead scoring process, leveraging data can help you set yourself up for success. 

So, how do you do that exactly? 

Create a data pipeline

While it may sound fancy, a data pipeline is just a compilation of information from a variety of sources that you analyze for marketing purposes. 

(Image Source)

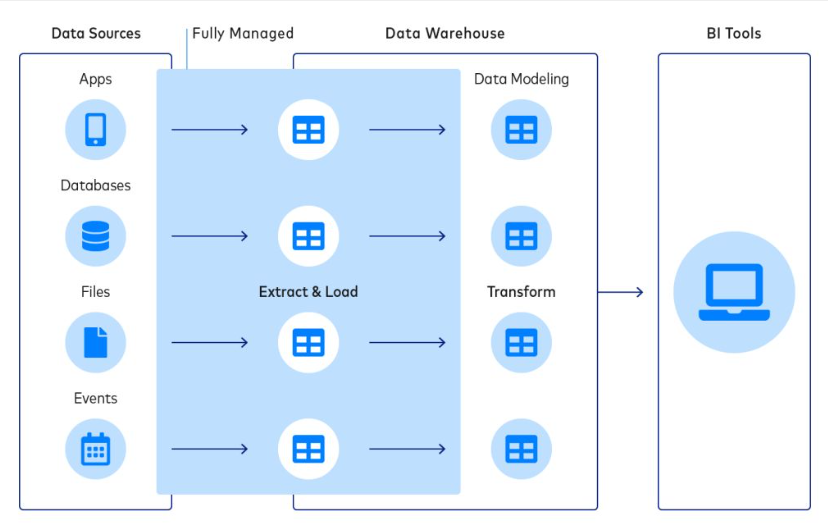
With a data pipeline, your business has a centralized data source allowing you to get a more robust view of your audience and make data-driven decisions. 

In other words, you have insights at your fingertips you can leverage to boost your social media presence. 

For instance, your data might show you that your audience values encouraging content. Or, your data might reveal that your audience is curious about NFTs and virtual goods. 

Whatever the case may be, you can use centralized data to learn more about your audience’s:

  • Pain points and needs
  • Social media purchasing habits
  • Content preferences 
  • Social media activity 

You can then turn those insights into action by improving your social media strategy as you discover more about your audience.

Psst, feeling overwhelmed by the thought of gathering your own data? Consider opting for a Customer Data Platform (CDP) that can do the heavy lifting for you. 

3. Plan thematic caption sequences and batch your content

Our third tip is probably our favorite. 

Why? 

Because it includes the formula every brand needs to deliver valuable and engaging content on social media — consistently.

Yes, we’re nodding to the hardcore truth that consistency is vital to: 

  • Discovering what kind of content performs best on social media 
  • Developing an understanding of your audience’s questions, needs, and concerns
  • Positioning yourself as an industry expert
  • Building trust and loyalty with your audience 
  • Understanding how to course correct when your strategy goes awry 

So, what’s the secret formula brands need to win on social media? 

First, plan thematic caption sequences. Then, batch your content. 

If you’ve never heard of planning thematic caption sequences, it just means choosing a series of caption themes (based on your goals and target audience) and rotating them out. 

For instance, the caption themes you rotate might include:

  • About me
  • Behind-the-scenes
  • Offer pitch 
  • Encouragement
  • Value-driven
  • Humor 

Or, you might choose:

  • Brand story 
  • Sustainability tips 
  • Company wins
  • News 
  • Specific offer 
  • Industry insights 

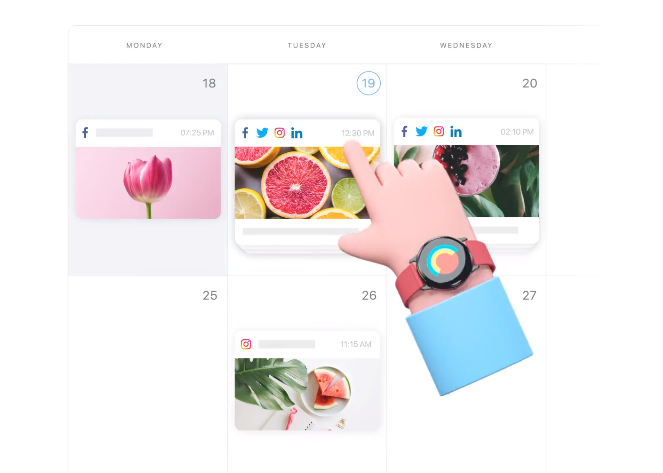
Let’s take the second example list and explore this a bit further. If you decide to post on social media Monday through Wednesday, then your caption theme list for the month would look like this: 

  • Monday: Brand story
  • Tuesday: Sustainability tips 
  • Wednesday: Company wins
  • Monday: News 
  • Tuesday: Specific offer 
  • Wednesday: Industry insights 
  • Monday: Brand story 
  • Tuesday: Sustainability tips
  • Wednesday: Company wins
  • Monday: News
  • Tuesday: Specific offer
  • Wednesday: Industry insights

See? Pretty easy.

Next, choose visual product themes to rotate along with your caption themes. 

Taking the second example, your visual product themes might include:

  • Candid photo of staff, management, or work location
  • Professional custom photograph of plants, trees, oceans, or general nature scenes
  • Custom text and announcement image  
  • Visual clipping or infographic from reputable news source 
  • User-generated image showcasing company product
  • Visual clipping or infographic from reputable industry source or peer-reviewed journal

Once you’ve laid all of that out, use a social media management tool to create your captions, upload your images, include your hashtags, and schedule your posts in batches. Aim to schedule your content at least 30 days out. 

(Image Source)

If you’re using an in-house marketing team or going the DIY route, lighten the load by getting access to caption templates and professional images through a membership with Social Curator.

4. Build in time for daily community engagement 

With internet users spending on average 147 minutes per day on social media, building in time to communicate with them is vital.

If you’re worried you can’t invest too much time on community engagement, remember it’s more about quality and consistency than quantity. In other words, it’s about the quality of the time you put in and the discipline to show up every day — even if it’s just for 30 minutes a day. 

If all else fails? Hire a virtual assistant and train them on how to engage with your audience on behalf of your brand.

Here are a few quick tips to help you stay active and engaged with your audience on social:

  • Respond to comments and questions as soon as possible — bonus points for sharing tips and resources, too
  • Leave comments and questions on your audience’s posts — bonus points for leaving words of encouragement and sharing personal experiences 
  • Initiate questions, quizzes, polls, and sliders in Stories
  • Show up for live video Q&As
  • Post and respond to thought leadership content on LinkedIn

5. Give users a reason to pay attention to your brand on social media

Sometimes your audience needs a little extra incentive to pay attention to you on social media. 

So, give them a reason to by putting some more oomph into your posts. 

Here’s how:

  • Share tremendous value: Give your audience advice, tools, tips, and tricks on the topics that matter most to them
  • Utilize giveaways: Reel your audience in with irresistible prizes they can enter to win
  • Give out freebies: Share free downloadables, guides, and ebooks 
  • Use storytelling techniques: Paint a picture and hook readers with real, meaningful stories — bonus points for drawing on emotion or weaving in humorous content

Wrap up 

Maximizing social media channels is a key topic of discussion across industries worldwide. 

With increasingly more users joining social media platforms, it’s no surprise brands are motivated to grab their slice of the market share. 

And with a limitless supply of marketing and relationship-building opportunities, social media will continue to play an integral role in connecting brands with customers. 

If you’re ready to make the most of your channels, we hope the best practices we shared will help you increase brand awareness and build lasting customer relationships. 

For quick reference, here’s another look at the tips we shared:

  • 1. Use a multichannel approach
  • 2. Befriend data
  • 3. Plan thematic caption sequences and batch your content 
  • 4. Build in time for daily community engagement 
  • 5. Give users a reason to pay attention to your brand on social media 

And that’s it for today! Now go forth and nurture your social media audience, friends.

The post Relationships 101: Tips for Maximizing Social Media Channels to Increase Brand Awareness appeared first on noupe.

Categories: Others Tags:

Healthcare: Use Text Messaging to Grow Your Practice

October 12th, 2022 No comments

Text messaging has become one of the most popular modes of communication, and it’s not just for teenagers or young people who have grown up in the information age. Texting has also become an effective marketing tool for businesses across myriad industries.

Step up your PT marketing plan with text messaging, and take advantage of one of the simplest ways to keep in touch with clients and prospects. When you reach out to clients on their digital devices, you increase the likelihood of getting a response, growing your practice one message at a time. Read on to learn how to use texting to your advantage.

Keep it Simple

Texting is convenient because people today typically keep their phones or devices within arm’s reach. You can maximize your texting outreach campaign by keeping your messages short and sweet. 

Most people react to text messages in the same way they interact on social media—long messages are generally considered a turnoff. Wordy messages coming from an unknown number are likely to go unread and be deleted. To use texting successfully, let them know who you are and get right to the heart of their needs with just a few sentences.

Be Relatable

A down-to-earth message can go a long way in making text recipients feel like you understand them. Start with a short greeting that includes your practice name. If you’re reminding them of an upcoming appointment, be sure to tell them you look forward to seeing them. To promote a special deal, or a new product or service, phase your message as an invitation to take advantage of a great opportunity.

Incorporate Healthcare SEO

Getting more real-time engagement with your clients and prospects is not the only advantage of texting. You may also get a bump in your overall search engine optimization (SEO). As recipients read your messages and click on the embedded links, it will drive more traffic to your website and other online assets.

Be sure to include links to your articles, landing pages, and website, to entice readers to engage with your content. The more visitors you have, the more relevant your practice will appear when it comes to Google ranking.

Use a Texting Schedule

One message is not enough to nudge your recipients into action. You need to court them over time, with the right messaging at the right times. The best way to do this is to create a texting schedule. Sending messages too often might annoy some people, and sending them too infrequently may cause them to forget about you.

Spread out your text messages no more than seven days apart. If you have an upcoming event or appointment, you can temporarily increase the frequency of texting until your last reminder prior to the event.

Time Your Messages Well

The last thing people want is a marketing call or message during dinner, late at night, or early in the morning when they’re getting geared up for work. The best times to send text messages are generally between noon and 3:00 pm. Weekend afternoons are also considered especially good times, since most people are free then, and more likely to read and respond to your messages.

HIPAA: Protect Client Data No Matter What

Whenever you share your client’s data over an electronic medium, you need to maintain compliance with HIPAA standards. Texting is no different. Make your clients aware that you are doing everything you can to guard their protected health information, and be sure to include automated consent forms before releasing their health info via text.

Put Texting on Autopilot

As a business owner, you understand the power of automation and the importance of streamlining your activities. For texting, use services like Front.com that let you schedule and send text messages using your email. Automated texting makes things easy for your employees who are already online all day to send and respond to text messages without switching devices. 

Front.com will keep a record of all text conversations for you, and store them all in one place for easy access. That way, if a client communicates by text with different employees, your staff can pull up their records to get all the info they need.

Get Ready to Engage

Texting shows recipients that you are available to listen to them and address their questions and problems — so long as you are responsive. Think about delegating the task of replying to texts to a trusted staff member, so clients’ messages get a response as soon as they come in.

Most people use texting to quickly volley questions and answers between parties, so provide your designated texter with a cheat sheet of quick responses. When a client requires a more in-depth response, that’s the perfect time to invite them into your practice for a consultation.  

Scripts Make Things Easier

Scripts are a great tool for automation that helps you streamline text messaging with your clients and prospects. Maintain a list of common answers to frequent questions that your staff can refer to for quick responses. Provide cheat sheets or handy cue cards to make it easy for your staff to respond within the ideal 10–15-minute window.  

Analyze Your Results

Use analytics tools like PatientPop to keep track of your campaigns, and to identify which links are generating the most clicks. With this information, you can see which promotions, times of day, or messages are most appealing to recipients.

Contact the Pros for Help

As patients’ preferred modes of communicating evolve, your physical therapy marketing strategy should be flexible enough to keep pace. The pros at Clever Solution are web development experts who can help you cultivate a stellar text marketing strategy that helps you grow your practice.

The post Healthcare: Use Text Messaging to Grow Your Practice appeared first on noupe.

Categories: Others Tags:

Top 12 Whiteboard Animation Software to look out for

October 12th, 2022 No comments

Marketers have been using whiteboard videos for a long time. The first ever whiteboard videos were created by recording an actual hand drawing on a whiteboard. Over the years, brands added animation to whiteboard videos to make them more engaging. 

Animated whiteboard videos are one of the most effective ways of explaining your product or services. These videos combine animation, characters, and voiceover on a white background, creatively presenting ideas and stories.

The popularity of whiteboard animation videos resulted in the launch of many amazing whiteboard animation software. This software enables brands to create professional whiteboard videos quickly and affordably. 

Video editing software is an excellent idea for creating videos independently. 

Here we have brought you a list of the most popular software for creating whiteboard animated videos. 

Let’s get started.

Mango Animate

Mango Animate lets users create complex messages into an engaging whiteboard explainer video. With exceptional tools and an easy-to-use dashboard, the animation is easier for beginners. Users can leverage the pro version features and make the best videos with a one-time fee.

Features of Mango Animate

  • Customized templates.
  • User-friendly dashboard to seamlessly create whiteboard explainers.
  • Live animation effect.
  • Library of hands with various sizes and gestures.
  • Caption and audio features.
  • Three output options are provided: online video, offline video, and Gif.

Pricing

One-time payment of $39

VideoScribe

What makes VideoScribe popular among video editors is its stunning features. It is an easy-to-use software with pre-built templates for professionals and beginners. 

For example, one can drag and drop animation to create engaging whiteboard videos within a few minutes.

Features of VideoScribe Whiteboard Animation 

  • Library of over 11k images and Gifs
  • Choose from a wide range of pens, erasers, and drawing hands.
  • Innovative features like effects, move-in fade-in with an automatic draw when hit play.
  • Over 190 royalty-free tracks and voice-over recording
  • Canvas sizes for every occasion

Pricing

The monthly Plan starts at $20.65/month

Annual Plan at $10/ month

Team Plan (Quote based)

Explaindio

Explaindio is a great tool for creating explainer videos without any technical expertise. The software allows videos for ads, social media, and animated explainers for YouTube in the easiest way possible.

Features of Explaindio

  • Ideal for professional-looking whiteboard animation and 2D and 3D animated videos.
  • Premade voice-overs.
  • Multiple editing features.
  • Royalty-free stock images.
  • Unlimited images and animated graphics for paid members.

Pricing:

Monthly Plan – $37/month

Annual Plan – $67/month

One-time Plan – $497

My Simple Show

Mysimpleshow lets users create unique whiteboard animations within a few minutes. The tool makes a complex topic simple and empowers beginners to create professional videos.

Features of MySimpleShow

  • Step-by-step video creation assistance for beginners.
  • Users can upload a pre-designed PowerPoint file.
  • Templates and auto-sync voice recording.
  • Easy distribution of files across channels.
  • Intelligent explainer engine

Pricing

Premium Fun Plan – $5.99/month

Business Plan – $129/month

Pro Plan – $499/month

RenderForest

Created by an Armenia-based company, RenderForest is among the most used video editing software for professionals and beginners. With dozens of video examples and a template library creating whiteboard animation videos is easy and fast.

Features of RenderForest

  • Graphic logo design.
  • Tools to build websites.
  • Undo and redo options.
  • Music recommendations.
  • New scene suggestions while creating videos.
  • AI-based video creation dashboard.

Pricing

Free Plan with limited features

Lite – $11/ Month

Pro – $18/ Month

Business – $20/ Month

Animaker

Animaker is one of the rapidly growing software in video editing and marketing, with more than 9 million users across the world. From 2D drawings to commercial videos, it delivers impressive results for startups and brands.

Features of Animaker

  • Simple drag-and-drop builder
  • Animated character creator
  • 100M+ Stock Videos and Photos
  • Upload and Edit Videos at 4K Video quality
  • Instant resizing for social media

Pricing

Basic- $10/month

Starter – $19/month

Pro- $49/month

Doodly

If you search for the best whiteboard animation software in 2022, Doodly will be among the top 5 names that industry experts suggest. The easy drag-and-drop option allows users to sit back and let the software draw animated videos.

Features of Doodly

  • 1000+ custom-drawn images.
  • Drag & Drop button using the Smart draw technology.
  • Royalty-free music.
  • Whiteboard, green board, glass board, and blackboard images.
  • Various human and cartoon hand styles.

Pricing

    Standard – $39/month

    Enterprise– $69/month

Vyond

Vyond allows users to create animated characters as per video context. From workplaces to casual environments, whiteboard animations are easy for hundreds of settings. The company has over 12 million registered users all across the world.

Features of Vyond

  • Create MP4s or animated GIFs for social media with a click.
  • Customization for characters and environments.
  • Simple and easy-to-understand interface.
  • Royalty-free audio files.

Pricing

Essential – $49/Month

Premium – $89/Month

Professional – $549/Month

Enterprise- Customized

Camtasia

If you are looking for professional whiteboard animation software, Camtasia is the best option. Powered by TechSmith, the Camtasia tool offers an excellent layout for beginners and professional video editors. 

Features of Camtasia

  • Royalty-free images and music tracks.
  • Built-in animation for logos, text, and graphics.
  • Multiple timelines and preview window for editing.
  • Instant access to frequently used tools and projects.
  • Easy transitions and animation.

Pricing

Along with the free trial, the entire software costs around $270 as a one-time fee.

You might have to pay for upgrades for additional features.

Biteable

Whether for a presentation or a landing page, Biteable has the most incredible user interface, allowing for the creation of whiteboard animation. From beginners to professionals, users can use its easy-to-understand features and create error-free explainers within a few minutes.

Features of Biteable

  • Premade templates for different environments and needs.
  • Built-in elements & effects .
  • Choose the purpose option before creating videos (Sales, social media, and presentation)

Pricing

Biteable Free – Free Download

Ultimate Plan – $49 / Month 

Teams – $249/ Month

Easy Sketch Pro

Easy Sketch allows making whiteboard explainers, animated whiteboards, and Doodle videos for all users without any technical experience. The Doodle videos created within the software make the explainers look more appealing in no time.

Features of Easy Sketch Pro

  • Easy to create full HD videos.
  • Built-in music library.
  • Real-time doodles.
  • Video analytic tool.

Pricing

The Plan starts at $37.

Moovly 

Moovly is one of the most trusted whiteboard animation software in 2022. Web-based software offers excellent customer support, pre-built templates, and transitions at no additional charge. It is a highly optimized tool providing video creation services to millions of people.

Features of Moovly

  • HD quality videos.
  • Provides timestamped in-video feedback and video collaboration for the projects.
  • Has over 1 million video assets.
  • All features could be used with just one click.
  • Works well with Chrome or Firefox.
  • Broadcast videos straight to YouTube, Vimeo, and other platforms.

Pricing 

Free sign-up with limited features

Pro Plan – $49/month

Max Plan – $99/month

Enterprise- Customized

Final Words

Whiteboard animated videos are a need for every brand’s video marketing strategy in 2022. These videos are known for being professional, engaging, and educational at the same time. Whiteboard videos can efficiently explain products and services and motivate customers to purchase within minutes. All it takes is great software and a production team to back up the video.  

These were the top 12 software to choose from. Based on the features, pricing, and quality, select any software and produce professional videos for video marketing or presentation.

The post Top 12 Whiteboard Animation Software to look out for appeared first on noupe.

Categories: Others Tags:

Early Days of Container Style Queries

October 12th, 2022 No comments

We’re still in suuuuuper early days with container queries. Too early for broad browser support, but Chromium already supports it, Safari started supporting it in version 16, and Firefox is presumably not far behind.

Most early days conversations revolving around container queries usually compare the syntax to media queries.

/* Stacked flex container */
.post {
  display: flex;
  flex-direction: column;
}

/* Change direction when viewport is 600px or wider */
@media(min-width: 600px) {
  .post {
    flex-direction: row;
  }
}

/* Define the container */
.posts {
  container-name: posts;
  container-type: inline-size;
}

.post {
  display: flex;
  flex-direction: column;
}

/* Query the container's min-width */
@container posts (min-width: 600px) {
  /* Change styles when `posts` container is 600px or wider */
  .post {
    flex-direction: row;
  }
}

Both of these are making queries for min-width: 600. The difference is that the media query is looking at the viewport’s width to trigger those style changes while the container query is looking at the computed width of the .posts element. Sweet!

But after listening to CSS Podcast Episode 59, Una and Adam poked at the future of container queries: style queries! The current working draft of the CSS Containment Module Level 3 spec defines container style queries:

container style query allows querying the computed values of the query container. It is a boolean combination of individual style features () that each query a single, specific property of the query container.

But no examples on syntax just yet — only a brief description:

The syntax of a  is the same as for a declaration, and its query is true if the computed value of the given property on the query container matches the given value (which is also computed with respect to the query container), unknown if the property or its value is invalid or unsupported, and false otherwise. The boolean syntax and logic combining style features into a style query is the same as for CSS feature queries. (See @supports.)

So, yes, given time we should expect to pull off something like this:

.posts {
  container-name: posts;
}

@container posts (background-color: #f8a100) {
  /* Change styles when `posts` container has an orange background */
  .post {
    color: #fff;
  }
}

That’s a pretty dumb example. One thing to note is that the container-type is no longer based on the container’s inline-size but by style. We could delcare that like so:

.posts {
  container-name: posts;
  container-type: style; /* unnecessary */
}

…but all container queries are style queries by default. Well. at least as it stands today. Miriam Suzanne has a nice outline of the possible issues that might pop up with that.

Where might querying a container’s styles come in handy? I don’t know yet! But my mind gos to a few places:

  • Custom property values: We’ve seen custom properties used like state indicators, such as the DRY-switching method Ana covered a while back. The value changes, and so do styles.
  • Alternate dark mode approach: Instead of basing it all on a body class change that re-assigns custom property values, maybe we can change an entire color palette if, say, the body background changes color.
  • More complex query conditions: Like, say, we want to apply styles when the size and style conditions for a container are met.

Una also mentioned in the CSS Podcast that container style queries could help prevent some awkward styling situations, like if we happen to have italicized text in an already italicized blockquote:

blockquote {
  container-name: quote;
}

@container quote (font-style: italic) {
  em, i, q, address {
    font-style: normal;
  }
}

Early Days of Container Style Queries originally published on CSS-Tricks, which is part of the DigitalOcean family. You should get the newsletter.

Categories: Designing, Others Tags:

10 Reasons to Choose a Cloud-based Security Solution

October 12th, 2022 No comments

The cloud has probably impacted the future of business more than any other single factor. When attempting to effect a digital transformation from traditional on-premises hardware, the 24/7 data availability undoubtedly is of tremendous benefit, but a constantly moving perimeter brings with it increased security challenges.

If there is one thing that the Covid-19 pandemic taught, is that with increased operational flexibility and remote work, attack surfaces, insecure data transfers, and even compliance issues also increased tenfold. Security challenges to physical business premises also increased with either ill-intentioned incursions or health and hygiene issues.

The importance of cloud security is now front and center for any website designer or developer. Building and managing a web design service can be challenging as it is, but any service needs to focus on a client’s needs and be able to customize offerings. 

Integrated cloud security systems become fundamental in web design and development because even a single intrusion can create havoc for a client and have repercussions for your own design business. You may lose clients and even be penalized in search results.

What Is a Cloud-Based Security System?

When considering cloud security, we are referring to a variety of technologies and procedures that have been formulated to protect a business against both internal and external security threats. With the digital transformation of businesses across the globe and the increased use of cloud-based tools, the security of technology becomes a necessary part of any business infrastructure.

The technological optimization of business organization brings with it new security challenges. Undoubtedly, cloud-based tools improve both the capabilities and flexibility of a business’ on-premises physical structure, but if these capabilities are not secure, there can be grave consequences. 

10 Key Reasons to Select Cloud-Based Security Solutions 

1. Data Security

Data security is one of the top issues, if not the number one concern, for both companies and consumers. The protection of privacy and personal as well as financial data is the basis of trust between a company and its clients. The increase in the use of personal devices has allowed for an increase in attacks.

Cloud-based security solutions can protect the entire lifecycle of data through encryption, safe passwords, MFA – multi-factor authentication and continually tested backups. The integration of multi-factor authentication featuring several levels of authentication is designed to increase an organization’s level of protection.  

Web designers must protect personal data and payment information from data breaches, data loss, cross-site scripting intrusions, and DDoS attacks whether volume, protocol, or application layer attacks.

2. Threat Management

Cloud-based security will be applied to all organizational endpoints such as access points and ports, applications, devices, etc. Cloud-based solutions will include a central management hub with all security procedures integrated onto a single platform. 

Necessities such as visibility, the monitoring of internet-based security attacks, physical property intrusion, logistical management, access point and video management of physical properties, fire, and smoke detection, can all be managed from a single platform that is directly connected to law enforcement and emergency service providers, and it will be active 24/7 for 365 days a year. 

3. System and Cost Scalability

One of the principal benefits to cloud-based systems is scalability. Security can be scaled to specific needs for security coverage, capacity, and eventual fluctuations in an organization’s demands. The expenses incurred will vary with the organization’s needs. If you have seasonal high traffic, the server capacity will be increased to avoid crashes and meet operational requirements. If the company has a period of scaled back activity, expenses will be reduced as well.

4. Automatic Compliance with Regulatory Demands

Regulated industries and sectors have a constant concern to comply with regulatory requirements, updates, and modifications, especially when dealing with privacy and data security. Cloud-based security systems are continually updated to comply with federal and local regulatory requirements. 

5. Technological Support

A principal and debilitating problem with physical onsite security solutions can be a complete system failure and the amount of time required for repair. Cloud-based security solutions can keep a system up and functioning even if single components may fail. The constant technological monitoring, failover protocols, and geo-redundancy are all designed to avoid system failure and interruption. System monitoring permits host providers to address problems immediately.

When designing, a complete support system needs to be integrated affording clients 24/7 protection. Building in redundancies can ensure that a clients web service is always up and running with built-in preventative security measures. A specific process has been designed into the system to step in and repair any potential security challenge.

6. DDoS -Distributed Denial of Service

Ill-intentioned hackers target an organization’s computer system by flooding it with numerous requests simultaneously. Websites automatically will slow for loading and risk crashing as request numbers exceed site limits. Cloud-based security systems will look for, identify, and stop bulk traffic that is suspected of targeting an organization’s servers. This means preventing downtime that will inevitably cost a company money. 

7. Updates and Maintenance

One of the principal causes for viruses and malware infections is unpatched software. For many organizations it’s quite difficult to maintain software updated when occupied with daily operations. This allows for disruptions, loss of data, and occasionally falling prey to ransomware. Cloud-based hosting providers install patches and update software continually, meaning organizations will not experience any system downtime. 

Automated updates and alerts facilitate rapid responses to hackers and cybercrime. Security credentials can also be updated without any delay. Cloud-based systems feature advanced automation that can be used to monitor and control workflows and people flow.  The possibility to integrate cloud-based systems with physical location security data will improve an organization’s overall security thus lessening vulnerabilities, saving time, and avoiding attacks that can affect operations.

8. Data Recovery 

Human error, power outages, and natural disasters can all lead to the loss of data. While organizations should be prepared with a Disaster Recovery Plan, that should also be tested at regular intervals, many do not. A cloud-based security system will store data in an entirely different location that benefits from automatic backups and around the clock security and surveillance.

9. Flexibility and Remote Management

The remote management of security tools using cloud-based platforms can also meet physical security needs. Management will be able to access, modify, and offer quick responses to issues that arise. 

Cloud-based systems do not require a physical server. Data can be managed from any location as long as there is an internet connection. Less space is needed at physical premises for an infrastructure that might eventually be compromised due to component failure, natural disaster, or the ill-intentioned. Cloud-based security management facilitates an organization’s remote operations and enables an immediate response to any type of security need. 

10. Integration of IOT Devices and Artificial Intelligence 

Wireless devices vary in capabilities from managing smart locks and RFID door readers, to smart lighting, which can all be managed from a cloud-based security system. Monitoring and sending alerts are rapid and easy. Cloud-based security systems also can host artificial intelligence programs to permit the recognition of specific threats and undesirable behaviors rapidly and alert to security risks allowing for quicker intervention.

In Conclusion

Traditional working methods have been challenged by globalization, technological advancements, and the Covid-19 pandemic. Traditional on-premises hardware alone is no longer up to the challenges posed. Fortunately, the advancement of technology has also provided cloud-based security solutions to contrast threats and mitigate risks management.

While web design naturally focuses on performance, cloud security can no longer be an afterthought. Cloud security now more than ever requires security being built into platforms from day one.

Cloud security design permits customers to maintain a secured IT structure despite adding new capabilities or the rapidity of operations, and they will not be able to be easily or readily bypassed or compromised. Because cloud environments are complex and the speed of applications have increased, incorporating security into development and design from the beginning is one of the best tools available for guaranteeing cybersecurity.

The post 10 Reasons to Choose a Cloud-based Security Solution appeared first on noupe.

Categories: Others Tags:

Rendering External API Data in WordPress Blocks on the Front End

October 11th, 2022 No comments
An ordered set of football team rankings showing team logos, names, and game results.

There’ve been some new tutorials popping here on CSS-Tricks for working with WordPress blocks. One of them is an introduction to WordPress block development and it’s a good place to learn what blocks are and to register them in WordPress for use in pages and posts.

While the block basics are nicely covered in that post, I want to take it another step forward. You see, in that article, we learned the difference between rendering blocks in the back-end WordPress Block Editor and rendering them on the front-end theme. The example was a simple Pullquote Block that rendered different content and styles on each end.

Let’s go further and look at using dynamic content in a WordPress block. More specifically, let’s fetch data from an external API and render it on the front end when a particular block is dropped into the Block Editor.

We’re going to build a block that outputs data that shows soccer (er, football) rankings pulled from Api-Football.

This is what we’re working for together.

There’s more than one way to integrate an API with a WordPress block! Since the article on block basics has already walked through the process of making a block from scratch, we’re going to simplify things by using the @wordpress/create-block package to bootstrap our work and structure our project.

Initializing our block plugin

First things first: let’s spin up a new project from the command line:

npx @wordpress/create-block football-rankings

I normally would kick a project like this off by making the files from scratch, but kudos to the WordPress Core team for this handy utility!

Once the project folder has been created by the command, we technically have a fully-functional WordPress block registered as a plugin. So, let’s go ahead and drop the project folder into the wp-content/plugins directory where you have WordPress installed (probably best to be working in a local environment), then log into the WordPress admin and activate it from the Plugins screen.

Now that our block is initialized, installed, and activated, go ahead and open up the project folder from at /wp-content/plugins/football-rankings. You’re going to want to cd there from the command line as well to make sure we can continue development.

These are the only files we need to concentrate on at the moment:

  • edit.js
  • index.js
  • football-rankings.php

The other files in the project are important, of course, but are inessential at this point.

Reviewing the API source

We already know that we’re using Api-Football which comes to us courtesy of RapidAPI. Fortunately, RapidAPI has a dashboard that automatically generates the required scripts we need to fetch the API data for the 2021 Premier League Standings.

A dashboard interface with three columns showing code and data from an API source.
The RapidAPI dashboard

If you want to have a look on the JSON structure, you can generate visual representation with JSONCrack.

Fetching data from the edit.js file

I am going to wrap the RapidAPI code inside a React useEffect() hook with an empty dependency array so that it runs only once when the page is loaded. This way, we prevent WordPress from calling the API each time the Block Editor re-renders. You can check that using wp.data.subscribe() if you care to.

Here’s the code where I am importing useEffect(), then wrapping it around the fetch() code that RapidAPI provided:

/**
* The edit function describes the structure of your block in the context of the
* editor. This represents what the editor will render when the block is used.
*
* @see https://developer.wordpress.org/block-editor/reference-guides/block-api/block-edit-save/#edit
*
* @return {WPElement} Element to render.
*/

import { useEffect } from "@wordpress/element";

export default function Edit(props) {
  const { attributes, setAttributes } = props;

  useEffect(() => {
    const options = {
      method: "GET",
      headers: {
        "X-RapidAPI-Key": "Your Rapid API key",
        "X-RapidAPI-Host": "api-football-v1.p.rapidapi.com",
      },
    };

    fetch("https://api-football-v1.p.rapidapi.com/v3/standings?season=2021&league=39", options)
      .then( ( response ) => response.json() )
      .then( ( response ) => {
        let newData = { ...response };
        setAttributes( { data: newData } );
        console.log( "Attributes", attributes );
      })
      .catch((err) => console.error(err));
}, []);

  return (
    <p { ...useBlockProps() }>
      { __( "Standings loaded on the front end", "external-api-gutenberg" ) }
    </p>
  );
}

Notice that I have left the return function pretty much intact, but have included a note that confirms the football standings are rendered on the front end. Again, we’re only going to focus on the front end in this article — we could render the data in the Block Editor as well, but we’ll leave that for another article to keep things focused.

Storing API data in WordPress

Now that we are fetching data, we need to store it somewhere in WordPress. This is where the attributes.data object comes in handy. We are defining the data.type as an object since the data is fetched and formatted as JSON. Make sure you don’t have any other type or else WordPress won’t save the data, nor does it throw any error for you to debug.

We define all this in our index.js file:

registerBlockType( metadata.name, {
  edit: Edit,
  attributes: {
    data: {
      type: "object",
    },
  },
  save,
} );

OK, so WordPress now knows that the RapidAPI data we’re fetching is an object. If we open a new post draft in the WordPress Block Editor and save the post, the data is now stored in the database. In fact, if we can see it in the wp_posts.post_content field if we open the site’s database in phpMyAdmin, Sequel Pro, Adminer, or whatever tool you use.

Showing a large string of JSON output in a database table.
API output stored in the WordPress database

Outputting JSON data in the front end

There are multiple ways to output the data on the front end. The way I’m going to show you takes the attributes that are stored in the database and passes them as a parameter through the render_callback function in our football-rankings.php file.

I like keeping a separation of concerns, so how I do this is to add two new files to the block plugin’s build folder: frontend.js and frontend.css (you can create a frontend.scss file in the src directory which compiled to CSS in the build directory). This way, the back-end and front-end codes are separate and the football-rankings.php file is a little easier to read.

/explanation Referring back to the introduction to WordPress block development, there are editor.css and style.css files for back-end and shared styles between the front and back end, respectively. By adding frontend.scss (which compiles to frontend.css, I can isolate styles that are only intended for the front end.

Before we worry about those new files, here’s how we call them in football-rankings.php:

/**
* Registers the block using the metadata loaded from the `block.json` file.
* Behind the scenes, it registers also all assets so they can be enqueued
* through the block editor in the corresponding context.
*
* @see https://developer.wordpress.org/reference/functions/register_block_type/
*/
function create_block_football_rankings_block_init() {
  register_block_type( __DIR__ . '/build', array(
    'render_callback' => 'render_frontend'
  ));
}
add_action( 'init', 'create_block_football_rankings_block_init' );

function render_frontend($attributes) {
  if( !is_admin() ) {
    wp_enqueue_script( 'football_rankings', plugin_dir_url( __FILE__ ) . '/build/frontend.js');
    wp_enqueue_style( 'football_rankings', plugin_dir_url( __FILE__ ) . '/build/frontend.css' ); // HIGHLIGHT 15,16,17,18
  }
  
  ob_start(); ?>

  <div class="football-rankings-frontend" id="league-standings">
    <div class="data">
      <pre>
        <?php echo wp_json_encode( $attributes ) ?>
      </pre>
    </div>
    <div class="header">
      <div class="position">Rank</div>
      <div class="team-logo">Logo</div>
      <div class="team-name">Team name</div>
      <div class="stats">
        <div class="games-played">GP</div>
        <div class="games-won">GW</div>
        <div class="games-drawn">GD</div>
        <div class="games-lost">GL</div>
        <div class="goals-for">GF</div>
        <div class="goals-against">GA</div>
        <div class="points">Pts</div>
      </div>
      <div class="form-history">Last 5 games</div>
    </div>
    <div class="league-table"></div>
  </div>

  <?php return ob_get_clean();
}

Since I am using the render_callback() method for the attributes, I am going to handle the enqueue manually just like the Block Editor Handbook suggests. That’s contained in the !is_admin() condition, and is enqueueing the two files so that we avoid enqueuing them while using the editor screen.

Now that we have two new files we’re calling, we’ve gotta make sure we are telling npm to compile them. So, do that in package.json, in the scripts section:

"scripts": {
  "build": "wp-scripts build src/index.js src/frontend.js",
  "format": "wp-scripts format",
  "lint:css": "wp-scripts lint-style",
  "lint:js": "wp-scripts lint-js",
  "packages-update": "wp-scripts packages-update",
  "plugin-zip": "wp-scripts plugin-zip",
  "start": "wp-scripts start src/index.js src/frontend.js"
},

Another way to include the files is to define them in the block metadata contained in our block.json file, as noted in the introduction to block development:

"viewScript": [ "file:./frontend.js", "example-shared-view-script" ],
"style": [ "file:./frontend.css", "example-shared-style" ],

The only reason I’m going with the package.json method is because I am already making use of the render_callback() method.

Rendering the JSON data

In the rendering part, I am concentrating only on a single block. Generally speaking, you would want to target multiple blocks on the front end. In that case, you need to make use of document.querySelectorAll() with the block’s specific ID.

I’m basically going to wait for the window to load and grab data for a few key objects from JSON and apply them to some markup that renders them on the front end. I am also going to convert the attributes data to a JSON object so that it is easier to read through the JavaScript and set the details from JSON to HTML for things like the football league logo, team logos, and stats.

The “Last 5 games” column shows the result of a team’s last five matches. I have to manually alter the data for it since the API data is in a string format. Converting it to an array can help make use of it in HTML as a separate element for each of a team’s last five matches.

import "./frontend.scss";

// Wait for the window to load
window.addEventListener( "load", () => {
  // The code output
  const dataEl = document.querySelector( ".data pre" ).innerHTML;
  // The parent rankings element
  const tableEl = document.querySelector( ".league-table" );
  // The table headers
  const tableHeaderEl = document.querySelector( "#league-standings .header" );
  // Parse JSON for the code output
  const dataJSON = JSON.parse( dataEl );
  // Print a little note in the console
  console.log( "Data from the front end", dataJSON );
  
  // All the teams 
  let teams = dataJSON.data.response[ 0 ].league.standings[ 0 ];
  // The league logo
  let leagueLogoURL = dataJSON.data.response[ 0 ].league.logo;
  // Apply the league logo as a background image inline style
  tableHeaderEl.style.backgroundImage = `url( ${ leagueLogoURL } )`;
  
  // Loop through the teams
  teams.forEach( ( team, index ) => {
    // Make a div for each team
    const teamDiv = document.createElement( "div" );
    // Set up the columns for match results
    const { played, win, draw, lose, goals } = team.all;

    // Add a class to the parent rankings element
    teamDiv.classList.add( "team" );
    // Insert the following markup and data in the parent element
    teamDiv.innerHTML = `
      <div class="position">
        ${ index + 1 }
      </div>
      <div class="team-logo">
        <img src="${ team.team.logo }" />
      </div>
      <div class="team-name">${ team.team.name }</div>
      <div class="stats">
        <div class="games-played">${ played }</div>
        <div class="games-won">${ win }</div>
        <div class="games-drawn">${ draw }</div>
        <div class="games-lost">${ lose }</div>
        <div class="goals-for">${ goals.for }</div>
        <div class="goals-against">${ goals.against }</div>
        <div class="points">${ team.points }</div>
      </div>
      <div class="form-history"></div>
    `;
    
    // Stringify the last five match results for a team
    const form = team.form.split( "" );
    
    // Loop through the match results
    form.forEach( ( result ) => {
      // Make a div for each result
      const resultEl = document.createElement( "div" );
      // Add a class to the div
      resultEl.classList.add( "result" );
      // Evaluate the results
      resultEl.innerText = result;
      // If the result a win
      if ( result === "W" ) {
        resultEl.classList.add( "win" );
      // If the result is a draw
      } else if ( result === "D" ) {
        resultEl.classList.add( "draw" );
      // If the result is a loss
      } else {
        resultEl.classList.add( "lost" );
      }
      // Append the results to the column
      teamDiv.querySelector( ".form-history" ).append( resultEl );
    });

    tableEl.append( teamDiv );
  });
});

As far as styling goes, you’re free to do whatever you want! If you want something to work with, I have a full set of styles you can use as a starting point.

I styled things in SCSS since the @wordpress/create-block package supports it out of the box. Run npm run start in the command line to watch the SCSS files and compile them to CSS on save. Alternately, you can use npm run build on each save to compile the SCSS and build the rest of the plugin bundle.

View SCSS
body {
  background: linear-gradient(to right, #8f94fb, #4e54c8);
}

.data pre {
  display: none;
}

.header {
  display: grid;
  gap: 1em;
  padding: 10px;
  grid-template-columns: 1fr 1fr 3fr 4fr 3fr;
  align-items: center;
  color: white;
  font-size: 16px;
  font-weight: 600;
  background-repeat: no-repeat;
  background-size: contain;
  background-position: right;
}

.frontend#league-standings {
  width: 900px;
  margin: 60px 0;
  max-width: unset;
  font-size: 16px;

  .header {
    .stats {
      display: flex;
      gap: 15px;

      &amp; &gt; div {
        width: 30px;
      }
    }
  }
}

.league-table {
  background: white;
  box-shadow:
    rgba(50, 50, 93, 0.25) 0px 2px 5px -1px,
    rgba(0, 0, 0, 0.3) 0px 1px 3px -1px;
  padding: 1em;

  .position {
    width: 20px;
  }

  .team {
    display: grid;
    gap: 1em;
    padding: 10px 0;
    grid-template-columns: 1fr 1fr 3fr 4fr 3fr;
    align-items: center;
  }

  .team:not(:last-child) {
    border-bottom: 1px solid lightgray;
  }

  .team-logo img {
    width: 30px;
  }

  .stats {
    display: flex;
    gap: 15px;
  }

  .stats &gt; div {
    width: 30px;
    text-align: center;
  }

  .form-history {
    display: flex;
    gap: 5px;
  }

  .form-history &gt; div {
    width: 25px;
    height: 25px;
    text-align: center;
    border-radius: 3px;
    font-size: 15px;
  }

  .form-history .win {
    background: #347d39;
    color: white;
  }

  .form-history .draw {
    background: gray;
    color: white;
  }

  .form-history .lost {
    background: lightcoral;
    color: white;
  }
}

Here’s the demo!

Check that out — we just made a block plugin that fetches data and renders it on the front end of a WordPress site.

We found an API, fetch()-ed data from it, saved it to the WordPress database, parsed it, and applied it to some HTML markup to display on the front end. Not bad for a single tutorial, right?

Again, we can do the same sort of thing so that the rankings render in the Block Editor in addition to the theme’s front end. But hopefully keeping this focused on the front end shows you how fetching data works in a WordPress block, and how the data can be structured and rendered for display.


Rendering External API Data in WordPress Blocks on the Front End originally published on CSS-Tricks, which is part of the DigitalOcean family. You should get the newsletter.

Categories: Designing, Others Tags:

3 Best Ways to Improve User Feedback

October 10th, 2022 No comments

What determines the success of your company? Is it your social media following? Or the number of trial users, perhaps? 

While these contribute to a company’s success, without user feedback, they are not sustainable—therefore, not profitable. You can watch the graph going up; however, to actually achieve long-term success, you must listen to what your users are saying and implement necessary changes to improve their experience.

In this article, we will guide you through different types of user feedback, and how you can collect and analyze it to maximize the longevity of your product or app.

What is User Feedback?

User feedback is all the information and data directly gathered from your users regarding their reactions and experiences with your products, apps, services or websites. This feedback can be collected in various ways, such as through Customer Satisfaction Score (CSAT) or Net Promoter Score (NPS) surveys. User feedback or customer feedback reveals valuable insights into user experience and level of satisfaction.

Why Do You Need User Feedback?

Feedback from users is the bread and butter of product teams. Scheduling 1:1 interviews, creating custom forms and polls or embedding surveys in your app or service is the best way to notice early trends to improve your product and provide better value for your customers.

Understanding what makes customers happy and making product decisions according to their responses ensures increasing the number of returning customers who will gladly spread the word about your services and attract new potential users.

Investing in user feedback may seem daunting initially, but the results will help you reach your long-term goals.

3 Types of User Feedback

Before understanding the methods for improving user feedback, let’s take a look at different types of feedback, what they mean for your business, and how to use them to understand the role of customer experience better.

1. Proactive Feedback

Proactive user feedback refers to customer surveys or direct feedback from customers conducted prior to any fallouts or negative reviews appearing online. In other words, proactive user feedback measures the ratio of happy customers and unhappy customers and provide actionable insights.

You first inform your customer base about the possible problems in your app or service and share the solution you’re working on to deter users from posting negative feedback. A proactive customer feedback approach allows you to make immediate changes to retain loyal customers. It sends a strong signal to potential customers about how they will be valued and listened to when they encounter an issue.

In that sense, proactive feedback is a type of qualitative feedback that helps companies build user experiences that align with their needs better. You can implement proactive user feedback into your business in several ways, but Net Promoter Score (NPS) feedback surveys are the most popular option.

Net Promoter Score (NPS) is a simple question, asking real users to rate their experience and likelihood of recommending your service to their peers, family or colleagues. It usually gives a scale from 1 to 10 to users, 1 being the least likely and 10 being the most likely to recommend your services.

With software like UserGuiding, you can measure app experience, embed NPS into websites or apps and use your score to invest in product improvement with a no-code design that will save you time and money. NPS surveys are especially helpful for customer success teams to keep customers happy and active on your platform. You can also send follow-up questions to get in-depth product feedback and improve your response rates.

2. Reactive Feedback

The difference between proactive and reactive user feedback is that reactive feedback comes unsolicited, meaning the users respond to your app or product with a specific demand in mind. There might be a bug to fix, an improvement to an existing feature, or something completely broken. In short, customer service teams step in after a problem occurs.

Reactive feedback includes the Customer Satisfaction Survey (CSAT) and Retention Survey. Customer Satisfaction Survey (CSAT) is similar to the Net Promoter Score (NPS) in that they both calculate the level of satisfaction and collect customer insights into product design, product development, and more.

Retention Survey, on the other hand, closely monitors why users have downgraded their paid plan and let you gauge customer loyalty towards your brand.

These feedback types are helpful for detecting already-existing problems within your product or service. However, since the problem has already caused some damage to the customer, the customer journey is more likely to suffer from friction and volatility. Therefore, it is important for customer success teams to examine customer feedback carefully and take measures, such as open communication, a sincere apology, etc.

3. On-Demand Feedback

On-Demand feedback is another name for ongoing user feedback. This feedback type can include in-app surveys, open-ended questions on websites, regular email surveys, social media feedback from actual users and potential users, and so on. Although the feedback forms have a wide variety, it is important to add your personal touch to stand out among the rest.

Jotform’s form builder is the perfect tool to create custom user feedback templates for your company. Based on the replies you receive, you can tweak and improve the form and work on your customer loyalty.

With these forms, feedback from users can be collected and assessed anytime, anywhere, so you do not have to worry about creating multiple reports to stay on top of the valuable feedback you receive.

In addition, Jotform offers over a hundred integrations with other apps, which is very useful for tracking your data. You can also collect payments and donations from loyal customers with its no-code builder.

3 Best Ways to Improve User Feedback

Whether you have low customer satisfaction levels or raving user feedback online, there is always room for improvement. We’ve gathered three essential tips you can implement to keep customers happy and make the best of the feedback from customers. Check it out:

1. Get to Know Your Users

Although there is a connection between you and the users, you still need to nurture this relationship and establish a collaborative environment. Without focusing on customer interactions, you cannot grow as a business.

But how can you get to know your users better?

Once again, polls and surveys are very productive in taking measurable actions based on negative or positive feedback. You can tease a product idea, promote digital products better, or define a clear product roadmap. While creating polls and surveys, make sure to follow these steps:

  • Without a clear direction, you will be unable to hone your questions or come up with follow-up questions to optimize the user experience.
  • Make sure that what you ask and how you ask match in tone and scope. Not every question will resonate with every user and you must be okay with that. Segment your users based on their activity, status or even motivation. This will make your surveys more efficient and your product marketing more on point.
  • Include multiple formats if necessary. From open-ended questions to multiple-choice and rating systems, you can work with a variety of options to measure how familiar the user is with your brand and satisfied with your product. Keep in mind to go over your poll or survey more than one time to ensure the formats do not clash and create confusion.

2. Don’t Be a Stranger to Users’ Email Inboxes

Out of sight, out of mind.

In-app interactions are invaluable for sure. However, users do not spend all of their time on your app (as much as you want them to). Therefore, it is important to initiate customer interactions and well-thought conversations outside your app or product to keep your relationship with users fresh.

Email surveys are great for reaching out to your users. You can also fine-tune the results by adding A/B testing to your campaigns. These tests help understand how users behave and frequently interact with your content.

Perfecting your subject lines, including CTAs in your email body, and sending timely follow-ups contribute to improving your user feedback as well.

3. Go Direct

Whether for a new feature, how-to guide, or a discount, you need to count on your users.

Offer them exclusive content and opportunities in exchange for their feedback and review. You can give early access to your new features or connect them with the support team once a problem arises and offer a step-by-step process when they feel too overwhelmed with your product.

Direct and open communication, combined with exclusive benefits, will create a sense of community and belonging for your users. They will be more enthusiastic about working with you to improve the product or app they love using.

Final Words

Even though collecting user feedback seems time-consuming, each new piece of feedback can change your product roadmap for the better. Collecting and analyzing user feedback with multiple forms and surveys will help you decide which actions must be taken to improve user experience. It will also show users that they are cared for, and that their demands will be met, which is a great starting point for building trust.

The post 3 Best Ways to Improve User Feedback appeared first on noupe.

Categories: Others Tags:

3 Essential Design Trends, October 2022

October 10th, 2022 No comments

This month, it’s all about the images. Each of the design trends we spotted has to do with the images you select – or don’t select – for a project and how you use them.

Here’s what’s trending in design this month.

1. Floating Images

Sometimes you design off the grid intentionally. Other times you are designing on a grid that’s maybe not-so-obvious. One of these things is happening with the floating images website design trend.

Here, you’ll see images and image containers that don’t seem to have any direction with their placements. They may or may not include animation, that further emphasizes the floating effect.

Floating images can include:

  • Cutouts that aren’t anchored to anything or any container
  • Images that are scattered on the canvas
  • Images in oddball placements that don’t seem to serve a purpose
  • Any image or element with an obvious off-the-grid location or spacing
  • Images that use different orientations or lack depth for perception

The challenge with this style is that it can look cohesive and organized or can turn into a jumble of parts rather quickly. It can take a lot of user testing to find the right balance.

Repeat uses animated, outline-style images in the background that have seemingly random placements. The floating effect is further emphasized by animation and the overlapping of images and other elements.

HummingYard uses images in a container in the design but the placements don’t have obvious meaning. There’s also a floating leaf on the right side of the canvas and a call to action button that appears to be off the grid as well. Each of the elements seems almost haphazardly placed, creating a floating effect for the entire design.

Wealthsimple uses a bunch of smaller different images to create a floating cascade of elements. The three-dimensional icons almost look like they are falling down the screen. Some overlap text elements, but most do not. It all feels a little random, but the images do frame and help bring the eyes toward the center-screen text elements and call to action.

2. No Images

If floating images aren’t your thing when considering a trendy design element, maybe no images is the answer.

In this design trend, the aesthetic comes together without any true imagery. The design uses mostly text with maybe an icon, logo, or small divot. The result can be a fairly stark design, but there’s a distinct focus on the words.

This trend is not so difficult to design, but storytelling and language are vital if you want users to interact with the design. No images can sometimes be off-putting to users who are looking for something visual.

Fandes Consulting uses a super simple black and white design with a simple call to action on the homepage. The scroll cue has a nice animation that helps you get a little deeper into the design quickly. (There are also more interactive elements and images after the scroll.)

Diego also uses a simple and stark aesthetic for his website. Again, there’s a simple animation for engagement and there’s more color and some imagery beyond the scroll.

Ashfield MedComms has the most color of these no-image website examples. With a navy background and a green icon, you can feel your eyes moving more on the screen here. There’s also more to read and a scroll animation to further the engagement.

3. Merged Text and Images

The merged text and images trend is the most complex of these design examples. Here, designers are creating overlapping layers for text and image (or animated) elements on the screen so that there’s a lot to consume visually. This can be a highly engaging concept, but also one that’s difficult to develop.

This design trend can be immensely beautiful when done well. Layered elements are exciting and have a “designed” feeling to them.

The visual challenge is this: Maintaining the readability of words and letters, especially when you are thinking about the responsiveness of the website. Animation or motion can add another level of complication.

If you are planning a design like this, it is important to plan for breakpoints and even have a fallback for what to do when readability becomes a concern. The desktop and mobile aesthetics might have different feels here to ensure that you have an easy-to-understand visual theme for both.

The Most Dangerous Places for Sailors includes text and an image element (the ship) that are tucked behind an animated water layer. What’s especially nice about this design is how the water looks just as dangerous as the words convey thanks to motion and the shape and color of the graphics.

Meow overlaps text and an image in a way that almost obscured readability, but the word has enough context that it’s generally understood. If you click through, there’s a fun little animation with the cat as well.

Champoleon the Valley of Dreams tucks part of the text into the mountains for a foreground to text to background layer set that’s beautiful and unified. There are a lot of layers in this design, making it much more complex than it appears on the surface. On the scroll, the rest of the site continues this layered theme with text and images that overlap and share space.

Conclusion

Which of these image trends is most appealing to you? They are vastly different approaches to website design and can work for different projects in different ways. They also range in development complexity, from super easy to manage – no images at all – to potentially challenging – merged text and images.

Source

The post 3 Essential Design Trends, October 2022 first appeared on Webdesigner Depot.

Categories: Designing, Others Tags:

Best Travel Apps to Relish Travelling Experience

October 10th, 2022 No comments

When you travel, you want to be able to experience the culture and feel the local atmosphere. But you also want to relax and experience the freedom of going where you want, when you want. That’s only possible when you plan your trip well, but it also requires spontaneity. The best way to experience both is to plan your trip and go with the flow.

Whether you’re planning a trip abroad or just want to get out of the city for a day, the best travel apps can help you experience the best of what the destination offers without draining your wallet or breaking your routine. We’ve curated a list of the best travel apps to help you plan your trip, explore the best local hidden gems, navigate cities, and connect with people.

We’ve hand-picked the best apps to help you plan your trip and explore the world quickly, no matter where you are. Some are focused on helping you navigate your current location, while others are better suited for long-term travel planning. We’ve also included a variety of social and networking apps to help you connect with people while you’re on the road.

PackPoint

Once you’ve decided where you’d like to go, the next step is to figure out what you’ll need to bring. One of the best ways to plan for your trip is to use an app that customizes your packing list based on weather forecasts and a series of questions about your trip. The app developer of your choice will ask you where you’re going when you’ll be there, and what you plan to do while you’re there. You’ll also be asked questions about your trip, such as what kind of weather you like to travel in and what types of activities you prefer to do.

Hopper

The Hopper app is one of the most popular ways to find cheap flights. It uses complex algorithms to analyze billions of flight and hotel prices across the web daily. It draws on historical data to generate a color-coded calendar showing the cheapest dates and times for a given destination. The app is best used when you have a specific flight or hotel in mind, but it can also be used as a general travel planning tool. This information can be used to build a basic travel budget and generate a rough estimate of the cost of a trip, but it doesn’t offer the fine-tuned planning features of the apps above.

The app uses your location and the dates you’ve selected as part of the algorithm to generate a calendar of prices and color-codes it to help you assess the risk of making a purchase. You can also access the app’s “Hopper Research Library” to see what your friends have purchased and share it with them to help.

Wanderlog

Whether looking for flights, hotels, or a destination, Wanderlog makes it easy to find the best deals with travel app ideas. You can even search for flights, hotels, and destinations simultaneously to compare prices side by side. Whether you prefer to book your travel on the app or your phone, you can keep all your flight, hotel, and restaurant reservations in one place. That way, you can focus on the fun stuff — like planning your road trip route and coordinating with friends.

Wanderlog is a complete package for those looking to customize their trips, but it also includes handy travel guides from users worldwide so you can plan your trip in a pinch. Customization is at the core of Wanderlog, so you can make it your own by adding photos, text, and other graphics. You can even create your maps, showing you your location on the route, so you don’t get lost. This is a great way to add a personal touch to your travels, and it’s super easy to do.

Kayak

Kayak is best known as a travel search engine but also includes booking services. It is one of the best travel apps for researching and finding cheap flights since it allows you to search for flights, hotels, and car rentals. It also gives you a complete list of possible options, including reduced hacker fares where you book outgoing and returning flights with two separate airlines. You can also use Kayak to find and book accommodations for your trip. It connects to many different services, so you can book your reservations without manually tracking down reservations. The only downside is that Kayak can be a little overwhelming if you’re starting, and it can be challenging to get a sense of how much your trip will cost once you start searching for flights.

HotelTonight

If you’re a traveler who prefers to plan as little as possible and show up at the airport or hotel when your flight or accommodations are scheduled, then HotelTonight may not be the best app for you. But if you’re a seat-of-your-pants type traveler or one who likes to have a backup plan in case your reservations don’t work out, then HotelTonight is an easy way to find last-minute hotels and get rooms without having to call or make a reservation. It works like a traditional hotel booking system, where you can choose from various room types, pick your location, and confirm your booking. But instead of calling a hotel directly, you head to HotelTonight.

TrailWallet

Keep track of your spending and save money on the things you can’t be without; use Trail Wallet, the world’s first digital road map, to discover the best experiences, places, and things to do, wherever you go. Just head to the app store to download and use the built-in map to plan the best routes and get the most out of your travels. No more digging through maps and guides to find hidden gems and experiences, no more guessing where to go next, and no more overpaying for things you don’t need. The best part is that you never even have to carry cash when exploring.

GlobeTips

The best part about traveling is experiencing different cultures and norms regarding tipping. Many countries have a different tipping culture than the United States, which can be confusing and even frustrating if you don’t know what to expect. GlobeTips can help you navigate different tipping norms across countries so you can best understand and appreciate the service you’re getting. You can also use GlobeTips to help you decide if a tip is appropriate for the service you received, such as restaurant waiters or cab drivers.

GlobeTips can help you navigate different tipping norms across countries, so you never have to guess how much to give and never feel awkward not giving enough. Just head to the app to find the right amount for the situation, and you’re good to go. You can even pull up a custom tip calculator for any country to get a better estimate of how much to give, and if you want to leave a tip extra for the bartender, head to the built-in map and choose the “tip” option. The app will automatically calculate the right amount for you and show you where to leave it. 

EatWith

Eatwith takes the guesswork out of finding the best local experiences. The app connects you with hand-picked locals from more than 130 countries passionate about sharing their culture and showing you the best parts of their hometowns. You can use Eatwith to book food tours and cooking classes, but it can also be an excellent resource for finding things to do on your own, such as visiting museums or going for a drink at a local bar. The app will help you connect with suitable hosts for the experience you’re looking for and help you book it in minutes.

You can use the app to host dinner parties, food tours, and cooking classes with your host, or you can use it to book a private experience. Once you’ve been matched with a host, the app will connect you so you can start planning your adventure. You can also customize your host experience by choosing the language and cuisine you want to learn about and the cuisine you want to know about.

CultureTrip

The CultureTrip app lets you explore a city’s personality, culture, offerings, and intricacies through original video series, stories, and listicles. You’ll be able to dive into the personality of a city—from the people who live there to the things that make it unique—through in-depth video series and engrossing narrative stories. You’ll be able to tap into the experience of our award-winning writers and videographers. They will bring you close encounters with the people, places, and experiences that define the city.

The app will also connect you with the best local adventures, so you can discover new things to do and see in your destination. You can also connect with other culture lovers passionate about exploring their cities and share your experiences with them.

iTranslate

iTranslate is a new app that allows you to type or speak your sentence and get the translation in your chosen language. It’s a pretty handy tool for people who don’t have time to memorize every word in the language they want to speak or understand. The app uses a series of algorithms to translate your sentence into the chosen language, and then you can choose to either hear the translation read aloud to you or see it on the screen in your preferred language. You can also add your custom translations to sentences, which is pretty handy when you need to ask a question in a language you don’t know well.

Final Words

There are many great travel apps out there, and even more, are worth checking out. Whether you’re looking for a fun way to explore a new city or trying to find a last-minute flight to Paris, the right travel app can help you get where you want to go. Some of the best travel apps will help you plan your trip, find the best places to visit, and get you where you need to be on time. Some of the best travel apps will also help you make dinner reservations, find a great fitness class, find a cool bar or cafe, and more.

The post Best Travel Apps to Relish Travelling Experience appeared first on noupe.

Categories: Others Tags: