Create A Responsive Dashboard With Angular Material And ng2-Charts
Create A Responsive Dashboard With Angular Material And ng2-Charts
Zara Cooper 2020-07-27T10:00:00+00:00
2020-07-27T15:35:48+00:00
Creating a dashboard from scratch is often pretty complicated. You have to create tools to collect data on items of interest. Once collected this data has to be presented in an easy to understand and meaningful way to your users. It involves intricate planning of what data to include and how to display it effectively. Once you have a plan, implementing the design is a massive task especially since it involves building multiple components.
With Angular Material and ng2-charts, you can take advantage of schematics to cut down the effort and time you may spend building a dashboard. Angular Material ships with a number of schematics that you could use to generate a dashboard. Similarly, ng2-charts provides schematics for generating multiple chart components. In this article, I’ll illustrate how to use both ng2-charts and Angular Material to set up a dashboard fairly quickly.
An Example
To illustrate how to build a dashboard, we’ll take the example of an online store selling leather goods like bags, wallets, key holders, and so on. The store owner would like to track information such as where customers come from to their online store, how their products sell, how traffic sources relate to sales, among other things.
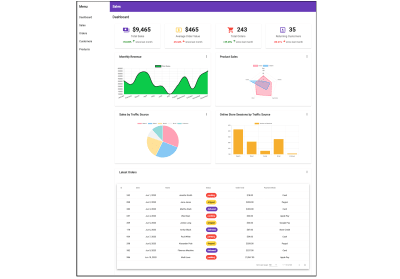
We’ll build a dashboard to display this information and help the store owner analyze it. The dashboard will contain four small summary cards, four different kinds of charts, and a table listing most recent orders made. The four summary cards will display information such as total revenue from sales, average order value, the total number of orders, and number of returning customers. The charts will display the number of units sold for each product, sales by traffic source, online store sessions over time, and sales for the week.
Prerequisites
To follow along, you’ll need to have Angular CLI installed. If you do not have it installed, you can find out how to get it at cli.angular.io. If you’re not starting from a pre-existing Angular project, you need to generate one by running ng new . For instance, to create an admin panel for the aforementioned store, we’ll run:
ng new store-admin-panelYour project also needs to have routes configured for it. If you’re starting from a new app, select yes when prompted on whether to add an Angular Routing module during your project setup above.
Add Angular Material And Ng2-Charts To Your Project
Angular Material ships with various schematics for generating a variety of useful components like address books, trees, tables, navigation, and so on. To add Angular Material to your project, run:
ng add @angular/materialPick a theme from the options provided in subsequent prompts. Next, you’ll be prompted to choose whether to add Angular Material typography styles and browser animations. You do not need these and could just respond no.
Next, you’ll need to install ng2-charts. ng2-charts requires charts.js as a dependency. To install ng2-charts run:
npm install ng2-charts --saveThen install charts.js:
npm install chart.js --saveTo access the charts, add the ChartsModule to the AppModule‘s imports.
import { ChartsModule } from 'ng2-charts';

@NgModule({
  imports: [
   …
   ChartsModule,
   …
]
})
Lastly, install ng2-charts schematics as a dev dependency because they do not ship with ng2-charts by default.
npm install --save-dev ng2-charts-schematicsGenerating A Navigation Component
First off, we’ll need to add a navigation component to help users maneuver through the app comfortably. The navigation should contain links to the dashboard and other pages that will be part of the admin panel. Angular material provides a schematic that generates a navigation component. We’ll name this component nav. Adding a side nav to the application is accomplished by running:
ng generate @angular/material:navigation navTo link other routes in the navigation, use the routerLink directive and change the page name in the toolbar depending on what route a user is on.
// nav.component.ts
...
menuItems = ['dashboard', 'sales', 'orders', 'customers', 'products'];
<!--nav.component.html-->
...
<mat-nav-list>
<a *ngFor="let item of menuItems" mat-list-item [routerLink]="'/'+item"> {{item | titlecase}} </a>
...To see this component, add it to app.component.html.
<!--app.component.html-->
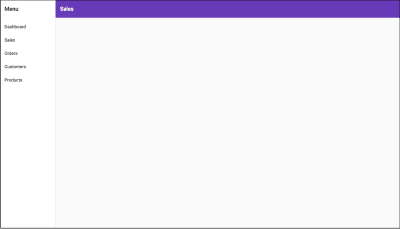
<app-nav></app-nav>This is what the NavComponent looks like.
Since the nav will be displayed alongside other components, adding a router-outlet to it would help switch between the other different components. In the nav.component.html template, just after the closing , replace the comment with .
<!--nav.component.html-->
<mat-sidenav-container>
   ...
   <mat-sidenav-content>
     <mat-toolbar>
       ...
     </mat-toolbar>
     <router-outlet></router-outlet>
   </mat-sidenav-content>
 </mat-sidenav-container>
In the screenshots that follow in this article, this nav component will be omitted to better highlight the dashboard we’ll be generating for the sake of the tutorial. If you’re following along while building this dashboard, the nav will still appear as pictured above in your browser with the dashboard within it.
Generate The Dashboard
The most important part of the dashboard is its layout. It needs to hold all the components mentioned earlier and be responsive when displayed on different devices. To generate the dashboard layout, you’ll need to run the @angular/material:dashboard schematic. It will generate a responsive dashboard component. Pass the preferred name for your dashboard to the schematic. In this instance, let’s name it dash.
ng generate @angular/material:dashboard dashTo view the newly generated dashboard within the nav component, add a route for it to the router.
// app-routing.module.ts
import { DashComponent } from './dash/dash.component';

const routes: Routes = [{ path: 'dashboard', component: DashComponent }];

@NgModule({
  imports: [RouterModule.forRoot(routes)],
  exports: [RouterModule]
})
Once done, to see the results, run npm start and head on over to localhost:4200/dashboard. You should see this:
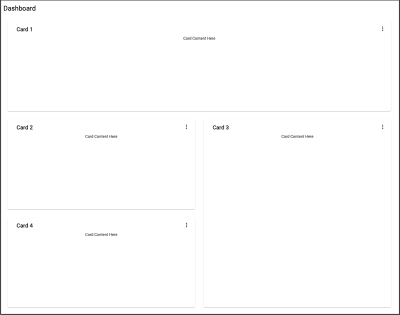
The schematic generates four cards in the template and displays them in a responsive grid. The Angular Material CDK uses the Layout package to style this responsive card grid. The BreakpointObserver utility of the Layout package assesses media queries and makes UI changes based on them. There are various breakpoints available but within the generated component, only two categories are catered for. The Breakpoints.Handset and other queries that do not match it. The Layout package specifies 14 breakpoint states that you can use to customize the responsiveness of your dashboard.
// dashboard.component.js
...
cards = this.breakpointObserver.observe(Breakpoints.Handset).pipe(
    map(({ matches }) => {
      if (matches) {
        ...
      }
      ...
    })
  );
Going back to the dashboard, since four summary cards, four charts, and a table will be on the dashboard, we need nine cards in total. Breakpoints.Handset and Breakpoints.Tablet matches will display in a one-column grid where:
- The four summary cards will span one row.
- The charts will span two rows.
- The table will span four rows.
Non-Breakpoints.Handset and non-Breakpoints.Tablet matches will display in four columns where:
- The four summary cards will span one row and one column.
- The charts will span two rows and two columns.
- The table will span four rows and four columns.
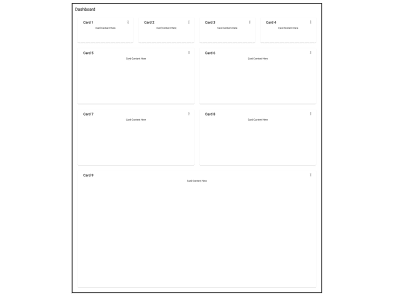
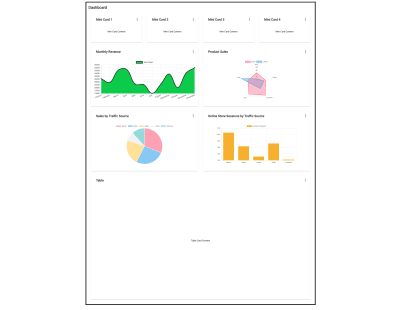
It should look something like the screenshot below in non-Breakpoints.Handset and non-Breakpoints.Tablet matches. On Breakpoints.Handset and Breakpoints.Tablet matches, everything will just display in one column.
Create A Card Component
In the dashboard component, all the cards are generated through iteration. To prevent repetition, when adding all the new components, we’ll create a reusable card component. The card component will accept a title as input and use ng-content to dynamically add the rest of the content. To create the card component, run:
ng g c card -m app --style cssFrom the dashboard component template, we’ll just take the markup enclosed within the tag and place it In the card template:
<!--card.component.html-->
<mat-card class="dashboard-card">
   <mat-card-header>
       <mat-card-title>
           {{title}}
           <button mat-icon-button class="more-button" [matMenuTriggerFor]="menu" aria-label="Toggle menu">
               <mat-icon>more_vert</mat-icon>
           </button>
           <mat-menu #menu="matMenu" xPosition="before">
               <button mat-menu-item>Expand</button>
               <button mat-menu-item>Remove</button>
           </mat-menu>
       </mat-card-title>
   </mat-card-header>
   <mat-card-content class="dashboard-card-content">
       <ng-content></ng-content>
   </mat-card-content>
</mat-card>
To add the title as input to the card:
// card.component.ts
import { Component, Input } from '@angular/core';

...

export class CardComponent{
 @Input() title: string;


...
}
To style the card:
/*card.component.css*/
.more-button {
   position: absolute;
   top: 5px;
   right: 10px;
}

.dashboard-card {
   position: absolute;
   top: 15px;
   left: 15px;
   right: 15px;
   bottom: 15px;
}


.dashboard-card-content {
   text-align: center;
   flex-grow: 1;
   display: flex;
   flex-direction: column;
   align-items: center;
   max-height: 100%;
   justify-content: center;
   align-items: stretch;
}

mat-card {
   display: flex;
   flex-direction: column;
}
Adding Cards To The Dashboard
Since the dashboard elements will be added individually and not through iteration, the dashboard component needs to be modified to account for this. In dashboard.component.ts, remove the cards property and replace it with a cardLayout property instead. The cardLayout variable will define the number of columns for the material grid list and how many rows and columns each of the dashboard cards will span. Breakpoints.Handset and Breakpoints.Tablet query matches will display in 1 column and those that do not match will display in 4 columns.
// dashboard.component.js
...


cardLayout = this.breakpointObserver.observe(Breakpoints.Handset).pipe(
   map(({ matches }) => {
     if (matches) {
       return {
         columns: 1,
         miniCard: { cols: 1, rows: 1 },
         chart: { cols: 1, rows: 2 },
         table: { cols: 1, rows: 4 },
       };
     }

    return {
       columns: 4,
       miniCard: { cols: 1, rows: 1 },
       chart: { cols: 2, rows: 2 },
       table: { cols: 4, rows: 4 },
     };
   })
 );

...
In the dash.component.html template, replace the colspan and rowspan values of mat-grid-tile elements and the cols property of the mat-grid-list element.
<!--dash.component.html-->
<div class="grid-container">
 <h1 class="mat-h1">Dashboard</h1>
 <mat-grid-list cols="{{ ( cardLayout | async )?.columns }}" rowHeight="200px">
   <!--Mini Cards-->
   <mat-grid-tile *ngFor="let i of [1, 2, 3, 4]" [colspan]="( cardLayout | async )?.miniCard.cols"
     [rowspan]="( cardLayout | async )?.miniCard.rows">
     <app-card title="Card {{i}}"><div>Mini Card Content Here</div></app-card>
   </mat-grid-tile>
   <!--Charts-->
   <mat-grid-tile *ngFor="let i of [5, 6, 7, 8]" [colspan]="( cardLayout | async )?.chart.cols"
     [rowspan]="( cardLayout | async )?.chart.rows">
     <app-card title="Card {{i}}"><div>Chart Content Here</div></app-card>
   </mat-grid-tile>
   <!--Table-->
   <mat-grid-tile [colspan]="( cardLayout | async )?.table.cols" [rowspan]="( cardLayout | async )?.table.rows">
     <app-card title="Card 9"><div>Table Content Here</div></app-card>
   </mat-grid-tile>
 </mat-grid-list>
</div>
The dashboard will end up looking exactly like the most recent screenshot linked above.
Generating The Charts
The four charts that we need for the dashboard are:
- A radar chart of products by unit sold.
- A pie chart of sales by traffic source.
- A bar chart of online store sessions.
- A line chart of sales across the year.
Similar to creating the dashboard, generating chart components involves running a schematic. Using the ng2-charts schematics, generate the four different charts. We’ll place them in a folder called charts. Run ng generate ng2-charts-schematics: .
ng generate ng2-charts-schematics:radar charts/product-sales-chart
ng generate ng2-charts-schematics:pie charts/sales-traffic-chart
ng generate ng2-charts-schematics:line charts/annual-sales-chart
ng generate ng2-charts-schematics:bar charts/store-sessions-chart
After running these commands, all four chart components are generated and are populated with sample data ready for display. Depending on what data you’d like to show, pick charts that most suit your data visualization needs. For each of the charts generated above, add the chartContainer class to the divs that enclose the canvas element in the chart templates.
<div class="chartContainer">
  <canvas baseChart width="400" height="400">
    ...
Next, add this styling to styles.css so that they could be accessible to all the chart components.
/*styles.css*/
...

.chartContainer canvas {
    max-height: 250px;
    width: auto;
}

.chartContainer{
    height: 100%;
    display: flex;
    flex-direction: column;
    align-items: center;
    justify-content: center;
}
Adding Data To The Charts
The generated chart components come with sample data already plugged in. If you have pre-existing services that provide your own data, you can add this data from them to the chart components. The charts take labels for the x-axis, data or data sets, a chart type, colors, a legend as well as other customization options. To provide the data and labels to the charts, create a service that will fetch data from a source of your choice and return it in a form that the charts accept. For instance, the AnnualSalesChartComponent receives its dataset and labels from the SalesService‘s getSalesByMonth method which returns an array of sales for each month for the current year. You can find this service here and data it returns here. Inject the service as a private property to the AnnualSalesChartComponent constructor. Call the method that returns the required chart data from the service within the ngOnInit lifecycle hook.
// annual-sales-chart.component.ts
import { SalesService } from 'src/app/sales/sales.service';


...


export class AnnualSalesChartComponent implements OnInit {
  public salesChartData: ChartDataSets[] = [
   { data: [], label: 'Total Sales' },
 ];

 public salesChartLabels: Label[] = [];
  ...

  constructor(private salesService: SalesService) { }
  ngOnInit() {
   this.salesService.getSalesByMonth().subscribe({
     next: salesItems => {
       salesItems.forEach(li => {
         this.salesChartData[0].data.push(li.revenue);
         this.salesChartLabels.push(li.month);
       });
     },
    ...
   });
 }
}
Adding Charts To The Dashboard
The next step involves adding the charts to the dashboard, in dash.component.html. Here’s what that looks like:
<!--dash.component.html-->
...

<!--Charts-->
<mat-grid-tile [colspan]="( cardLayout | async )?.chart.cols" [rowspan]="( cardLayout | async )?.chart.rows">
   <app-card title="Monthly Revenue">
       <app-annual-sale-chart></app-annual-sale-chart>
   </app-card>
</mat-grid-tile>
<mat-grid-tile [colspan]="( cardLayout | async )?.chart.cols" [rowspan]="( cardLayout | async )?.chart.rows">
   <app-card title="Product Sales">
       <app-product-sales-chart></app-product-sales-chart>
   </app-card>
</mat-grid-tile>
<mat-grid-tile [colspan]="( cardLayout | async )?.chart.cols" [rowspan]="( cardLayout | async )?.chart.rows">
   <app-card title="Sales by Traffic Source">
       <app-sales-traffic-chart></app-sales-traffic-chart>
   </app-card>
</mat-grid-tile>
<mat-grid-tile [colspan]="( cardLayout | async )?.chart.cols" [rowspan]="( cardLayout | async )?.chart.rows">
   <app-card title="Online Store Sessions by Traffic Source">
       <app-store-sessions-chart></app-store-sessions-chart>
   </app-card>
</mat-grid-tile>

...
This is what the resultant responsive dashboard looks like.
Generating A Table
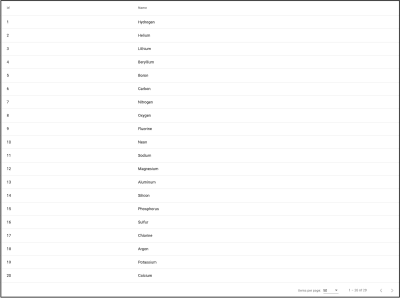
We’ll add an orders table to give the shop owner an overview of the most recent orders placed and their status. To generate the orders table component, run the schematic:
ng generate @angular/material:table orders-tableThis will generate a table component that will look like this.
Tables with many columns may be difficult to make responsive for handset and tablet views. When adding the table to a card, make it horizontally scrollable so that all the data can be viewed properly and is not obstructed. You can do this by adding the styling below to your table component:
<!--table.component.html-->
<div class="mat-elevation-z8 small-table">
 <table mat-table class="full-width-table" matSort aria-label="Elements">
   ...
/*table.component.css*/
...
.small-table{
overflow-x: scroll !important;
}To add the table to the dash component:
<!-- dashboard.component.html>
...
  <mat-grid-tile [colspan]="( cardLayout | async )?.table.cols" [rowspan]="( cardLayout | async )?.table.rows">
     <app-card title="Latest Orders">
       <app-orders-table></app-orders-table>
     </app-card>
  </mat-grid-tile>
...
Adding Data To The Table
Like with charts, you can add data to the table in the ngOnInit method from a service. Additionally, you will need to modify your table’s generated data source to consume data from the service. To start off, inject the service in the table’s class constructor. Let’s take the example of a table listing the latest orders for this dashboard. To get data for the table, let’s inject the OrderService in the OrdersTableComponent constructor, change the MatTable type assertion of the table view child, and amend the list of displayed columns to reflect an order interface. If you’re interested in the data being added to the table, you can find it here. The last thing involves getting the total length of the data items available to be used to set the total in the table’s .
// orders-table.component.ts
import { OrderService } from '../orders.service';
import { Order } from '../order';
...
export class OrdersTableComponent implements AfterViewInit, OnInit {
...
 @ViewChild(MatTable) table: MatTable;
 dataLength: number;

 displayedColumns = [
   "id",
   "date",
   "name",
   "status",
   "orderTotal",
   "paymentMode",
 ];
...
constructor(private orderService: OrderService){}

ngOnInit() {
 this.datasource = new OrdersTableDataSource(this.orderService);
 this.orderService.getOrderCount().subscribe({
   next: orderCount => {
    this.dataLength = orderCount;
   },
   ...
 });
}
...
}
Next, we’ll need to modify the OrdersTableDataSource class to accept the OrderService as a parameter in its constructor. We’ll have to modify its connect and destroy methods as well. The connect method connects the data source to the table and updates the table when new data items are emitted from the stream it returns, in this case, an orders array observable. The dataMutations constant combines the first data load, pagination, and sorting events into one stream for the table to consume. Pagination and sorting are handled by the OrderService server-side. So we need to pass the offset and page size from paginator and the active sort field and sort direction of the sort property to the getOrders method of the OrderService. The disconnect method should be used to close any connections made and release resources held up in the connect method.
// orders-table.datasource.ts
...
export class OrdersTableDataSource extends DataSource<Order> {
 paginator: MatPaginator;
 sort: MatSort;

 constructor(private orderService: OrderService) {
   super();
 }

 connect(): Observable<Order[]> {
   const dataMutations = [
     of('Initial load'),
     this.paginator.page,
     this.sort.sortChange
   ];

   return merge(...dataMutations).pipe(mergeMap(() => {
     return this.orderService.getOrders(
       this.paginator.pageIndex * this.paginator.pageSize,
       this.paginator.pageSize,
       this.sort.active,
       this.sort.direction
     );
   }));
 }

 disconnect() {}
}
In the orders table template, insert the new columns and bind the length property of to the dataLength property. For the status column, use a element for better visualization of the order status. To have access to , add the MatChipsModule as an import to AppModule.
<!-- orders-table.component.html -->
<div class="mat-elevation-z8">
<table mat-table class="full-width-table" matSort aria-label="Elements">
<!-- Id Column -->
<ng-container matColumnDef="id">
<th mat-header-cell *matHeaderCellDef mat-sort-header>Id</th>
<td mat-cell *matCellDef="let row">{{row.id}}</td>
</ng-container>
<!-- Date Column -->
<ng-container matColumnDef="date">
<th mat-header-cell *matHeaderCellDef mat-sort-header>Date</th>
<td mat-cell *matCellDef="let row">{{row.date | date }}</td>
</ng-container>
<!-- Name Column -->
<ng-container matColumnDef="name">
<th mat-header-cell *matHeaderCellDef mat-sort-header>Name</th>
<td mat-cell *matCellDef="let row">{{row.name}}</td>
</ng-container>
<!-- Order Total Column -->
<ng-container matColumnDef="orderTotal">
<th mat-header-cell *matHeaderCellDef mat-sort-header>Order Total</th>
<td mat-cell *matCellDef="let row">{{row.orderTotal | currency}}</td>
</ng-container>
<!-- Payment Mode Column -->
<ng-container matColumnDef="paymentMode">
<th mat-header-cell *matHeaderCellDef mat-sort-header>Payment Mode</th>
<td mat-cell *matCellDef="let row">{{row.paymentMode}}</td>
</ng-container>
<!-- Status Column -->
<ng-container matColumnDef="status">
<th mat-header-cell *matHeaderCellDef mat-sort-header>Status</th>
<td mat-cell *matCellDef="let row">
<mat-chip-list>
<mat-chip color="{{ row.status == 'delivered' ? 'primary' : ( row.status == 'shipped' ? 'accent' : 'warn' ) }}" selected>
{{row.status}}
</mat-chip>
</mat-chip-list>
</td>
</ng-container>
<tr mat-header-row *matHeaderRowDef="displayedColumns"></tr>
<tr mat-row *matRowDef="let row; columns: displayedColumns;"></tr>
</table>
<mat-paginator #paginator [length]="dataLength" [pageIndex]="0" [pageSize]="5" [pageSizeOptions]="[5, 10, 15, 20]">
</mat-paginator>
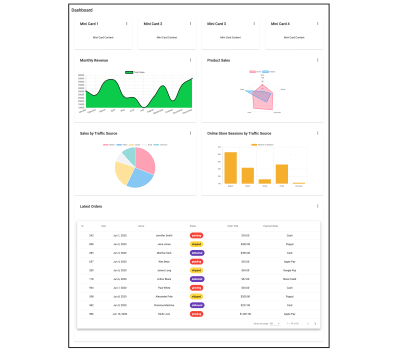
</div>Once data has been added to the table, this is what the dashboard will look like:
Creating A Mini Card Component
All that’s left to complete the dashboard is to populate the four small cards that sit at the top. Having smaller summary cards as part of the dashboard makes it easy to highlight brief pieces of information that do not need whole charts or tables. In this example, the four mini cards will display total sales, average order value, the total number of orders, and the number of returning customers that visited the store for the day. This is just an example. These mini cards cannot be generated like with the navigation, dashboard layout, charts, and the table. They have no schematics. Below we’ll briefly go through how to create them. Although we’re going to add data specific to the example, you can add whatever you want to them or decide to do away with them altogether. To start off, generate the mini-card component, run:
ng g c mini-card -m app --style cssYou can find the template for the component linked here and its styling here. This component has eight input properties that you can find out how to add here. To get data to the mini card components, inject the service that provides data to them in the DashComponent constructor. Assign data received from the service to a property of the DashComponent. In this instance, we’ll get data from the StoreSummaryService and assign it to the miniCardData property. Here’s how:
// dash.component.ts
export class DashComponent implements OnInit{
...
 miniCardData: StoreSummary[];

 constructor(private breakpointObserver: BreakpointObserver, private summaryService: StoreSummaryService) {}

 ngOnInit() {
   this.summaryService.getStoreSummary().subscribe({
     next: summaryData => {
       this.miniCardData = summaryData;
     }
   });
 }
}
To add the mini-cards to the dash component and have them populated with data from the service:
<!--dash.component.html-->
...
<!--Mini Cards-->
<mat-grid-tile *ngFor="let mc of miniCardData" [colspan]="( cardLayout | async )?.miniCard.cols"
[rowspan]="( cardLayout | async )?.miniCard.rows">
<app-mini-card [title]="mc.title" [textValue]="mc.textValue" [value]="mc.value" [color]="mc.color" [percentValue]="mc.percentValue"></app-mini-card>
</mat-grid-tile>
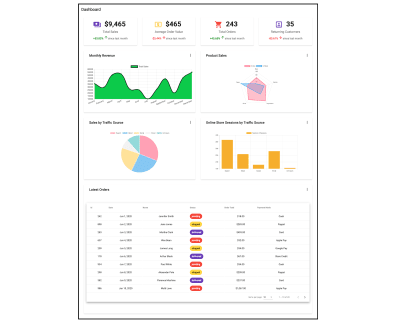
...The screenshot below is what the dashboard will look like with the mini cards populated.
Putting All Together
In the end, the dashboard component template should contain:
<!-- dashboard.component.html -->
<div class="grid-container">
 <h1 class="mat-h1">Dashboard</h1>
 <mat-grid-list cols="{{ ( cardLayout | async )?.columns }}" rowHeight="200px">
   <!--Mini Cards-->
   <mat-grid-tile *ngFor="let mc of miniCardData" [colspan]="( cardLayout | async )?.miniCard.cols"
     [rowspan]="( cardLayout | async )?.miniCard.rows">
     <app-mini-card [icon]="mc.icon" [title]="mc.title" [value]="mc.value" [color]="mc.color" [isIncrease]="mc.isIncrease" duration="since last month" [percentValue]="mc.percentValue" [isCurrency]="mc. isCurrency"></app-mini-card>
   </mat-grid-tile>
   <!--Charts-->
   <mat-grid-tile [colspan]="( cardLayout | async )?.chart.cols" [rowspan]="( cardLayout | async )?.chart.rows">
     <app-card title="Monthly Revenue">
       <app-annual-sale-chart></app-annual-sale-chart>
     </app-card>
   </mat-grid-tile>
   <mat-grid-tile [colspan]="( cardLayout | async )?.chart.cols" [rowspan]="( cardLayout | async )?.chart.rows">
     <app-card title="Product Sales">
       <app-product-sales-chart></app-product-sales-chart>
     </app-card>
   </mat-grid-tile>
   <mat-grid-tile [colspan]="( cardLayout | async )?.chart.cols" [rowspan]="( cardLayout | async )?.chart.rows">
     <app-card title="Sales by Traffic Source">
       <app-sales-traffic-chart></app-sales-traffic-chart>
     </app-card>
   </mat-grid-tile>
   <mat-grid-tile [colspan]="( cardLayout | async )?.chart.cols" [rowspan]="( cardLayout | async )?.chart.rows">
     <app-card title="Online Store Sessions by Traffic Source">
       <app-store-sessions-chart></app-store-sessions-chart>
     </app-card>
   </mat-grid-tile>
   <!--Table-->
   <mat-grid-tile [colspan]="( cardLayout | async )?.table.cols" [rowspan]="( cardLayout | async )?.table.rows">
     <app-card title="Latest Orders">
       <app-orders-table></app-orders-table>
     </app-card>
   </mat-grid-tile>
 </mat-grid-list>
</div>
Here’s what the resultant dashboard contains.
Conclusion
Creating dashboards involves a fair amount of work and planning. A way to make building them faster is to use the various schematics provided by Angular Material and ng2-charts. With these schematics, running a command will generate a wholly complete component and can result in having a dashboard up and running fairly quickly. This leaves you a lot more time to focus on creating data services and adding them to your dashboard components.
If you want to learn more about some of the schematics provided by Angular Material, visit material.angular.io, and for those provided by ng2-charts, visit their site linked here.
(ra, yk, il)